
Related Manuals for BEARWARE 303530


Summary of Contents for BEARWARE 303530
- Page 1 DEUTSCH / 2 ENGLISH / 16 FRANÇAIS / 30 ITALIANO / 44 ESPAÑOL / 58 WETTERSTATION / WEATHERSTATION Mod.-Nr.: 303530...
- Page 2 Vielen Dank, dass Sie sich für ein Produkt von BEARWARE entschieden haben. Damit Sie auch lange Freude mit Ihrem erworbenen Gerät haben, lesen Sie sich bitte die nachfolgende Bedienungsanleitung aufmerksam durch. Prüfen Sie vor Inbetriebnahme der gelieferten Ware, ob diese vollständig, fehlerfrei und unbe- schädigt ist.
- Page 3 3. Zusätzliche Hinweise zu diesem Gerät Kontrollieren Sie bei Erstinbetriebnahme des Gerätes nochmals die Unver- sehrtheit des Produkts bzw. der Bauteile sowie die Funktion. Verwenden Sie dieses Gerät nicht, wenn es beschädigt ist. Setzen Sie die Basisstation und den Außensensor keiner Feuchtigkeit oder direktem Sonnenlicht aus. Der Außensen- sor ist Spritzwassergeschützt und sollte nicht dauerhaftem und direktem Regen ausgesetzt werden.
- Page 4 4. Tasten Symbol Taste MODE: Drücken Sie während des Standardbildschirms die “MO- DE”-Taste, um zwischen den verschiedenen Anzeigemodi zu wäh- len. Wenn Sie innerhalb von 10 Sekunden keine Taste drücken, wechselt die Wetterstation zurück in den Standardbildschirm). SET: Drücken Sie während des Standardbildschirms die “SET”-Tas- te, um zwischen °C und °F zu wählen.
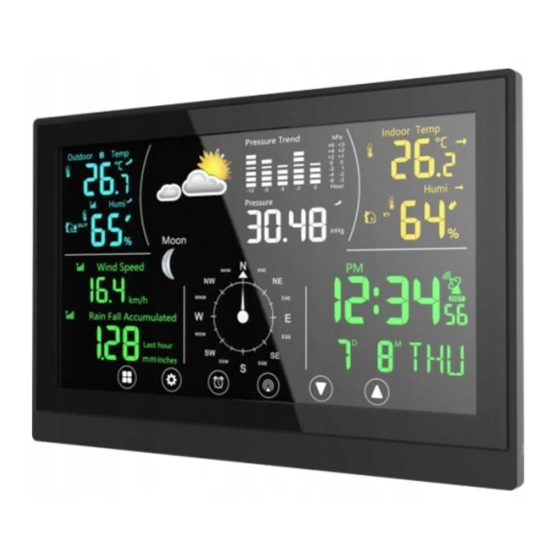
- Page 5 Anzeigebereich Außentemperaturanzeige Uhrzeitanzeige Inntentemperaturanzeige Tages- und Datumsanzeige Wettervorhersage- und Luftdrucksanzeige Mondphasenanzeige “CHANNEL”-Schalter Wandmontage- Aufhängung Batteriefach- Abdeckung Deutsch...
- Page 6 5. Inbetriebnahme Entnehmen Sie das Produkt aus der Verpackung und entfernen Sie jegliches Ver- packungsmaterial. Öffnen Sie das Batteriefach des Außensensors und legen Sie 2x 1,5V AAA Batterien hinein und wählen Sie am „Channel-Schalter“ den gewünsch- ten Kanal aus. Anschließend öffnen Sie das Batteriefach auf der Rückseite der Haupteinheit und legen ebenfalls 3x 1,5V AAA Batterien ein.
- Page 7 Datum und Tag: Die Wetterstation verfügt über eine Datums- und Wochentags-Anzeige. Im oberen Abschnitt wird das Datum und im unteren Abschnitt der Wochentag angezeigt. Die voreingestellte Sprache ist hierbei Deutsch. Wenn Sie die Sprache ändern möchten, finden Sie im Abschnitt “Grundeinstel- lungen”...
- Page 8 Werte ändern, z.B um mindestens 2 hPa (=0,06 inHg), oder mindestens 1°C (= 1,8°F), oder die Luftfeuchtigkeit sich um min. 5% ändern, wird dies im Trend berücksichtigt. Wettervorhersage: Die Wetterstation berechnet eine Wetter- vorhersage für etwa 12 Stunden, die auf der Luftdruckentwicklung basiert.
- Page 9 Außentemeraturanzeige: Die Außentemperatur wird von dem Außensen- sor gemessen und bis zu einem Zehntel Grad ge- nau angezeigt. Die eingestellte Temperaturein- heit erscheint rechts neben dem gemessenen Wertes. Die Temperatureinheit kann zwischen °C und °F gewechselt werden. Drücken Sie dafür die „SET-Taste“...
- Page 10 Auf diese Weise können Sie die folgenden Einstellungen in folgender Reihenfolge ändern und anpassen: • Zeitzone • Spracheinstellung - Zum Einstellen des Wochentages im Display. Die folgenden Kürzel können eingestellt werden und mit den Tasten “UP” und “DOWN” ausgewählt werden: GER (Deutsch), FRE (Französisch), ITA (Italienisch), DUT (Niederländisch), SPA (Spanisch), DAN (Dänisch), ENG (Englisch) •...
- Page 11 8.2 Temperaturalarm Sie haben die Möglichkeit einen Temperaturbereich für den Außensensor sowie für die Innentemperatur zu definieren. Mit dem Temperaturalarm wird die Basis- station einen Alarmton abgeben, wenn außerhalb dieses Temperaturbereiches gemessen wird. Drücken Sie im Standardbildschirm die „MODE“-Taste 4x hintereinander, sodass nur noch die Innen- und die Außentemperatur im Display angezeigt werden.
- Page 12 8.3 Alarmeinstellung Die Wetterstation kann bis zu 2 Alarmeinstellungen speichern, welche separat ein- sowie ausgeschaltet werden können. Alarm setzen Drücken Sie 2x die “MODE”-Taste im Standardbildschirm, um in den Alarm- modus zu gelangen. Im Display wird nur die Alarmzeit angezeigt. Drücken und halten Sie im Alarmmodus für 2-3 Sekunden die „SET“-Taste, bis die Alarmzeit beginnt zu blinken.
- Page 13 9. Gespeicherte Daten Maximale und Minimale Temperaturen Drücken Sie die “UP”-Taste, um die maximale Innen- sowie Außentemperatur und die maximale Luftfeuchtigkeit anzeigen zu lassen. Im Display erscheint der Schriftzug „max“. Drücken Sie die “UP”-Taste erneut, um die minimal gemessenen Werte anzeigen zu lassen. Im Display erscheint der Schriftzug „min“. Nach ca. 15 Sekunden wird der aktuelle Messwert angezeigt.
- Page 14 Achtung! 11. Sicherheitshinweise und Haftungsausschluss Versuchen Sie nie das Gerät zu öffnen, um Reparaturen oder Umbauten vorzuneh- men. Vermeiden Sie Kontakt zu den Netzspannungen. Schließen Sie das Produkt nicht kurz. Das Gerät ist nicht wasserdicht, bitte verwenden Sie es nur im Trocke- nen.
- Page 15 WEEE Richtlinie 2012/19/EU WEEE Register-Nr: DE 67896761 Hiermit erklärt die Firma WD Plus GmbH, dass sich das Gerät 303530 in Übereinstimmung mit den grundlegenden Anforderungen und den übrigen einschlägigen Bestimmungen der Richtlinie 2014/53/EU befindet. Eine vollständige Konformitätserklärung erhalten Sie bei: WD Plus GmbH, Wohlenbergstraße 16, 30179 Hannover, http://downloads.ganzeinfach.de/...
- Page 16 Thank you for choosing a BEARWARE product. Please read the following user man- ual carefully so as to get the most from the product that you have purchased. Be- fore using the product, first check that the delivered item is complete, accurate and undamaged.
- Page 17 3. Additional information about this device Check that the product and the components are intact and if the device is work- ing properly when using it for the first time. The outdoor sensor is splash-proof and should not be exposed to continuous and direct rain. An ideal location would therefore be covered and in the shade.
- Page 18 4. Buttons Symbol Button MODE: Press the "MODE" button in the default screen to select between the different display modes. If you do not press any button within 10 seconds, the weather station switches back to the default screen). SET: Press the "SET" button in the default screen to select be- tween °C and °F.
- Page 19 Display area Outdoor temperature display Time display Indoor temperature display Day and date display Weather forecast and air pressure display Moon phases display "CHANNEL" switch Wall mounting hanger Battery com- partment cover English...
- Page 20 5. Initial use Take the product out of the package and remove all the packaging material. Open the battery compartment of the outdoor sensor and insert two 1.5V AAA batteries and select the desired channel at the “Channel switch.” Then open the battery compartment on the back of the main unit and insert three 1.5V AAA batteries.
- Page 21 Date and day: The weather station comes with a date and day display. The date is displayed in the top section and the day in the bottom section. The pre-configured language is German. If you want to change the language, please refer to section "Basic settings"...
- Page 22 Weather forecast: The weather station calculates a weather forecast for about 12 hours, which is based on the air pressure trend. Naturally, this forecast cannot be compared with satellites or high-per- formance computers. The forecast shows only an approximation of the current trend. Indoor temperature display and humidity The indoor temperature is measured by the base station and is shown to an accuracy of one...
- Page 23 Outdoor temperature display: The outdoor temperature is measured by the outdoor sensor and shown to an accuracy of one tenth of a degree. The configured tempera- ture unit is displayed to the right of the reading. The temperature unit can be changed between °C and °F.
- Page 24 In this way, you can change and customise the following settings in the sequence mentioned below: • Time zone • Language setting - To set the day on the display. The following codes can be configured and selected using the "UP" and "DOWN" buttons: GER (German), FRE (French), ITA (Italian), DUT (Dutch), SPA (Spanish), DAN (Danish), ENG (English) •...
- Page 25 8.2 Temperature alarm It is possible to define a temperature range for the outdoor sensor and for the indoor temperature. With the temperature alarm, the base station will sound an alarm if the reading is outside this temperature range. Press the "MODE" button 4 times consecutively in the default screen, so that only the indoor and the outdoor temperatures are displayed.
- Page 26 8.3 Alarm setting The weather station can store up to 2 alarm settings, which can be turned on and off separately. Setting the alarm Press the "MODE" button two times in the default screen to access the alarm mode. Only the alarm time is shown in the display. Press and hold the "SET"...
- Page 27 9. Stored data Maximum and minimum temperatures Press the "UP" button to view the maximum indoor and outdoor temperatures as well as the maximum humidity. "max" appears on the display. Press the "UP" but- ton again to view the minimum measured values. "min" appears on the display. After about 15 seconds, the current reading is displayed.
- Page 28 Caution! 11. Safety instructions and disclaimer Never try to open the device to carry out repairs or to make modifications. Avoid contact with the mains voltage. Do not short-circuit the product. The device is not waterproof, therefore please use it only in dry surroundings. Protect it from high humidity, water and snow.
- Page 29 WEEE directive 2012/19/EU WEEE Register no.: DE 67896761 The company WD Plus GmbH hereby certifies that the device 303530 com- plies with the fundamental requirements and all other relevant stipulations of the guideline 2014/53/EC. A complete conformity statement can be obtained from: WD Plus GmbH, Wohlenbergstraße 16, 30179 Hanover, http://downloads.ganzeinfach.de/...
- Page 30 Nous vous remercions d'avoir choisi un produit BEARWARE. Pour que vous puissiez profiter longtemps de l'appareil acquis, veuillez lire attentivement le mode d’em- ploi suivant. Avant la mise en service du produit livré, vérifiez s'il est complet, sans défauts et intact.
- Page 31 3. Indications supplémentaires concernant cet appareil Lors de la première mise en service de l'appareil, assurez-vous une fois de plus de l'intégrité du produit ou des composants et de son intégrité fonctionnelle. Le capteur extérieur est étanche aux éclaboussures et ne doit pas être exposé à une pluie directe et continue.
- Page 32 4. Touches Symbole Touche MODE : Appuyez sur la touche « MODE » sur l’écran standard pour sélectionner entre les différents d’affichage. Si vous n’appuyez sur aucune touche au bout de 10 secondes, la station météorologique retourne à l’écran standard. SET : Appuyez sur la touche «...
- Page 33 N° Plage d'affichage Affichage de la température extérieure Affichage de l'heure Affichage de la température intérieure Affichage du jour et de la date Affichage de la prévision météorologique et de la pression de l'air Affichage des phases de la lune 5.
- Page 34 Sortez le produit de l'emballage et retirez tout matériau d'emballage. Ouvrez le compartiment à batteries du capteur extérieur et placez 2 batteries AAA de 1,5 V et et sélectionnez la chaîne souhaitée dans le «Channel Switch». Ouvrez le compar- timent à batteries au dos de l'unité principale et placez-y aussi 3x batteries AAA de 1,5 V.
- Page 35 Date et jour : La station météorologique dispose d’un affichage de la date et du jour de la semaine. La date est affichée dans la partie supérieure et le jour de la semaine dans la partie inférieure. La langue préré- glée ici est l’allemand.
- Page 36 Prévision météorologique : La station météorologique calcule une prédic- tion météorologique pour environ 12 heures, basée sur le développement de la pression atmosphérique. Cette prédiction ne peut pas, naturellement, être comparée avec celle de satellites ou d’ordinateurs performants. La prédiction montre simplement une indication approximative du développement actuel.
- Page 37 Affichage de la température extérieure : La température extérieure est mesurée par le capteur extérieur et affichée avec une précision d’un dixième de degré. L'unité de température réglée apparait à droite à côté de la valeur mesurée. L'unité de température peut être commutée entre °C et °F.
- Page 38 De cette manière, vous pouvez modifier et ajuster les paramètres suivants dans l’ordre ci-après : • Fuseau horaire • Paramètre de langue - Pour le réglage du jour de la semaine sur l'écran. Les abréviations suivantes peuvent être réglées et sélec- tionnées avec les touches «...
- Page 39 8.2 Alarme de température Vous avez la possibilité de définir une plage de températures pour le capteur extérieur ainsi que pour la température intérieure. Avec l’alarme de température, la station de base émet un son d’alarme si une valeur mesurée se situe en dehors de cette plage de température.
- Page 40 8.3 Réglage de l’alarme La station météorologique peut enregistrer jusqu’à 2 réglages d’alarmes, qui peuvent être activés ainsi que désactivés séparément. Réglage D’alarme Appuyez 2 fois sur la touche « MODE » sur l’écran standard pour accéder au mode alarme. L’écran affiche seulement le temps de l’alarme Maintenez enfoncée la touche «...
- Page 41 9. Données enregistrées Températures maximales et minimales Appuyez sur la touche « UP » pour afficher la température maximale extérieure et intérieure ainsi que l'humidité maximale. Une inscription « max » apparait sur l'écran. Appuyez de nouveau sur la touche « UP » pour afficher les valeurs mini- males mesurées.
- Page 42 canaux. Ce faisant, la station météorologique explore tous les canaux, même ceux qui ne sont pas éventuellement occupés par des capteurs extérieurs. Attention ! 11. Consignes de sécurité et clause de non responsabilité N'essayez jamais d'ouvrir l'appareil afin de réaliser des réparations ou des trans- formations.
- Page 43 Directive DEEE 2012/19/UE DEEE Numéro de registre : DE 67896761 Par la présente, WD Plus GmbH déclare que l'appareil 303530 est conforme aux exi- gences essentielles et autres dispositions pertinentes de la directive 2014/53/ UE. Pour obtenir une déclaration de conformité complète, adressez-vous à : WD Plus GmbH, Wohlenbergstraße 16, 30179 Hanovre, http://downloads.ganzeinfach.de/...
- Page 44 Grazie per aver scelto un prodotto di BEARWARE. Per utilizzare con soddisfazione il prodotto acquistato a lungo, si prega di leggere attentamente le seguenti istruzioni per l’uso. Prima della messa in funzione della merce consegnata, verificare che sia integra, esente da difetti e non danneggiata.
- Page 45 3. Istruzioni aggiuntive per questo apparecchio Controllare alla prima messa in funzione dell'apparecchio l'integrità del prodotto stesso e dei componenti nonché la funzione. Il sensore esterno è resistente agli spruzzi e non deve essere esposto a pioggia continua e diretta. Un luogo ideale sarebbe quindi coperto e all’ombra.
- Page 46 4. Tasti Simbolo Tasto MODE: Nella schermata standard premere il tasto "MODE” per selezionare le varie modalità di visualizzazione. Se entro 10 se- condi non si preme alcun tasto, la stazione meteorologica torna alla schermata standard). SET: Nella schermata standard premere il tasto "SET” per sceglie- re tra C°...
- Page 47 Intervallo di visualizzazione Display temperatura esterna Visualizzazione ora Display temperatura interna Display del giorno e della data Previsione meteorologica e visualizzazione della pressione atmosferica Visualizzazione fasi lunari Interruttore “CHANNEL” Gancio per montaggio a muro Coperchio vano batterie Italiano...
- Page 48 5. Messa in funzione Rimuovere il prodotto dalla confezione e togliere qualsiasi materiale di imballag- gio. Aprire il vano batterie del sensore esterno e inserire 2 x batterie del tipo AAA da 1,5V e e selezionare il canale desiderato sul “Commutatore di canale”. Quindi aprire il vano batterie sul retro dell'unità...
- Page 49 Data e giorno: La stazione meteorologica dispone di un display di data e giorno della settimana. Nella sezione su- periore viene visualizzata la data, in quella sinistra il giorno della settimana. La lingua preimpostata è il tedesco. Se si desidera cambiare la lingua, nel capitolo "Impostazioni di base"...
- Page 50 Previsioni meteorologiche: La stazione meteorologica calcola una previ- sione per ca. 12 ore basata sullo sviluppo della pressione atmosferica. Naturalmente questa previsione non può essere paragonata a satelliti o calcolatori ad alte prestazioni. La previsione mostra unicamente un'indicazione approssima- tiva dello sviluppo attuale. Visualizzazione della temperatura interna e dell’umidità...
- Page 51 Visualizzazione temperatura esterna: La temperatura esterna viene misurata dal sensore esterno e visualizzata con precisione al decimo di grado. L'unità di temperatura impostata appare a destra di fianco al valore misurato. L'unità di temperatura può essere cambiata tra °C e °F. A questo scopo premere il tasto "SET"...
- Page 52 In questo modo è possibile modificare e adattare le impostazioni successive nella seguente sequenza: • Fuso orario • Impostazione lingua - Per l'impostazione del giorno della set- timana nel display. Le seguenti sigle possono essere impostate e selezionate con i tasti "UP" e "DOWN": GER (tedesco), FRE (Francese), ITA (italiano), DUT (olandese), SPA (spagnolo), DAN (danese), ENG (inglese) •...
- Page 53 8.2 Allarme temperatura E' possibile definire un campo di temperatura per il sensore esterno e per la temperatura interna. Con l'allarme temperatura la stazione di base emette un allarme, se la misurazione avviene oltre l’intervallo di temperatura. Nella schermata standard premere il tasto „MODE“ 4x una dopo l’altra, in modo che vengano visualizzate sul display solo la temperatura interna e la temperatura esterna.
- Page 54 8.3 Impostazione allarme La stazione meteorologica può memorizzare fino a 2 impostazioni d'allarme che possono essere attivate e disattivate separatamente. Impostare l'allarme Premere il tasto "MODE" 2 volte nella schermata standard per accedere alla modalità di allarme. Sul display viene visualizzato solo l’orario dell'allarme. In modalità...
- Page 55 9. Dati salvati Temperature massime e minime Premere il tasto “UP” per visualizzare la temperatura interna ed esterna massima e l’umidità massima. Nel display appare la scritta "max". Premere di nuovo il tasto "UP" per visualizzare i valori minimi misurati. Nel display appare la scritta "min". Dopo ca.
- Page 56 Attenzione! 11. Avvertenze di sicurezza ed esclusione della responsabilità Non tentare mai di aprire l'apparecchio per effettuare riparazioni o trasformazioni. Evitare il contatto con le tensioni di rete. Non cortocircuitare il prodotto. L'appa- recchio non è impermeabile, utilizzarlo solo in luoghi asciutti. Proteggerlo da ele- vata umidità...
- Page 57 Direttiva RAEE 2012/19/UE Numero reg. RAEE: DE 67896761 Con la presente la ditta WD Plus GmbH dichiara che il dispositivo 303530 è conforme ai requisiti essenziali e alle rimanenti disposizioni in materia come stabilito dalla di- rettiva 2014/53/UE. Una dichiarazione di conformità completa è disponibile presso: WD Plus GmbH, Wohlenbergstraße 16, 30179 Hannover, http://downloads.ganzeinfach.de/...
- Page 58 Muchas gracias por escoger un producto de BEARWARE. Para que pueda disfrutar de su adquisición, le rogamos que lea atentamente las siguientes instrucciones de uso. Antes de ponerlo en marcha, compruebe que el producto suministrado no presenta defectos ni daños.
- Page 59 3. Instrucciones adicionales para este aparato Antes de la primera puesta en marcha, controle que los componentes del aparato estén intactos y que funcionen correctamente. El sensor exterior es a prueba de salpicaduras y no debe ser expuesto a la lluvia continua y directa. Por lo tanto, un lugar ideal estaría cubierto y a la sombra.
- Page 60 4. Botones Símbolo Botón MODE (modo): En la pantalla de inicio, pulse el botón "MODE" para cambiar entre los distintos modos. Si no pulsa ningún botón en 10 segundos, la estación meteorológica cambia a la pantalla de inicio. SET (ajustes): En la pantalla estándar, pulse el botón "SET" para cambiar entre °C y °F.
- Page 61 N.º Pantalla Indicador de la temperatura exterior Indicador de la hora Indicador de la temperatura interior Indicador de la fecha y la hora Indicador de la previsión meteorológica y presión barométrica Indicador de las fases lunares Conmutador "CHAN- NEL" Montaje de pared suspensión Compar-...
- Page 62 5. Puesta en marcha Saque el producto del embalaje y retire todo el material de embalaje. Abra el compartimento para pilas del sensor externo e introduzca 2 pilas de 1,5 V AAA y seleccionar el canal deseado en el “Cambio de Canal”.. A continuación, abra el compartimento para pilas en la parte posterior de la unidad principal y coloque ahí...
- Page 63 Fecha y día: La estación meteorológica dispone de una vista de fecha y día de la semana. En la parte superior aparece la fecha y en la parte inferior, el día de la semana. El idioma preseleccionado es el alemán. Si desea modificar el idioma, encontrará...
- Page 64 Previsión meteorológica: La estación meteorológica efectúa un pronósti- co del tiempo para unas 12 horas, basado en la evolución de la presión de aire. Naturalmente que este pronóstico no puede compararse con satélites o computadoras de alto rendimiento. El pronóstico muestra solamente un dato apro- ximado de la evolución actual.
- Page 65 Indicador de la temperatura exterior: La temperatura exterior es medida por el sensor exterior y visualizada con una precisión de hasta una décima de grado. La unidad de temperatura fijada aparecerá a la derecha junto al valor medido. La unidad de temperatura puede cambiarse entre °C y °F.
- Page 66 De esta forma podrá modificar y adaptar los siguientes ajustes en el siguiente orden: • Zona horaria • Ajuste del idioma - Para fijar el día de la semana en la pantalla. Se pueden ajustar las siguientes abreviaturas y seleccionarse con los botones "UP"...
- Page 67 8.2 Alarma de la temperatura Tiene la posibilidad de definir un margen de temperatura para el sensor exterior, así como para la temperatura interior. Con este, la estación base emite una alar- ma cuando se realiza una medición fuera de dicho rango de temperatura. Pulse cuatro veces seguidas el botón "MODE"...
- Page 68 8.3 Ajuste de alarma La estación meteorológica puede guardar hasta 2 ajustes de alarma, que pueden conectarse y desconectarse por separado. Poner la alarma Presione dos veces el botón "MODE" en la pantalla de inicio para acceder a la configuración de la alarma. En la pantalla se mostrará ahora la hora de la alarma.
- Page 69 9. Datos técnicos Temperaturas máximas y mínimas Pulse el botón "UP" para visualizar la temperatura exterior e interior máximas, y la humedad del aire máxima. En la pantalla aparece la inscripción "max". Vuelva a pulsar el botón "UP" para hacer aparecer los valores mínimos medidos. En la pantalla aparece la inscripción "min".
- Page 70 ¡Atención 11. Advertencias de seguridad y exoneración de responsabilidad No intente abrir el dispositivo para realizar reparaciones o modificaciones. Evite el contacto con la red eléctrica. No produzca un cortocircuito en el producto. El dispo- sitivo no es estanco, utilícelo solo en entornos secos. Protéjalo contra la humedad, el agua y la nieve.
- Page 71 Directiva WEEE 2012/19/UE Número de registro WEEE: DE 67896761 La empresa WD Plus GmbH declara por la presente que el aparato 303530 satisfa- ce los requisitos esenciales y el resto de disposiciones pertinentes según lo estableci- do en la directiva 2014/53/UE. Solicite una declaración de conformidad completa en: WD Plus GmbH, Wohlenbergstraße 16, 30179 Hannover (Alemania), http://downloads.gan-...
- Page 72 WD Plus GmbH • Wohlenbergstraße 16 • D-30179 Hannover V1.0...
Need help?
Do you have a question about the 303530 and is the answer not in the manual?
Questions and answers
Mi serve il sensore esterno perché si è rotto
To replace the external sensor for BEARWARE part number 303530, follow these steps:
1. Ensure the new sensor uses 2 AAA 1.5V batteries and is within range of the base station.
2. Set the channel on the new sensor using the switch in its battery compartment.
3. On the base station, press the "CHANNEL" button repeatedly until the selected channel appears.
4. If the connection is not established, press and hold the "CHANNEL" button on the base station for about 3 seconds to start manual signal reception. The connection symbol will blink.
5. If the connection fails after 5 minutes, move the sensor and base station closer to each other and try again.
Make sure the sensor is placed in a dry, shaded area and not exposed to direct rain.
This answer is automatically generated