
Subscribe to Our Youtube Channel
Related Manuals for BEARWARE 302547


Summary of Contents for BEARWARE 302547
- Page 1 DEUTSCH 2 FRANÇAIS 18 ITALIANO 34 EPSPAÑOL 50 ENGLISH 69 WETTERSTATION / WEATHERSTATION Mod.-Nr.: 302547/20200715FZ006...
- Page 2 Vielen Dank, dass Sie sich für ein Produkt von BEARWARE entschieden haben. Damit Sie auch lange Freude mit Ihrem erworbenen Gerät haben, lesen Sie sich bitte die nachfolgende Bedienungsanleitung aufmerksam durch. Prüfen Sie vor Inbetriebnahme der gelieferten Ware, ob diese vollständig, fehlerfrei und unbe- schädigt ist.
- Page 3 3. Zusätzliche Hinweise zu diesem Gerät Kontrollieren Sie bei Erstinbetriebnahme des Gerätes nochmals die Unversehrt- heit des Produkts bzw. der Bauteile sowie die Funktion. Verwenden Sie dieses Gerät nicht, wenn es beschädigt ist. Setzen Sie die Basisstation keiner Feuchtigkeit oder direktem Sonnenlicht aus. Der Außensensor ist Spritzwassergeschützt und sollte nicht dauerhaftem und direktem Regen ausgesetzt werden.
- Page 4 4. Produkt-Details Taste SET/HISTORY DOWN/Alarm ALARM/SET ALERT °C / °F Deutsch...
- Page 5 Taste Uhrzeit / Alarm Barometer / Wettervorhersage-Piktogramm Innentemperatur Außentemperatur Datumsanzeige / Mondphasenanzeige Wandmontage- Aufhängung Display Batteriefach- Status-LED Abdeckung Standfuß Deutsch...
- Page 6 5. Inbetriebnahme Entnehmen Sie das Produkt aus der Verpackung und entfernen Sie jegliches Ver- packungsmaterial. Öffnen Sie das Batteriefach des Außensensors und legen Sie 2x 1,5V AA Batterien hinein. Anschließend öffnen Sie das Batteriefach auf der Rücksei- te der Haupteinheit und legen ebenfalls 2x 1,5V AA Batterien ein. Alternativ können Sie das mitgelieferte 5V / 150mA Hohlsteckernetzteil für den Betrieb verwenden.
- Page 7 Wenn die Wetterstation das Signal erkannt hat, zeigt sie die aktuelle Mitteleuro- päische Zeit, das Datum und den Wochentag an. Das DCF-Symbol “ ” erscheint anschließend im Display. Wenn der Versuch, ein Signal zu empfangen fehlschlägt, beendet die Wetterstation die Suche nach ungefähr 7 Minuten. Das DCF-Symbol erlischt im Display. Sie aktivieren erneut die Suche, indem Sie die “DOWN”-Taste für ungefähr 3 Se- kunden drücken, bis das DCF-Symbol im Display nochmals erscheint.
- Page 8 DCF-Symbol: Das Funkturm Symbol bedeutet einen erfolgreichen Empfang des DCF-Signals. Die Wetterstation synchronisiert jede Nacht die Uhrzeit. Während der Synchronisation, blinkt das Symbol auf. Wenn die Zeit erfolgreich empfangen wurde, leuchtet das Symbol bis zur nächsten Synchronisation dauerhaft. Mondphasen: Die aktuelle Mondphase wird im Display der Wetter- station wie folgt angezeigt: Der Teil des Mondes, welcher nicht beleuchtet ist, wird im Display dunkel dargestellt.
- Page 9 Trendanzeige: Die Trendanzeige ändert sich stündlich, steigend oder fallend, wenn der Luftdruck sich im Messzeitraum um mindestens 2 hPa (=0,06 inHg) verändert. Wettervorhersage: Die Wetterstation berechnet eine Wettervorhersage für etwa 12 Stunden, die auf der Luftdruckentwicklung basiert. Natürlich kann diese Vorhersage nicht mit Satelliten oder Hochleistungsrechnern verglichen werden.
- Page 10 Luftfeuchtigkeit: In dieser Anzeige wird die aktuelle Luftfeuchtigkeit angezeigt, die die Wetterstation ausgesetzt ist. Temperatur- oder Luftfeuchtigkeitstrend: Die Trendanzeige ändert sich stündlich, steigend oder fallend, wenn die Temperatur oder die Luftfeuchtigkeit sich im Mess- zeitraum um mindestens 2°C (= 3,6°F) verändert. Raumklima-Bewertung: Basierend auf der Luftfeuchtigkeit und der Temperatur wird das Raumklima bewertet.
- Page 11 Wenn die Innentemperatur außerhalb des Bereiches 20°C-28°C liegt, wird keine Raumklima-Bewertung durchgeführt. Niedrige Batterie: Wenn das Batteriesymbol auftaucht, sind die einge- legten Batterien leer und sollten schnellstmöglich gegen Neue ausgetauscht werden. Dies gilt für den Außensensor sowie für die Basisstation. Außentemeraturanzeige: Die Außentemperatur wird von dem Außen- sensor gemessen und bis zu einem Zehntel...
- Page 12 8. Grundeinstellungen Hinweis: Ein festes Berühren der Oberseite des Gehäuses schaltet die Hin- tergrundbeleuchtung ein. Nachdem die “SNOOZE/SLEEP”-Taste losgelassen wird, schaltet sich diese nach 5 Sekunden wieder aus. Bitte beachten Sie, dass die Basisstation nicht auf 2 Tasten gleichzeitig reagiert. Daher em- pfehlen wir stets nur jeweils eine Taste zu drücken.
- Page 13 • Luftdruck - Der Luftdruck wird in “mb” oder in “hPa” entspre- chend der Einstellung angezeigt. Hier können Sie nun die Anzeige auf den barometrischen Luftdruck von Ihrem Standort einstellen. Verwenden Sie die Luftdruck-Daten von Ihrem Standort aus dem Internet oder aus dem lokalen Wetterbericht. Bitte beachten Sie, dass die Daten in die Wetterstation eingegeben werden müssen.
- Page 14 8.2 Alarmeinstellung Die Wetterstation kann bis zu 2 Alarmeinstellungen speichern, welche separat ein- sowie ausgeschaltet werden können. Alarm setzen Drücken und halten Sie die “ALARM/SET”-Taste für ca. 3 Sekunden, um in die Alarmeinstellungen zu gelangen. Die Alarmzeit wird nun anstelle der Uhrzeit angezeigt.
- Page 15 9. Gespeicherte Daten Maximale und Minimale Temperaturen Drücken Sie die “MEM”-Taste, um die maximale Innen- sowie Außentemperatur und die maximale Luftfeuchtigkeit anzeigen zu lassen. Die jeweilig maximal ge- messenen Werte werden nun im Display angezeigt. Drücken Sie die “MEM”-Taste erneut, um die minimal gemessenen Werte anzeigen zu lassen. Nach 5 Sekunden wird der aktuelle Messwert angezeigt.
- Page 16 Achtung! 11. Sicherheitshinweise und Haftungsausschluss Versuchen Sie nie das Gerät zu öffnen, um Reparaturen oder Umbauten vorzuneh- men. Vermeiden Sie Kontakt zu den Netzspannungen. Schließen Sie das Produkt nicht kurz. Das Gerät ist nicht wasserdicht, bitte verwenden Sie es nur im Trocke- nen.
- Page 17 Batterie nicht in den Hausmüll gegeben werden darf. WEEE Richtlinie 2012/19/EU WEEE Register-Nr: DE 67896761 Hiermit erklärt die Firma WD Plus GmbH, dass sich das Gerät 302547/20200715FZ006 in Übereinstimmung mit den grundlegenden Anforderungen und den übrigen einschlägigen Bestimmungen der Richtlinie 2014/53/EU befindet. Eine vollständige Konformitätserklärung erhalten Sie bei: WD Plus GmbH, Wohlenbergstraße 16, 30179 Hannover,...
- Page 18 Nous vous remercions d'avoir choisi un produit BEARWARE. Pour que vous puissiez profiter longtemps de l'appareil acquis, veuillez lire attentivement le mode d'em- ploi suivant. Avant de mettre en service les marchandises livrées, vérifiez qu’elles sont complètes, exemptes de défauts et non endommagées.
- Page 19 3. Indications supplémentaires concernant cet appareil Vérifiez l’intégrité du produit et les composants, ainsi que le fonctionnement lors de la première mise en service de l’appareil. N'utilisez pas cet appareil s’il est endommagé. N’exposez pas la station de base à de l'humidité ou à la lumière di- recte du soleil.
- Page 20 4. Détails du produit Touche SET/HISTORY DOWN/Alarm ALARM/SET ALERT °C / °F Français...
- Page 21 Touche Heure / alarme Baromètre / pictogramme de prévision météorologique Température intérieure Température extérieure Affichage de la date / affichage de la phase lunaire Fixation murale Écran Couvercle du LED d'état compartiment à batteries Pied Français...
- Page 22 5. Mise en service Sortez le produit de l'emballage et retirez tout matériau d'emballage. Ouvrez le compartiment à batteries du capteur extérieur et placez 2 batteries AA de 1,5 V. Ouvrez le compartiment à batteries au dos de l'unité principale et placez-y aussi 2 batteries AA de 1,5 V.
- Page 23 Lorsque la station météorologique a reconnu le signal, elle affiche l’heure d’Eu- rope centrale actuelle, la date et le jour de la semaine. Le symbole DCF « » apparait ensuite à l'écran. Lorsque la tentative de recevoir le signal échoue, la station météorologique arrête la recherche après environ 7 minutes.
- Page 24 Symbole DCF : Le symbole de tour de radio indique une réception réussie du signal DCF. La station météorologique synchronise l’heure chaque nuit. Le symbole clignote durant la synchronisation. Lorsque l’heure a été reçue avec succès, le symbole reste allu- mé...
- Page 25 Affichage de tendance : L’affichage de tendance change chaque heure, en hausse ou en baisse, lorsque la pression atmosphérique change d’au moins 2 hPa (=0,06 inHg) durant la période de mesure. Prévision météorologique : La station météorologique calcule une prédiction météorologique pour environ 12 heures, basée sur le développement de la pression atmosphérique.
- Page 26 Humidité de l'air : Dans cet affichage, l'humidité de l’air actuelle, à laquelle la station météorologique est soumise, est indiquée. Tendance de température ou d'humidité de l’air : L’affichage de tendance change chaque heure, en hausse ou en baisse, lorsque la température ou l'humidité de l’air change d’au moins 2°C (=3,6°F) durant la période de mesure.
- Page 27 Lorsque la température intérieure se situe en dehors de la plage de 20°C à 28°C, l'évaluation du climat intérieur n’est pas effectuée. Batterie faible : Lorsque le symbole de batterie apparait, les batteries insérées sont vides et devraient être remplacées le plus rapidement possible par des nouvelles.
- Page 28 8. Réglages de base Note : Un contact ferme avec la partie supérieure du boîtier allume le rétroéclairage. Une fois que la touche « SNOOZE/SLEEP » est relâchée, le rétroéclairage s'éteint après 5 secondes. Veuillez noter que la station de base ne réagit pas à...
- Page 29 et « DOWN ». Oriente vous préférablement à une prédiction de la météo actuelle. • Pression atmosphérique - la pression atmosphérique est affichée en « mb » ou « hPa », en fonction du réglage. Ici vous pouvez maintenant régler l’affichage à la pression barométrique de votre site.
- Page 30 8.2 Réglage de l’alarme La station météorologique peut enregistrer jusqu’à 2 réglages d’alarme, qui peuvent être activés ainsi que désactivés séparément. Régler une alarme Maintenez la touche « ALARM/SET » enfoncée pendant 3 secondes pour accéder aux paramètres d’alarme. L’heure d’alarme est maintenant affichée au lieu de l’heure actuelle.
- Page 31 9. Données enregistrées Températures maximales et minimales Appuyez sur la touche « MEM » pour faire afficher les températures intérieure et extérieure maximales ainsi que l'humidité de l’air maximale. Les valeurs maximales mesurées respectives sont maintenant affichées sur l'écran. Appuyez de nouveau sur la touche «...
- Page 32 Attention! 11. Consignes de sécurité et clause de non responsabilité N’essayez jamais d’ouvrir l’appareil pour le réparer ou le modifier. Évitez tout contact avec la tension du secteur. Ne court-circuitez pas l’appareil. L’appareil n’est pas approuvé pour une utilisation en extérieur, utilisez-le exclusivement dans un endroit sec.
- Page 33 Directive DEEE: 2012/19/EU N° d’enregistrement DE: 67896761 Par la présente, la société WD Plus GmbH, déclare que l’appareil 302547/20200715FZ006 est conforme aux exigences essentielles et aux autres dispositions pertinentes 2014/53/EU . Pour obtenir une déclaration de conformité dans son intégralité, contactez: WD Plus GmbH, Wohlenbergstraße 16, 30179 Hanovre,...
- Page 34 Grazie per aver scelto un prodotto di BEARWARE. Per utilizzare con soddisfazione l'apparecchio acquistato, si prega di leggere attentamente le seguenti istruzioni per l’uso. Prima di mettere in servizio il prodotto consegnato, la preghiamo di verificare che esso sia completo, privo di difetti e non danneggiato.
- Page 35 3. Istruzioni aggiuntive per questo apparecchio Controllare l’integrità del prodotto e dei componenti nonché il suo funzionamen- to durante la prima messa in servizio. Il sensore esterno è resistente agli spruzzi e non deve essere esposto a pioggia continua e diretta. Un luogo ideale sarebbe quindi coperto e all’ombra.
- Page 36 4. Dettagli del prodotto Tasto SET/HISTORY DOWN/Allarme ALARM/SET ALERT °C / °F Italiano...
- Page 37 Tasto Ora / Allarme Barometro / Pittogramma previsioni meteorologiche Temperatura interna Temperatura esterna Visualizzazione data/fasi lunari Gancio per montag- gio a muro Display Coperchio LED di vano batterie stato Base d'appoggio Italiano...
- Page 38 5. Messa in funzione Rimuovere il prodotto dalla confezione e togliere qualsiasi materiale di imballag- gio. Aprire il vano batterie del sensore esterno e inserire 2 x batterie AA da 1,5V. Successivamente aprire il vano batterie sul retro dell'unità principale e inserire 2 x batterie AA da 1,5V.
- Page 39 Quando la stazione meteorologica ha riconosciuto il segnale, indica l'ora dell'Eu- ropa centrale attuale, la data e il giorno della settimana. Successivamente il simbolo DCF " " appare nel display. Se il tentativo di ricevere un segnale fallisce, la stazione meteorologica termina la ricerca dopo circa 7 minuti.
- Page 40 Simbolo DCF: Il simbolo del ripetitore indica che la ricezione del segnale DCF è andata a buon fine. La stazione meteorologica sincronizza l'o- ra ogni notte. Durante la sincronizzazione lampeggia il simbolo. Se l'ora è stata ricevuta con successo, il simbolo è illuminato permanentemente fino alla sincronizzazione successiva.
- Page 41 Display tendenza: Il display della tendenza cambia ogni ora, in ascesa o in discesa, quando la pressione atmosferica cambia di almeno 2hPa (=0,06 inHg) nel periodo di misurazione. Previsioni meteorologiche: La stazione meteorologica calcola una previsione per ca. 12 ore basata sullo sviluppo della pressione atmosferica.
- Page 42 Umidità dell'aria: In questo display viene visualizzata l'umidità dell'aria attuale a cui la stazione meteorologica è esposta. Tendenza temperatura e umidità dell'aria: Il display della tendenza cambia ogni ora, in ascesa o in discesa, quando la temperatura o l'umidità dell'aria cambia di almeno 2°C (=3,6°F) nel periodo di misurazione.
- Page 43 Se la temperatura interna si trova al di fuori del campo di 20°C-28°C non viene eseguita alcuna valutazione del clima ambientale. Batteria bassa: Se compare il simbolo della batteria, le batterie inserite sono esaurite e devono essere sostituite al più presto con delle nuove. Ciò vale sia per il sensore esterno sia per la stazione di base.
- Page 44 8. Impostazioni di base Nota: toccando la parte superiore del sensore di movimento si accende la retroilluminazione. Lasciando il tasto "SNOOZE/SLEEP", questo si spegne nuovamente dopo 5 secondi. Si fa notare che la stazione di base non reagisce a 2 tasti contemporaneamente. Pertanto si raccomanda di premere sempre un solo tasto alla volta.
- Page 45 postare il display alla pressione atmosferica della propria località. Utilizzare i dati della pressione atmosferica della propria località da internet o dal bollettino meteorologico locale. Tenere presente che è necessario inserire i dati nella stazione meteorologica. • Unità pressione atmosferica - L'impostazione standard in Europa è...
- Page 46 8.2 Impostazione allarme La stazione meteorologica può memorizzare fino a 2 impostazioni d'allarme che possono essere attivate e disattivate separatamente. Impostare l'allarme Premere e tenere premuto il tasto "ALARM/SET" per ca. 3 secondi per accedere alle impostazioni dell'allarme. Il tempo dell'allarme viene visualizzato al posto dell'ora.
- Page 47 9. Dati memorizzati Temperature massime e minime Premere il tasto "MEM" per fare visualizzare la temperatura interna ed esterna e la massima pressione atmosferica. I rispettivi valori massimi misurati vengono visualizzati nel display. Premere di nuovo il tasto "MEM" per visualizzare i valori minimi misurati.
- Page 48 Attenzione! 11. Specifiche di sicurezza ed esclusione della responsabilità Non tentare di aprire l’apparecchio per ripararlo o sistemarlo. Evitare di entrare in contatto con la tensione di rete. Non cortocircuitare il prodotto. L’apparecchio non è omologato per essere utilizzato all’aperto, usarlo quindi solo in luoghi asciutti.
- Page 49 Direttiva RAEE: 2012/19/EU Reg. RAEE n.: DE 67896761 La società WD Plus GmbH ivi dichiara che l’apparecchio 302547/20200715FZ006 è conforme ai requisiti di base e alle rimanenti disposizioni 2014/53/EU. Per la dichiarazione di confor- mità completa, rivolgersi a: WD Plus GmbH, Wohlenbergstraße 16, 30179 Hannover, http://downloads.ganzeinfach.de/search/model/302547...
- Page 50 Muchas gracias por escoger un producto de BEARWARE. Para que pueda disfru- tar durante mucho tiempo de su adquisición, le rogamos que lea atentamente las siguientes instrucciones de uso. Antes de la puesta en servicio de la mercancía suministrada, compruebe que esté completa e intacta.
- Page 51 3. Instrucciones adicionales para este aparato Al poner en funcionamiento el aparato por primera vez, compruebe de nuevo el estado del producto, de los componentes y su funcionamiento. El sensor exterior es a prueba de salpicaduras y no debe ser expuesto a la lluvia continua y directa. Por lo tanto, un lugar ideal estaría cubierto y a la sombra.
- Page 52 4. Detalles del producto prog. Botón SET/HISTORY DOWN/Alarma ALARM/SET ALERT °C / °F Español...
- Page 53 prog. Botón Hora / Alarma Barómetro / pictograma de la previsión del tiempo Temperatura interior Temperatura exterior Indicador de la fecha / indicador de la fase lunar Montaje de pared suspensión Pantalla Compartimento LED de estado para pilas tapa Español...
- Page 54 5. Puesta en funcionamiento Saque el producto del embalaje y retire todo el material de embalaje. Abra el com- partimento para pilas del sensor externo e introduzca 2 pilas de 1,5 V AA. A conti- nuación abra el compartimento para pilas situado en la parte trasera de la unidad principal e introduzca también 2 pilas de 1,5 V AA.
- Page 55 Cuando fracasa el intento de recibir la señal, la estación meteorológica finaliza la búsqueda tras aprox. 7 minutos. El símbolo DCF desaparece del display. Usted activará de nuevo la búsqueda presionando la tecla «DOWN» durante unos 3 segundos, hasta que el símbolo DCF aparece de nuevo en el display. Alternativa- mente tiene la posibilidad de fijar la hora a mano.
- Page 56 Símbolo DCF: El símbolo de torre emisora significa que se capta correcta- mente la señal DCF. La estación meteorológica sincroniza cada noche la hora. Durante la sincronización parpadea el símbolo. Si se ha recibido correctamente la hora, el símbolo parpadeará continuamente hasta la siguiente sincronización.
- Page 57 Visualización de la tendencia: La vista de la tendencia cambia cada hora, en aumento o en des- censo, cuando la presión del aire cambia en el periodo medido en al menos 2 hPa (=0,06 inHg). Previsión meteorológica: La estación meteorológica efectúa un pronóstico del tiempo para unas 12 horas, basado en la evolución de la presión de aire.
- Page 58 Humedad del aire: En este indicador se visualiza la humedad actual del aire a la que está expuesta la estación meteorológica. Tendencia de la temperatura o de la humedad del aire: El indicador de la tendencia cambia cada hora, en aumento o en descenso, cuando cambia la temperatura o la humedad del aire en el periodo medido en al menos 2°C (= 3,6°F).
- Page 59 Cuando la temperatura interior está fuera del margen de 20°C-28°C, no se efectúa el cálculo del clima interior. Pilas bajas: Cuando aparece el símbolo de la pila, las pilas utiliza- das están vacías y deberán cambiarse por unas nuevas lo más rápido posible. Esto es válido tanto para el sensor exterior como para la estación base.
- Page 60 8. Ajustes básicos Indicación: Tocar firmemente la parte superior de la carcasa conecta la iluminación de fondo. Después de soltar la tecla «SNOOZE/SLEEP», se desco- necta de nuevo a los 5 segundos. Preste atención a que la estación base no reacciona a 2 teclas al mismo tiempo. Por ello, recomendamos siempre presionar sólo una tecla.
- Page 61 la presión barométrica del aire de su localidad. Utilice los datos de la presión del aire de su localidad extraídos de internet o del pronóstico local del tiempo. Preste atención a que los datos se tienen que introducir en la estación meteorológica. •...
- Page 62 8.2 Ajuste de alarma La estación meteorológica puede guardar hasta 2 ajustes de alarma, que pueden conectarse y desconectarse por separado. Poner la alarma Presione y mantenga pulsada la tecla «ALARM/SET» durante unos 3 segundos para acceder a los ajustes de alarma. La hora de la alarma se visualiza ahora en el lugar de la hora.
- Page 63 9. Datos almacenados Temperaturas máximas y mínimas Presione la tecla «MEM» para hacer aparecer la temperatura interior y exterior máxima y la humedad máxima del aire. Los valores máximos medidos se visuali- zarán ahora en el display. Presione la tecla «MEM» de nuevo para hacer aparecer los valores mínimos medidos.
- Page 64 Atención! 11. Instrucciones de seguridad y exención de responsabilidad No intente nunca abrir el dispositivo para repararlo o modificarlo. Evite entrar en contacto con las tensiones de la red. No cortocircuite el producto. El dispositivo no está homologado para el uso al aire libre, manténgalo siempre seco. Protéjalo de una elevada humedad ambiental, agua y nieve.
- Page 65 Directiva WEEE: 2012/19/EU N.º reg. WEEE: DE 67896761 Por la presente, la empresa WD Plus GmbH declara que el dispositivo 302547/20200715FZ006 cumple los requisitos fundamentales y las demás disposiciones específicas 2014/53/EU. Puede obtener una declaración de conformidad íntegra en: WD Plus GmbH, Wohlenbergstraße 16, 30179 Hannover,http://downloads.ganzeinfach.de/search/model/302547...
- Page 66 Thank you for choosing a BEARWARE product. Please read the following user man- ual carefully so as to get the most from the product that you have purchased. Be- fore using the product, first check if the delivered item is complete, accurate and undamaged.
- Page 67 3. Additional information about this device Check if the product and the components are intact and if the device is working properly when using it for the first time Do not use this device if it is damaged. Do not expose the base station to moisture or direct sunlight. Before using the product, ensure that the available supply voltage corresponds to the operating voltage indicated on the specification plate.
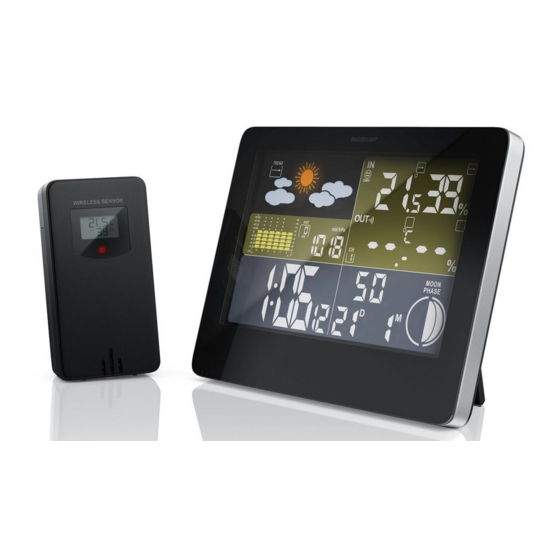
- Page 68 4. Product details Button SET/HISTORY DOWN/Alarm ALARM/SET ALERT °C / °F English...
- Page 69 Button Time / alarm Barometer / weather forecast pictogram Indoor temperature Outdoor temperature Date display / Moon phase display Wall mounting hanger Display Battery compart- Status LED ment cover Pedestal English...
- Page 70 5. Commissioning Take the product out of the package and remove all the packaging material. Open the battery compartment of the outdoor sensor and insert two 1.5V AA batteries. Then open the battery compartment on the back of the main unit and insert two 1.5V AA batteries.
- Page 71 If the attempt to receive a signal fails, the weather station stops scanning after about 7 minutes. The DCF symbol disappears from the display. Re-activate the scanning by pressing the "DOWN" button for about 3 seconds until the DCF symbol is shown again in the display. Alternatively, you have the option of manually setting the time.
- Page 72 DCF symbol: The radio tower symbol indicates successful reception of the DCF signal. The weather station synchronises the time every night. The symbol starts flashing during synchronisation. If the time has been successfully received, then the symbol glows continuously until the next synchronisation. Phases of the moon: The current phase of the moon is shown in the display of the weather station as follows: The part of the...
- Page 73 Trend display: The trend display changes every hour, increasing or decreasing if the air pressure changes by at least 2 hPa (= 0.06 inHg) in the measurement duration. Weather forecast: The weather station calculates a weather forecast for about 12 hours, which is based on the air pressure trend.
- Page 74 Humidity: This display shows the current air humidity experi- enced by the weather station. Temperature or humidity trend: The trend display changes every hour, increases or decreases, if the temperature or the humidity changes in the measurement period by at least 2°C (= 3.6°F). Indoor climate assessment: The indoor climate is assessed based on the humidity and the temperature.
- Page 75 Low battery: If the battery symbol appears, then the inserted batteries are empty and should be replaced with new batteries as soon as possible. This applies to the outdoor sensor as well as to the base station. Outdoor temperature display: The outdoor temperature is measured by the outdoor sensor and shown to an accuracy of one tenth of a degree.
- Page 76 8. Basic settings: Note: Firmly touching the top of the housing will switch on the backlight. After the "SNOOZE/SLEEP" button is released, it switches off again after 5 seconds. Please note that the base station does not respond to 2 buttons at the same time.
- Page 77 from the local weather report. Please note that the data has to be entered into the weather station. • Atmospheric pressure unit - The default setting in Europe is the unit "hPa". Alternatively, you can set the unit "inHg". 8.1 Temperature alarm You have the option to define a temperature range for the outdoor sensor.
- Page 78 8.2 Alarm setting The weather station can store up to 2 alarm settings, which can be turned on and off separately. Setting the alarm Press and hold the "ALARM/SET" button for about 3 seconds to access the alarm settings. The alarm time is now displayed instead of the time. You can make the desired settings using the "UP"...
- Page 79 9. Stored data Maximum and minimum temperatures Press the "MEM" button to view the maximum indoor and outdoor temperatures as well as the maximum humidity. The respective maximum readings are now shown on the display. Press the "MEM" button again to view the minimum meas- ured values.
- Page 80 Caution! 11. Safety instructions and disclaimer Never try to open the device to repair or make modifications. Avoid contact with the mains voltage. Do not short-circuit the product. The appliance is not water- proof, therefore please use it only in dry surroundings. Protect it from high humidi- ty, water and snow.
- Page 81 WEEE directive 2012/19/EU WEEE Register no.: DE 67896761 The company WD Plus GmbH hereby certifies that the device 302547/20200715FZ006 com- plies with the fundamental requirements and all other relevant stipulations of the guideline 2014/53/EC. A complete conformity statement can be obtained from: WD Plus GmbH, Wohlenbergstraße 16, 30179 Hanover,...
- Page 82 Notes...
- Page 83 Notes...
- Page 84 WD Plus GmbH • Wohlenbergstraße 16 • D-30179 Hannover...
Need help?
Do you have a question about the 302547 and is the answer not in the manual?
Questions and answers