Table of Contents
Advertisement
Quick Links
INSTALLATION MANUAL
BIAMP IMPERA ECHO
000.0000.000
WHAT IS IN THE BOX?
Echo, DK
• 1 x Biamp Impera Echo
• 1 x 12V wall plug PSU
Terminal connectors
• 1 x Front cover
• 1 x Paper cover
• Quick guide
IMPORTANT SAFETY INSTRUCTIONS
Caution:
Read these instructions:
Read and understand all safety and operating instructions before using the equipment.
Keep these instructions:
The safety instructions should be kept for future reference.
Heed all warnings:
Follow all warnings and instructions marked on the equipment or in the user information.
Avoid attachments:
Do not use tools or attachments that are not recommended, because they may be hazardous.
Warning!:
• This equipment should be operated only from the included power supply.
• To remove power from the equipment safely, remove all power cords from the rear of the equipment,
or the desktop power module (if detachable), or from the power source receptacle (wall plug).
• Power cords should be routed so that they are not likely to be stepped on or pinched by items placed
upon or against them.
• Do not defeat the safety purpose of a polarized or grounding-type plug. A polarized plug has two
blades with one wider than the other. A grounding-type plug has two blades and a third grounding
prong. The wide blade or the third prong is provided for your safety. If the provided plug does not fit
into your outlet, consult an electrician for replacement of the obsolete outlet.
A:
Echo, EU
• 1 x Biamp Impera Echo
• 1 x 12V wall plug PSU
Terminal connectors
• 1 x Front cover
• 1 x Paper cover
• Metal plate
• 2 x screws for metal plate
• Quick guide
9300 S.W. Gemini Drive Beaverton, OR 97008 USA
Echo, US
• 1 x Biamp Impera Echo
• 1 x 12V wall plug PSU
Terminal connectors
• 1 x Front cover
• 1 x Paper cover
• Metal plate
• 2 x screws for metal plate
• Quick guide
T:
+1 503.641.7287
W:
www.biamp.com
1
Advertisement
Table of Contents

Subscribe to Our Youtube Channel
Related Manuals for Biamp IMPERA ECHO


Summary of Contents for Biamp IMPERA ECHO
- Page 1 WHAT IS IN THE BOX? Echo, DK Echo, EU Echo, US • 1 x Biamp Impera Echo • 1 x Biamp Impera Echo • 1 x Biamp Impera Echo • 1 x 12V wall plug PSU • 1 x 12V wall plug PSU •...
- Page 2 Contact your local Biamp reseller or distributor. • If the equipment has slots or holes in the enclosure, these are provided to prevent overheating of sensi- tive components inside.
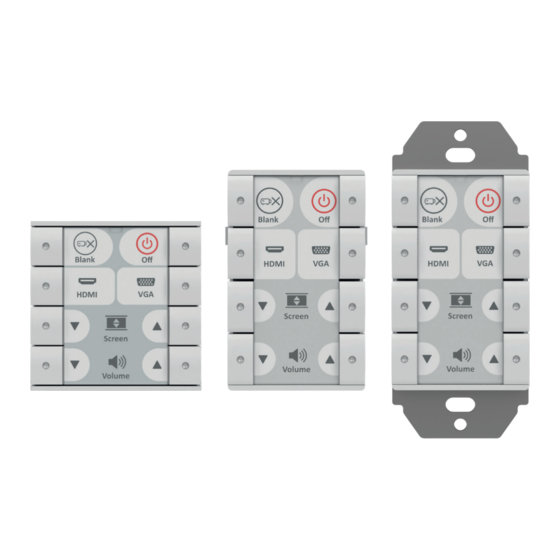
- Page 3 Echo is a perfect choice for the classroom, meeting or conference room and is easy to install. Echo can control devices through IR, or RS232. Echo is available in polar white. The drawings in the manual of Biamp Control - Echo is based on the DK, US and EU versions. Function description...
-
Page 4: Specifications
Input trigger low < 1VDC Input trigger high > 4VDC Output type Open drain Isolated output Max voltage load 24 VDC Max current 0.5 A Connector 4 pin screw block 9300 S.W. Gemini Drive Beaverton, OR 97008 USA +1 503.641.7287 www.biamp.com... - Page 5 I/O 1 TX-2 I/O 3 I/O 2 I/O 1 TX-2 Number Description RS-232 port, Bi-directional RS-232 or IR port, Uni-directional NEB bus port Input/Output connector 12 VDC power input 9300 S.W. Gemini Drive Beaverton, OR 97008 USA +1 503.641.7287 www.biamp.com...
-
Page 6: Hardware Installation
HARDWARE INSTALLATION The Biamp Impera - Echo can be installed in standard electrical back boxes or by using mounting brackets. Each model (DK, US, EU) fits in typical boxes matching specific installation requirements for the country of sale. Prepare the installation site by installing the needed back box or brackets. - Page 7 • Remount the paper label, insert a printed transparent label showing the button functions, and mount the front cover. Note that the front cover mounts in only one direction. 9300 S.W. Gemini Drive Beaverton, OR 97008 USA +1 503.641.7287 www.biamp.com...
-
Page 8: Connections And Controls
TX-2 RS-232/IR port The RS-232/IR port is used for either one-way RS-232 or IR commu- +12V RX-1 nication depending on the setup made in Biamp Project Designer. TX-1 I/O 3 I/O 2 I/O 1 Be aware that the port can’t be used as RS-232 and IR port at the TX-2 same time. - Page 9 Connect your NEB devices as shown to this port with a cable not exceeding 20 cm of length. Use NEB extenders if distances above 20 cm between the units is needed. See the Biamp website for RoHS details on the NEB Extender.
-
Page 10: Troubleshooting
• Check LAN connection to the Biamp network unit. Flashing Firmware upgrade Biamp • One or more of the Biamp network units used in the current project needs network unit. a firmware upgrade before it will work with this project. - Page 11 This document describes how to install and operate the Biamp Impara - Echo. COPYRIGHT - All information contained in this manual is the intellectual property and copyrighted material of Biamp. All rights are reserved. No third party is allowed access to content, information or data in this manual without Biamp express written consent.
Need help?
Do you have a question about the IMPERA ECHO and is the answer not in the manual?
Questions and answers