Advertisement
X-400C
Cloud Setup & Cell Activation
(For faster setup, we recommend doing this step first)
1. Register or login to your account at: www.ControlByWeb.cloud
2. Choose 'Devices' from the left navigation bar and click 'New Device'.
3. On the New Device page, select the 'Cell Device' tab.
4. Enter a device name, the last 6 digits of serial number, and the Cell ID
(located on the side of the device) and click 'Submit'.
5. You'll be redirected to the Device Edit page. *Click 'Activate SIM Card'.
*Note: If data plan was
purchased separately, first
enter Data Plan Code
(sent via email) & click
'Apply Data Plan'.
Activation may take 15
minutes. Click 'Check SIM
Status' to verify activation.
6. Once activated, power
up the X-400C.
May take up to 5
minutes to connect.
See users manual for setup instructions:
www.ControlByWeb.com/support/
| Quick-Start Guide
+5V
Power
Supply
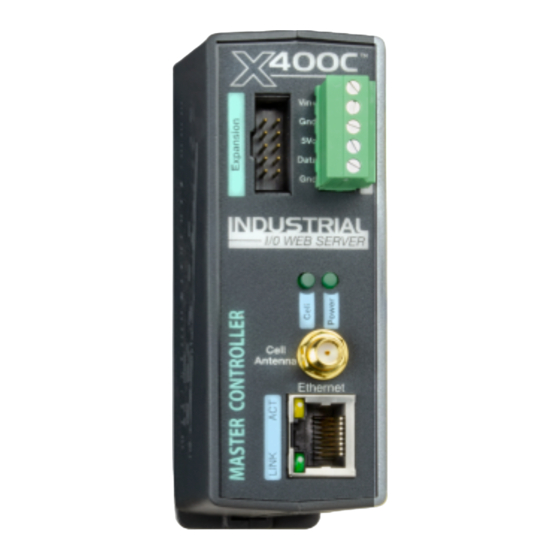
Antenna SMA Connector
Indicator Light:
Blinking = Connecting,
Solid = Connected
Vin+
Power Input
(9-28 VDC)
Gnd
5Vo
Connect to
Data
Temp/Humidity
sensors (optional)
Gnd
Expansion Bus
Connect to Expansion Modules
Rev 1.0
Advertisement
Table of Contents

Related Manuals for ControlByWeb X-400C


Summary of Contents for ControlByWeb X-400C
- Page 1 Cloud Setup & Cell Activation (For faster setup, we recommend doing this step first) 1. Register or login to your account at: www.ControlByWeb.cloud 2. Choose ‘Devices’ from the left navigation bar and click ‘New Device’. 3. On the New Device page, select the ‘Cell Device’ tab.
- Page 2 | Quick-Start Guide X-400C LAN Setup Steps (Optional) 1. Power the module and connect to network. 2. Set IP address on computer to be on the same network as the module. (Example: Set computer to 192.168.1.50) 3. To configure the module, open a web browser and enter: http://192.168.1.2/setup.html...
Need help?
Do you have a question about the X-400C and is the answer not in the manual?
Questions and answers