Advertisement
Quick Links
SONY
XLR
J7
-$7'
7"
-9 - _:\::
'Y
1--
XL R Adaptor Kit
Kit adaptateur XLR
XLR~@c~~~
::Z-5'-f-::i:J'-1i-::1startup
Guide/
5-006-087-01(1)
Guide de demarrage/Gufa de inicio/
Einfuhrungsanleitung/Beknopte
gids/
Startguide/Guida di
avvio/Guia
de infcio/
J\flrni¥i17'.r~H'li¥i
• Multi
n
1
Interface Shoe
XLR-K3M
©
2019 Sony Corporation
Printed in Japan
https://www.sony.net/
11111111111111111111111111111
5006087010
~+.·
7
8
~
10
11
12
13 14
15
2
20
li,Htmtl
About the manual for this product
This
guide describes
the necessary
preparations
to
start
using
the
product, basic operations, etc.
For
details,
refer to the
"Help
Guide" (web
manual).
"Help Guide" (Web manual)
http:/
/rd1 .sony. net/help/ilc/1920/h_zz/
Notes on use
• This unit is
a kit
that includes
an XLR
Adaptor for cameras with
the Multi Interface
shoe
in
addition
to
a
microphone.
For
camera
models
compatible with
this
unit,
visit
the
website at:
https:
/ /www.sony.net/d
ics/k3m/
• Using this unit
with products
from
other
manufacturers may
affect
its
performance,
leading to
accidents or
malfunction.
• Using the
supplied
Extension
Cable for Audio with products
other
than
XLR-K3M
may
affect
its
performance,
leading to
accidents or malfunction.
• This unit is not
dust-proof, splash-proof, or waterproof.
• To
avoid
the
risk of a
fire
or an electric shock, observe
the
following:
-
Do not disassemble
or alter
this unit.
-
Do not use this unit
with wet
hands.
-
Do not
allow
ingress
of water or foreign
matters
(metal,
flammable
substances, etc.)
to this unit.
-
Do not use this unit in
a
place
subject
to
water splashes,
high
humidity,
dust, oil
fumes,
and steam.
• To
avoid
the risk
of damage or a
malfunction,
observe
the
following:
-
This unit is
precision equipment.
Do not
drop or
hit the
unit,
nor do
you allow a strong physical
impact
exerted on
it.
-
Do not touch the
connector of
the Multi Interface
foot, as
well as
the
port and
jacks
on
this
unit,
with
bare hands.
-
Do not use
or store
this unit in
a place subject
to high
temperatures
and
humidity.
- When
using this unit
outdoors,
keep the unit from
exposure
to rain
or seawater.
• For interior inspection
and
repair
of
this
unit,
contact your Sony
dealer
or
local
authorized Sony service
facility.
For Customers in the U.S.A.
For
question regarding your product or
for the
Sony Service
Center
nearest
you, call
1-800-222-SONY
(7669).
Supplier's
Declaration
of Conformity
Trade Name:
SONY
Model
: XLR-A3M
Responsible Party:
Sony
Electronics Inc.
Address: 16535
Via
Esprillo,
San
Diego,
CA 92127
U.S.A.
Telephone Number:
858-942-2230
This
device complies with
part 15
of
the FCC rules.
Operation
is
subject
to the
following
two
conditions: (1)
This device may not
cause
harmful
interference,
and (2)
this
device
must
accept any
interference received, including interference that may
cause
undesired
operation.
The
supplied
interface
cable
must be used
with
the
equipment
in
order
to
comply with
the limits for
a digital
device
pursuant
to
Subpart
8
of
Part 15
of
FCC Rules.
Fl
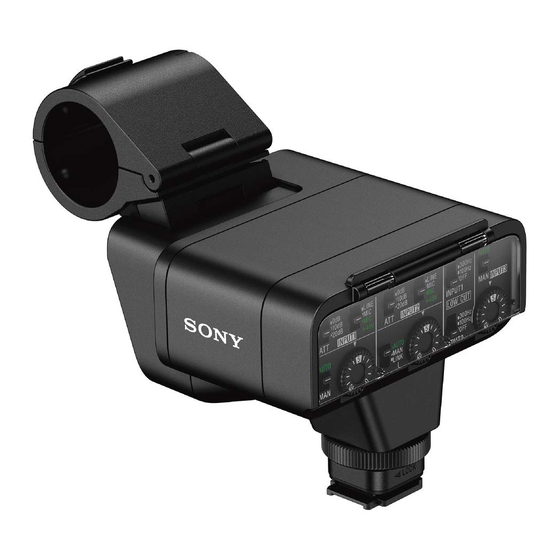
Identifying the parts
Wind screen
2 Microphone 3
Microphone
holder
4
ATT (INPUT1) switch
5 INPUT1
(LINE/MIC/MIC+48V) switch
6
ATT (INPUT2) switch
7 INPUT2
(LINE/MIC/MIC+48V) switch
8
LOW
CUT (INPUT1) switch 9 AUTO/MAN (INPUT3) switch
10
AUTO/MAN (INPUT1) switch
11
AUDIO
LEVEL
(INPUT1) dial
12
AUTO/MAN/LINK (INPUT2) switch
13
AUDIO
LEVEL
(INPUT2) dial
14 LOW
CUT (INPUT2) switch
15
AUDIO
LEVEL
(INPUT3) dial
16 Lock dial
17
Multi
Interface foot 18
Connector protect cap
19 DIGITAL/ANALOG
switch (If your camera
is
compatible with
the digital
audio
interface
of
the Multi Interface
shoe, set
the
switch
to
"DIGITAL.")
20 INPUT
SELECT switch
21 Release lever 22 Micro USS
port
23
Cable
holder 24 INPUT3 jack 25 INPUT2 jack 26 INPUT1 jack
Notes
• Before
connecting/disconnecting an external
microphone
or
device to/from
the INPUT1
or
INPUT2 jack,
be sure
to
set
the
INPUT1
(LINE/MIC/MIC+48V) or
INPUT2
(LINE/MIC/MIC+48V)
switch
to the
position other
than
"MIC+48V." While
the
switch
is
set
to
"MIC+48V," plugging/unplugging
the
cable
from the
external
microphone
or
device may
cause a
loud noise
or a
malfunction
of
the
device.
• To
protect
the
connector of
the
Multi
Interface foot from
damage while carrying around
this unit, remove the unit from
the
camera, attach
the
connector
protect
cap
to
the foot and
put
the unit in the
supplied case.
•
While
this unit is
attached
to
a camera along with other
accessories via a
mounting
bracket (not supplied), such as
Sony VCT-SSLH, do
not hold the
camera with
hands
for camera
shooting.
To
avoid
the risk
of an
incident
caused by dropping,
attach
the
camera
to
a
tripod.
•
While
recording is in progress,
operation and
handling noises
of a camera or a
lens
may be recorded.
Touching this unit
while
recording is in
progress causes a
noise to
be
including in the
recording
.
•
While
recording is in
progress,
do not
change
the INPUT1,
INPUT2,
and
DIGITAL/ANALOG
switch settings.
• If the microphone
of
this unit is in proximity to
a speaker, a
howling
effect (acoustic
feedback) may
occur.
In
such a case,
move the unit
away
from the
speaker
to
allow
the maximum
distance
between
the microphone
and
the
speakers; or
lower
the
speaker volume.
• Before
changing
the lens, make
sure
that no
wind screen
fibers
are
present
on
the
surface of
the lens
and
the
camera body.
If
present, clean
them
off with a blower etc. and
then
change
the lens.
• If
dust or water droplets are present on
the
surface of
the
microphone,
a successful
recording may not
be possible.
Be
sure
to
clean
the microphone
surface before
using this unit.
• Before
changing
the lens,
be sure
to
remove
this unit from the
camera.
•
When you are
finished
with
using this unit, lens
cleaning
is
recommended.
Specifications
Dimensions
(Approx.):
XLR Adaptor (XLR-A3M) unit
113.2 mm
x
106.1
mm x
79 mm
(Width/Height/Depth)
(41/2
in.
x
41/4 in.
x
31/8
in.)
(excluding the cord and projecting parts)
Microphone (ECM-XM1)
21
mm
x
162 mm
(Diameter/Length)
(27/32
in.
x 61/2
in.)
(excluding
the
wind screen and cord)
Mass
(Approx.):
XLR Adaptor (XLR-A3M) unit 187
g (6.6 oz)
Microphone (ECM-XM1) 121.5
g (4 oz)
Supplied
items:
XLR Adaptor (XLR-A3M) (1),
Microphone
(ECM-XM1) (1),
Wind screen
(7), Connector
protect
cap (attached) (2),
Extension
Cable for Audio (1), Case (1), Set of
printed
documentation
Design
and specifications are subject
to
change without
notice.
Multi Interface
Shoe
is
a
trademark
of Sony Corporation.
Advertisement

Related Manuals for Sony XLR-A3M


Summary of Contents for Sony XLR-A3M
- Page 3 Help Guide XLR Adaptor Kit XLR-K3M Use this Help Guide when you have issues or questions on how to use your XLR adaptor kit. Supported camera models Identifying the parts Preparations Unpacking Attaching/removing the XLR adaptor to/from the camera Attaching/removing the supplied microphone Recording Selecting the digital or analog input type Using the supplied microphone...
- Page 4 Selecting the audio input for recording audio to the channels on the camera About this unit Notes on use Specifications Trademarks 5-008-246-11(1) Copyright 2019 Sony Corporation...
- Page 5 Supported camera models This unit is a kit that includes an XLR adaptor for cameras with the Multi Interface Shoe in addition to a microphone. For camera models compatible with this unit, visit the website at: https://www.sony.net/dics/k3m/ 5-008-246-11(1) Copyright 2019 Sony Corporation...
- Page 6 Help Guide XLR Adaptor Kit XLR-K3M Identifying the parts Body parts Wind screen Microphone holder Microphone Lock dial Multi Interface foot Note Do not touch the connector of the Multi Interface foot with bare hands. Connector protect cap Switches and dials...
- Page 7 ATT (INPUT1) switch Select the standard input level of the INPUT1 jack. This switch setting is active when the INPUT1 (LINE/MIC/MIC+48V) switch is set to “MIC” or “MIC+48V.” INPUT1 (LINE/MIC/MIC+48V) switch Select the option suitable for the device connected to the INPUT1 jack. ATT (INPUT2) switch Select the standard input level of the INPUT2 jack.
- Page 8 Using the supplied microphone Using a device, such as an external audio device Minimizing noise with the LOW CUT function Adjusting the recording volume level Selecting the audio input for recording audio to the channels on the camera 5-008-246-11(1) Copyright 2019 Sony Corporation...
- Page 9 XLR Adaptor Kit XLR-K3M Unpacking If you find anything missing, please contact your dealer. The number in the parentheses indicates the quantity. XLR Adaptor (XLR-A3M) (1) Microphone (ECM-XM1) (1) Wind screen (1) Connector protect cap (attached) (2) Extension Cable for Audio (1)
- Page 10 Help Guide XLR Adaptor Kit XLR-K3M Attaching/removing the XLR adaptor to/from the camera Attach the XLR adaptor to a camera. Note Before attaching/removing the adaptor to/from a camera, turn off the power to the camera. Remove the connector protect cap from the XLR adaptor. Slide the Multi Interface foot of the XLR adaptor into the shoe on the camera ( ), and then rotate the lock dial in the “LOCK”...
- Page 11 Slide the Multi Interface foot of the Extension Cable for Audio in to the shoe on the camera ( ), and then rotate the lock dial in the “LOCK” direction ( ) to firmly secure the cable. 5-008-246-11(1) Copyright 2019 Sony Corporation...
- Page 12 Help Guide XLR Adaptor Kit XLR-K3M Attaching/removing the supplied microphone Attach the supplied microphone (ECM-XM1) to the XLR adaptor. Note Before attaching/removing the microphone to the adaptor, be sure to set the INPUT1 (LINE/MIC/MIC+48V) switch to the position other than “MIC+48V.” While the switch is set to “MIC+48V,” plugging/unplugging the cable from the microphone may cause a loud noise or a malfunction of the microphone.
- Page 13 Set the INPUT1 (LINE/MIC/MIC+48V) switch to the position other than “MIC+48V.” Press and hold the release lever, grasp the plug of the cable from the microphone, and the pull out the cable. Remove the microphone from the microphone holder. Related Topic Using the supplied microphone 5-008-246-11(1) Copyright 2019 Sony Corporation...
- Page 15 If your camera is compatible with the audio interface of the Multi Interface Shoe, set the switch to “DIGITAL.” This allows the unit and the attached camera to communicate with each other with digital signals and provide audio recording with minimum noise insertion. Related Topic Supported camera models 5-008-246-11(1) Copyright 2019 Sony Corporation...
- Page 16 Help Guide XLR Adaptor Kit XLR-K3M Using the supplied microphone Use the supplied microphone that you attached to the XLR adaptor following the instructions in “Attaching/removing the supplied microphone” for recording. You can record super-directional monaural sound. Make sure that the INPUT1 (LINE/MIC/MIC+48V) switch is set to “MIC+48V.” Set the ATT (INPUT1) switch to “10dB.”...
- Page 17 Adjustment of the recording volume level on the attached camera does not work. Related Topic Selecting the digital or analog input type Minimizing noise with the LOW CUT function Selecting the audio input for recording audio to the channels on the camera 5-008-246-11(1) Copyright 2019 Sony Corporation...
- Page 18 Help Guide XLR Adaptor Kit XLR-K3M Using a device, such as an external audio device Use a microphone other than the supplied one or an external audio device, such as an audio mixer, for recording. Note Before connecting/disconnecting a device to/from the INPUT1 or INPUT2 jack, be sure to set the INPUT1 (LINE/MIC/MIC+48V) or INPUT2 (LINE/MIC/MIC+48V) switch to the position other than “MIC+48V.”...
- Page 19 If the noise from the jacks with no device connected is disturbing, set the INPUT1 (LINE/MIC/MIC+48V) or INPUT2 (LINE/MIC/MIC+48V) switch to “LINE.” Related Topic Selecting the digital or analog input type Minimizing noise with the LOW CUT function 5-008-246-11(1) Copyright 2019 Sony Corporation...
- Page 20 Change the LOW CUT (INPUT1) or LOW CUT (INPUT2) switch setting. Select either “300Hz” or “100Hz” depending on the noise to minimize. Related Topic Using the supplied microphone Using a device, such as an external audio device 5-008-246-11(1) Copyright 2019 Sony Corporation...
- Page 21 Help Guide XLR Adaptor Kit XLR-K3M Adjusting the recording volume level Adjust the recording volume level of the input audio from the INPUT1, INPUT2, or INPUT3 jack. Note While the unit is attached to a camera, adjustment of the recording volume level on the camera does not work. Set the AUTO/MAN(/LINK) switch for the audio input jack (INPUT1/INPUT2/INPUT3) to “MAN.”...
- Page 22 Using the supplied microphone Using a device, such as an external audio device 5-008-246-11(1) Copyright 2019 Sony Corporation...
-
Page 23: Input Select
Help Guide XLR Adaptor Kit XLR-K3M Selecting the audio input for recording audio to the channels on the camera With the INPUT SELECT switch, select the audio input jack on the unit (INPUT1, INPUT2, or INPUT3) through which audio is recorded to the channels on the attached camera. Note While the unit is attached to a camera, you cannot record the input audio from the built-in microphone or the microphone jack on the camera. - Page 24 Using the supplied microphone Using a device, such as an external audio device 5-008-246-11(1) Copyright 2019 Sony Corporation...
- Page 25 While this unit is attached to a camera along with other accessories via a mounting bracket (not supplied), such as Sony VCT-55LH, do not hold the camera with hands for camera shooting. To avoid the risk of an incident caused by dropping, attach the camera to a tripod.
-
Page 26: Specifications
Help Guide XLR Adaptor Kit XLR-K3M Specifications XLR Adaptor (XLR-A3M) unit INPUT1/INPUT2 jack (3-pin XLR/TRS, female type, phantom-power compatible) Standard input level: -50 dBu (ATT = 10) Standard recording volume level: -20 dBFS LINE Standard input level: +4 dBu Audio input jacks... - Page 27 Mass (Approx.) Operation 0 °C to 40 °C (32 °F to 104 °F) temperatures Storage temperatures -20 °C to +55 °C (-4 °F to +131 °F) Design and specifications are subject to change without notice. 5-008-246-11(1) Copyright 2019 Sony Corporation...
- Page 28 Help Guide XLR Adaptor Kit XLR-K3M Trademarks Multi Interface Shoe is a trademark of Sony Corporation. 5-008-246-11(1) Copyright 2019 Sony Corporation...
Need help?
Do you have a question about the XLR-A3M and is the answer not in the manual?
Questions and answers