Universal Devices ISY-994i Series User Manual
Hide thumbs
Also See for ISY-994i Series:
- User manual (90 pages) ,
- User manual (692 pages) ,
- Quick setup manual (3 pages)

Subscribe to Our Youtube Channel
Related Manuals for Universal Devices ISY-994i Series


Summary of Contents for Universal Devices ISY-994i Series
- Page 1 ISY-994i Series User Guide October 29, 2015 V4.3.26 (Supporting Firmware Release 4.2.18 and above)
-
Page 2: Table Of Contents
Table of Contents 1 Introduction..........................1 1.2 What's Included ........................2 1.3 Requirements & Recommendations .................... 2 1.4 The ISY Front Panel ........................3 1.5 The ISY Rear Panel ........................4 2 Installation ..........................5 2.1 Hardware Installation ....................... 5 2.2 Connecting to the ISY from a Local PC .................. - Page 3 3.7 Notifications ......................... 49 Adding Recipients & Changing Server Settings ..............49 3.7.1 Custom Notifications ....................50 3.7.2 3.8 Interfacing with the ELK ......................51 3.9 Optional Modules ........................54 Network Module ......................54 3.9.1 Climate Module ......................56 3.9.2 Electricity Module .......................
- Page 4 Appendix J: Event Viewer Log Details ..................... 99 Table of Figures Figure 1: ISY Front Panel ......................... 3 Figure 2: ISY-994i Series Rear Panel ......................4 Figure 3: Login Window .......................... 7 Figure 4: Help/About Menu ........................7 Figure 5: My URL........................... 7 Figure 6: ISY’s Home Tab ........................
- Page 5 Figure 39: Temporarily Disable a Program....................34 Figure 40: Disabled Programs ........................ 34 Figure 41: Unsaved Programs with Changes ..................... 35 Figure 42: Schedule Screen – Time Range ....................35 Figure 43: Schedule Screen – Time & Day ....................36 Figure 44: Status Condition –...
-
Page 6: Introduction
1 Introduction Thank you for purchasing a Universal Devices, Inc. ISY Series device. The ISY provides central control of home automation devices in a residence and is designed to play the role of home automation device controller in any domestic UPnP network. -
Page 7: What's Included
1.2 What's Included Depending on the package you purchased, you received at least the following: ISY-994i Series device Two (2) Standard Category 5e Ethernet patch cables Quick Start guide 1.3 Requirements & Recommendations... -
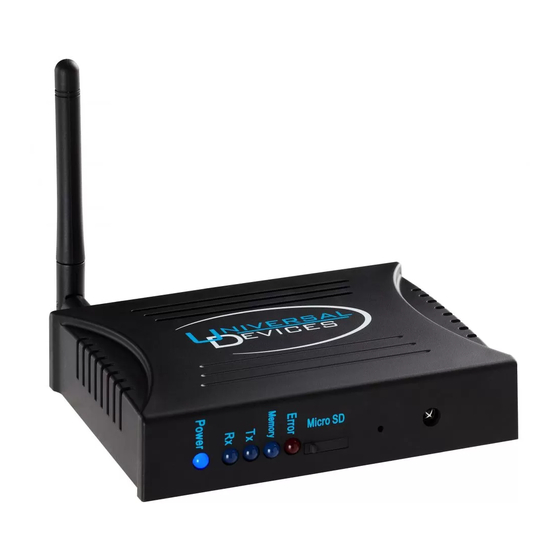
Page 8: The Isy Front Panel
included), you must have a micro USB cable and available USB port on your computer to configure the ISY's network parameters. 1.4 The ISY Front Panel The ISY’s front panel has several elements with which you should become familiar: Figure 1: ISY Front Panel ... -
Page 9: The Isy Rear Panel
1.5 The ISY Rear Panel The rear panel of the ISY features the following: Figure 2: ISY-994i Series Rear Panel The Power port is used to provide power to the ISY with an AC adapter. This may not be necessary if using a 2412S PLM, but is required when using a 2413S PLM. Please use an AC adapter that provides 5V DC, a minimum of 300mA, and is center terminal positive. -
Page 10: Installation
2 Installation Installation of the ISY is completed in several easy steps. The following instructions assume that you are installing the ISY on a DHCP-enabled network (true in the vast majority of cases) and are using a Windows-based PC to connect to the ISY. If you do not have a router or other DHCP-enabled network to plug the ISY into and plan on using a direct connection to a PC, or if you are using an OS other than Windows, please see our online Wiki for more advanced installation instructions:... - Page 11 Java: Please ensure that the latest edition of Java is installed on your computer. The latest Java downloads may be found at: http://www.java.com/getjava As shipped from the factory, the ISY is configured to obtain an IP address via DHCP. There are a few easy ways to connect to your ISY and find its local URL: Option1: In most cases, the quickest and easiest way to connect to the ISY for the first time on a Windows PC is to open a web browser and type in the following URL:...
- Page 12 Figure 3: Login Window Please refer to 3.1.1 Setting the User ID and Password to change these values. To find your ISY’s login URL, click the HELP -> ABOUT pull down menu: Figure 4: Help/About Menu Then look for the address listed after “My URL.” Figure 5: My URL Type this into your web browser to quickly connect to your ISY in the future.
-
Page 13: The Html Interface
When using DHCP, in some cases your ISY may receive a new IP address from your router (or other DHCP server). If this happens, you may not be able to use the old address to connect to your ISY. To find your ISY’s new address, simply double-click your My Lighting icon or visit the following URL to automatically find the ISY (and its new address) on your network: http://isy.universal...com/994i/4.2.30... - Page 14 Figure 6: ISY’s Home Tab You won’t be able to do much until you start configuring your ISY, but here is a summary of what you can do with the HTML Interface: Home Tab: My Devices & Scenes – This is where you will find a list of all INSTEON devices and scenes you have on your ISY.
- Page 15 My Programs – By clicking this item you can view the status of any Programs you have stored on your ISY and also control them. You will learn more about Programs in the section entitled 3.3 The Programs/Details Tab. Networking Resources (only available if the optional Network Resources Module has been installed on your ISY) –...
-
Page 16: Launching The Administrative Console
Clear Cache – This button clears the disk and memory cache of the HTML interface allowing you to see the latest changes to your node list. Install Admin Console – This button installs a local copy of the Admin Console applet to your system, creating a desktop icon so you can launch the Admin Console quickly and easily. -
Page 17: Basic Configuration
the user interface too detailed to include in this section – please refer to Appendix F: User Enhancement Details for a description of these enhancements. The ISY’s Administrative Console automatically checks for the latest firmware release. When a new release is detected, the ISY provides a notification message and instructions on how to perform the update. -
Page 18: Setting The Time And Location
Both the User ID and Password must be entered Both the User ID and Password are case sensitive Both the User ID and Password must be between 3 and 10 characters The following characters are NOT allowed: < > / ; & 3.1.2 Setting the Time and Location Click the ISY’s Configuration tab, then the System sub-tab, to set your time (used for Program schedules) and location (used to calculate sunrise/sunset times). - Page 19 choose your scheme. Please note that the Administrative Console must be closed and re- opened for your Theme change to take effect. Figure 9: Change Theme Menu Desert Grey High Contrast Default - 14 -...
-
Page 20: The Main Tab
Figure 10: Theme Samples 3.2 The Main Tab The Main tab is where you can add, configure, and manage your INSTEON devices. Figure 11: The Main Tab The left-hand pane displays a hierarchy of folders, devices, and scenes contained within your ISY.
Need help?
Do you have a question about the ISY-994i Series and is the answer not in the manual?
Questions and answers