Table of Contents
Advertisement
Quick Links
Advertisement
Table of Contents

Subscribe to Our Youtube Channel
Related Manuals for InfiRay AFFO Series


Summary of Contents for InfiRay AFFO Series
- Page 1 AFFO Series Operating Manual V1.0 InfiRay Technologies Co., Ltd.
-
Page 2: Specifications
Specifications Model AP13 Detector Specifications Type Uncooled Vox Resolution 256× 192 Pixel size, μm ≤ 40 NETD, mk Frame Rate, Hz Optical Specifications Objective Lens, mm 13.5° × 10.1° Optical Magnification, × 1.2-2.4 Digital Zoom, × 1× , 2× Diopter -3~+1 Detection Range, m (Target size: 1.7m×... -
Page 3: Package Contents
⚫ User manual II. Description: The AFFO series infrared thermal imager is for outdoor use. It can be used in the day or night, or in harsh weather (such as rain, snow, fog, and haze) without being affected by strong light. It requires no external light source. -
Page 4: Button Operations
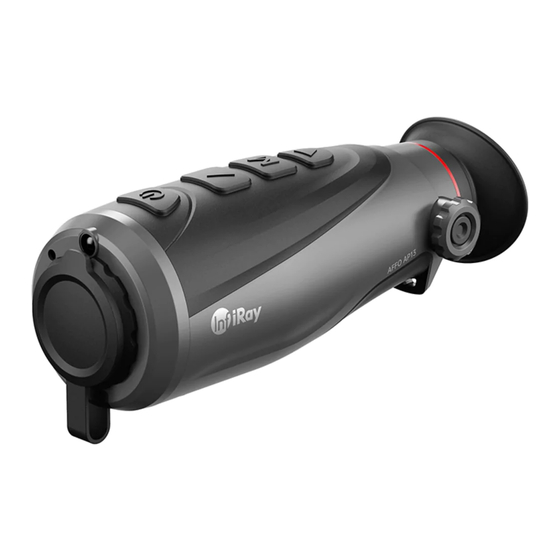
IV. Units and Controls 1. Lens cover, 2. Front cover, 3. Power button, 4. Up button, 5. M button (menu button), 6. Down button, 7. Bottom casing, 8. Eye cup, 9. Focusing knob, 10. Type-C interface rubber cap V. Button Operations The following table lists buttons from top to bottom: Device Status/ Button... - Page 5 pointer —— Menu screen Scroll up the menu Press and hold this button to turn on the LED —— Powered off indicator; Release the button to turn off the LED indicator Home screen Enable digital zoom Enter the menu Switch on and off/Enter the Confirm the option/Save Menu button (M next-level options/Select a...
-
Page 6: Powering Off
IX. Turning On/Off the LED Indicator The AFFO series is equipped with the LED indicator. You can quickly turn on the LED indicator. When the device is powered off, press the ↑ button to turn on the LED indicator, and release the ↑... -
Page 7: Digital Zoom
On the home screen, press and hold the ↑ button to turn on the laser pointer. After the laser pointer is turned on, a laser pointer icon is displayed. Press and hold the ↑ button again to disable the laser locating function. XIII. -
Page 8: Hotspot Tracking
On the home screen, press and hold the ↑button + M button simultaneously to enter the stadiametric rangefinding mode; Target box-selecting range adjustment: Press the ↑/↓ button to enlarge/shrink the range of the cursor for 2px. The upper and lower cursors each move for 1px. Press and hold the ↑/↓button to enlarge/shrink the range of the cursor for 10px. -
Page 9: Video Output
displayed in the central area of the screen. (cover lens during calibration) XVIII. Video Output On the main menu, turn on the video output function. The video output icon is displayed on the always-visible status bar on the top. Use a Micro HDMI video output data cable so that the video can be played on an external display. - Page 10 Use the ↑ button and ↓ button to switch up and down among functions. Functions 1 to 4 are options where you can press the M button to turn on/off the corresponding function and save the settings instantly; For functions 5 to 6, you can press the M button to cyclically select a specific option under the function and press and hold the M button to save and confirm the settings.
-
Page 11: Laser Calibration
indicate negativity. XX. Laser Calibration Laser cross calibration: Point the cursor to the laser calibration function on the second page of the menu, and press the M button to enter the laser calibration page: the X axis and Y axis are displayed, the center cursor returns to the central area of the screen, and the default cursor returns to that of factory settings. - Page 12 (The Default position is configured upon delivery, and the arrow points to the Default position. Press and hold the ↑ button + ↓ button for activation to adjust the Default position: Adjust the position in the X axis and Y axis. After determining the small cross position, press the M button to save the settings.) XXI.
-
Page 13: Date Setup
position requiring defective pixel calibration, and press the button to add a defective pixel. In the PIP image, Add is displayed (this function is unavailable in the AP13); In the same position, press the button again to delete the defective pixel. In the PIP image, Del is displayed. Hover the point near the PIP image. -
Page 14: Time Setup
XXIII. Time Setup Point the cursor to the time setup function on the second page of the menu. The 24-hour system is used, and the time is displayed in the format of hour/minute. Press the M button to configure the time, use the ↑button and↓ button to configure the correct hour/minute, press the M button to switch between hour/minute, and press and hold the M button to save and exit from the time configuration. -
Page 15: Factory Reset
XXV. Factory Reset Point the cursor to the factory reset function on the second page of the menu, and press the M button to enter the configuration page. Use the ↑ button and ↓ button to select between yes and no, and press the M button for confirmation. - Page 16 a battery icon will show the low-battery status on the display.) Note: The battery should be fully charged before first use. XXVIII. Precautions 1. The rated voltage of the product is 5V. Please charge the device promptly when the battery is low so that the service life of the thermal imager will not reduce due to battery over-discharge;...
Need help?
Do you have a question about the AFFO Series and is the answer not in the manual?
Questions and answers