
Related Manuals for InfiRay MH25


Summary of Contents for InfiRay MH25
- Page 1 InfiRay USA www.InfiRayUSA.com 800.769.7125 InfiRay USA MH25 Multifunction Thermal Imager User’s Manual Date 20200521 Version V2.1 All rights reserved and shall not be copied and distributed in any form without written permission.
-
Page 2: Table Of Contents
InfiRay USA www.InfiRayUSA.com 800.769.7125 CONTENTS 1. Overview ........................1 2. Tech Specs ........................2-3 3. System Functions …..................... 4 4. Product Components …....................5 5. Operation Functions …....................6 5.1 Switching on/off ....................7 5.2 Electronic Magnification ..................7 5.3 Context Menu ....................... 8 5.4 Advanced Menu .................... -
Page 3: Overview
16650 and 16340 batteries and can be powered externally through the USB-C port with a 5V battery pack. The MH25 is operated by an intuitive menu system and user-friendly rotary encoder button. This one button operation has positive clicks with each selection and allows for quick and easy operation in dark environments. -
Page 4: Tech Specs
2. Tech Specs Table 1. Technical Specifications Model MH25 Detector Parameter Resolution 640×512 Pixel Size 12μm Spectral Response 8~14μm NETD ≤60mK@25℃,f/1.2 MRTD ≤600mK@25℃,f/1.2 Frame Rate 50Hz Optical Parameter Objective Lens 25mm Focus Mode Manual Field of View 17.5°×14° Detection Range... - Page 5 Laser Pointer None Rangefinder Stadiametric Palette White/Black/Red/Pseudo Remote Control Bluetooth Battery 16340/16650/ NOTE: The MH25 will not function properly using a CR123A 16340——up to 1.5 hours Max. Battery Life 16650——up to 3 hours Operating Temperature -10℃~+50℃ Power Consumption <2000mW IP Rating...
-
Page 6: System Functions
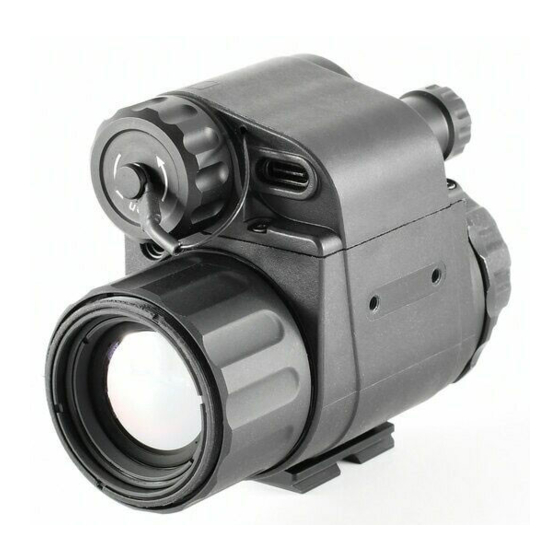
3. System Functions ● Shuttered Calibration and Manual Calibration ● White Hot, Black Hot, Red Hot, Pseudo Color ● 8X digital magnification ● Image brightness adjustment, sharpness adjustment, contrast adjustment ● Motion sensor adjusts the forward image ● Electronic compass ●... - Page 7 4. Product Diagram The main components of the MH25 are shown in figure 4-1. Figure 4-1. MH25 Diagram All rights reserved and shall not be copied and distributed in any form without written permission.
-
Page 8: Operation Functions
5. Operation Functions The Quick Command Menu, Advanced Menu and other functions can be accessed via the rotary encoder. All menus can be closed by pressing the encoder for 3 seconds. 5.1 Powering On/Off To power on – hold the encoder button down for 3 seconds. To power off –... - Page 9 Figure 5-1. Normal display interface All rights reserved and shall not be copied and distributed in any form without written permission.
- Page 10 NOTE: The InfiRay USA MH25 does not have a laser. Only certain models feature a laser, and the MH25 does not. The laser icon may be present, but there is no laser. Rotating the encoder will toggle functions and a short press will activate the function.
-
Page 11: Advanced Menu
To activate the advanced menu press and hold the encoder for 3 seconds. Make sure the lens is not pointing down, as a 3 second press pointing down will power the MH25 off. The advanced menu displays 5 submenus including Device, Function, Reticle, Calibration and Setting. - Page 12 Figure 5-3. Advanced menu Menu Operation: Once the advanced menu is displayed, short press the encoder to toggle through the 5 menu selections. Rotate the encoder to toggle through the selections in each submenu. Short press the encoder to select a particular setting or function in the submenu and rotate the encoder to make changes to that setting or function.
- Page 13 All rights reserved and shall not be copied and distributed in any form without written permission.
- Page 14 All rights reserved and shall not be copied and distributed in any form without written permission.
- Page 15 Table 5-1. Details of Xmini advanced menu Function Option items Function Operation Status items Enables/Disables Bluetooth remote control. **Bluetooth Device Bluetooth ON/OFF Icon turns blue video and data transfer are not supported** All rights reserved and shall not be copied and distributed in any form without written permission.
- Page 16 6th Floor of Block A, Changbai Technology Park, No.8 Zhenzhu RD, Xinzhan General Pilot Zone China, Anhui, Hefei,230012 0551- 62829826 The upper left Displays and updates icon turns blue, directional heading Compass ON/OFF and the azimuth automatically according to bar appears the geomagnetic direction.
- Page 17 InfiRay USA www.InfiRayUSA.com 800.769.7125 Type Reticle Color Pattern Laser The reticle is Reticle disabled on the MH25. Calibration After entering the compass Compass calibration menu item, wave the monocular in a figure 8 calibration Compass Compass calibration motion as indicated by the interface is picture in the display.
- Page 18 InfiRay USA www.InfiRayUSA.com 800.769.7125 After selecting this option, short press the encoder. Restores monocular After pressing the encoder, Factory to original factory Dialog prompts Reset a dialog box will appear. settings Select "Yes" to execute or Setting "No" to cancel.
-
Page 19: Preventative Maintenance
InfiRay USA www.InfiRayUSA.com 800.769.7125 Figure 5-4. Rangefinder interface Figure 5-5. Laser calibration interface Figure 5-6. Reticle calibration interface Figure 5-7. Compass calibration interface 6. Preventative Maintenance 6.1 Battery Replacement ▶ Power off unit before replacing the batteries; ▶ The battery power icon is displayed on the upper right side of the display. There are four levels of power. -
Page 20: Product Cleaning And Maintenance
Avoid using excessive force as this may result in scratching the lenses. 7. General Troubleshooting Please contact InfiRay USA or an authorized vendor for assistance before attempting to perform any modifications or repairs beyond the scope of the troubleshooting procedures in this manual. -
Page 21: Safety Regulation
InfiRay USA www.InfiRayUSA.com 800.769.7125 Rotate diopter ring on Display menu and Diopter setting not adjusted eyepiece until the display icons are blurry properly becomes clear. Enable video out in Video output not enabled Function Menu No analog video output The data cable does not match.
Need help?
Do you have a question about the MH25 and is the answer not in the manual?
Questions and answers