Table of Contents
Advertisement
Quick Links
Advertisement
Table of Contents

Related Manuals for Insane Audio JK4001


Summary of Contents for Insane Audio JK4001
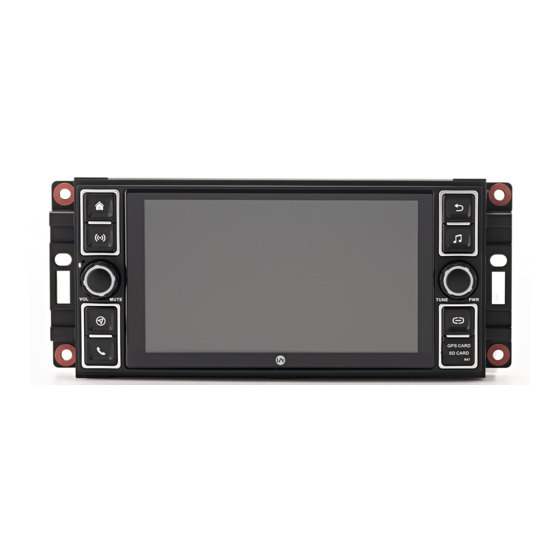
- Page 1 Caption JK4001 Installation Manual...
-
Page 2: Safety Precautions
Safety Precautions Warnings Before you use this product, be sure to carefully read this Do not unassemble or modify the product. Doing so Installation Manual and the separate User’s Guide to could lead to an accident, fire or electrical shock. ensure product is installed and used properly. - Page 3 Connect the product properly according to the instructions. Failing to do so could lead to fire or an Enjoy your new JK4001 and we’II see ya’ on the trail! accident. Do not sandwich cords between the seat railing or allow them to touch protrusions.
-
Page 4: Parts List
Parts List JK4001 Main Wiring Harness USB Wire Harness Audio RCA Wire Harness USB Wire Harness External Microphone USB Wire Harness RockCam Camera Harness OBDII Adapter GPS Antenna IA CarPlay/Android Auto Wire Harness WiFi and Bluetooth Antenna... - Page 5 Opening the Dashboard Note: Disconnect the negative battery terminal before beginning this installation. WARNING On the top of your dash, there is a rubber insert that can be pried open with a plastic dash tool or a small screwdriver. That will reveal a single 7mm bolt that needs to be removed.
- Page 6 Opening the Dashboard Remove the single 7mm bolt behind the switch panel. Pry off the dash panel just below the steering wheel. Start with the top corners. Once it is off, remove two 7mm bolts at the top corners.
- Page 7 Opening the Dashboard Opening The Dashboard Now you can pop the entire upper dash panel off. It’s held in place with pressure clips. Remove the upper dashboard.
- Page 8 The factory AM/FM antenna adapter is a white connector that can easily be removed by pressing the little lever down. This plugs right into the back of the JK4001. The yellow connector is a SiriusXM antenna that is no longer used.
- Page 9 uConnect Modules SPECIAL NOTE FOR VEHICLES THAT PREVIOUSLY HAD OEM uCONNECT MODULES CAUTION Certain uConnect modules will still remain active even after your OEM radio has been removed. This may result in the uConnect module placing an un-necessary drain on your vehicle’s battery even after your Jeep is powered off.
- Page 10 Installing the JK4001 NOTE: FOR VEHICLES THAT HAVE THE ALPINE PREMIUM SOUND F2 - F1 Connection (Labeled) SYSTEM R2 - R1 Connection (Labeled) CAUTION Before proceeding with the installation, vehicles with the OEM Alpine Premium Sound System will need to make a minor change on the main wiring harness.
- Page 11 JK4001 Wire Diagram (A) Connect the main power wire harness (B) Connect Audio RCA wire harness for aftermarket amps and speakers only, not needed for OEM sound system (C) Connect USB Fast Charge harness (D) Connect IA Carplay/Android Auto wire harness...
- Page 12 Installing the JK4001 USB Wiring Harnesses Route all USB wires to the glove box GPS Antenna The GPS antenna has a magnetic or an adhesive mount and is best placed on the top of the head unit as shown in the picture.
-
Page 13: External Microphone
Installing the JK4001 External Microphone The JK4001 comes with a built-in Bluetooth microphone, but we also include a high quality external microphone. This external microphone will work at just about any location, but we do have some recommendations for placement. Try to keep this microphone away from any windows, air vents, or speakers to avoid background sounds or feedback. - Page 14 Installing the JK4001 RockCam Power and GND wires Cameras Connect your camera(s) to the RockCam video RCA pigtail. We support up to 4 cameras. The pigtail offers two wires labeled “RockCam Power” and “RockCam GND” that automatically provide +12V whenever you reverse the vehicle or open the RockCam app.
- Page 15 Installing the JK4001 Cameras Check the camera installation by opening the RockCam app. Tips If you see a “No signal” warning, ensure that the front video feed is connected to “RockCam Video In” RCA port and the power wires are properly connected.
-
Page 16: Operational Tips
Insane NavEngine can be accessed both via the icon or by pressing the navigation button on the face of your JK4001. The GPS card is located behind the cover labeled “GPS/SD Card”. The GPS card needs to be inserted while using the Insane Navigation System. This will get you where you’re going both on and off the road. -
Page 17: Troubleshooting
Troubleshooting GENERAL BLUETOOTH Head unit not powering ON, no lights, no screen. Device is not pairing. Check and reseat your main wiring harness. Remove the black Make sure Bluetooth is turned ON: Apps > Settings > wiring harness plug from the rear of the head unit and confirm Bluetooth >... -
Page 18: Android Auto
Troubleshooting Resources Insane Audio offers free lifetime support. If you have any Android Auto questions and/or concerns regarding your head unit, feel free to reach out to us at support@insaneaudio.com. Android Auto will not launch/start. Ensure a certified Android cable is being used. Make sure...
Need help?
Do you have a question about the JK4001 and is the answer not in the manual?
Questions and answers