Table of Contents
Advertisement
Advertisement
Table of Contents

Subscribe to Our Youtube Channel
Related Manuals for Insane Audio 200 series


Summary of Contents for Insane Audio 200 series
-
Page 2: Table Of Contents
Introduction Safety Precautions Hardware and Buttons Applications and Widgets Touch Screen Display LED Backlighting Setting the Date and Time Adjusting Sound Safety Features Music Player Video Player Radio App iPod App Bluetooth Setup Using WiFi Insane NavEngine Downloading Apps Support Frequently Asked Questions Appendix A: Factory Data Reset Appendix B: Torque Setup... - Page 3 Audio head unit, please visit our support page. All Insane Audio Android-based head units are fairly simple to operate, but if you are new to the Android operating system or need some general assistance, then this guide is for you.
- Page 4 Keep your hands on the wheel, and keep your eyes on the road! Never attempt to open your Insane Audio head unit or repair it yourself. Doing so is not only dangerous, but it will void your warranty.
- Page 5 This section will focus on Insane Audio’s JK2001, but the same general principles apply for other Insane Audio Android-based head units. The following buttons are on the right side of your JK2001. Should you ever need to reset your unit, you can press this button with a pen or paper clip.
- Page 6 The following buttons are on the left side of your JK2001. internal microphone The HOME button will bring you back to the Home Screen from any app. The NAVI button opens the Insane NavEngine app or other custom app. Turning this knob will adjust the volume.
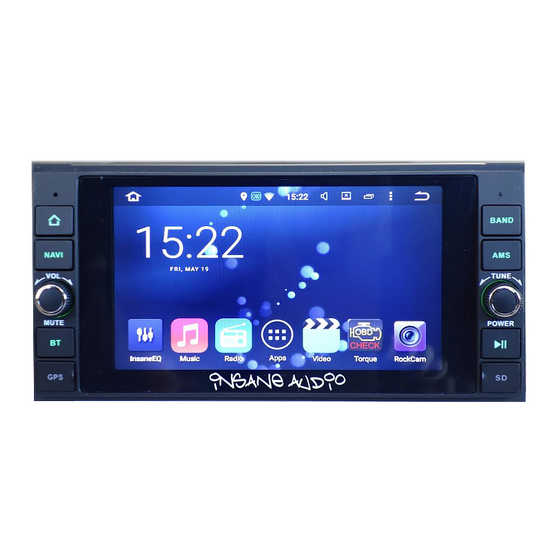
- Page 7 This is the main menu of your Insane Audio head unit. At the bottom of your screen you will see an icon with six squares grouped together. We call this the “six pack”. Clicking on the six pack will lead you to the app drawer where you can view all applications currently installed on the system.
- Page 8 2 million apps available on Google Play. Many of them are free, and almost all of them will work with your new Insane Audio head unit! To move an application from the App Drawer to your Home Screen, simply press and hold on the specific app and drag where you would like that app to be.
- Page 9 It’s important to understand the differences between icons on your Home Screen and applications in the App Drawer. Icons on your Home Screen are simply shortcuts to applications. So you can move or delete these however you’d like. To delete an icon from your Home Screen, simply hold it down then drag it to the trash.
- Page 10 Home Screen. Your Insane Audio head unit already contains a bunch of cool widgets that we put on there for you. To access them, press the six pack, then swipe the screen past all of the applications.
- Page 11 To move a widget to your Home Screen, simply repeat the drag and drop method for apps. And to delete one off your Home Screen, just drag and drop to the top red bar. Of course, you can always download additional widgets from the Google Play store.
- Page 12 All Insane Audio head units come with extremely high quality, high resolution, fully capacitive touch screen displays. That means that not only does it look great, but you can navigate the system and access data in a far more enriching experience then ever possible before.
- Page 13 You can adjust the brightness of your screen by swiping down twice from the top of the screen at the main menu and clicking on the brightness icon.
- Page 14 You can adjust your LED backlighting to be any color you’d like. To do this, first go to the Settings menu (accessible through the App Drawer), and then look for Element. In here, you can either choose from the preset solid color options, create your own color by using the sliders on the left, or select the rainbow option which will set the system to gradually fade through all colors in the rainbow.
- Page 15 There are two places where the time is set: the system Settings and the Clock Widget. The system Settings can be accessed by pressing the six pack. Then find the Settings icon.
- Page 16 From the Settings menu, select Date & Time. There are a lot of options here, but we recommend starting simple, and then playing around with advanced features as you get more comfortable. To that effect, turn off all three automatic time checkboxes, and then manually set your date, time and time zone.
- Page 17 The Clock widget is on the main menu and has its own time controls as well as some pretty cool features. For example, you can set a “home” time zone. Then, when you drive to a different time zone, it will automatically add another clock and show both your home time and your local time.
- Page 18 Disable “Automatic home clock”. Then go back one menu and tap on the red globe icon. This will bring up a list of world cities. Note that if you check any of these boxes, then the time for that city will appear on the clock widget.
- Page 19 InsaneEQ gives you full control over how things sound inside your vehicle. The easiest way to access this is to swipe down twice from the top of your screen, and select Amp. equalizer balance/fade...
-
Page 20: Safety Precautions
Your Insane Audio head unit is shipped to you from our factory with certain safety precautions enabled, however, this can be customized just like everything else on the system. IMPORTANT: Please use your Insane Audio head unit responsibly! Do not operate or attempt to watch video while driving. - Page 21 Select Settings, then scroll with your finger to the bottom of the menu and tap on “Driving settings”.
- Page 22 Watching video: When you are driving, your unit should disable any video so as to not distract the driver. Checking this setting will allow the unit to continue playing videos or DVDs while the car is in motion. Notifications: This setting will suppress notifications while the car is in motion.
- Page 23 There are many ways in which you can play music on your Insane Audio head unit. Perhaps one of the best ways is to play music that has been stored onto a microSD card or USB thumb drive. Insane Audio’s JK2001 has a microSD card slot on the bottom...
- Page 24 First, you’ll want to plug your media into a computer and load it up with music. Your Insane Audio head units supports different media types, but Insane Audio recommends that your media be formatted using the FAT32 format. If you need help with this, hit us up at support@insanejeepaudio.com...
-
Page 25: Music Player
Depending on your settings, your music player may or may not automatically open when you insert your media. You can also access the music player by clicking on the Music icon from the Home Screen. Tapping on the folder icon on the bottom right will allow you to change the source for your music. - Page 26 You can swipe open the right side of the music player to show available media. The app will display any album artwork available. You can display the visualizer or show album information by tapping on the icon at the upper right.
- Page 27 You can choose to repeat your playlist/folder and also randomize the song order by tapping on the upper right icon. While Insane Audio provide an awesome music player, keep in mind that you can find more from the Google Play store.
-
Page 28: Video Player
Similar to adding music to media being accessed by your Insane Audio head unit, you can also add movies to your storage media. Your Insane Audio head unit will play videos in most modern file formats. Once you have videos on your microSD card or a thumb drive, you can access them in the Video app on the Home Screen. -
Page 29: Radio App
If you are looking for some good old fashioned AM/FM radio, you can find the Radio app right on your Home Screen. Insane Audio’s JK2001 provides two buttons on the right panel that work exclusively with the Radio app. The BAND button switches between FM1, FM2, FM3, AM1 and AM2 bands. - Page 30 You can switch between AM and FM frequency bands by pressing the BAND button. Alternatively, you can tap on the AM/FM buttons at the lower right corner. To tune into a particular station, simply tap on the left and right arrows.
- Page 31 At the bottom half, you have two rows of presets. To set a preset, simply tune to a station you'd like to preset and then hold (long press) one of the bottom entries, and it will store that preset for you. After setting your presets, you can cycle through them by turning the right knob.
- Page 32 You can automatically search for radio stations by pressing the AMS button. Alternatively you can tap on the AMS icon at the lower left corner. AMS is a good feature when you’re driving into an unknown area. Simply press the button and it will scan through stations and set your presets automatically.
- Page 33 The other two bottom icons control stereo/mono channels and local/distant frequency handling. AF enables alternate frequencies. This allows the tuner to automatically shift to a different frequency broadcasting the same digital tag when the first signal becomes too weak. If you’re not explicitly looking to take advantage of this feature, then we recommend leaving it turned off to avoid confusion.
- Page 34 TA automatically scans for traffic announcements in your area. PTY is a self destruct button. DO NOT PRESS THIS BUTTON UNDER ANY CIRCUMSTANCE.
- Page 35 Simply push the button, and then your Insane Audio unit will give you a list of program types. Select what you'd like to listen to, and it'll try to find it.
-
Page 36: Ipod App
Insane Audio supports both classic iPods and newer style iPods (you’ll need an adapter) by using the included iPod cable. Most folks wire their iPod cable through the glove box. The iPod app is available in the App Drawer (by pressing the six pack), or it will automatically launch when an iPod is plugged in. - Page 37 The functionality of the iPod app is similar to that of the Music app. Swiping from the right side allows you to select songs. The bottom right icon will access additional options.
- Page 38 Here you can browse by playlist, by artist, or by album. It is worth noting that your Insane Audio head unit was specifically built to be able to support both old-style iPods and new-style iPods. We did this simply because we want our users to have more options and maximum compatibility.
- Page 39 Insane Audio head unit: • Always plug the adapter into your iPod first, and then into the Insane Audio cable after. Your iPod doesn't play nicely with your Insane Audio head unit, not the other way around.
- Page 40 Your Insane Audio head unit can connect to all kinds of different Bluetooth devices. For example, you can connect to your smartphone for both hands-free calling and media streaming. The first step is to launch the Bluetooth app by pressing the BT button.
- Page 41 Here you can change the name of your device as well as the default PIN. This is always a good idea. We will go with something like this.
- Page 42 Now let’s step through connecting a smartphone to your Insane Audio head unit. At this point, you’ll want to go to your phone and find the Bluetooth section under its settings. Please keep in mind that all phones are different and your settings will vary, but you...
- Page 43 Once you attempt to connect, you’ll likely be asked for a PIN. This is the one you just created earlier. Once you have successfully paired your device, you’ll note that more icons have come to life in the Bluetooth menu. Let’s go ahead and stream some audio from our smartphone.
- Page 44 Once you have successfully paired your device, you’ll note that more icons have come to life in the Bluetooth menu. Let’s go ahead and stream some audio from our smartphone. From the App Drawer, run the A2DP app. You can now wirelessly stream music from your smartphone. Press the HOME button to have the music play in the background.
- Page 45 You can place calls through the Bluetooth app by tapping on the dial pad icon at the left. You’ll want to call people through your contact list, but you’ll likely have to synchronize with your phone for the first time. Tap on the people icon at the left, and then tap on the button at the lower right corner.
- Page 46 Your Insane Audio head unit comes with a high quality, ruggedized WiFi antenna designed to pickup a nearby WiFi signal. Most users use their smartphone as a mobile hotspot (sometimes called WiFi tethering) to have Internet connectivity on the go! To setup WiFi, first press the six pack, and then enter the Settings app.
- Page 47 In the Settings app, select Wi-Fi. Turn WiFi on, and then you will see available networks. Simply tap on the preferred network and tap on Connect. Depending on the network settings, you may or may not be prompted for a password.
-
Page 48: Insane Navengine
Perhaps one of the best features of your Insane Audio head unit is Insane NavEngine. With road maps, off-road maps, turn-by-turn directions and full 3D topography, Insane NavEngine is designed to get you where you are going both on the road and on the trail. - Page 49 Alternatively, you can select the Insane NavEngine icon in the App Drawer. Insane NavEngine is fairly intuitive, but has enough features and functionality to warrant a separate instruction manual. Click here for the Insane NavEngine instruction manual or visit our website at www.insaneaudio.com...
- Page 50 Your new Insane Audio head unit is packed with all kinds of apps and features, but you aren’t limited to just that! Just like your smartphone or tablet, your Insane Audio head unit can go online and download additional apps. To do that, you’re going to want to access the Google Play store.
- Page 51 This is the Play Store main menu. In this example, we are going to click on the search button and look for Pandora Internet radio. We found it, so the next step is to install it. After clicking on the INSTALL button, the app will show up on both the Home Screen (as a shortcut) and in the App Drawer.
-
Page 52: Support
Should you need assistance above and beyond this guide, you can always hit us up at support@insanejeepaudio.com In addition, please be sure to check out our online user forum at . Our forum is entirely www.insaneaudio.com/forum free and is there as a resource for our customers. It’s a great place to share ideas with others in the community as well as get additional tips and tricks from our techs. - Page 53 Answer: You most likely have AF turned on in the radio app. AF is short for alternative frequency. Having this turned on means that if your Insane Audio unit senses a weak signal, it will automatically scan to try and find another station broadcasting the same digital tag.
- Page 54 Lastly, the adapter does draw a small current, so if you left it plugged in and parked for an extremely long time, it could theoretically drain your battery. Question: What kind of backup camera is recommended? Answer: Insane Audio currently makes two backup cameras for different applications. Find out more here: www.insaneaudio.com/IA_Products.html...
- Page 55 Bluetooth audio. Lastly, you can install an external Sirius XM receiver and connect it to your Insane Audio head unit via the aux audio inputs and access it through the AV In app. The last one is a great option for those who don’t want to use their phones...
- Page 56 Question: Does my Insane Audio head unit support steering wheel controls? Answer: You bet! Some of our units work right out of the box, while others require a little programming. Refer to the installation instructions for your particular Insane Audio head unit.
- Page 57 In certain rare occasions would you need to restore your Insane Audio head unit to its original configuration. Suppose you are transferring ownership of the unit, or suppose you feel that your Android system is bloated or even compromised by malware. Then you can perform a Factory Data Reset, completely removing all personal data and downloads within the unit.
- Page 58 Choose “Backup & reset” from the Settings menu. Then choose “Factory data reset” at the bottom. It can take several minutes for this process to complete.
- Page 59 After resetting the unit, you’ll want to re-install Insane NavEngine. From the App Drawer, open the ApkInstaller app. Tap the INSTALL button and under GPS card, navigate to . Open the GPS/Android/data/com.navngo.igo.javaclient package and proceed with the installation. iGO.apk...
- Page 60 Next associate the NAVI button with Insane NavEngine as follows. Open the Settings app from the App Drawer, and select “Navigation settings”. Under “Navigation applications options”, choose Insane NavEngine.
- Page 61 Next install the Torque app. From the App Drawer, open the ApkInstaller app. Tap on INSTALL and under OEM, proceed to install the Torque APK.
- Page 62 Your Insane Audio head unit comes with the Torque app pre- installed. While this isn’t something that we build or support directly at Insane Audio, it’s pretty darn cool, so we included it on your system. Note that Torque should already be setup and configured on your Insane Audio head unit but should you need to re-install it for any reason (i.e.
- Page 63 Step 2: Connect to your OBD Bluetooth Adapter. • First, press the BT button. • Tap on the search icon on the left column. • You’ll note that this menu shows all paired and available devices. A paired device is something that has already been connected.
- Page 64 • Once you’ve removed all the paired devices, you’ll want to ask your Insane Audio head unit to search for all available devices. Click on the search icon at the top right. The search takes a little bit but should find your OBD Bluetooth adapter.
- Page 65 Step 3: Configure Torque. Unless you moved it, tap on Torque icon located on your Home Screen. Tap on the gear icon at the lower left corner, and then choose Settings.
- Page 66 Scroll down and find “OBD2 Adapter Settings”. Then find “Choose Bluetooth Device”. If you followed our directions in Step 2, then there should only be one device listed. Select it. Torque is now set up!
Need help?
Do you have a question about the 200 series and is the answer not in the manual?
Questions and answers