DAVIS WeatherLink Console User Manual
Hide thumbs
Also See for WeatherLink Console:
- Software user's manual (116 pages) ,
- Getting started manual (32 pages) ,
- Addendum (21 pages)
Table of Contents
Advertisement
Advertisement
Table of Contents

Related Manuals for DAVIS WeatherLink Console


Summary of Contents for DAVIS WeatherLink Console
- Page 1 WeatherLink ® Console USER GUIDE...
-
Page 2: Table Of Contents
… 04 SIGN UP FOR WEATHERLINK.COM … 11 1. Account Information … 11 2. Console Configuration Chapter 2: Set Up Your WeatherLink Console … 04 … 11 3. Customize Display … 04 POWER UP AND CONNECT TO WI-FI AND WEATHERLINK.COM …... -
Page 3: Introduction
DAVIS WeatherLink Console User Guide Introduction WHAT’S IN THE BOX • WeatherLink Console • Wall mount bracket It’s here! • Tabletop kickstand Your next-gen WeatherLink Console • AC adapter and cable (no adapter with USB model) will revolutionize the way you access, analyze, and understand the hyper-local •... -
Page 4: Chapter 1: Get Ready
WeatherLink Console 1. SE T UP YOUR WE ATHER S TATION SENSOR SUITE If you have a purchased your WeatherLink Console along with P OWER UP AND CONNEC T TO WI-FI AND WE ATHERLINK .COM a new Vantage Pro2 or Vantage Vue sensor suite, you should set up your sensor suite first and have it up and running. -
Page 5: Configure Devices
You can also calibrate temperature, humidity, or wind using 5. The next screen will allow you to create or log into your this screen. Please be aware that Davis sensors are quite WeatherLink account. Either create your account, log in to accurate, and calibration is normally not needed. -
Page 6: Display Format Settings
DAVIS WeatherLink Console User Guide Tip: For Online Archive Rates more frequent than DISPL AY FORMAT SE T TINGS 15 minutes, you must be a Pro or Pro+ subscriber. Make sure the display formats are as you want them to be. -
Page 7: Chapter 3: Mounting Your Console
Console CHOOSE THE CONSOL E LOCATION You will want to place your WeatherLink Console in a location where it is accessible, and the Display screen is easy to read. It can either be mounted on a wall or used on a table, shelf, or desktop. -
Page 8: Chapter 4: Navigating Your Console
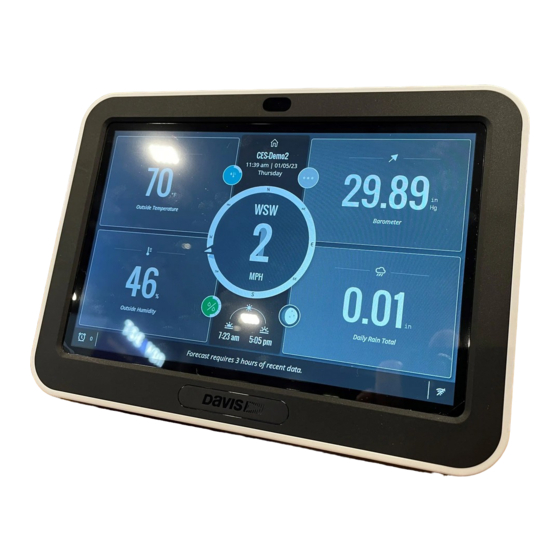
DAVIS WeatherLink Console User Guide Chapter 4: Navigating Your Or choose the 2 X 2 layout for 4 different tiles, plus the center Console wind rose, with two or just one aspect in each. YOUR DISPL AY SCREEN The customizable Display screen will let you see just what information you most want at a glance. -
Page 9: Current Weather Home Tab
DAVIS WeatherLink Console User Guide • In the lower right corner, tap the “Jump to Current” button to CURRENT WE ATHER HOME TAB move the “now” divider to center of the chart. Tap the House symbol area at the top of the display screen to access the various tab sections. -
Page 10: Graph Tab
DAVIS WeatherLink Console User Guide • Tap the “Monthly” tab to see weather data recaps for every GR APH TAB day of the month. At the top of the page, you’ll see the average high and low temperature, as well as rainfall and any records set this month to date. -
Page 11: Data Tab
DAVIS WeatherLink Console User Guide Note: The account screen allows you to edit or add account DATA TAB information, customize your Display, change console Tap the data symbol to open the Data screen. settings, set alarms, and manage your device. - Page 12 DAVIS WeatherLink Console User Guide 3. Tap the Customize Display button on upper right 5. Make sure the correct sensor is selected. (For to save your layout choice and proceed to the tile example, outside temperature from your sensor and bubble options page.
-
Page 13: Console Settings
2. The Units of Measure Tab allows you to customize Barometer. the units of measurement you prefer. Note: Davis Instruments sensors are quite • Temperature: Fahrenheit or Celsius accurate and should not need calibrating. • Soil Moisture: Kpa, bar, or cb However, you may do so on this screen. -
Page 14: Alarms
Display screen. It will go off itself otherwise after one minute. Please read the Davis Instruments Privacy Policy. Use the Alarm History tab to see a list of alarms that have To return to the Display screen at any time, tap the Display occurred and when. -
Page 15: Chapter 5: Troubleshooting And Faqs
Can I power my console from a USB port on my computer? Davis sensors are factory-calibrated for accuracy and will normally not need any calibration. Comparing your data to No. The computer USB port will not supply sufficient power. -
Page 16: Contacting Davis Technical Support
ID number. Choose any open ID. You will need to set your WeatherLink Console to listen to this transmitter ID. The old console will become one of your “Stations and Sensors.” To add it, go to the Accounts screen, choose Console Configuration, then choose Stations and Sensors. -
Page 17: Appendices
DAVIS WeatherLink Console User Guide Note: Wind chill is not calculated above 92° F (33° C). Appendices Heat Index The Heat Index uses temperature and the relative humidity APPENDIX A: WE ATHER DATA to determine how hot the air actually “feels.” When humidity... - Page 18 DAVIS WeatherLink Console User Guide Dew Point altitudes, atmospheric pressure is generally adjusted to the equivalent sea level pressure. This adjusted pressure is known Dew point is the temperature to which air must be cooled as barometric pressure. The Console measures atmospheric for saturation (100% relative humidity) to occur, providing pressure.
- Page 19 DAVIS WeatherLink Console User Guide Note: Your station’s UV readings do not take into account UV reflected off snow, sand, or water, which can significantly increase your exposure. Nor do your UV readings take into account the dangers of prolonged UV exposure.
- Page 20 DAVIS WeatherLink Console User Guide Evapotranspiration (ET) Soil Moisture Evapotranspiration (ET) is a measurement of the amount of Soil Moisture, as the name suggests, is a measure of the water vapor returned to the air in a given area. It combines moisture content of the soil.
-
Page 21: Appendix B: Specifications
DAVIS WeatherLink Console User Guide APPENDIX B: SPECIFICATIONS Console Operating Temperature +32° to +122° F (0° to +50° C) Non-Operating (Storage) Temperature -20° to +60° C (-4° to +60° C) Console Current Draw 2A max Power Adapter 5 VDC, 2000 mA... -
Page 22: Appendix C: Weather Data Specifications
DAVIS WeatherLink Console User Guide APPENDIX C: UPDATE INTERVALS AND WE ATHER DATA SPECIFICATIONS Update Intervals by Sensor Barometric Pressure 1 minute Barometer Inside Humidity 1 minute Outside Humidity 50 seconds Humidity Dew Point 10 seconds Rainfall Amount 20 seconds... - Page 23 DAVIS WeatherLink Console User Guide Specifications by Sensor The following specifications may include parameters that require optional sensors that may not be installed on your sensor suite. Variable Resolution Range Nominal Accuracy Barometric Pressure** 0.01'' Hg; 0.1 mm Hg; 16'' to 32.5'' Hg; 410 to 820 mm Hg;...
-
Page 24: Appendix D: Wireless Repeater Configuration
DAVIS WeatherLink Console User Guide APPENDIX D: WIREL ESS REPE ATER CONFIGUR ATION A Vantage Pro2 Wireless Repeater (#7627) or Long-Range Wireless Repeater (#7654) increase transmission distances or improve transmission quality between a station and the Console. A repeater receives information transmitted from a transmitting station and retransmits it to the Console. - Page 25 WeatherLink Console User Guide Innovation, Science and Economic Development Canada ICES-003 Compliance Label: CAN ICES-3 (B)/NMB-3(B) Changes or modification not expressly approved in writing by Davis Instruments may void the warranty and void the user’s authority to operate this equipment.
Need help?
Do you have a question about the WeatherLink Console and is the answer not in the manual?
Questions and answers
how do I link my unit to my Samsung Cell phone ?