
Related Manuals for Graywind 58441


Summary of Contents for Graywind 58441
- Page 1 SMART MOTORIZED SLIDING PANEL INSTRUCTION INTELLIGENTE MOTORISIERTE SCHIEBELEMENTE ANLEITUNG スマート電動パネルカーテン取扱説明書 58441 Version: 2.0 Date: 14, Jul, 2022...
-
Page 2: Table Of Contents
CONTENTS Preparation Accessories Valance Installation 3-11 Joinable Track Installation 12-18 Joinable Middle-opening Track Installation 19-25 Side Wall Mount 27-33 Ceiling Mount 35-40 Remote control parameters 41-42 Motor Parameters 43-44 App Connection 45-48 Motor Programming 49-52 Motor Disassembly 53-54 Fabric Cleaning Guide KATALOG Vorbereitung Zubehör... - Page 3 目次 事前準備 出荷一覧 バランスの取り付け 3-11 12-18 延長トラック 片方開きの取り付け 19-25 延長トラック 両方開きの取り付け 26-33 正面取付け 34-40 天井取付け 41-42 リモコンパラメータ モーターパラメータ 43-44 アプリ接続 45-48 モータープログラミング 49-52 53-54 モーターの分解 ファブリックのお手入れ方法...
-
Page 4: Vorbereitung
PREPARATION|VORBEREITUNG|事前準備 * Punch Diameter 0.2” * Hexagon Wrench size 0.1” (6mm) (2.5mm) * Bohrlochgröße 0.2” Größe der Sechskantschraube 0.1” (6mm) (2.5mm) * 六角レンチサイズ 0.1インチ(2.5mm) * ドリル穴サイズ 0.2インチ(6mm) -
Page 5: Accessories
ACCESSORIES|ZUBEHÖR| 出荷一覧 Optional|オプション Standard Version|Standard Version| 標準版 Joinable Track Version|Version mit Verlängerungsschiene| 延長トラック 片方開き版 Joinable Middle-opening Track Version Verlängerungsschienenversion mit mittlerer Öffnung 延長トラック 両方開き版 Lithuim Cell CR2032 78.7” (2m) w x1... -
Page 6: Valance Installation
VALANCE INSTALLATION GEHÄUSE INSTALLATION バランスの取り付け Valance Accessories (Standard Version) Gehäusezubehör (Standardversion) 取り付け用の部品 (標準版) P4-6 Installation|Installation| 取り付けについて EXTRA ACCESSORIES FOR OUTSIDE MOUNT ZUSÄTZLICHES ZUBEHÖR FÜR DIE AUßENMONTAGE 正面付けの追加アクセサリー Valance Accessories (Joinable Track Version) Gehäuse-Zubehör (Version mit Verlängerungsschiene) 取り付け用の部品 (延長トラック 片方開き版) P7-11 Installation|Installation|... - Page 7 Valance Installation (Standard Version) Gehäuse-Montage (Standardversion) バランスの取り付け (標準版) INSIDE MOUNT|INNENMONTAGE|天井付け...
- Page 8 OUTSIDE MOUNT|AUßENMONTAGE|正面付け...
- Page 10 Valance Installation (Joinable Track Version) Gehäuse-Installation (Version mit Verlängerungsschiene) バランスの取り付け (延長トラック 片方開き版) Loosen the screws Lösen Sie die Schrauben ネジを緩めます。 Move it to the middle Bewegen Sie es in die Mitte 真ん中に移動させます。 Tighten the screws Schrauben festziehen ネジを締めます。...
- Page 11 Tighten the screws Schrauben festziehen ネジを締めます。...
- Page 12 INSIDE MOUNT|INNENMONTAGE|天井付け...
- Page 13 OUTSIDE MOUNT|AUßENMONTAGE|正面付け...
-
Page 15: Joinable Track Installation
JOINABLE TRACK INSTALLATION INSTALLATION DER VERLÄNGERUNGSSCHIENE 延長トラック 片方開きの取り付け Loosen the screw Lösen Sie die Schraube ネジを緩めます。... - Page 17 Tighten the screw Schrauben festziehen ネジを締めます。...
- Page 18 Connect the two rods by moving the green belt. Verbinden Sie die beiden Stäbe, indem Sie den grünen Riemen bewegen. 緑のベルトを動かして、2本のロッドをつなげます。...
- Page 19 Remove the screws Entfernen Sie die Schrauben ネジを取り外します Please put them aside. They will be installed later. Bitte legen Sie sie beiseite. Sie werden später installiert. それらを脇に置いてください。 それらは後でインストールされます。...
- Page 21 Loosen the screws Move it to the middle Lösen Sie die Schrauben Bewegen Sie es in die Mitte ネジを緩めます 真ん中に移動させます。 Tighten the screws Schrauben festziehen ネジを締めます...
-
Page 22: Joinable Middle-Opening Track Installation
JOINABLE MIDDLE-OPENING TRACK INSTALLATION INSTALLATION DER ERWEITERUNGSSCHIENE MIT MITTLERER ÖFFNUNG 延長トラック 両方開きの取り付け Loosen the screw Lösen Sie die Schrauben ネジを緩めます。... - Page 24 Tighten the screw Schrauben festziehen ネジを締めます。...
- Page 25 Connect the two rods by moving the green belt. Verbinden Sie die beiden Stäbe, indem Sie den grünen Riemen bewegen. 緑のベルトを動かして、2本のロッドをつなげます。...
- Page 26 Remove the screws Entfernen Sie die Schrauben ネジを取り外します Please put them aside. They will be installed later. Bitte legen Sie sie beiseite. Sie werden später installiert. それらを脇に置いてください。 それらは後でインストールされます。...
- Page 28 Move it to the middle Loosen the screws Lösen Sie die Schrauben Bewegen Sie es in die Mitte ネジを緩めます 真ん中に移動させます。 Tighten the screws Schrauben festziehen ネジを締めます...
-
Page 29: Seitenwandhalterung
SIDE WALL MOUNT SEITLICHE WANDHALTERUNG 正面取付け * Punch Diameter 0.2”(6mm) * Dreifache Lochgröße 0.2 (6mm) ” (6mm) * ドリル穴サイズ 0.2” * The side view * Die Seitenansicht 側面図... -
Page 30: Side Wall Mount
Stick the tape on the wall horizontally and leave 16” of space on both sides. Kleben Sie das Klebeband horizontal an die Wand und lassen Sie auf beiden Seiten 40 CM Platz. テープを壁に水平に貼り付け、両側に 40cm のスペースを空けます。 1” 1” (≈25mm) 10” (≈254mm) Drilling positions are equidistant. - Page 32 Assemble the valance brackets (Optional) Montieren Sie die Gehäusehalterungen (Optional) 上飾り金具を組み立てる (オプション) <5” (<100mm) <5” (<100mm)
- Page 34 07. Install the vanes according to labels. Montieren Sie die Schaufeln gemäß den Etiketten. ラベルに従ってベーンを取り付けます。...
- Page 35 08. Adjust the vanes to keep them aligned Stellen Sie die Schaufeln so ein, dass sie ausgerichtet bleiben. ベーンが揃うように調整します。 For Extension middle-opening Track Version, the quantities of vanes on both sides need to be consistent and the vanes need to be aligned. Bei der Schienenversion mit verlängerter Mittelöffnung muss die Anzahl der Schaufeln auf beiden Seiten gleich sein und die Schaufeln müssen ausgerichtet sein.
- Page 36 Assemble the valance brackets (Optional) Montieren Sie die Gehäusehalterungen (optional) 上飾り金具を組み立てる (オプション)...
-
Page 37: Deckenhalterung
CEILING MOUNT DECKENMONTAGE 天井取付け Depth≥6”(150mm) Tiefe≥6”(150mm) (150mm) 深さ≥ インチ Depth|Tiefe| 深さ * The side view * Die Seitenansicht 側面図 * Punch Diameter 0.2”(6mm) * Größe des Bohrlochs 0.2”(6mm) (6mm) * 穴のサイズ0.2インチ... -
Page 38: Ceiling Mount
Stick the tape on the wall horizontally and leave 16” of space on both sides. Kleben Sie das Klebeband horizontal an die Wand und lassen Sie auf beiden Seiten 16” Platz. テープを壁に水平に貼り付け、両側に 40.6cm のスペースを空けます。 1“ 1“ (25mm) (25mm) 10“(254mm) Drilling positions are equidistant. In gleichem Abstand markieren 等距離にマークします... - Page 39 Assemble the valance brackets (Optional) Montieren Sie die Gehäusehalterungen (optional) 上飾り金具を組み立てる (オプション) <5” (<100mm) <5” (<100mm)
- Page 41 Install the vanes according to labels. Montieren Sie die Schaufeln gemäß den Etiketten. ラベルに従ってベーンを取り付けます。...
- Page 42 06. Adjust the vanes to keep them aligned Stellen Sie die Schaufeln so ein, dass sie ausgerichtet bleiben ベーンが揃うように調整します。 For Extension middle-opening Track Version, the quantities of vanes on both sides need to be consistent and the vanes need to be aligned. Bei der Schienenversion mit verlängerter Mittelöffnung muss die Anzahl der Schaufeln auf beiden Seiten gleich sein und die Schaufeln müssen ausgerichtet sein.
- Page 43 Assemble the valance brackets (Optional) Montieren Sie die Gehäusehalterungen (optional) 上飾り金具を組み立てる (オプション) Properly pull down the tail of part "h" to expose the buckle "p " of the headspace. Ziehen Sie das Ende von Teil „h“ richtig nach unten, um die Schnalle „p2“ des Kopfraums freizulegen パーツ「h」のテールを適切に引き下げて、バックル「p 」を露出させます...
-
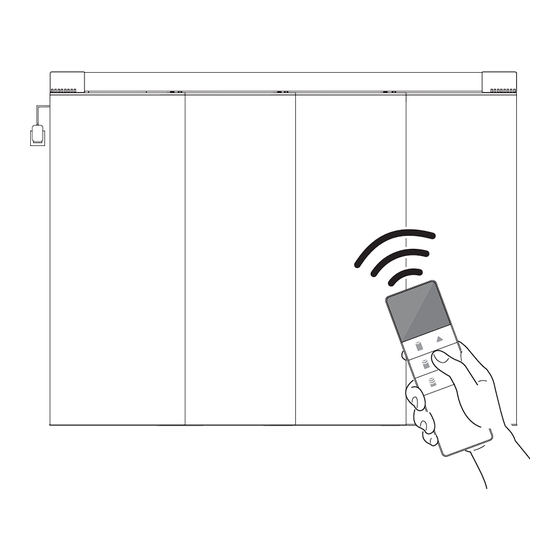
Page 44: Remote Control Parameters
REMOTE CONTROL PARAMETERS PARAMETER FÜR DIE FERNBEDIENUNG リモコンパラメータ Lithuim Cell CR2032 Magnetic Holder Magnetisch-Halter CR2032(3V) 磁気ホルダー s x2 INSTALL THE BATTERY DIE BATTERIE INSTALLIEREN リモコン電池を取付ます Lithuim Cell CR2032 Lithuim Cell CR2032 Now you can control the blind via remote! Jetzt können Sie die Rollos per Fernbedienung steuern! リモコンでブラインドを制御することができました!... - Page 45 Channel “1-6” Control max 6 blinds separately Kanal “1-6” Bis zu 6 Rollos separat steuern チャンネル “1-6” 最大6個ブラインドを制御できます - Channel + Channel - Kanal + Kanal - チャンネル チャンネル 75% position 75 % Stelle Up|Oben| アップ 75%の位置 50% position Stop|Stoppen| ストップ...
-
Page 46: Motor Parameters
MOTOR PARAMETERS MOTOR PARAMETERS モーターパラメータ... - Page 47 Charging Port Ladeschnittstelle 充電口 Indicator Light Kontrollleuchte 表示ライト Setting Button Einstellungstaste 設定ボタン...
-
Page 48: App Connection
APP CONNECTION APP-VERBINDUNG アプリ接続 APP control directly, or Alexa/Google home control, please download the APP on the envelope. Please make sure your phone is connected to Wi-Fi, before the APP is pairing with motor and controlling the shades. APP-Steuerung direkt oder Alexa/Google-Heimsteuerung, bitte laden Sie die APP auf dem Umschlag herunter. - Page 49 Rename Umbenennen 名前を変更 (Device name) Partially open/close Teilweise öffnen/schließen 一部開閉 Close Open Nah dran Offen 閉める 開ける Congratulations!Now you can free control blind via the App! Glückwunsch! Sie können Ihre Jalousien jetzt frei über die App steuern. おめでとうございます!今はアプリで自由にブライ ンドをコントロールできます。...
- Page 50 CONTROL THE BLIND VIA ALEXA ROUTINE STEUERUNG DER ROLLOS ÜBER EINE ALEXA-ROUTE アレクサ定型アクションを通してブラインドを制御する (日本語版アプリの場合、デバイスが見つからない可能性があります。 その場合、アプリを英語に切り替えて、設置するの必要があります。) Enter the routine name. Geben Sie den Namen der Routine ein. 定型アクション名を入力します。 Enter content of voice command. Geben Sie den Inhalt des Sprachbefehls ein. 音声コマンドの内容を入力します。...
- Page 51 Drag to adjust open percentage. Ziehen Sie, um den Öffnungsprozentsatz anzupassen. ブラインドの開いているパーセンテージを調整します In order to control (device name) better, You can set up multiple routines based on different usage scenario, such as fully open, fully closed, half-open etc. Um (Gerätename) besser steuern zu können, können Sie mehrere Routinen basierend auf verschiedenen Nutzungsszenarien einrichten, z.
-
Page 52: Motor Programming
MOTOR PROGRAMMING MOTORPROGRAMMIERUNG モータープログラミング HOW TO CHANGE OPEN&CLOSE DIRECTION ÄNDERN DER ÖFFNEN-SCHLIESSEN-RICHTUNG 開閉方向の変更方法 Red light on Rotes Licht an 赤点灯 Press and hold for 3s Drücken und halten 3s 3秒間長押し Red light flashing Rotes Licht blinkt 赤ランプ点滅 Press“ ”+ “ ”... - Page 53 SET 3 FAVORITE POSITIONS FESTLEGEN SIE 3 LIEBLINGSPOSITIONEN お気に入りのポジション Choose the channel Move the panels to the desired position Wählen Sie den Kanal Schieben Sie die Paneele in die gewünschte Position チャンネルを選択 パネルを目的の位置に移動します Press and hold “ ”+“ ” for 2s Drücken und halten „...
- Page 54 HOW TO DELETE REMOTE CONTROL FERNBEDIENUNG LÖSCHEN リモコンの削除方法 Red light is on Rotes Licht ist an Press and hold for 3s 赤いライトが点灯しています Drücken und halten 3s 3秒間長押し Press and hold for 7s Red light is off Drücken und halten 7s Rotes Licht ist aus 7秒間長押し...
- Page 55 HOW TO RE-PAIR WITH MOTOR WIE MAN DEN MOTOR WIEDER REPARIERT モーターとペアリングするの方法 Please finish the 4 steps quickly. Bitte beenden Sie die 4 Schritte schnell. 4つのステップをすばやく完了してください Red light is on Rotes Licht ist an 赤いライトが点灯しています Press and hold for 3s Drücken und halten 3s 3秒間長押し...
-
Page 56: Motor Disassembly
MOTOR DISASSEMBLY MOTOR DEMONTAGE モーターの分解 This step is optional, the motor is fixed on the track rod normally. Please refer to this part if you need to disassemble the motor. Dieser Schritt ist optional, der Motor wird normalerweise auf der Spurstange befestigt. Bitte beziehen Sie sich auf diesen Teil, wenn Sie den Motor zerlegen müssen. -
Page 58: Fabric Cleaning Guide
FABRIC CLEANING GUIDE STOFFREINIGUNGSANLEITUNG ファブリックのお手入れ方法 Cloth cleaning Vacuum Cleaner Low Temperature Ironing Tuchreinigung Staubsauger Wenig Eisen ファブリックのお手入れ方法 掃除機 低温アイロン *Please note that the cleaning cloth needs to be half wet or dry. Pleasr try it before cleaning the fabric. *Bitte beachten Sie, dass das Reinigungstuch halb nass oder trocken sein muss. Bitte probieren Sie es aus, bevor Sie den Stoff reinigen. 湿った布または乾いた布で拭いてください。... - Page 59 “Alexa “Open the curtain.”...
Need help?
Do you have a question about the 58441 and is the answer not in the manual?
Questions and answers