Table of Contents
Advertisement
Quick Links
MICROWAVE OVEN
USER MANUAL
MCM1817G1F
Warning notices: Before using this product, please read this manual carefully and keep it for future reference.
The design and specifications are subject to change without prior notice for product improvement. Consult
with your dealer or manufacturer for details.
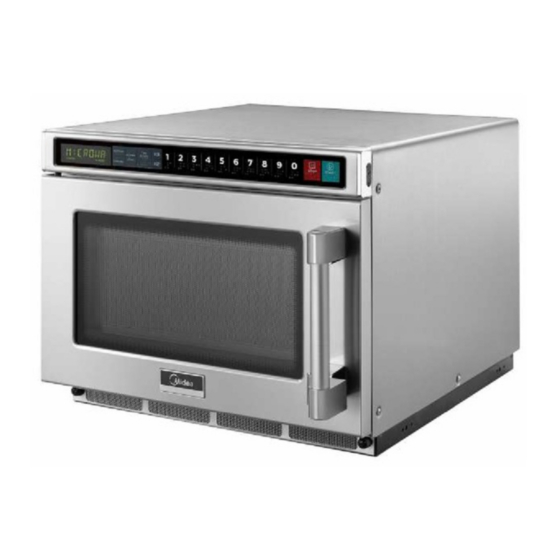
The diagram above is just for reference. Please take the appearance of the actual product as the standard.
Advertisement
Table of Contents

Related Manuals for Midea MCM1817G1F


Summary of Contents for Midea MCM1817G1F
- Page 1 MICROWAVE OVEN USER MANUAL MCM1817G1F Warning notices: Before using this product, please read this manual carefully and keep it for future reference. The design and specifications are subject to change without prior notice for product improvement. Consult with your dealer or manufacturer for details.
-
Page 2: Table Of Contents
THANK YOU LETTER THANK YOU LETTER Thank you for choosing Midea! Before using your new Midea product, please read this manual thoroughly to ensure that you know how to operate the features and functions that your new appliance offers in a safe way. -
Page 3: Safety Instructions
If you find any damage, please contact to Midea’s nominated commercial product suppliers. Please note modifications or alterations to the appliance are not allowed for your safety concern. - Page 4 Precautions To Avoid Possible Exposure To Excessive Microwave Energy a. Do not attempt to operate this oven with the door open since this can result in harmful exposure to microwave energy. It is important not to break or tamper with the safety interlocks. b.
- Page 5 Important Safety Instructions WARNING To reduce the risk of fire, electric shock, injury to persons or exposure to excessive microwave oven energy when using your appliance, follow basic precautions, including the following: • Read and follow the specific:”PRECAUTIONS TO AVOID POSSIBLE EXPOSURE TO EXCESSIVE MICROWAVE ENERGY”.
- Page 6 • WARNING: Liquids and other foods must not be heated in sealed containers since they are liable to explode. • When heating food in plastic or paper containers, keep an eye on the oven due to the possibility of ignition. •...
- Page 7 • Metallic containers for food and beverages are not allowed during microwave cooking. • The appliance shall not be cleaned with a steam cleaner. READ CAREFULLY AND KEEP FOR FUTURE REFERENCE...
- Page 8 To Reduce The Risk Of Injury To Persons Grounding Installation DANGER Electric Shock Hazard Touching some of the internal components can cause serious personal injury or death. Do not disassemble this appliance. WARNING Electric Shock Hazard Improper use of the grounding can result in electric shock.
- Page 9 • If a long cord set or extension cord is used: - The marked electrical rating of the cord set or extension cord should be at least as great as the electrical rating of the appliance. - The extension cord must be a grounding-type 3-wire cord.
- Page 10 Utensils CAUTION Personal Injury Hazard It is hazardous for anyone other than a competent person to carry out any service or repair operation that involves the removal of a cover which gives protection against exposure to microwave energy. See the instructions on “Materials you can use in microwave oven or to be avoided in microwave oven.”...
- Page 11 Materials You Can Use In Microwave Oven Utensils Remarks Follow manufacturer’s instructions. The bottom of browning Browning dish dish must be at least 3/16 inch (5mm) above the turntable. Incorrect usage may cause the turntable to break. Microwave-safe only. Follow manufacturer's instructions. Do Dinnerware not use cracked or chipped dishes.
-
Page 12: Specification
SPECIFICATION Product Model MCM1817G1F Rated Voltage 230-240 V~ 50 Hz Microwave Input 3000 W Microwave Output 1800 W 420x563x340mm External Dimensions: Approx. 3 . kg Net Weight: 1. The order of dimensions is width x depth x height; the outline depth includes the length of the handle a stretched back plate while the height value includes the foot. -
Page 13: Product Overview
PRODUCT OVERVIEW Control Panel(with braille) and Features (8) (9) (2) (3) (4) (5) (1) Defrost Button (2) USB Button (3) Power Level Button (4) Time Entry Button (5) Double Quantity Button (6) Triple Quantity Button (7) Number Buttons (8) Stop Button (9) Start Button... - Page 14 Setting Up Your Oven Names of Oven Parts and Accessories Remove the oven and all materials from the carton and oven cavity. Your oven comes with the following accessories: User Manual A) Control panel B) Observation window C) Safety interlock system D) Ceramic board E) Filter F) Plug...
-
Page 15: Product Installation
PRODUCT INSTALLATION Countertop Installation Remove all packing material and accessories. Examine the oven for any damage such as dents or broken door. Do not install if oven is damaged. Cabinet: Remove any protective film found on the microwave oven cabinet surface. Installation 1. - Page 16 2. Stacking and installation of the microwave oven. The maximum height of stacking shall be two layers. Specific stacking installation is as follows - Unscrew and remove the mounting plate, and then tighten the screws. - Remove the four screws as shown in Figure. - Mount the mounting plate to the lower position and fix the screws that are just loosened.
-
Page 17: Operation Instructions
OPERATION INSTRUCTIONS Appendix. A User Options Option Setting Discription OP:10 Beeper sounds three times 1 EOC Tone OP:11 Continuous beep OP:12 5 quick beeps(repeating) OP:20 Beeper Off OP:21 2 Beeper Volume OP:22 Medium OP:23 High OP:30 3 Key Tone On/Off OP:31 no operation in ready, pause or set state for OP:40... - Page 18 Appendix. B Default Cook Times Press the number key to quickly activate the preset time and firepower. Button Display (Time) Power 0:10 100% 0:20 100% 0:30 100% 0:45 100% 1:00 100% 1:30 100% 2:00 100% 2:30 100% 3:00 100% 3:30 100%...
- Page 19 Power Up When the oven is electrified for the first time, “ ------- ” will display on the screen. If the “ ” button is pressed, the oven will enter Idle Mode. Idle Mode In Idle Mode, the screen will display “ ECO ”. NOTE: •...
- Page 20 Manual Cook Entry Mode 1. You can manually enter a cook time and power level while in this mode. 2. Press “TIME ENTRY” and press number keys to enter cooking time. The maximum time is 60 minutes. 3. Press “POWER LEVEL” and press number keys to enter power level 0-10. 4.
- Page 21 Manual Preset Program Cook Mode In this mode, you can specify the cooking time and power level. 1. If you have set the user option “OP:81” mode, open the door and press “1” pad for 5 seconds, the buzzer will sound once and enter to this mode. 2.
- Page 22 Multi-Stage Cooking You can set this mode in manual preset program cook mode or manual cook entry mode. 1. Three stages can be set. After setting the power level and time for the first stage, press “TIME ENTRY” and then press number keys to set the time. Then press “POWER LEVEL”...
- Page 23 How to set the U disk 1. Insert the U disk to computer and open the file called “Setup”. 2. Double-click “MenuEdit” to enter editable interface. (Recommendation: Right-click and choose “Run as administrator ”) 3. Set the maximum cooking time of single menu.
- Page 24 4. Set the first menu, two stages of cooking can be maximumly set . And you can set the cooking time and power. 5. Click “ New Line ” to create the second menu, the third menu , the forth menu … And 20 menus can be maximumly set.
- Page 25 6. Click “ Export File ” to export the file to U disk. And the file will be named “UTABLE.C ”. Then click “ Save ”to finish the setting.
-
Page 26: Cleaning
CLEANING Be sure to unplug the appliance from the power supply. • Clean the inside of the oven after using with a slightly damp cloth. • Clean the accessories in the usual way in soapy water. • The door frame and seal and neighbouring parts must be cleaned carefully with a damp cloth when they are dirty. - Page 27 Filter cleaning Caution! Make sure the splash shield is installed correctly before use of the microwave oven! Filter Filter screws The front filter serves as the air inlet; the filter should be cleaned on time to keep the chamber clean. •...
-
Page 28: Trouble Shooting
TROUBLE SHOOTING Normal Radio and TV reception may be interfered when microwave oven operating. It is similar to the interference of small electrical Microwave oven interfering TV reception appliances, like mixer, vacuum cleaner, and electric fan. It is normal. In low power microwave cooking, oven light Dim oven light may become dim. -
Page 29: Trademarks, Copyrights And Legal Statement
Midea may constitute trademark infringement or unfair competition in violation of relevant laws. This manual is created by Midea and Midea reserves all copyrights thereof. No entity or individual may use, duplicate, modify, distribute in whole or in part this manual, or bundle or sell with other products without the prior written consent of Midea. -
Page 30: Disposal And Recycling
DISPOSAL AND RECYCLING Important instructions for environment Compliance with the WEEE Directive and Disposing of the Waster Product: This product complies with EU WEEE Directive (2012/19/EU). This product bears a classification symbol for waster electrical and electronic equipment (WEEE). This symbol indicates that this product shall not be disposed with other household wastes at the end of its service life. - Page 32 Midea (HK)
Need help?
Do you have a question about the MCM1817G1F and is the answer not in the manual?
Questions and answers