Table of Contents
Advertisement
Available languages
Available languages
Quick Links
BEDIENUNGSANLEITUNG
USER'S MANUAL
MODE D'EMPLOI
MANUAL DEL USUARIO
CDT-200
Top Loading CD-Player
©
COPYRIGHT
Für weiteren Gebrauch aufbewahren!
Nachdruck verboten!
Keep this manual for further needs!
All rights reserved!
Gardez ces instructions pour des utilisations ultérieurs!
Réproduction interdite!
Prohibida toda reproducción!
Guarde este manual para posteriores usos.
Advertisement
Table of Contents

Related Manuals for Omnitronic CDT-200


Summary of Contents for Omnitronic CDT-200
- Page 1 BEDIENUNGSANLEITUNG USER'S MANUAL MODE D'EMPLOI MANUAL DEL USUARIO CDT-200 Top Loading CD-Player © COPYRIGHT Für weiteren Gebrauch aufbewahren! Nachdruck verboten! Keep this manual for further needs! All rights reserved! Gardez ces instructions pour des utilisations ultérieurs! Réproduction interdite! Prohibida toda reproducción!
-
Page 3: Table Of Contents
MULTI-LANGUAGE-INSTRUCTIONS Inhaltsverzeichnis Table of contents Sommaire Contenido 1. EINFÜHRUNG............................... 5 2. SICHERHEITSHINWEISE..........................5 3. BESTIMMUNGSGEMÄSSE VERWENDUNG ....................6 4. GERÄTEBESCHREIBUNG .......................... 7 4.1 Features ..............................7 4.2 Vorderseite............................... 7 4.3 Rückseite ..............................9 5. INSTALLATION ............................9 6. BEDIENUNGSHINWEISE..........................9 6.1 Inbetriebnahme ............................ - Page 4 1. INTRODUCTION ............................21 2. INSTRUCTIONS DE SÉCURITÉ ........................ 21 3. EMPLOI SELON LES PRÉSCRIPTIONS....................22 4. DESCRIPTION ............................23 4.1 Features ..............................23 4.2 Face avant ............................. 23 4.3 Dos................................. 25 5. INSTALLATION ............................25 6. UTILISATION .............................. 25 6.1 Mise en marche .............................
-
Page 5: Einführung
- diese Betriebsanleitung genau beachten. 1. EINFÜHRUNG Wir freuen uns, dass Sie sich für einen OMNITRONIC CDT-200 entschieden haben. Wenn Sie nachfolgende Hinweise beachten, sind wir sicher, dass Sie lange Zeit Freude an Ihrem Kauf haben werden. Nehmen Sie den OMNITRONIC CDT-200 aus der Verpackung. -
Page 6: Bestimmungsgemässe Verwendung
Den Netzstecker immer als letztes einstecken. Vergewissern Sie sich, dass der Netzschalter auf „OFF“ steht, wenn Sie das Gerät ans Netz anschließen. Halten Sie das Gerät von Hitzequellen wie Heizkörpern oder Heizlüftern fern. Das Gerät darf nicht in Betrieb genommen werden, nachdem es von einem kalten in einen warmen Raum gebracht wurde. -
Page 7: Gerätebeschreibung
Reinigen Sie das Gerät niemals mit Lösungsmitteln oder scharfen Reinigungsmitteln, sondern verwenden Sie ein weiches und angefeuchtetes Tuch. Soll das Gerät transportiert werden, verwenden Sie bitte die Originalverpackung, um Transportschäden zu vermeiden. Der Serienbarcode darf niemals vom Gerät entfernt werden, da ansonsten der Garantieanspruch erlischt. Wird das Gerät anders verwendet als in dieser Bedienungsanleitung beschrieben, kann dies zu Schäden am Produkt führen und der Garantieanspruch erlischt. - Page 8 1. STOP-TASTE Zum Stoppen der Wiedergabe. 2. SINGLE-TASTE Mit dieser Taste können Sie zwischen einmaligem Abspielen eines Titels und Continuous Play wählen. Durch einmaliges Drücken erscheint „SINGLE“ in der Anzeige. Der aktuelle Titel wird einmal gespielt. Danach geht der CD-Player am Anfang des nächsten Titels in den Pause-Modus. 3.
-
Page 9: Rückseite
4.3 Rückseite 14. NETZANSCHLUSS 15. NETZSCHALTER Drücken Sie den Netzschalter, um das Gerät einzuschalten. 16. SPANNUNGSWAHLSCHALTER Achten Sie darauf, dass die richtige Spannung eingestellt ist. 17. AUDIO OUT-BUCHSEN An diese Buchsen wird das Musiksignal in analoger Form ausgegeben. Zum Anschluss an Ihr Mischpult. 5. -
Page 10: Cd-Schubfach
6.2 CD-Schubfach Wenn die Abdeckklappe geschlossen ist, drücken Sie die Open-Taste. Die Abdeckklappe öffnet sich. Legen Sie Ihre CD in das CD-Fach ein und schließen Sie die Abdeckklappe. Halten Sie dazu die CD mit 2 Fingern am äußersten Rand fest. Vermeiden Sie es, in das Innere der CD zu greifen. -
Page 11: Cueing
Möglichkeit 1: Stellen Sie den CD-Player auf Wiedergabemodus. Benutzen Sie den Kopfhörer zum Vorhören. Synchronisieren Sie die Abspielgeschwindigkeit über den Pitchfader des CD-Players (Pitch-Taste muss gedrückt sein). Möglichkeit 2: Wenn sich die zwei Signalquellen nur im Basstakt unterscheiden, können Sie die Synchronisation über die Pitch Bend-Tasten oder das Scratch-Rad vornehmen. -
Page 12: Reinigung Und Wartung
8. REINIGUNG UND WARTUNG LEBENSGEFAHR! Vor Wartungsarbeiten unbedingt allpolig vom Netz trennen! Das Gerät sollte regelmäßig von Verunreinigungen wie Staub usw. gereinigt werden. Verwenden Sie zur Reinigung ein fusselfreies, angefeuchtetes Tuch. Auf keinen Fall Alkohol oder irgendwelche Lösungsmittel zur Reinigung verwenden! Im Geräteinneren befinden sich keine zu wartenden Teile. -
Page 13: Introduction
- follow the instructions of this manual 1. INTRODUCTION Thank you for having chosen a OMNITRONIC CDT-200. You have acquired a reliable and powerful device. If you follow the instructions given in this manual, we can assure you that you will enjoy this device for many years. -
Page 14: Operating Determinations
Keep away from heaters and other heating sources! If the device has been exposed to drastic temperature fluctuation (e.g. after transportation), do not switch it on immediately. The arising condensation water might damage your device. Leave the device switched off until it has reached room temperature. -
Page 15: Description
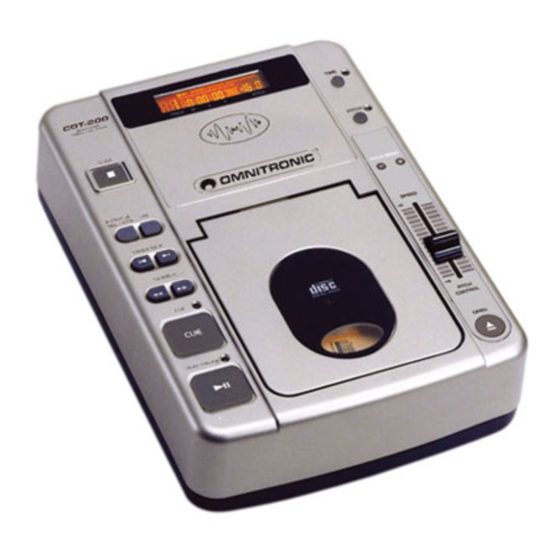
4. DESCRIPTION 4.1 Features Ergonomic Tabletop CD-Player Ergonomic flat-top-design • With high-quality Sony-laser-unit • Latest 1-bit technology (8-times) • FLT-display of all modes • Open-button locked in playback-mode • Pitch-control switchable from +/- 8 % to +/- 16 % • 100 mm fader for pitch-control 4.2 Frontpanel 1. - Page 16 4. SEARCH-BUTTONS Pause-mode: To cue and reverse at a very low speed. You can exactly select the starting-point. The selected frame is repeated if you have pressed the Cue-button before (CUE-LED is shining). Playback-mode: Use the Search/Scan-buttons in order to cue and reverse at a very high speed. 5.
-
Page 17: Rear Panel
4.3 Rear panel 14. AC CONNECTION 15. POWER SWITCH Press this button to start operation. 16. VOLTAGE SELECTOR Make sure that the indication corresponds to the available voltage. 17. AUDIO OUT-SOCKETS The music-signal of these sockets is analogue. Connect the output to the respective input of your mixer. 5. -
Page 18: Cd-Tray
6.2 CD-tray Press the Open-button to open the Disc compartment-door. The door opens. Insert your CD into the CD- compartment and close the compartment-door. Make sure that you only hold the CD with 2 fingers on the edge. Avoid touching the inside area of the CD. 6.3 LCD-display If the CD is improperly positioned,"ERR"... -
Page 19: Cueing
Put the CD-player into playback-mode and cue with the headphones. Synchronise the bass-beat via the left or right Pitch Bend-button. 6.7 Cueing The player is in Playback-mode. Press the Loop In/Fly Cue-button and the Cue-point is memorized. The red Cue-LED shortly flashes twice. As soon as you press the Cue-button, the player returns the Cue-point and goes into Pause-mode. -
Page 20: Cleaning And Maintenance
8. CLEANING AND MAINTENANCE DANGER TO LIFE! Disconnect from mains before starting maintenance operation! We recommend a frequent cleaning of the device. Please use a soft lint-free and moistened cloth. Never use alcohol or solvents! There are no servicable parts inside the device. Maintenance and service operations are only to be carried out by authorized dealers. -
Page 21: Introduction
- être suffisamment qualifiée - être priée de suivre strictement les instructions de service suivantes. 1. INTRODUCTION Nous vous remercions d'avoir choisi un OMNITRONIC CDT-200. Vous êtes en possession d'un appareil très capaz. Sortez le OMNITRONIC CDT-200 de son emballage. -
Page 22: Emploi Selon Les Préscriptions
La fiche de secteur doit toujours être branchée en dernier lieu. Assurez-vous que l'interrupteur secteur est en position «OFF» avant de brancher l'appareil au secteur. Tenez l'appareil éloigné de toute source de chaleur comme des éléments de chauffage ou des radiateurs souflants. -
Page 23: Description
Ne nettoyez jamais l'appareil avec des produits de nettoyage trop puissants ou abrasifs, mais utilisez un chiffon doux, humide. Si vous deviez transporter l'appareil, utilisez l'emballage d'origine pour éviter tout dommage de transport. Ne jamais retirez le code barre de l'appareil, puisque ceci annullerait toute garantie. Si l'appareil est utilisé... - Page 24 1) TOUCHE STOP Pour arreter la lecture. 2) TOUCHE SINGLE Cette touche permêt la selection dans la fonction lecture, soit en mode simple, soit en mode continu. Si vous pressez la touche Single, la plage est jouée une fois. Apres, le lecteur se place en mode pause. L'indication "SINGLE"...
-
Page 25: Dos
4.3 Dos 14) ALIMENTATION SECTEUR 15) TOUCHE POWER Une pression sur la touche permet la mise sous tension de l'appareil (position enfoncée). Pour mettre l'appareil hors tension, agir de nouveau sur cette touche (position sortie). 16) SELECTEUR DE TENSION Assurez-vous que vous utilisez le tension correcte. 17) SORTIES AUDIO OUT Le signal de musique est sortie en output en forme analogue. -
Page 26: Tiroir D'accès Du Cd
6.2 Tiroir d'accès du CD Quand le compartiment est fermé. presser sur la touche Open pour ouvrir le compartiment. Placer un C.D. dans le compartiment. Fermez le compartiment. Seulement maintenir le CD avec deux doigts. 6.3 LCD-Display Si le CD est mal positionne, le texte "ERR" ou "NO DISC" peut apparaître sur l'afficheur. Si le CD est correctement positionné, le temps total et le numéro total du CD apparaissent courtement sur l'afficheur. -
Page 27: Cueing
Mettre le lecteur en Mode de lecture. Utiliser le casque d'écoute de votre tâble de mixage. Synchronisez les rhythmes des graves avec la touche Pitch Bend gauche ou droite. 6.7 Cueing Le lecteur se trouve en Mode de lecture. Pressez la touche Loop In/Fly Cue et le point Cue est mémorisé. La DEL Cue rouge clignote deux fois. Quand vous pressez la touche Cue, le lecteur retourne au au point Cue et se place en mode Pause. -
Page 28: Nettoyage Et Maintenance
8. NETTOYAGE ET MAINTENANCE DANGER DE MORT! Toujours débrancher avant de proceder à l'entretien! L'appareil doit être nettoyé régulièrement de contaminations comme de la poussière etc. Pour le nettoyage, utilisez un torchon non pelucheux humide. Ne pas utiliser un aucun cas de l’alcool ou des détergents pour le nettoyage. -
Page 29: Introducción
-estar cualificada -seguir las instrucciones de este manual 1. INTRODUCCIÓN Gracias por haber elegido un OMNITRONIC CDT-200. Desembale su CDT-200. Antes de la puesta en marcha inicial, por favor asegúrese de que no hay daños causados durante el transporte. Si los hubiese, consulte a su proveedor y no use el aparato. -
Page 30: Instrucciones De Manejo
Si el aparato se ha visto expuesto a fluctuaciones drásticas de temperatura (p.e. tras el transporte) no lo ponga en marcha inmediatamente. La condensación de agua podría causarle daños. Deje el aparato desconectado hasta que llegue a la temperatura ambiente. No coloque líquidos sobre el aparato o en sus cercanías. -
Page 31: Descripción Del Aparato
4. DESCRIPCIÓN DEL APARATO 4.1. Features CD-player Tabletop ergonómico Flat Top Design • CD-player moderno con tecnológica 1 bit • FLT display de todos modos • Tecla Open bloqueada mientras suena una canción • Ajuste de velocidad conmutable de +/- 8 % a +/- 16 % • Fader de 100 mm para ajuste de velocidad 4.2 Panel frontal 1. - Page 32 4. TECLAS SEARCH/SCAN Modo de pausa: Para buscar lentamente en una canción hacia delante y hacia atrás. De esta forma puede encontrar un punto de comienzo por ejemplo. En el modo de pausa la secuencia actual se repite tan pronto como gire la rueda Jog.
-
Page 33: Panel Trasero
4.3 Panel trasero 14. CONEXIÓN AC 15. INTERRUPTOR DE PUESTA EN MARCHA Pulse el interruptor para comenzar a manejarlo. 16. SELECTOR DE VOLTAJE Asegúrese de que la indicación corresponde al voltaje disponible. 17. CASQUILLOS DE SALIDA DE AUDIO (AUDIO OUT) La señal de música de estos casquillos es análoga. -
Page 34: Bandeja Del Cd
6.2 Bandeja del CD Pulse la tecla Open para abrir la bandeja del disco. La bandeja del CD se abre. Inserte su CD en la bandeja. Maneje el CD sólo por el borde con 2 dedos. Evite tocar la parte interior del CD. Cierre la bandeja. 6.3 Pantalla LCD Si se ha colocado el CD de forma inadecuada aparece "ERR"... -
Page 35: Escucha
Posibilidad 2: Si las dos fuentes de señal sólo difieren en el ritmo de los bajos (bass beat), puede sincronizar mediante las teclas Pitch Bend o la rueda Scratch. Ponga el CD-player en el modo de lectura y escuche con los auriculares. Sincronice el ritmo de los bajos mediante la tecla Pitch Bend derecha o izquierda. -
Page 36: Limpieza Y Mantenimiento
8. LIMPIEZA Y MANTENIMIENTO ¡PELIGRO DE MUERTE! ¡Siempre desenchufe el aparato antes de comenzar con el mantenimiento! Recomendamos una limpieza frecuente del aparato. Por favor utilice un paño suave que no suelte pelusa humedecido. ¡No utilizar nunca alcohol o disolventes! No hay piezas que necesiten de servicio dentro del aparato.
Need help?
Do you have a question about the CDT-200 and is the answer not in the manual?
Questions and answers