Table of Contents
Advertisement
Quick Links
Download this manual
See also:
User Manual
BEDIENUNGSANLEITUNG
USER'S MANUAL
MODE D'EMPLOI
MANUAL DEL USUARIO
CDP-2400
Dual-CD-Player
©
Für weiteren Gebrauch aufbewahren!
Copyright
Keep this manual for future needs!
Nachdruck verboten!
Gardez ce mode d'emploi pour des
Reproduction prohibited!
utilisations ultérieures!
Réproduction interdit!
Guarde este manual para posteriores usos.
Prohibida toda reproducción.
Advertisement
Table of Contents

Related Manuals for Omnitronic CDP-2400


Summary of Contents for Omnitronic CDP-2400
-
Page 1: Sampler-Modus
BEDIENUNGSANLEITUNG USER'S MANUAL MODE D'EMPLOI MANUAL DEL USUARIO CDP-2400 Dual-CD-Player © Für weiteren Gebrauch aufbewahren! Copyright Keep this manual for future needs! Nachdruck verboten! Gardez ce mode d’emploi pour des Reproduction prohibited! utilisations ultérieures! Réproduction interdit! Guarde este manual para posteriores usos. -
Page 2: Effekte
You can find the latest update of this user manual in the Internet under: Vous pouvez trouvez la dernière version de ce mode d'emploi dans l'Internet sous: Vd. puede encontrar la versión más reciente de este manual en el Internet bajo: www.omnitronic.com... -
Page 4: Table Of Contents
MULTI-LANGUAGE-INSTRUCTIONS Inhaltsverzeichnis Table of contents Sommaire/Contenido 1. EINFÜHRUNG............................... 6 2. SICHERHEITSHINWEISE..........................6 3. BESTIMMUNGSGEMÄSSE VERWENDUNG ....................7 4. GERÄTEBESCHREIBUNG .......................... 8 4.1 FEATURES .............................. 8 4.2 BESCHREIBUNG DOPPEL-CD-PLAYER....................9 4.3 STEUEREINHEIT ..........................10 5. INSTALLATION ............................14 6. BEDIENUNGSHINWEISE........................... 14 6.1 INBETRIEBNAHME .......................... -
Page 5: Technische Daten
8. CLEANING AND MAINTENANCE ......................37 9. TECHNICAL SPECIFICATIONS......................... 37 1. INTRODUCTION ............................38 2. INSTRUCTIONS DE SÉCURITÉ ........................ 38 3. EMPLOI SELON LES PRÉSCRIPTIONS....................39 4. DESCRIPTION ............................40 4.1 FEATURES ............................40 4.2 BLOC DES LECTEURS......................... 41 4.3 BLOC DE COMMANDE......................... 42 5. -
Page 6: Introduction
- include every supplementay update with the original manual 1. INTRODUCTION Thank you for having chosen a OMNITRONIC CDP-2400. You have acquired a reliable and powerful device. If you follow the instructions given in this manual, we can assure you that you will enjoy this device for many years. -
Page 7: Operating Determinations
Important: Damages caused by the disregard of this user manual are not subject to warranty. The dealer will not accept liability for any resulting defects or problems. Always plug in the power plug least. Make sure that the power-switch is set to OFF position before you connect the device to the mains. -
Page 8: Features
Never remove the serial barcode from the device as this would make the guarantee void. If this device will be operated in any way different to the one described in this manual, the product may suffer damages and the guarantee becomes void. Furthermore, any other operation may lead to dangers like short-circuit, burns, electric shock, etc. -
Page 9: Controller
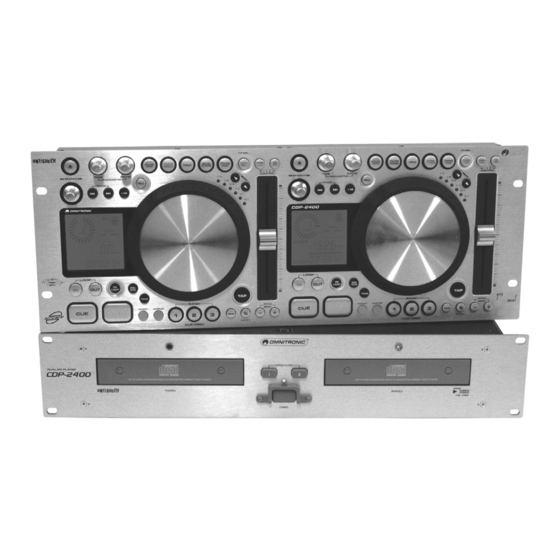
Rear panel: 4. AC CONNECTION 5. REMOTE CONTROL Connect the controller via these plugs. Make sure that you connect the player Unit 1 to the controller Unit 1 and the player Unit 2 to the controller Unit 2. 6. AUDIO OUT-SOCKETS The music-signal of these sockets is analogue. - Page 10 1. SECTION UNIT 1 The left part of the controller is designed for controlling the left CD-player (1). 2. SECTION UNIT 2 The right part of the controller is designed for controlling the right CD-player (2). 3. OPEN/CLOSE BUTTONS Via the Open/Close-buttons, you can open and close the respective CD-tray. 4.
-
Page 11: Vfd-Display
18. PITCHFADER You can adjust the desired speed with the Pitchfader. The display shows the current percentage. 19. DISPLAY VFD-display for displaying the different modes and functions. Please refer to the explanations under 6.3 VFD-display. 20. LOOP IN/REALTIME CUE-BUTTON By pressing the In-button, you can memorize the Cue-point. Furthermore, you can program the In-button of a sequence which will be repeated then. - Page 12 29. BANK/CUE-BUTTONS You can memorize a Cue-point and a sample on every Bank/Cue-button. The memorized Cue-button or the sample (press Sampler-button first) can be recalled via the respective Bank/Cue-button. 30. SCRATCH-WHEEL Playback-mode: Via the Scratch-wheel, you can adjust the playback-speed by +/- 100 %. Please refer to the explanations under 6.6 Adjusting the playback-speed.
-
Page 13: Installation
35. CONNECTOR PORTS Connect the main unit here. 36. CONTROL-SOCKETS Via the Control-socket, the respective CD-player can be remotely controlled. If you are using a mixer with Faderstart-function connect the player with the Control Out-socket. Please note that these sockets must never be connected with any voltage. -
Page 14: Vfd-Display
6.3 VFD-display If the CD is improperly positioned,"ERR" or "NO DISC" appears on the display. If the CD is properly positioned, the total number of tracks and the total playback time are shortly displayed. The player jumps to the first track and is in the Pause-mode (Play/Pause-LED flashes). -
Page 15: Cueing
Memorizing several Cue-points: With the CDP-2400, you can memorize up to 4 different Cue-points of different tracks and recall them via the Bank/Cue-button or the Cue-button, respectively. Press the Memory/Recall-button (LED on) and the desired Bank/Cue-button in order to memorize the current Cue-point on the Bank/Cue-button. -
Page 16: Interactive Scratch-Wheel
Bank/Cue-button, only the first 7 seconds will be memorized. Memorizing several samples: With the CDP-2400, you can memorize up to 3 different samples of different tracks and recall them via the Bank/Cue-button. Press the Memory/Recall-button (LED on) and the desired Bank/Cue-button in order to memorize the current sample on the Bank/Cue-button. -
Page 17: Effects
Playback of memorized samples: Continuous-mode: By pressing the Sampler-button (LED on) and the respective Bank/Cue-button, you can recall the samples memorized via the Memory/Recall-button. The sample will be repeated until you press the Sampler-button again (LED off). The memorized samples can be played back at any time. If the Sampler-button is pressed duruing the playback of the CD, the sample mixes with the CD-playback. -
Page 18: Beat Sync-Function
Via the Beat Sync-buttons, you can quickly and easily select the desired tact. 6.13 Faderstart With the CDP-2400, you have the possibility to start the CD-player directly from the mixer. Make sure that the Faderstart-socket is connected with the respective socket on the mixer. Additionally, the Audio Out- 35/71 10602365X17NXS_V_1_0.DOC... -
Page 19: Stand By-Mode
sockets have to be connected with the Line-input sockets of your mixer. Please note that the Faderstart- function only works with the appropriate mixers. Insert the CD and select the desired track (Pause-mode). Start playback from your mixer. Please note that the Faderstart-function is a Cue-point Faderstart-function. This means that the CD-player starts playback after activating the respective channel of the mixer and goes into Pause-mode and returns to the Cue-point after activating the channel again. - Page 20 connections Does not read the program The player is in normal playback Press the Play/Pause-button and mode re-program Pop noise Mixer or amplifier connections Check cable and jack quality inapropriate Faderstart does not work Missing Audio Out-connection Connect the Audio Out-sockets with the Line-input sockets of your mixer 8.
Need help?
Do you have a question about the CDP-2400 and is the answer not in the manual?
Questions and answers