
Related Manuals for Elid EL2305D


Summary of Contents for Elid EL2305D
- Page 1 EL2305D Access Control Panel User Guide EL2305D DOOR ACCESS CONTROLLER USER GUIDE (Revision 1.1.20) ELID SDN BHD Revision 1.1.20...
- Page 2 EL2305D Access Control Panel User Guide EL2305D DOOR ACCESS CONTOLLER USER GUIDE SYSTEM INITIALIZATION TO COLD START TO PROGRAM THE MASTER CARD TO PROGRAM THE ENGINEERING CARD SETTING CARD TYPE SETTING DISPLAY TYPE SETTING EL2000 MODE SETTING CONTINUOUS SWIPING SETTING CARD SIZE SETTING CLEAR SECURITY 1.10...
- Page 3 EL2305D Access Control Panel User Guide TEST MENU SAVE PARAMETER CLEAR MEMORY USER MENU TEST MENU CARD MENU TRANSACTION MENU DOOR MENU SENSOR MENU OUTPUT MENU PIN ENTRY MENU CLEAR MEMORY Revision 1.1.20...
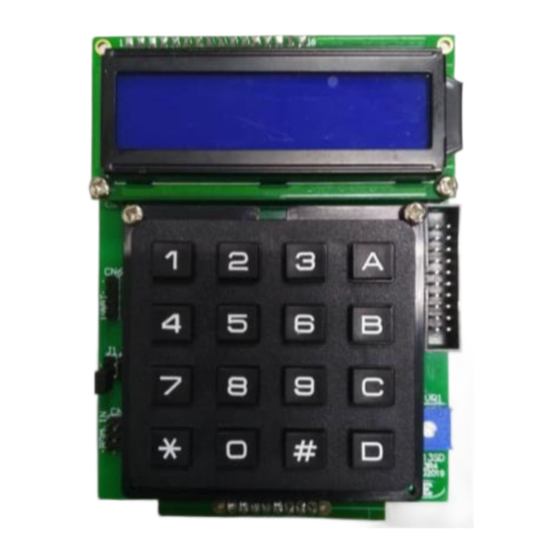
- Page 4 EL2305D Access Control Panel User Guide EL2305D DOOR ACCESS CONTROLLER Programming Keypad Layout Revision 1.1.20...
-
Page 5: System Initialization
EL2305D Access Control Panel User Guide CHAPTER 1 1. SYSTEM INITIALIZATION TO COLD START Hold down keys "A” on the keypad and simultaneously switch off and then switch back on the power supply. (Alternatively, hold down keys "A” on the keypad and press the reset switch while power is on.) - Page 6 EL2305D Access Control Panel User Guide EL2k Swip TO PROGRAM THE MASTER CARD Press <A> key, in order to set the master card number. EL2305D SET-UP Mast card 000000 You should key in 6-digit master card number followed by the <#> key.
- Page 7 EL2305D Access Control Panel User Guide EL2305D SET-UP Eng card 000000 You should key in 6-digit Engineering card number followed by the <#> key. SETTING CARD TYPE Press <C> key to choose the type of reader and card format you wish to use.
- Page 8 EL2305D Access Control Panel User Guide Code Details WIEG Wiegand Reader, with 26-bit Wiegand format PROX Proximity Reader, with ELID format EPRX Diester Reader, with 48 bit Diester format FWIE Free Wiegand Reader, with 32bit format MatrixPIN Keypad Reader only SETTING DISPLAY TYPE Press <D>...
- Page 9 EL2305D Access Control Panel User Guide SETTING EL2000 MODE Press <#> key from main screen and on the second screen of main menu press <A> to select “EL2000 MODE” command. EL2000 Alrm Outp Emulate YES 6 outputs will emulate EL2000, being used for duress alarm, door open alarm, door shunt, sensor alarm and sensor armed.
- Page 10 EL2305D Access Control Panel User Guide Card Swiping Continuous YES User are allowed to swipe even when the door is open. NO The reading is disable until the door is closed. SETTING CARD SIZE Press <C> to select “CARD SIZE” command. This command is for setting the data capture window of a Free Format.
- Page 11 EL2305D Access Control Panel User Guide Limits of bit settings (Free Wiegand) Limits Symbol No. of Bits Max no. of bits to make up a card number 40 (000000~999999) Max bits to be taken for reading a card number Max offset bits to read a card number SETTING CLEAR SECURITY Press <D>...
-
Page 12: Before Operation
EL2305D Access Control Panel User Guide NO The controller in Secure Mode. After finishing the above set-up, you should press "*" key from the main screen to exit. The date/time should appear on the LCD and the red light on the reader should begin to flash. -
Page 13: Engineering Menu
EL2305D Access Control Panel User Guide CHAPTER 2 2. ENGINEERING MENU Note: To access the programming menu, Present the Master Card to Readers in Door 1, and key in the PIN 1. (Do not present the Master card to door 2. Door 2 readers will not accept the master card). - Page 14 EL2305D Access Control Panel User Guide SENSOR MENU TEST MENU Sensor Type Test Keypad Operation Mode Test Reader Delay Time Test Input Alarm Duration Test Output Test Communication OUTPUT MENU Test 7-Segment ...
- Page 15 EL2305D Access Control Panel User Guide TO ENTER ENGINEERING MENU There are two methods to enter into programming mode: Present the Master Card to Readers in Door 1, and key in the PIN 1. (Do not present the Master card to door 2. Door 2 readers will not accept the master card).
- Page 16 EL2305D Access Control Panel User Guide The default release time is 005 seconds. User can change from 001 to 200. SET L.R. TIME Dr1 005 Dr2 005 2.2.2 SHUNT ACTIVATION TIME (Shun T.) Each time the door is validly open - as when a valid card is swiped, the Door Shunt Output is activated.
- Page 17 EL2305D Access Control Panel User Guide 2.2.3 DOOR SENSOR (Dr Ssor) To select the type of Door-Contact user wish to use, either Door-Open-Contact- Open (select: OPEN) or Door-Open-Contact-Closed (select: CLOSE). Set Door Param Door Ssor OPEN 2.2.4 PUSH BUTTON (Push exit) ...
- Page 18 EL2305D Access Control Panel User Guide 2.2.5 PIN SELECT (PIN SEL) User can choose to use PIN1 or PIN2. PIN1: User can select their own PIN number for each card. PIN2: Pre-defined PIN. Set Door Param PIN Compare PIN 2 2.2.6 PIN ENTRY (PIN ENT)
- Page 19 EL2305D Access Control Panel User Guide 2.2.7 VALID BUZZER (VALID BUZ) This command is to allow you to enable or disable the buzzer sound for every valid card entry. Set Door Param Entry BUZ 2.2.8 DOOR SENSOR DEBOUNCE (Dr Ssor) ...
- Page 20 EL2305D Access Control Panel User Guide 2.2.9 EXCHANGE READER (Xchg Rdr) This command allows you to choose reader 2 as either door 1 exit reader or door 2 entry reader. Set Door Param RDR2 as EXIT YES 2.3 CARD MENU 2.3.1 DATABASE MODE (DB Mode)
- Page 21 EL2305D Access Control Panel User Guide 2.3.2 TRANSACTION SIZE (Trn Size) If user wished to extend the transaction buffer, then set the transaction database to “extended”. Set DBASE Para Tran DB Size NORM 2.3.3 CARD SIZE (Crd Size) Refer 1.8 Setting Card size on page 10.
- Page 22 EL2305D Access Control Panel User Guide 2.3.5 AUTO LOCK RELEASE MODE (ALR Mod) YES: The door will remain locked until there is a valid card entry, thereafter, it will remain open until the selected time zone expires NO: The door will open as soon as the time zone set for automatic opening is activated.
- Page 23 EL2305D Access Control Panel User Guide 2.3.7 2 Refer 1.7 Setting Continuous Swiping on page 9. 2.4 SENSOR MENU 2.4.1SENSOR TYPE (Ssr Typ) Ssr Oprn Dly Alm Door Enter the no of door for the sensor. Set Sensor Param Ssor Type ...
- Page 24 EL2305D Access Control Panel User Guide 2.4.2 OPERATION MODE (Oprn Mod) Ssr Oprn Dly Alm Door Enter the no of door for the sensor. Set Sensor Param #1 Ssor Mod ALRM Status Input (such as MOTOR ON/OFF) can be in either state both of that are normal in operation.
- Page 25 EL2305D Access Control Panel User Guide operation when another door opens. You can do this by using the Interlock Inhibit input. When programmed in the Inhibit mode, each time the sensor input is activated, the Reader will not open the door even when a valid card is swiped.
- Page 26 EL2305D Access Control Panel User Guide 2.4.3 DELAY TIME (Dly Time) Delay Time is only applicable for alarm point and irrelevant to status point To set the desired Delay Time, key in the value (in 2 digits) which may be any form 00-99 seconds.
-
Page 27: Alarm Duration
EL2305D Access Control Panel User Guide Alarm Duration 2.5 OUTPUT MENU 2.5.1OUTPUT TYPE (Outp Type) GENERAL PURPOSE MODE (GP): the output can be activated manually by means of a special card or from a PC or by timer. EVENT MODE (EVNT): the output is also activated by an input event, which may be any of the transaction codes recognized by the unit. - Page 28 EL2305D Access Control Panel User Guide If you have selected EVENT MODE, there are 4 modes available; SHORT (SHRT): Each event, defined by the command “OUTPUT EVENT” will cause the output to turn on for duration of 1 second TOGGLE (TOG): Each occurrence of an event will cause the output to toggle ON.OFF.ON.OFF etc.
- Page 29 EL2305D Access Control Panel User Guide CODE MEANING OF CODE CODE MEANING OF CODE Valid Entry (IN) Output On Invalid Card Output Off Duress Alarm Exclude Sensor Invalid PIN Include Sensor Door Open Alarm Status On (Sensor #1) Pulse Door Open...
-
Page 30: Communication Menu
EL2305D Access Control Panel User Guide NOTE: if you have chosen any of the points to be “GP” instead of “EVENT”, then this command will have no effect on those points. 2.5.1 OUTPUT DURATION COMMAND (Out Dur) This setting is to set the duration for which the output point is to stay activated when it is set to the “PULSE”... - Page 31 EL2305D Access Control Panel User Guide Set Comm Para Baud Rate 9600 2.6.2 UNIT NUMBER (Add No) If the configuration is 1-door 2-reader, unit number can be set from 1 to 16. If the configuration is 2-door 2 reader, unit number setting can be odd number only (01, 03, 05, 07, 09, 11, 13, 15).
-
Page 32: Keypad Test
EL2305D Access Control Panel User Guide 2.7 TEST MENU 2.7.1 TEST KEYPAD (Test Keyp) This is for testing the matrix keypad located on the controller, and not for EK9S reader keypad. As any key is pressed, its value will be shown on the LCD display. -
Page 33: Output Test
EL2305D Access Control Panel User Guide 2.7.3 TEST INPUT (Test IN) The display indicates the status of the Door Switch (DS), Push Button (PB), Sensor #1 (S1), and Sensor #2 (S2) 0=Contact Open, and 1= Contact Closed. DS 1 PB 0 S1 0 S2 0 2.7.4 TEST OUTPUT (Test OUT) - Page 34 EL2305D Access Control Panel User Guide > Output Test < 1 GP Output #1 Similarly, with other keys as listed below: - General Purpose Output #3 General Purpose Output #4 General Purpose Output #5 General Purpose Output #6 Door Lock –D1 Red LED –D1...
- Page 35 EL2305D Access Control Panel User Guide 2.7.5 TEST COMMUNICATION (Test Com) Echo Test: Used PC linked via EL70 to controller. Run a communication program such as HyperTerminal on the PC and set it to behave as a terminal. Printer Test: the controller will send a stream of characters out of the serial port.
- Page 36 EL2305D Access Control Panel User Guide 2.7.7 TEST MEMORY (Test RAM) Press the <#> Key to commence testing >>> RAM TEST <<< Confirm ( * / # ) If all the pages of the Random Access Memory (RAM) are good. The display screen will show “GOOD RAM!”...
-
Page 37: Save Parameter
EL2305D Access Control Panel User Guide 2.8 SAVE PARAMETER This command allows you to save all the parameters that you have programmed in the secondary storage device, which will be retained even when power supply is switched off. Press the <#> Key to confirm. - Page 38 EL2305D Access Control Panel User Guide CHAPTER 3 3. USER MENU Note: To access the programming menu, Present the Master Card to Readers in Door 1, and key in the PIN 1. (Do not present the Master card to door 2. Door 2 readers will not accept the master card).
- Page 39 EL2305D Access Control Panel User Guide TRANSACTION MENU OUTPUT MENU VIEW TRANSACTION ON OUTPUT PRINT TRANSACTION OFF OUTPUT SECOND OUTPUT TIME ZONE CLEAR TRANSACTION LOG TRANSACTION COMMUNICATION MODE SENSOR MENU PIN ENTRY ...
- Page 40 EL1335D Access Control Panel User Guide 3.1 TEST MENU 3.1.1 SET DATE (Set Date) >>> SET DATE <<< 09 – 09 – 89 Day Month Year Day of the Week The cursor will be blinking at the following filed. You may key in the new value. ...
- Page 41 EL1335D Access Control Panel User Guide 3.1.2 SET TIME (Set Tim) >>> SET TIME <<< 00 : 02 : 45 Hour Minute Second The cursor will be blinking at the following filed. You may key in the new value. 3.1.3 SET HOLIDAY (Set HOL) >...
- Page 42 EL1335D Access Control Panel User Guide (From 1 to 20) A total of 20 holidays may be preprogrammed, using the Set Hol. 3.1.4 SET TIMER (Set Tmr) A total of 24 timers may be programmed for each door, each timer has two sets of start-stop times.
- Page 43 EL1335D Access Control Panel User Guide 3.1.5 ADJUST CLOCK (Adj Clk) This command allows the user to calibrate the accuracy of EL2305D calendar clock. It allows the user to add or subtract up to 60 seconds daily or weekly.
- Page 44 EL1335D Access Control Panel User Guide 3.1.6 DAY LIGHT SAVING (Day light) This command allow controller automatically adjust time one hour forward according to the day light saving start date and adjusted one hour backward according to the day light saving end date. ...
- Page 45 EL1335D Access Control Panel User Guide Install Cards Time Zon #01 Then the Time zone value is shown. You should choose which access time zone you want. Install Cards 000000 To 000000 Key in the starting number and ending number (provided number are sequential) of the card.
- Page 46 EL1335D Access Control Panel User Guide You can select either to install cards in Door 1 or Door 2. Delete Cards 012345 Key in the starting number and ending number (provided number are sequential). 3.2.3 VIEW DATABASE (View DB) View User Cards Door #01 ...
- Page 47 EL1335D Access Control Panel User Guide View User Cards Page No : 01 There are 16 memory pages that you can select from for each door. 3.2.4 PRINT CARD DATABASE (Prt DB) This command works in the same way as View Card Data Base, except that instead of showing the cards on the LCD screen, the cards are sent to the communication port.
- Page 48 EL1335D Access Control Panel User Guide Set Cust Code 0000 3.2.6 PROGRAMMABLE PIN (Prg PIN) If PROG PIN set PIN 2, you are not allowed to change the PIN value the display will show “Not Allowed” If PROG PIN set PIN 1 and you have not installed any card, the display will show “No Record Found”.
- Page 49 EL1335D Access Control Panel User Guide If you wish to change the PIN number of a specified card, you need to search for the card in the correct page and then modify its value. Default setting of the PIN value is 0000. Program PIN 0001 123456...
- Page 50 EL1335D Access Control Panel User Guide CLR D1DB – will clear database in door #1 CLR D2DB – will clear database in door #2 3.3 TRANSACTION MENU 3.3.1 VIEW TRANSACTION (View Trn) View Log 09/09 12:24 012345 You can select either to view data in Door 1 or Door 2. ...
- Page 51 EL1335D Access Control Panel User Guide <F4> Print Alarm Individual – Print all abnormal transaction of a specific holder. 3.3.3 SECOND FIELD FOR TRANSACTION (Se- cond) Send Seconds? Second field OFF OFF – controller will not send the second field to the software. ...
- Page 52 EL1335D Access Control Panel User Guide 3.3.5 LOG TRANSACTIONS (Log Trns) This command is allows you to choose what events you wish to log in the transaction buffer. The default setting is to record all events. If you desire to record only selected activities, you should change the setting to “NO”.
- Page 53 EL1335D Access Control Panel User Guide PIN MODE (ON/OFF) – to set controller into the more secure mode of requiring PIN in addition to card. Anti 3.4.2 ANTI-PASSBACK COMMAND OFF – Anti-Passback is not implemented. TMR (Timer) – Anti-Passback by Timer. ...
- Page 54 EL1335D Access Control Panel User Guide A card that has been used to gain access cannot be reused until a certain time elapsed. This time delay is set using the Anti-Passback Setting command. You may key in any value between 000 and 120 minutes. 3.4.4 AUTOMATIC LOCK RELEASE TIME ZONE COMMAND (ALR TZ) Set A.L.R.
-
Page 55: Sensor Menu
EL1335D Access Control Panel User Guide Set PIN TZ 01 SUN:00 MON:01 3.4.6 KEYPAD LOCK OUT COMMAND Determines the number of times that a person is allowed to make mistake in keying PIN number repeatedly before the card is taken out of service. 3.5 SENSOR MENU ... - Page 56 EL1335D Access Control Panel User Guide 3.5.1 MANUAL OPERATION OF SENSING INPUTS Exclude Sensor Command: You should enter the sensor number as before. Exclude Sensor Sensor # 1 Arm Sensor Command: Press <#> key to confirm. Disarm Sensor Command: Press <#> key to confirm. 3.5.2 AUTOMATIC OPERATION OF SENSING INPUTS ...
- Page 57 EL1335D Access Control Panel User Guide Set Sensor TZ SUN:00 MON: 00 Sensor # Day Timer Day Timer 3.6 OUTPUT MENU 3.6.1 ON OUTPUT COMMAND You are expected to key in any number from 1 to 6 as there are 6 output points.
- Page 58 EL1335D Access Control Panel User Guide 3.6.2 OFF OUTPUT COMMAND The point selected will immediately turn off as an output. Off Output Output #1 3.6.3 SET OUTPUT TIME ZONE The Set Output Time Zone command allows you to program the 6 outputs to be activated automatically according to timer settings.
-
Page 59: Communication Mode
EL1335D Access Control Panel User Guide 3.7 COMMUNICATION MODE ENQUIRY MDOE – it is assumed that you have linked all controllers together via a communication bus to a PC running an Access Management Software like E.WIN, which allows you to remotely program and monitor all access functions. ... - Page 60 EL1335D Access Control Panel User Guide Define PIN Code 0000 TZ:01 3.9 CLEAR MEMORY This command is to clear all memory in User defined settings, and return them to default values. Revision 1.2.19...
Need help?
Do you have a question about the EL2305D and is the answer not in the manual?
Questions and answers