Table of Contents
Advertisement
Quick Links
Advertisement
Table of Contents

Subscribe to Our Youtube Channel
Related Manuals for Elid EL2305D


Summary of Contents for Elid EL2305D
- Page 1 EL2305D DOOR ACCESS CONTROLLER TECHNICAL MANUAL (R1.1.20) ELID SDN BHD...
-
Page 2: Table Of Contents
ELID EL2305D DOOR ACCESS CONTROLLER TECHNICAL MANUAL TABLE OF CONTENTS 1. EL2305D Door Access Controller 1.1 INTRODUCTION 1.1.1 Keypad / Reader 1.1.2 Door Sensor 1.1.3 Electric Door Lock 1.1.4 Miscellaneous Inputs / Outputs 1.2 CARDS 1.2.1 Card Features 1.2.2 User Cards 1.2.3... - Page 3 3.2.5 Auto Lock Release Mode 3.2.6 Special Card Mode 3.2.7 Continuous Swipe Mode 3.3 SENSOR MENU 3.3.1 Sensor Type 3.3.2 Operation Mode 3.3.3 Delay Time 3.3.4 Alarm Duration 3.4 OUTPUT MENU 3.4.1 Output Type 3.4.2 Output Events Command 3.4.3 Output Duration Command 3.4.4 Example of Using EVENT Mode 3.5.1...
- Page 4 4.8 PIN ENTRY MENU 4.9 CLEAR MEMORY APPENDIX : I Fig 1 EL2305D wiring II Fig 2 EL2305D Sensor/Output wiring using EA8 III Fig 3 EL2305D Multi-drop wiring using EL70Q communicator IV Fig 4 EL2305D RS485 wiring using EL70Q communicator...
-
Page 5: El2305D Door Access Controller
Thus, it is an optional board. EL2305D can run without this board in normal operation. ELID offers a wide range of readers that may be used in EL2305D. Some of these are listed below: - Revision 1.1.20... - Page 6 EL2305D Door Access Controller Chapter 1- Introduction Keypad EK9S - Keypad with 4x7 segment display Readers ERH23 / ERH923 - HID Proximity Reader ERM723 / ERM823 / ERM923 - EM Proximity Reader ER728 / ER928 - Mifare contactless smart card reader Keypad - Reader EK9R - Keypad with 4x7 segment display &...
-
Page 7: Door Sensor
The controller may optionally be connected to an interface panel where various types of alarm outputs, control outputs and status inputs are connected. EL2305D can support 1 unit of EA8 (with 2 inputs and 6 outputs). The EA8 is related to Door 1. If your installation does not use these devices, ignore this section. - Page 8 These points are referred to as Input Sensor Points #1 and #2. Outputs: EL2305D is equipped with 7 outputs. Out of these, 6 outputs may be individually programmed to be operated by any input condition.
-
Page 9: Cards
This output is usually connected to a sounder to alert the occurrence of a break-in. 1.2 CARDS There are 4 types of cards used in ELID EL2305D Access Control System. Master Card : Master Card is supplied with each controller. -
Page 10: User Cards
Each card has a PIN (Personal Identification Number) code. The PIN code feature gives added security in that if a card is lost, the card cannot be used unless the PIN code is also known. EL2305D can be programmed to be in PIN mode or no-PIN mode. In the noPIN mode (PIN disable mode), users only need to swipe the card to open the door. - Page 11 EL2305D Door Access Controller Chapter 1- Introduction The procedure for using a special card is as follows: - First swipe the special card. If the card is valid, the equipment will request for the PIN number, irrespective of whether PIN code is enabled or not.
- Page 12 EL2305D Door Access Controller Chapter 1- Introduction To deactivate or turn off an output point Press the key "5" (also labeled with the word “OFF”), and the display will show :- Now key in the point number you wish to turn off, which can be from 1 to 6, followed by "#"...
-
Page 13: Access Granting
"INVALID TIME ZONE". ELID EL2305D has powerful features for implementing Time Zone. A calendar clock incorporated inside the controller keeps track of the date, day-of-week and the time. - Page 14 The above constitutes one Access Time Zone category, which could be used, say, for general office staff. EL2305D allows you to declare up to 10 different sets of Access Time Zone categories. You can therefore have entirely different time zone categories for managers, cleaners and etc.
-
Page 15: Installation
CN12. 2.1 COMMUNICATION OPTIONS There are 3 options for linking EL2305D to a PC. The first is by RS485, and this signal is available at CN3. The second option is by Multi-drop, which is available at CN6. The third is by LAN and this is available at TCP/IP Module. -
Page 16: Miscellaneous Inputs / Outputs
EL2305D Door Access Controller Chapter 2 – Installation do not have large surges on the communication bus. To select this mode, you must set the hardware jumper link to RS485 (default setting is Multidrop). This jumper is located bottom left corner. -
Page 17: Power Supply
12VDC supply provided from pin 8. Similarly input voltfree contacts can be wired to the sensor inputs using the 12VDCpower source. ELID supplies a standard interface panel fitted with relays and LED display for each output and opto-isolated inputs for the 2 sensor inputs. -
Page 18: Powering Up El2306D
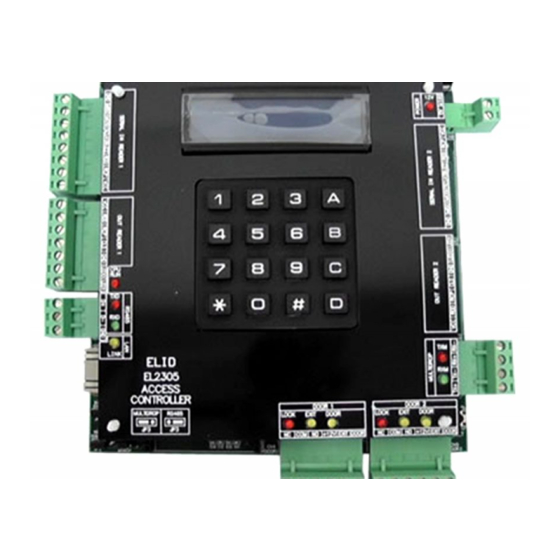
2.4 POWERING UP EL2305D Refer to the drawing in the previous page to identify key components on the EL2305D PCB. Note that 3 parts can be easily unplugged. They are:- • LCD display •... - Page 19 Chapter 2 – Installation The keyboard used is extended keyboard called EK9S which connected to the pin CN13 on EL2305D consists of 16 keys; most keys have dual functions. A brief description of the use of the keys is as follows.
- Page 20 EL2305D Door Access Controller Chapter 2 – Installation have pressed the <#> key, the display will go back to the original menu screen. Press B key in order to set the Engineering card number. The display will show: - EL2305D SET-UP...
- Page 21 EL2305D Door Access Controller Chapter 2 – Installation Pressing the <D> Key causes the setting toggle between ER5S, ER5M, DUAL, ER5. When the desired setting is shown, press the <#> key to accept it. If you are using 7-segment display such as EK9S, just leave the answer as ‘ER5S’.
- Page 22 EL2305D Door Access Controller Chapter 2 – Installation the maximum number of digits to be read. For example if the card contains the number string: 12345678 901234 56789 | Offset | | Length | And you want to read only ninth digit (i.e. 9) to the fourteenth digit (I.e.
-
Page 23: Engineering Menu Commands
EL2305D Door Access Contorller Chapter 3- Engineering Menu CHAPTER 3 3. ENGINEERING MENU COMMANDS DOOR MENU COMMUNICATION MENU LOCK RELEASE TIME BAUD RATE SHUNT ON TIME (Shun T.) ADDRESS NUMBER DOOR SENSOR (Dr Ssor) ... -
Page 24: Door Menu
EL2305D Door Access Controller Chapter 3 – Engineering Menu 3.1 DOOR MENU Select DOOR Menu, you will notice that the screen changes to: - Shun Push Ssor exit Lock Shunt Door Push Release Activation Sense Button Time Time Setting Setting Pressing the <#>... -
Page 25: Lock Release Time (L-R Time)
EL2305D Door Access Controller Chapter 3 – Engineering Menu (PIN1/PIN2), PIN Entry (yes/no), Valid Buzzer (yes/no) and Debounce Setting -- have common settings, applicable to both door 1 and door 2, and cannot be set individually for each door. 3.1.1... -
Page 26: Door Sensor
EL2305D Door Access Controller Chapter 3 – Engineering Menu In order to change the multiplication factor, press the <D> Key. Each time the <D> Key is pressed the value changes. When the desired value is shown on the screen, press the <#> Key to accept. -
Page 27: Pin Select
The PIN entry command allows you to set whether you wish to have the facility of opening the door by PIN number (without card). EL2305D allows you to predefine up to 10 such numbers that can be used to open the door. -
Page 28: Door Sensor Debounce
Set Door Param RDR2 as EXIT YES If you are using EL2305D as 2-door controller, you may need to press D to toggle the parameter from YES to NO, which means reader 2 located at CN2 will become the IN reader of door 2. -
Page 29: Card Menu
EL2305D Door Access Controller Chapter 3 – Engineering Menu 3.2 CARD MENU Select Card Menu Command. The display will show: - Dual Size Size Database Transaction Card Size Dual Card Mode Size Database Mode And pressing <#> key, a second screen appears;... -
Page 30: Transaction Size
And it is desired to read only digit 9 to 13, then the value of the "offset" is 08 and the "length" is 5. For EL2305D, the maximum length is 6, and the maximum offset is 17. On entering this command, the screen will show: -... -
Page 31: Dual Card
EL2305D Door Access Controller Chapter 3 – Engineering Menu 3.2.4 Dual Card In dual card mode, which is a high security mode, the controller will require 2 valid cards to be swiped before the request is granted. In other words, it requires 2 persons to be present in order to activate the event such as granting door access to a highly secured area controlled by the controller. -
Page 32: Continuous Swipe Mode
If the setting is "NO", then the reading is disabled until the door is closed. 3.3 SENSOR MENU EL2305D caters for 2 sensor inputs for the door, which may be programmed for Status Supervision, Alarm Supervision or Interlock Inhibit. -
Page 33: Operation Mode
EL2305D Door Access Controller Chapter 3 – Engineering Menu Key whereupon the following screen will appear: - Ssr Oprn Dly Alm Door Enter the sensor for door number ‘01’, the following screen will appear:- Set Sensor Param Ssor Type Sensor Input Number... - Page 34 EL2305D Door Access Controller Chapter 3 – Engineering Menu Status Input (such as MOTOR ON/OFF) can be in either state both of that are normal in operation. Alarm Input (such as a Motion Detector) however is normally in Non-alarm State and when it goes to the other state, it is in an abnormal condition and must cause the Sensor Alarm Output to be activated.
-
Page 35: Delay Time
EL2305D Door Access Controller Chapter 3 – Engineering Menu 3.3.3 Delay Time The third command for setting sensor input parameter is Delay Time Setting. Press the <C> Key and the screen will show: - Set Alm Trg Dly Dlay 1 00 Dlay 2 00 ... -
Page 36: Alarm Duration
This function is only active in the EL2000 emulation mode. 3.4 OUTPUT MENU In the EL2000 emulation mode, EL2305D can control 2 output points referred to as GP output #1 and GP output #2. These points may be used for a wide range of application. They can be thought of as card-controlled switches allowing authorized persons to turn on and off other equipment. -
Page 37: Output Type
In addition, the outputs can also be timer controlled. Various commands affecting the output points are described in Section 4.6. In the EL2305D mode of operation, all 6 outputs can be used as GP Outputs or event activated outputs. The outputs can be programmed to be activated by a combination of events occurring at the door. - Page 38 EL2305D Door Access Controller Chapter 3 – Engineering Menu In the GP (General-Purpose) mode, the output can be activated manually by means of a special card, or from a PC or by a timer. In the EVNT (event) mode, the output is also activated by an input event, which may be any of the transaction codes recognized by the unit.
-
Page 39: Output Events Command
Note that if you have chosen any of the points to be "GP" instead of "EVENT", then this command will have no effect on those points. EL2305D can distinguish and log 21 different types of events. This is shown in the table below:-... -
Page 40: Output Duration Command
EL2305D Door Access Controller Chapter 3 – Engineering Menu TABLE OF TRANSACTION CODE CODE MEANING OF CODE CODE MEANING OF CODE Valid Entry (IN) Output On Invalid Card Output Off Duress Alarm Exclude Sensor Invalid PIN Include Sensor Door Open Alarm... -
Page 41: Example Of Using Event Mode
This can be done by using EL2305D with 2 readers, the entry reader for workers coming to work and the exit reader for workers going home. -
Page 42: Baud Rate
3.5.2 Unit Number Press the <B> Key to choose Unit No. For EL2305D, Unit Number Setting can be set from 1 to 16 but if you choose 2-door 2-reader configuration Unit Number setting can be odd number only. In other words, unit number can only be set to 01, 03, 05, 07, 09, 11, 13, 15. -
Page 43: Set Lan Command
- eg 4001 Note that you will also need to key in the same values in E.WIN, so that the PC knows where in the network EL2305D is located. Please check with the network administrator on what values to set and key in these values. -
Page 44: Test Menu
EL2305D Door Access Controller Chapter 3 – Engineering Menu Press <D> to change the value to YES follow by the <#> key. If your setting is successful, you will see the following on the screen. “ Wait …123456789” 3.6 TEST MENU This menu contains 8 diagnostic test routines for checking the hardware of the controller. -
Page 45: Test Reader
EL2305D Door Access Controller Chapter 3 – Engineering Menu 3.6.2 Test Reader On entering this command, the following display will show:- Reader Test Plse Swipe Card You can swipe card on any of the 4 Readers. The display will be as... -
Page 46: Test Output
EL2305D Door Access Controller Chapter 3 – Engineering Menu 3.6.4 Test Output On entering this command, the following display will show:- > Output Test < If Key 1 is pressed, the Duress Alarm Output for both EA8 is switched on and the display will show: - >... -
Page 47: Test Communication
HyperTerminal on the PC and set it to behave as a terminal. When the Echo Test is executed, everything typed on the keyboard of the PC will be sent to the EL2305D controller and be displayed on the LCD screen. Conversely, if any of the keys on the EL2305D panel is pressed, the character will appear on the PC screen. -
Page 48: Test Memory
EL2305D Door Access Controller Chapter 3 – Engineering Menu As you press any of the keys on the door 1 serial keypad, the value of the key will be displayed on the 7-segment display. Press <*> key to abort.] 3.6.7... -
Page 49: Save Parameter
EL2305D Door Access Controller Chapter 3 – Engineering Menu the display shows "GOOD ROM!" it implies that the checksum is correct. 3.7 SAVE PARAMETER This command allows you to save all the parameters that you have programmed in the secondary storage device, which will be retained even when power supply is switched off. -
Page 50: User Menu Commands
EL2305D Door Access Controller Chapter 4 – User Menu CHAPTER 4 4. USER MENU COMMANDS DOOR MENU TRANSACTION MENU PARAMETER MENU VIEW TRANSACTION ANTI-PASSBACK TIME PRINT TRANSACTION AUTO LOCK RELEASE SECOND TIME ZONE ... -
Page 51: Time Menu
EL2305D Door Access Controller Chapter 4 – User Menu 4.1 TIME MENU Enter into the TIME MENU. There are five sub-menus. Date light 4.1.1 Set Date To choose the Set Date Command, press the <A> Key, and the following display is shown: - >>>... -
Page 52: Set Time
EL2305D Door Access Controller Chapter 4 – User Menu be accepted and the old value remains. The cursor then jumps to the day of the week field, which should be entered as follows: - Sunday Monday Tuesday Wednesday Thursday Friday Saturday When this field is set and the <#>... -
Page 53: Set Holiday (Set Hol)
<*> Key. 4.1.3 Set Holiday (SET HOL) EL2305D may be programmed to recognize holidays. During such days, a different set of time zones may be activated. A total of 20 holidays may be preprogrammed, using the Set Hol. Command <C>. -
Page 54: Set Timer
EL2305D Door Access Controller Chapter 4 – User Menu It is a good idea to check all your entries again after you have completed your entry. 4.1.4 Set Timer A total of 24 timers may be programmed for each door, each timer has two sets of start-stop times. -
Page 55: Adjust Clock
<*> key to return to main menu. 4.1.5 Adjust Clock This command allows the user to calibrate the accuracy of EL2305D calendar clock. It allows the user to add or subtract up to 60 seconds daily or weekly. -
Page 56: Card Menu
EL2305D Door Access Controller Chapter 4 – User Menu Enter the start date and end date, then set ‘Enable Auto’ to “Yes’ in order to activate the day light saving function. 4.2 CARD MENU Under this menu are the following commands displayed on two screens. -
Page 57: Delete Cards
EL2305D Door Access Controller Chapter 4 – User Menu You can select either to install cards in Door 1 or Door 2. For example, if you wish to select door 2, just key in [ 0 2 <#> ]. If you wish to select door 1, key in [ 0 1 <#>... -
Page 58: View Data Base
EL2305D Door Access Controller Chapter 4 – User Menu 4.2.3 View Data Base On executing this command, the following screen appears:- View User Cards Door #01 You can select either to view cards in Door 1 or Door 2. For example, if you wish to select door 2, just key in [ 0 2 <#>... -
Page 59: Programmable Pin
This is because PIN 2 is calculated by an algorithm, and you are not allowed to change the PIN value. If you have set EL2305D to PIN 1, but you have not installed any card, then the display will show: -... -
Page 60: Access Time Zone
EL2305D Door Access Controller Chapter 4 – User Menu The memory for storing card numbers are arranged in a number of pages, with each page capable of storing up to 1600 cards (depending on card mode set in Engineering Menu). If you wish to change the PIN number of a specified card, you need to search for the card in the correct page and then modify its value. -
Page 61: Clear Database
EL2305D Door Access Controller Chapter 4 – User Menu Press <*> key and the display will show:- Set ACC TZ D02 SUN:01 MON:01 Where D02 stands for Door 2. You can now repeat the procedures described in the last paragraph to fill in the required time zones. -
Page 62: View Transaction
EL2305D Door Access Controller Chapter 4 – User Menu 4.3.1 View Transaction On executing this command, the following display is shown:- View Log Door #01 You can select either to view data in Door 1 or Door 2. For example, if you wish to select door 2, just key in [ 0 2 <#>... -
Page 63: Second Field Transaction
EL2305D Door Access Controller Chapter 4 – User Menu Note that this function can only be executed when communication mode (7 menu under User menu) is set to Stand Alone Mode. 4.3.3 Second Field for Transaction Press the <C> Key to activate the Second Field for Transaction Command. -
Page 64: Door Menu
EL2305D Door Access Controller Chapter 4 – User Menu On entering this command, the screen will show: - Def Log Events #1 All Event YES The default setting is to record all events. If you desire to record only selected activities, you should press "D" to change the setting to "NO"... -
Page 65: Parameter Menu
EL2305D Door Access Controller Chapter 4 – User Menu DOOR MENU PARAMETER MENU Permanent Lock Release Inhibit Access Anti Pass-back PIN Mode ANTI PASS-BACK TIME AUTOMATIC LOCK RELEASE TIME ZONE AUTOMATIC PIN DISABLE TIME ZONE KEYPAD LOCKOUT 4.4.1 Parameter Menu... -
Page 66: Anti-Passback Command
EL2305D Door Access Controller Chapter 4 – User Menu On entering permanent lock release command, the following display will appear:- Set Door Param 01 Lock ReL OFF Here, “01“ refers to Door 1, and “OFF“ shows that the door is NOT released. -
Page 67: Anti Passback Time Setting
EL2305D Door Access Controller Chapter 4 – User Menu mode of Anti-Passback, both entry reader and exit reader must be installed. Therefore, it is only applicable in single door configuration. 4RDR (4-Reader) – This mode is currently not applicable in EL2305D 4.4.3... -
Page 68: Automatic Pin Disable Time Zone Setting
EL2305D Door Access Controller Chapter 4 – User Menu For example, to set the timers for Sunday to 01 and that of Monday to 03, we must key in “01 <#>” followed by “03<#>”. The display will now move to Tuesday and Wednesday. Continue to set the desired timers until all eight days (Sunday through Saturday, plus holiday). -
Page 69: Sensor Menu
EL2305D Door Access Controller Chapter 4 – User Menu 4.5 SENSOR MENU Commands in this menu are used for setting the 2 alarm sensing points for door 1. Door 2 does not have the hardware to implement this function. Functions that can be performed on these points are as follows: -... -
Page 70: Manual Operation Of Sensing Inputs
EL2305D Door Access Controller Chapter 4 – User Menu 4.5.1 Manual Operation Of Sensing Inputs If Exclude Sensor Command is selected, the screen will show: - Exclude Sensor Sensor # 1 You should enter the sensor number as before. If Arm Sensor Command is selected, then the screen will show: -... - Page 71 0600, then if at 0400, it is disarmed, it will remain disarmed until 1800 the following day, when Automatic Timer will rearm it. If EL2305D is set to the EL2000 emulation mode, then output #3 functions as the Sensor Alarm Output. In this case, each time an armed sensor is activated, it will activate the Sensor Alarm Output.
-
Page 72: Output Menu
EL2305D Door Access Controller Chapter 4 – User Menu 4.6 OUTPUT MENU The Output Menu consists of 3 commands associated with the control of output points. These output points might be used, for example, to switch on buzzers, pumps, lights, air-conditioners, fans etc. All 6-output points can be individually controlled. -
Page 73: Off Output Command
EL2305D Door Access Controller Chapter 4 – User Menu turn on. You will be able to see this only if the output point is connected to some equipment. 4.6.2 Off Output Command If Off Output Command is selected, the screen will show: -... -
Page 74: Communication Mode
EL2305D Door Access Controller Chapter 4 – User Menu Set Output TZ SUN:00 MON:00 8 timers may be assigned to it, one for each day. Note that if timers are not used for any day, the value 00 should be entered. -
Page 75: Pin Entry Menu
When the desired mode is shown on the screen, press the <#> Key to accept. 4.8 PIN ENTRY MENU EL2305D allows you to store up to 10 sets of PIN numbers for opening door – without using card. There are 2 commands under this menu. PIN LENGTH sets the number of digits of the PIN code. -
Page 76: Clear Memory
EL2305D Door Access Controller Chapter 4 – User Menu Define PIN Code 0000 TZ:01 The value “#02” refers to PIN code 2. You can follow similar procedures to enter in valid PIN. You can either continue to enter in other PIN code, or press <*> key to escape. -
Page 77: Appendix
APPENDIX Figure 1 : EL2305D with EK9R/EK8R Keypad+Reader Wiring Revision 1.1.20... - Page 78 Figure 2 : EL2305D sensor & output using EA8 Revision 1.1...
- Page 79 Figure 3 : EL2305D Multidrop wiring using EL70Q communicator Revision 1.1...
- Page 80 Figure EL2305D RS485 wiring using EL70Q communicator Revision 1.1...
Need help?
Do you have a question about the EL2305D and is the answer not in the manual?
Questions and answers