Advertisement
Quick Links
Advertisement

Related Manuals for Ability VS18200


Summary of Contents for Ability VS18200
- Page 1 AI-Eye 8MP Fixed Lens Bullet Camera Quick Start Guide Model: VS18200...
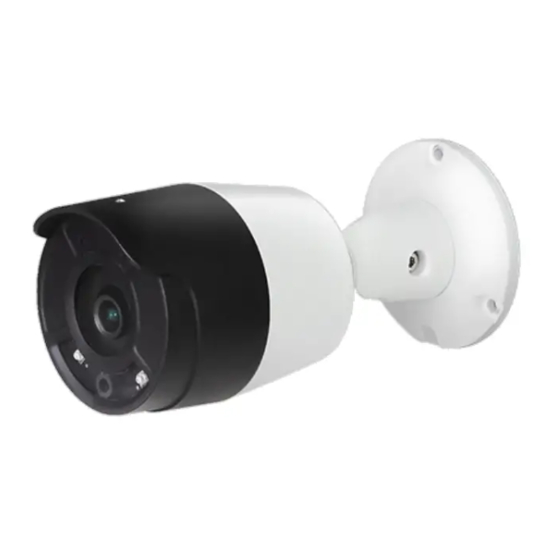
- Page 2 AI IP Camera Quick Start Guide 1.1 Accessing via Web Browser Default IP address User name Password https://192.168.0.11 admin AbAi.Camera1 1.2 Appearance Description The overview of the bullet camera is shown below:...
- Page 3 AI IP Camera Quick Start Guide 1.3 Packing list Component Pieces Camera Drilling sticker Expansion tube Tapping screw...
- Page 4 AI IP Camera Quick Start Guide 1.4 Cable Item Description LAN/POE Ethernet/POE connection. This interface supports POE. DC 12V+ / DC 12V – Power input interface. DC 12V(9.0V~15.0V) ALARM_OUT Alarm output and COM interfaces. The interface work together to form the alarm output. Alarm input interface.
-
Page 5: Installation
AI IP Camera Quick Start Guide Cable interface 2. Installation 2.1 Note 2.1.1Make sure the device in the package is in good condition and all the assembly parts are included. You will need the following:... - Page 6 AI IP Camera Quick Start Guide 2.2 Caution Please do not lift a camera by its cable.
- Page 7 AI IP Camera Quick Start Guide 2.3 Front cover of the camera removes Use a Allen key screwdriver to remover the front cover of camera, and rotator the cover to open it. Then, you can see the Reset button and SD card slot.
- Page 8 AI IP Camera Quick Start Guide 2.4 Reset Button To restore the camera to factory settings and software reboot the camera, you need to press and hold the reset button 5~10 seconds. To restore the camera to factory settings and hardware reboot the camera, ...
- Page 9 AI IP Camera Quick Start Guide 2.5 Micro SD card installation The SD card slot supports only class 6 or higher Micro SD card. To replace a Micro SD card, the device must be powered off. Otherwise, system exception may occur. When a Micro SD card is used for the first time, log in to the web client of the device and format the Micro SD card.
- Page 10 AI IP Camera Quick Start Guide 2.7 Camera mounting The suggested mounting height is over 3 meters at least. The right height and angle of camera is important to ensure image quality. The figure of the camera is installation requirements for concept and reference only. Tilt Angle=20∘...
- Page 11 AI IP Camera Quick Start Guide Wall Mounting Installation Step 1: Confirm that the cable outlet on the wall is large enough for the pigtails to pass through (size of hole size inserted here). Affix the drilling sticker to the camera installation position and ensure that the center of the sticker matches the cable outlet on the wall.
- Page 12 AI IP Camera Quick Start Guide Step 4: Loosen the three Philips head screws and adjust the camera to the required angle. Then re-tighten the screws, and adjust the position of the sunshield. Adjust the angle of the camera. Tighten 3 Philips head screws after adjustment. Tilt Angle : 90〫...
- Page 13 AI IP Camera Quick Start Guide Wall Mounting Installation with Junction Box and Camera Step 1 Place the junction box on the wall such that the arrows of bottom point to the ground as well as. Then use 4 screws to mount the junction box on to the wall. Step 2 Use 3 screws to fix the camera onto the cover of junction box.
- Page 14 AI IP Camera Quick Start Guide Pole Mounting Installation with Junction Box Step 1 Open up the 3 hose clamps and thread them through the installation holes on the mounting bracket. Then use 3 hose clamps to affix and install the pole-mount bracket to the pole.
- Page 15 AI IP Camera Quick Start Guide Step 3 Use 4 screws to fix the camera onto the cover of junction box. Then, clip the safety rope of the cover of the junction box to the bottom of the junction box. Thread the cables through the junction and attach them to the camera pigtails.
- Page 16 AI IP Camera Quick Start Guide 2.11 Cable connection 2.11-1 For safety precautions The lightning arrester must be installed and grounded if you install camera outdoor. Strong and weak current cables must be kept at least 5 cm apart from each ...
- Page 17 AI IP Camera Quick Start Guide 2.11-2 Power cable connection Connect the power cable to the device. 2.11-3 Ground cable installation Please connect ground cable of camera to ground.
- Page 18 AI IP Camera Quick Start Guide 2.11-4 Audio and alarm cable installation Connect the ground cable to ground the device, and then connect the power cable. If crimp terminals are not used, the wire thickness cannot exceed 1.5mm , and the length cannot exceed 25m.
- Page 19 AI IP Camera Quick Start Guide...
- Page 20 AI IP Camera Quick Start Guide 3. Check Item Please confirm the following to ensure that the equipment is installed correctly. Check Item Result All screw fully tightened The camera is securely installed to the mount or wall The ambient temperature meets the device specifications. Insulation and waterproofing measures have been taken to protect cables installed in humid environments, and the drip loops are in correct positions.
- Page 21 AI IP Camera Quick Start Guide Declaration of toxic and hazardous substances in electronic and electrical products...
- Page 22 AI IP Camera Quick Start Guide FCC compliance statement This device complies with part 15 of the FCC Rules. Operation is subject to the following two conditions: (1) this device may not cause harmful interference, and (2) this device must accept any interference received, including interference that may cause undesired operation.
Need help?
Do you have a question about the VS18200 and is the answer not in the manual?
Questions and answers