Ability AI-Vue VS1NL70 Quick Start Manual
Hide thumbs
Also See for AI-Vue VS1NL70:
- User manual (76 pages) ,
- User manual (29 pages) ,
- User manual (44 pages)

Related Manuals for Ability AI-Vue VS1NL70


Summary of Contents for Ability AI-Vue VS1NL70
- Page 1 AI-Vue Camera Bullet Quick Start Guide Copyright ©Ability Enterprise Co., Ltd. All rights reserved. Quick Start Guide Ver:01...
-
Page 2: Start To Use
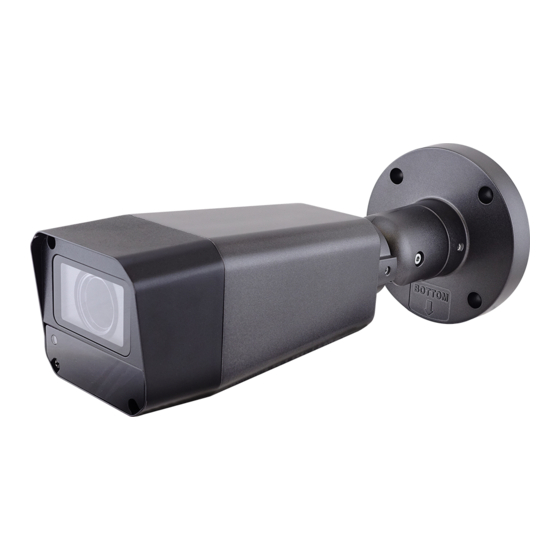
AI-Vue Camera Quick Start Guide 1. Start to Use 1.1 Accessing via Web Browser Default IP address User name Password https://192.168.0.11 admin AbAi.Camera1 1.2 Appearance Description The overview of the bullet camera is shown below:... - Page 3 AI-Vue Camera Quick Start Guide 1.3 Packing List Component Camera Drilling sticker Power terminal Crimping terminal (support 0.75mm2 and 1.0mm2 cable) Allen wrench(M4) Waterproof connector for network cables Quick Start Guide Desiccant packet Expansion tube Tapping screw...
- Page 4 AI-Vue Camera Quick Start Guide 1.4 Cable Item Description Ethernet/POE connection. This interface LAN/POE supports POE. DC 12V+ / DC 12V – Power input interface. DC 12V(9.0V~15.0V) AC 24V + / AC 24V - and AC 24V(18.0V~29.9V) Ground interface of an IPC ALARM_OUT Alarm output and reference interfaces.
-
Page 5: Installation
AI-Vue Camera Quick Start Guide 2. Installation 2.1 Note 2.1.1Make sure the device in the package is in good condition and all the assembly parts are included. 2.2 Caution Please do not lift a camera by its cable. (NG) - Page 6 AI-Vue Camera Quick Start Guide 2.3 Reset Use the phillips screwdriver to remove the front panel of camera. Step 1: To restart the camera, you need to press and hold the reset button less than 3 seconds. To restore the camera to factory settings, you need to press and hold the RESET button and power on the camera.
-
Page 7: Micro Sd Card Installation
AI-Vue Camera Quick Start Guide 2.4 Micro SD Card Installation Please refer to figure 2.4, insert the memory card to memory card slot on the rear panel of the camera. Use phillips screws (#2) to remove the front panel of camera and insert the SD card. During SD card installation, you are advised to turn the camera maintenance window downward and insert the SD card into the SD card slot from below to avoid accidentally dropping the SD card into the camera. - Page 8 AI-Vue Camera Quick Start Guide 2.5 Front panel of camera installation Please remove the dirt on the waterproof rubber strip and you need to avoid catching the fall prevention rope or other foreign objects, finally make sure tighten the screw before locking the front cover of the camera.
-
Page 9: Camera Mounting
AI-Vue Camera Quick Start Guide 2.6 Camera mounting Step 1: Confirm that the cable outlet on the wall is large enough for the pigtails to pass through. Affix the drilling sticker to the camera installation position and ensure that the center of the sticker matches the cable outlet on the wall. - Page 10 AI-Vue Camera Quick Start Guide Step 4: Loosen the three hex socket bolts and adjust the camera to the required angle. Then re-tighten the screws, and adjust the position of the sunshield. ※ Tighten 3 hex socket head cap screws after adjustment. ※...
-
Page 11: Cable Connection
AI-Vue Camera Quick Start Guide 2.7 Cable connection 2.7-1 For safety precautions The lightning arrester must be installed and grounded if you install camera outdoor. Strong and weak current cables must be kept at least 5 cm apart from each other. When connecting the cables to the device, take care to avoid connecting strong current cables to weak current interfaces or you will damage your device. - Page 12 AI-Vue Camera Quick Start Guide 2.7-2 Power cable connection Connect the ground cable to ground the device, and then connect the power cable. If crimp terminals are not used, the wire thickness cannot exceed 1.5mm², and the length cannot exceed 25m. If crimp terminals are used, the wire can be up to 0.75mm² for a 15 m length of wiring or up to 1.0mm²...
- Page 13 AI-Vue Camera Quick Start Guide 2.7-4 Audio and alarm cable installaion It is recommended that twisted pair cables be used as alarm cables. The diameter of the cable core ranges from 22AWG to 28 AWG. The impedance of the entire cable is less than or equal 100 ohms.
- Page 14 AI-Vue Camera Quick Start Guide 2.8 Cable waterproof and insulation Waterproof and insulate all cables including power cables, network cables, and unused pigtails. 1. Wrap one layer of insulation tape around each cable joint. 2. Stretch the waterproofing tape evenly to twice its original length. Then apply it for three layers from bottom to top, from top to bottom, and from bottom to top again.
- Page 15 AI-Vue Camera Quick Start Guide 2.9 Check Item Please confirm the following to ensure that the equipment is installed correctly. Check Item Result All screw fully tightened The camera is securely installed to the mount or wall The ambient temperature meets the device specifications. Insulation and waterproofing measures have been taken to protect cables installed in humid environments, and the drip loops are in correct positions.
- Page 16 AI-Vue Camera Quick Start Guide Declaration of toxic and hazardous substances in electronic and electrical products 設備名稱(Equipment name) : 型號(型式)Type designation (Type): AI-Vue 自動對焦槍型網路攝影機 VS1NL70/VS1NN60 限用物質及其化學符號 Restricted substances and its chemical symbols 單元 鉛 汞 鎘 六價鉻 多溴聯苯 多溴二苯醚 Unit Hexavalent Polybrominated Polybrominated...
Need help?
Do you have a question about the AI-Vue VS1NL70 and is the answer not in the manual?
Questions and answers