
Related Manuals for Meade LX200R


Summary of Contents for Meade LX200R
- Page 1 Instruction Manual ® 8", 10", 12", 14", 16" LX200 Advanced Ritchey-Chrétien Telescopes ® with GPS and AutoStar II Hand Controller (800) 626-3233 www.meade.com...
-
Page 3: Table Of Contents
R Users: See APPENDIX G 68, for features unique to the 14" model. ® The name "Meade," the Meade logo, LX200 and Autostar are trademarks registered with the U.S. Patent and Trademark Office and in principal countries throughout the world. -
Page 4: Quick-Start Guide
It is recommended that you attach the supplied tripod to the II setup indoors in the light so that you become familiar with the parts and operation before moving the telescope out- side into the dark for observing. The setup is the same for the standard field tripod and the giant field tripod. - Page 5 AutoStar II handbox. Attach microfocuser: Remove the dust cap from the rear cell port (A) of the telescope (Note: Telescope not shown for clarity). Thread the micro- focuser adapter (B) into the rear cell port thread.
-
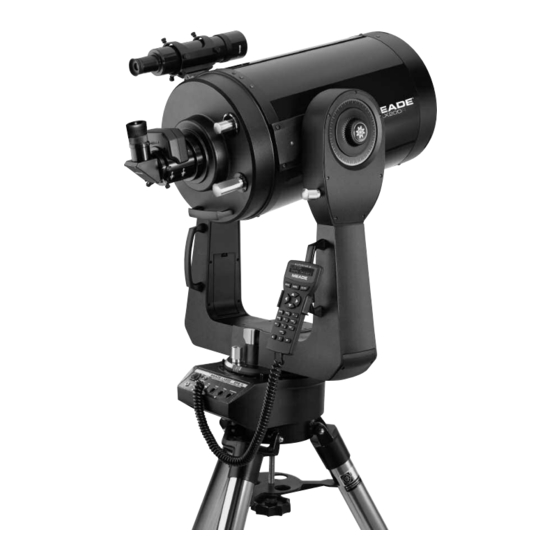
Page 6: Telescope Features
TELESCOPE FEATURES (not shown) Fig. 1: The Telescope; Computer Control Panel (inset); AutoStar II Handbox (inset). LX200R (not shown, on left fork arm) - 6 - 1& AutoStar II Hand Controller. See page 9. - Page 7 OFF. The red power indicator LED next to the switch illuminates when power is supplied to the AutoStar II handbox, the microfocuser, and to the telescope’s motor drives (the LED can be turned off in the Panel Light menu; see page 27).
-
Page 8: Optional Accessories
Arrow keys of the AutoStar II hand controller. Plug microfocuser into the Focus port (13C, Fig. 1). Tube Adapters: The optical and mechanical axes of the LX200R telescope have been carefully aligned at the factory to ensure accurate object pointing. Do not loosen or remove the optical tube assembly from the tube adapters. -
Page 9: Handbox
Download the Want to learn more about latest satellite data, star and object catalogs, tours, serial commands list, and software downloading the latest revisions, directly from the Meade website (www.meade.com). (Requires the option- updates of AutoStar II software from the LX200... -
Page 10: Moving Through Autostar Ii's Menus
"spiral search." Arrow Keys: The Arrow keys have several functions. Press an Arrow key to slew the telescope in a specific direction (up, down, left, and right), at any one of nine different speeds. See , page 17. Use the Up and Down Arrow keys SLEW SPEEDS to move the telescope vertically up and down. - Page 11 AutoStar II handbox. Coil Cord: Plug one end of the AutoStar II coil cord into the HBX port (13F, Fig. 1) of the computer control panel of the telescope and the other end into the AutoStar II coil cord port. See above.
-
Page 12: Getting Started
Place the entire telescope onto the top of the tripod head, and insert the thread- ed rod into the central hole in the bottom of the drive base of the telescope. Tighten the tension knob (Fig. 4); firm tightening of the tension knob is sufficient to result in rigid positioning of the tripod legs. -
Page 13: How To Assemble Your Telescope
(C) Microfocuser; (D) 1.25" accessory adapter. SC accessory adapter (L) may be used in this position instead if the telescope accessories are being used. Do not use either adapter if using a 2" diagonal diagonal mirror; (E) Eyepiece holder thumbscrew; (F) Eyepiece (Note: Your eyepiece make look different than the one pictured here);... -
Page 14: Choosing An Eyepiece
Attach microfocuser: Remove the dust cap from the rear cell port (5, Fig. 1) of the telescope. Thread the microfocuser adapter (B, Fig. 6) onto the rear cell port thread. Slide the microfocuser (C, Fig. 6) over the microfocuser adapter and tight- en the three hex screws (K, Fig. -
Page 15: Mounting And Adjusting The Viewfinder
43. The power, or magnification of a telescope is determined by the focal length of the tel- escope and the focal length of the eyepiece being used (an eyepiece's focal length is printed on the side of the eyepiece). -
Page 16: Observing
For more precise focusing, see FOCUSING THE EYEPIECE Once you get a feel for how your telescope moves and focuses, try to view some- thing more challenging, like a bird or a distant moving train. TO TRACK AN OBJECT AUTOMATICALLY GO TO SATURN models are excellent high-resolution terrestrial (land) telescopes. -
Page 17: Focusing The Eyepiece With The Microfocuser
Super Plössl 26mm. Speeds 7 or 8: Best used for rough centering of an object in the viewfinder. Speed 9: Moves the telescope quickly from one point in the sky to another. Bring the object into focus (see below). -
Page 18: Observe The Moon, Astronomical Observing
Observe the Moon Point your telescope at the Moon (note that the Moon is not visible every night) and practice using the Arrow keys, the microfocuser and the slew speeds to view different features. The Moon contains many interesting features, including craters, mountain ranges, and fault lines. - Page 19 North is. It may not actually level or tilt the telescope or point to North—it is just detecting these positions. This make take a minute or two.
-
Page 20: Observe A Star Using The Automatic Tracking Feature
Now that your telescope has been aligned, you are able to track celestial objects. In not visible in the eyepiece this example, the AutoStar II Arrow keys are used to find a star, and then AutoStar II's after the telescope finish- tracking capability automatically keeps the star centered in your telescope's eyepiece. -
Page 21: Finding True North
Detecting True Level To detect level of the base of the telescope, AutoStar II must calculate the tip and tilt of the telescope at three compass points and then compensate for it. Finding level involves the geometric calculations of a "plane." In order to define a plane, three positions are necessary. -
Page 22: Basic Autostar Ii Operation
- 22 - OBJECT MENU Want to see Mars? The Orion nebula? The Andromeda galaxy? Select from over 145,000 objects and press GO TO to move the telescope automatically to an object. Select Item: Event EVENT MENU Display the time of... -
Page 23: Navigating Autostar Ii
100 years), meteor showers, equinoxes and solstices, and the mini- mums of Algol. One very practical use of the Event menu is to check the Sunset option to determine when you can begin your astronomical observing session. - 23 - LX200R TIPS... -
Page 24: Autostar Ii Menus
AUTOSTAR II's MENUS - 24 -... -
Page 25: Objects Menu
GO TO once to change the second line to the name of the bright- est star in the constellation. Press GO TO a second time to slew the telescope to that star. Use the Scroll keys to cycle through the list of stars in the constellation, from brightest to dimmest. -
Page 26: Event Menu
Press ENTER. AutoStar II searches the libraries for the identity of the object being observed. If the telescope is not directly on an AutoStar II library object, the nearest library object is located and displayed on the screen. Press GO TO and the telescope slews to that object. -
Page 27: Glossary Menu, Utilities Menu
Alarm: Selects a time for an alarm signal to sound as a reminder. To use the Alarm, press ENTER, then choose "Set" or "Start/Stop." Eyepiece Calc: Calculates information about an eyepiece for the specific telescope to which AutoStar II is connected. -
Page 28: Setup Menu
Daylight Saving menu (see above) to turn the Daylight Saving option on or off. Keep in mind that the telescope is receiving the correct time whether or not you set this option to display your local time. - Page 29 R.A. and the Dec. axes by entering a number from 0% to 199%. This sets the back- lash in the way the Arrow keys move the telescope along an axis. If you enter a value near 199%, telescope responds more quickly as you hold down an Arrow key.
- Page 30 AutoStar II handbox. Software: Sends only the basic AutoStar II software. This is useful if one user has downloaded a new version of AutoStar II software from the Meade website (www.meade.com) and wants to pass this software along to friends.
-
Page 31: "Hot Button" Menus
AutoStar II handbox. Software: Receives only the basic AutoStar II software. This is useful if one user has downloaded a new version of AutoStar II software from the Meade website (www.meade.com) and wants to pass this software along to friends. -
Page 32: Advanced Autostar Ii Features
If you plan to observe using AutoStar II at different geographic locations, you can store observation sites in AutoStar II's memory to help simplify your telescope setup. Perform these procedures using the Site options (Add, Select, Delete, Edit) of the Setup menu. -
Page 33: Creating User Objects
To enter coordinates of an object into the "User: Objects" option of the Object menu: Make sure AutoStar II has been initialized and the telescope has been aligned. After the telescope is aligned, "Select Item: Object" displays. (If necessary, use the Scroll keys to scroll through the menus, as previously described, to find this option.) Press ENTER. -
Page 34: Observing Satellites, Landmarks
11. Use the AutoStar II Arrow keys to center the object in the viewfinder, then look Satellite orbits change and new satellites (including the Space Shuttle) are launched. Visit the Meade website (www.meade.com) approximately once a month to get updated information and instructions on how to download this data to AutoStar II. If orbital parameters are more than one month old, the satellite pass may not happen at the time predicted by AutoStar II. -
Page 35: Identify
"Landmark: Add" displays. If you wish to add more landmarks, repeat steps 5 through 8. To Select a landmark from the database: Make sure the telescope is located and aligned exactly as when the desired land- mark was entered into memory. Display the "Landmark: Select" menu option. Press ENTER. -
Page 36: Browse
In this procedure, you will center an object you wish to have identified by AutoStar II in the telescope eyepiece and use the "Identify" menu to find out information about the object or the nearest object to it in the AutoStar II database. -
Page 37: Alternate Alt/Az Alignment Methods
LX200R TIPS Mirror, Mirror... The LX200R telescopes provide features that allow you to control the primary optical mirror and focus functions for more precise viewing capability. One control feature is the primary mirror lock (9, Fig. 1). The primary mirror lock helps eliminate mirror flop. -
Page 38: Two-Star Alt/Az Alignment
Set Home Position. Place the telescope in the home position. To Set the Home Position Manually: a. See Figs. 19 and 20. Loosen the telescope’s Dec. lock (17, Fig. 1). Set the optical tube to 0° on the Dec. setting circle (20, Fig. 1). -
Page 39: Periodic Error Correction
R.A. and the Dec. axes; in polar alignment, you need only train the telescope's R.A. axis. If you train the telescope in polar alignment, make sure that "Polar" is select- ed in the "Telescope: Mount" menu ("Alt/Az" is the default setting). -
Page 40: Photography
You may perform through-the-telescope photography with any 35mm camera body with a removable lens. You may connect a camera to a #62 T-Adapter which is then connect- ed to the microfocuser assembly. See Fig. 21. Using this method, the telescope effec- tively becomes the lens of the camera. - Page 41 Photography with Meade’s AutoStar Suite™ The AutoStar Suite with Meade LPI™ (Lunar Planetary Imager) or Meade Deep Sky Imager™ turns your Meade LX200R telescope, AutoStar and PC into even more pow- erful and easy-to-use astronomical instrument. LPI (Fig. 23) and Deep Sky Imager (Fig. 24) combine the power of an electronic astro- nomical imager with the simplicity of a web cam.
-
Page 42: Star Charts
Talking Telescope software translates AutoStar text to synthesized speech through PC speaker. • Includes a cable to connect your LX200R model to your PC. See the CD Rom that is included with AutoStar Suite for more information and instruc- tion manual. -
Page 43: Optional Accessories
A wide assortment of professional Meade accessories is available for the escope models. The premium quality of these accessories is well-suited to the quality of the instrument itself. Consult the Meade General Catalog for complete details on these and other accessories. - Page 44 Moon and planets. Each filter threads into the barrel of any Meade 1.25" eyepiece, and into the barrels of virtually all other eyepiece brands as well. Meade filters are available in 12 colors for lunar and planetary appli- cations, and in Neutral Density as a lunar glare-reduction filter.
- Page 45 Meade website (www.meade.com). #547 Power Adapter with Cable (all models except 16” LX200R): Includes a 25 ft. cord and permits powering from a standard home (115v AC) outlet. #607 Cigarette Lighter Adapter: Powering the...
-
Page 46: Maintenance
Take special care to read and understand this section well so that your give you the best optical performance. As part of final optical testing, every Meade Advanced Ritchey-Chrétien telescope is precisely collimated at the Meade factory before shipment. However, vibrations in shipping can cause the optical system to become misaligned. - Page 47 At this point, look at the front of the telescope where your finger is aiming. It will either be pointing directly at a set screw, or it will be between two set screws aiming at the set screw on the far side of the black plastic secondary mirror support.
-
Page 48: Gauging The Movement Of The Telescope
Friday. In the unlikely event that your LX200R or call the Meade Consumer Solutions Department first, before returning the tele- scope to the factory, giving full particulars as to the nature of the problem, as well as your name, address, and daytime telephone number. The great majority of servicing issues can be resolved by telephone, avoiding return of the telescope to the factory. -
Page 49: Specifications
SPECIFICATIONS 8" f/10 LX200R Specifications Optical design ...Advanced Ritchey-Chrétien telescope Clear aperture...203mm (8") Focal length ...2000mm Focal ratio (photographic speed) ...f/10 Resolving power ...0.56 arc sec Coatings ...Meade EMC Super Multi-Coatings Mounting ...Cast-aluminum, double-tine forks Gears ...5.75"-dia. worm gears, both axes Periodic Error Correction ...Both axes... - Page 50 12" f/10 LX200R Specifications Optical design ...Advanced Ritchey-Chrétien telescope Clear aperture...305mm (12") Focal length ...3048mm Focal ratio (photographic speed) ...f/10 Resolving power ...0.375 arc sec Coatings ...Meade EMC Super Multi-Coatings Mounting ...Cast-aluminum, double-tine forks Gears ...5.75"-dia. worm gears, both axes Periodic Error Correction ...Both axes...
- Page 51 16" f/10 LX200R Specifications Optical design ...Advanced Ritchey-Chrétien telescope Clear aperture...406.4mm (16") Focal length ...4064mm Focal ratio (photographic speed) ...f/10 Resolving power ...0.28 arc sec Coatings ...Meade EMC Super Multi-Coatings Mounting ...Heavy-duty double-tine forks Gears ...11"-dia. worm gears, both axes Periodic Error Correction ...Both axes...
-
Page 52: Appendix A: Equatorial (Polar) Alignment
Fig. 40) is located on the top surface of the telescope’s drive base. The Declination circle (Fig. 39) is located at the top of the fork tine. With the telescope pointed at the North Celestial Pole, the Dec. circle should read 90° (understood to mean +90°). -
Page 53: Equatorial Wedge
Equatorial Wedge An optional equatorial wedge is required for equatorial (polar) alignment. Note: The Meade Ultra wedge is recommended for the 10" to 14" models. The equatorial wedge permits use in an astronomical, or “equatorial,” mode. The wedge fits onto the field tripod. Equatorial alignment allows you to take longer expo-... -
Page 54: Lining Up With The Celestial Pole
During any 24 hour period, stars make one complete revolution about the pole, mak- ing concentric circles with the pole at the center. By lining up the telescope’s polar axis with the North Celestial Pole (or for observers located in Earth’s Southern Hemisphere, with the South Celestial Pole), astronomical objects may be followed, or tracked, simply by moving the telescope about one axis, the polar axis. -
Page 55: Precise Polar Alignment
10 minutes or longer). In particular, the number of Declination corrections required is a direct function of the precision of polar alignment. Precise polar alignment requires the use of a crosshair eyepiece. The Meade Illuminated Reticle Eyepiece (see... -
Page 56: Easy Polar Alignment
NASA, Hubble, HST, astronomy, Messier, satellite, nebula, black hole, variable stars, etc. Check Meade’s website for the latest product and technical information. You can download the latest software revisions, links to other astronomical sites, coordinates of celestial objects and the latest satellite tracking information for your AutoStar II handset. -
Page 57: Appendix B: Latitude Chart
APPENDIX B: LATITUDE CHART Latitude Chart for Major Cities of the World To aid in the polar alignment procedure (see page 54), latitudes of major cities around the world are listed below. To determine the latitude of an observing site not listed on the chart, locate the city closest to your site. Then follow the procedure below: Northern hemisphere observers (N): If the site is over 70 miles (110 km) North of the listed city, add one degree for every 70 miles. -
Page 58: Appendix C: Create Your Own Guided Tour
More commands will be added from time-to-time to the list below. Periodically visit Meade's website (www.meade.com) for future additions. When a Guided Tour is selected, AutoStar II slews your telescope to a predetermined list of objects and displays information about each object, such as type of object, con- stellation location, R.A. - Page 59 TITLE TEXT PLANET MOON COMET LUNAR ECLIPSE METEOR SHOWER CONSTELLATION STAR PICK ONE/PICK END AUTO SLEW Description String: Description of an object. Must be surrounded by quotation marks. If the description is longer than one line, each line must end with a quotation mark and a hard return.
- Page 60 PLANET "name" Enter PLANET and then the name of the desired planet in quotes. AutoStar II provides the user with a description of the selected planet from its database. For example: PLANET "Pluto" MOON This command accesses information about the Moon from the AutoStar II database. SATELLITE "name"...
- Page 61 PICK ONE AUTO SELECT MESSIER 13 AUTO SELECT MESSIER 15 AUTO SELECT MESSIER 92 AUTO SELECT MESSIER 4 AUTO SELECT MESSIER 68 AUTO SELECT NGC 1234 AUTO SELECT TEXT "None Available" "I'm sorry. There are no bright globular" "clusters visible at this time." PICK END AUTO SLEW ON / AUTO SLEW OFF With AUTO SLEW ON enabled in the tour, AutoStar II automatically slews the tele-...
-
Page 62: Appendix D: Training The Drive
APPENDIX D: TRAINING THE DRIVE Train the telescope motors using AutoStar II. Perform this procedure if you are experiencing any pointing accuracy problems. Fig. 41 depicts the complete Drive Training procedure. Use a terrestrial object, such as a telephone pole or lamp post, to train the drive. Complete this exer- Note: cise once every 3 to 6 months to maintain the highest level of telescope pointing accuracy. -
Page 63: Appendix E: The Moon Menu
When AutoStar II synchs to a lunar feature, the telescope switches to Selenographic coordinates, i.e., lunar latitude and longitude. To observe the Apollo 15 landing site using the Moon option: 1. -
Page 64: Appendix F: 16" Lx200R Features
Fig 1). The resulting misalignment of the axes will result in inaccurate slew- ing of the telescope in the GO TO mode. Do not attempt to turn the focus knob of the optical tube (6, Fig. 1) until you have read the following note. - Page 65 Use the following procedure to assemble your telescope: To Assemble the 16” Super Field Tripod The 16” Super Field Tripod (Figs. 48 and 49) for the Meade 16” supplied as a completely assembled unit, except for the spreader bar (4, Fig. 48) and the six lock-knobs (5, Fig.
- Page 66 See Fig. 55. e. A fifth 3/8”-16x3/4” long bolt is supplied with the telescope. Just using your fingers, loosely tighten this bolt under the plate. See Fig. 55. This bolt acts as a safety fea- ture to prevent the DB-15 connector and cable from being damaged when you dis- assemble the telescope.
- Page 67 Connect the supplied coil cord from the fan to the 12vDC output jack (E, Fig. 47) on the control panel. LX200R TIPS Observing Considerations • Try to pick an observing site away from street and house lights and car head- lights.
-
Page 68: Appendix G: 14" Lx200R Features
Next, remove the battery holder and install the batteries as described in step #2 on page 13. Replace the holder and close the compartment. Replace the screws if you plan to use the telescope in equatorial alignment. These screws are not necessary when using the telescope in altazimuth alignment. -
Page 69: Appendix H: De-Rotater And Microfocuser Assembly
4. Tighten to a firm feel the other two microfocuser hex screws. 5. Attach the de-rotater to the rear cell of the telescope. - 69 -... -
Page 70: Appendix I: Smart Mount
APPENDIX I: Smart Mount Introduction Smart Mount improves the pointing accuracy of your LX200R telescope's "Go to" sys- tem. precisely center objects. Smart Mount allows your telescope to learn about, and then correct for, any systematic pointing errors, regardless of the cause. - Page 71 OUNT PDATE above). If Smart Mount was "On" when you last powered off your telescope, it will be "On" when you start the next session. When Smart Mount is "Off," the telescope will not use any model you have created to refine pointing accuracy.
-
Page 72: Basic Astronomy
Moon, and our solar system comes from observations made by ama- teur astronomers. So as you look through your Meade Galileo. To him, a telescope was not merely a machine made of glass and metal, but something far more—a window of incredible discovery. - Page 73 The disk of Venus appears white as Sunlight is reflected off the thick cloud cover that completely obscures any surface detail. Mars is about half the diameter of Earth, and appears through the telescope as a tiny reddish-orange disk. It may be possible to see a hint of white at one of the planet’s polar ice caps.
-
Page 76: Meade Limited Warranty
ONE YEAR from the date of original purchase in the U.S.A. and Canada. Meade will repair or replace a product, or part thereof, found by Meade to be defective, provided the defective part is returned to Meade, freight-prepaid, with proof of purchase.
Need help?
Do you have a question about the LX200R and is the answer not in the manual?
Questions and answers