
Related Manuals for EVO Manufacturing EVO-3010


Summary of Contents for EVO Manufacturing EVO-3010
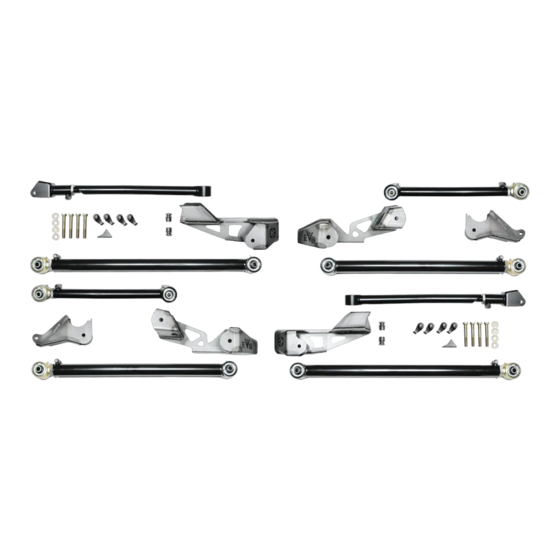
- Page 1 EVO Manufacturing Jeep Wrangler JL Unlimited 2018+ High Clearance Long Arm Kit Instruction Manual EVO-3010 4 DOOR ONLY...
- Page 2 Before starting installation procedure please read http://evomfg.com/Returns-Warranties-Shipping CAREFULLY READ AND FOLLOW ALL INSTRUCTIONS IN THIS MANUAL AND KEEP FOR FUTURE REFERENCE. IF YOU HAVE ANY QUESTIONS ABOUT THE PRODUCT CALL EVO MANUFACTURURING. FAILURE TO FOLLOW GUIDELINES COULD RESULT IN MALFUNCTION OF PARTS OR INJURY. PLEASE HAVE A TRAINED PROFESSIONAL ASSIST WITH OR INSTALL ALL PRODUCTS.
- Page 3 READ BEFORE INSTALL: It is generally a good idea to apply Loctite to all threaded bolts. ALWAYS wear safety glasses and other approved safety gear when working on a vehicle. All supplied bolts torqued according to chart at end of instruction. It is recommended all installation be performed by a trained professional.
- Page 5 Recommended Tools: o Welder and materials o Drill/ Metal hole saw o Wrench/Impact with sockets o Grinder/Cutting tool Safety Steps for installation o For installing EVO MFG products always use wheel chokes to block rear tires from rolling. o Always make sure you have everything necessary ready before install.
- Page 6 FRONT INSTALL 1. Carefully lift rear of vehicle by frame rails/crossmember extending the suspension until the tires leave the ground. 2. Securely place weight approved jack stands for vehicle under frame With vehicle rear tires now suspended and frame securely supported on stands, remove tires from vehicle.
- Page 7 1. Remove both driver and passenger side swaybar links bolts at axle and swaybar removing swaybar links and rotate sway up and out of the way. Factory front links will not be reused. There is a 6mm allen key inside both driver and passenger side upper sway bar studs.
- Page 8 8. Remove trackbar bolt at both axles. This will allow the axle to move side to side so be cautious about this from here on. 9. Unbolt driveshaft from axle. Tie up and out of the way. 10. To lower the axle without any binding, we will remove the factory lower front control arms.
- Page 9 11. Lower both front and rear axles (one at a time) while checking wire and hose lengths until springs can be removed. Adjust wire and hose connections as needed. 12. Remove springs 13. Remove upper control arms from frame and axle and set aside.
- Page 10 15. Remove exhaust crossover bar from chassis (small crossmember bar in front of exhaust crossover), Bar will not be reused. Keep hardware. 16. Using tools at your deposal, grinders, cut off wheels, torch, plasma cutter etc. Clearance all control arm mounts, front upper, lower and rear upper and lower clean to frame rails.
- Page 11 17. At exhaust collector, remove bolt on frame side of the collector and re- install opposite way (from front to back) through existing exhaust flange nut, tighten to snug. On rear side install supplied M8 nut. 18. Once all control arm mounts are clearance clean to frame.
- Page 12 20. After center pilot hole is drilled on driver side through both sides of frame DRILL INSIDE HOLE ONLY with 5/8” drill 21. On outside of frame we need to make a relief hole to install nut and washer inside frame to newer lower control arm bolt.
- Page 13 Weld front Brackets as shown. (not all areas are shown, weld all points of connection between frame and brackets, top and bottom, front and back) Driverside: Red Lines for Reference Passenger Side: Red lines for Reference...
- Page 14 23. Remove body mount bolt that is located in front of both rear tires. Keep hardware, will be reinstalling body mount.
- Page 15 24. Once all brackets are fitted to frame and fitment is acceptable. Clamp brackets to frame. Tack then weld ALL SEAMS, CONNECTIONS AND OPENINGS BETWEEN EVO BRACKETS AND FRAME. 25. Reinstall body mount using factory hardware. Avoid welding near transmission crossmember on front passenger bracket.
- Page 16 With EVO MFG rear long arm bracket located at frame, install upper control arm gusset welding to body mount lip and upper control arm bracket corner. Reference red line when welding. 26. On rear axle, cleanly cut and grind smooth to axle tube the entire driver and passenger side rear lower control/shock mounts.
- Page 17 27. Using the supplied EVO Rear Lower Control Arm mounts for the axle. Hold radius in bracket to axle tube. Notched front edge of EVO Bracket should be located flush with outer edge of axle bumpstop pad. Shock tabs should angle toward middle of vehicle.
- Page 18 28. After paint has dried. Install all control arms into their new mounting locations. Front upper arms will bend giving clearance around frame. Rear upper arms will bend giving clearance for tire. 29. Install all control arms with adjustable end at axle. All arms zerc fittings and pinch bolts are recommend be on the up side during install.
- Page 19 31. All hardware is reused at axle connection of control arms. Supplied hardware is used at frame connections. Install supplied 3/8” x 2” bolts on all 8 control arm pinch bolts. *Front Lower will use 5/8” bolt washers and nut on driver side through drilled/hole sawed holes.
- Page 20 33. Reinstall new arms at axle locations using factory or upgraded hardware. Verify all wiring and hoses are connected and have enough freedom for suspension motion. 34. Reinstall gas tank (Carefully) Make sure all hoses and wires are properly connected, make sure there are no leaking fluids.
- Page 21 Reinstall wheels and tires, lower to ground. Once vehicle is on the ground, set pinion angle on vehicle so that the driveshaft and the pinion are inline with the axle at an approximate ride height and centered to vehicle. RECENTER STEERINGWHEEL/FUNCTION CHECKS: Adjusting Turn buckle on Draglink.
- Page 22 After Install: o Tighten all bolts securing purchased parts to specified locations. o After completing installation using provided instructions, go through all steps again to make sure nothing was missed, not tightened or improperly assembled. o Some components may need to be purchased separately. o Check turn signals, headlights, fog lights (if applicable), taillights, blinkers and windshield wipers.
Need help?
Do you have a question about the EVO-3010 and is the answer not in the manual?
Questions and answers