Table of Contents
Advertisement
Available languages
Available languages
Quick Links
Advertisement
Table of Contents

Subscribe to Our Youtube Channel
Related Manuals for Horizon Hobby EVOLUTION 62GX


Summary of Contents for Horizon Hobby EVOLUTION 62GX
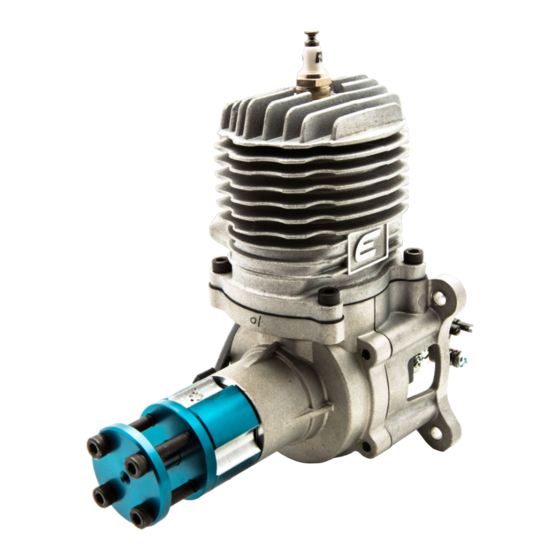
- Page 1 62GX Evolution ® Gas Engines ®...
-
Page 2: Safety Warnings
Do not use with incompatible components or alter this product in any way outside of the instructions provided by Horizon Hobby, LLC. This manual contains instructions for safety, operation and maintenance. It is essential to read and follow all the instructions and warnings in the manual, prior to assembly, setup or use, in order to operate correctly and avoid damage or serious injury. -
Page 3: Precautionary Guidelines
• Always use the throttle linkage to shut off the air or turn off the engine power switch to stop the engine. • Never use hands, fi ngers, or any other body part to stop the propeller. • Never throw any object into a propeller to stop it. •... - Page 4 Introduction Congratulations on your purchase of one of the exciting new engines in the Evolution ® gas engine series. All of the Evolution brand gas engines have been painstakingly designed and tested to ensure a hassle-free experience without giving away anything in expected performance or durability and are backed by a 2-year limited warranty.
-
Page 5: Installing The Engine
Installing the Engine Secure the engine to the airplane fi rewall using either M6 or 1/4–20 bolts. Use spacers or standoffs as needed to set the correct fi rewall-propeller distance according to the airplane manufacturer’s instructions. Refer to page13 for mounting dimensions. WARNING: Tighten all engine mounting screws before each fl... - Page 6 Installing a Muffl er (EVOM6 Inverted Wraparound Muffl er illustrated (not included)) IMPORTANT: Tighten the muffl er screws after the fi rst few tanks of fuel. The muffl er screws may loosen from heat and vibration. After the third tightening, no further muffl er loosening should occur.
- Page 7 Throttle Curve Setup The engine’s carburetor butterfl y valve provides 1. Ensure you have set up the throttle linkage non-linear engine response to throttle changes as described in the Connecting the Throttle (greater power increase between low throttle to Linkage section. It is very important that the 50% than 50% to full throttle).
-
Page 8: Attaching The Propeller And Spinner
Propeller Drilling Use a drill guide to drill four holes in the propeller. The guide ensures that the propeller bolts align with the driver and do not cross-thread. Using a drill press is highly recommended. 1. If your propeller has a 10mm (0.39 in) center 4. - Page 9 Connecting the Electronic Ignition The electronic ignition requires a voltage input • Ignition sensor (already attached to your of 6.0—8.4VDC. We recommend a 2S Li-Po engine) battery (such as the Spektrum Li-Po Receiver • Sensor magnet (already installed in the prop Pack 2000mAh (SPMB2000LP)).
- Page 10 Fuel This engine requires a mix of 32:1 gas to oil We tested primarily with Red Line two-stroke oil. ratio for break-in and normal operation. Other high-quality two-stroke oils will also work well. To properly mix the fuel, add 4.0 oz of high quality 2-stroke oil to one gallon (or 32 mL of oil Mixtures as rich as 25:1 are acceptable.
-
Page 11: Engine Break-In
Engine Break-in Your engine has been test run at the factory but not fi ne tuned. It needs to be broken-in to ensure long life of all components. This engine features a ringed-piston design, which requires a specifi c break-in procedure to ensure a tight seal between the piston ring and cylinder. For this to be accomplished, this process requires repeated heating and cooling cycles. -
Page 12: Troubleshooting Guide
• Check for proper mechanical function by Mechanical repairs must ALWAYS be completed turning the engine over. by an authorized Horizon Hobby service center. • Check that the carburetor is correctly Maintenance installed and that all gaskets are intact and After each fl... -
Page 13: Specifications
Specifi cations 88.00mm (3.46in) 38.50mm Spark Plug Cap 75.00mm (1.52in) (2.95in) 78.00mm (3.07in) 44.50mm (1.75in) Engine 147.90mm 66.00mm 157.50mm Mount (5.82in) (2.60in) (6.20in) Dimension 126.4mm (4.98in) 46.65mm 88.50mm (1.84in) Ø30.00mm (Ø1.18in) 41.00mm (3.48in) Propeller (1.61in) 129.50mm Bolt (5.10in) Dimension Disp 62cc (3.8 cu in) Weight Bore 1.80 in (46.0mm) Engine Only 52.3 oz (1483 g) - Page 14 Parts List Description Part Walbro Carburetor 62GX EVOG620843 Front Prop Washer 62GX EVOG620701 Rear Prop Washer 62GX EVOG620702 Prop Bolt Set (4) M5 x 45 62GX EVOG620703 Prop Drive Retaining Bolt 62GX EVOG620704 Prop Driver with Key 62GX EVOG620705 Ignition Pickup Magnet 62GX EVOG620706 Front Crankcase with Bearings 62GX EVOG620507...
-
Page 15: Exploded View
Exploded View 32, 33 32,33 21, 33 32,33 30 27 21, 33 8,10... - Page 16 2-YEAR LIMITED WARRANTY Limitation of Liability - HORIZON SHALL NOT BE LIABLE FOR SPECIAL, INDIRECT, INCIDENTAL What this Warranty Covers - Horizon Hobby, LLC OR CONSEQUENTIAL DAMAGES, LOSS OF (Horizon) warrants to the original purchaser that PROFITS OR PRODUCTION OR COMMERCIAL the product purchased (the “Product”) will be free...
- Page 17 Inspection or Services - If this Product needs Warranty Requirements Warranty to be inspected or serviced and is compliant consideration, you must include your original in the country you live and use the Product in, sales receipt verifying the proof-of-purchase date. please use the Horizon Online Service Request Provided warranty conditions have been met, submission process found on our website or...
-
Page 18: Warranty And Service Contact Information
Compliance Information for the European Union EU Compliance Statement: Horizon Hobby, LLC hereby declares that this product is in compliance with the essential requirements and other relevant provisions of the R&TTE, EMC, and LVD Directives. A copy of the EU Declaration of Conformity is available online at: http://www. - Page 19 HINWEIS Alle Anweisungen, Garantien und anderen zugehörigen Dokumente können im eigenen Ermessen von Horizon Hobby, LLC jederzeit geändert werden. Die aktuelle Produktliteratur fi nden Sie auf horizonhobby.com unter der Registerkarte „Support“ für das betreffende Produkt. SPEZIELLE BEDEUTUNGEN Die folgenden Begriffe werden in der gesamten Produktliteratur verwendet, um auf unterschiedlich hohe Gefahrenrisiken beim Betrieb dieses Produkts hinzuweisen: HINWEIS: Wenn diese Verfahren nicht korrekt befolgt werden, können sich möglicherweise...
- Page 20 • Bewahren Sie ihren Kraftstoff immer an einem sicheren Ort weit weg von möglicher Funkenbildung, Hitze oder zündfähigen Stoffen auf. • Stellen Sie immer sicher, dass das Luftfahrzeug korrekt gesichert ist und sich bei Motorstart nicht bewegen/anrollen kann. • Führen Sie nach den Einstellungen vor dem Erstfl ug den Bindevorgang erneut aus. •...
- Page 21 Einleitung Herzlichen Glückwunsch zum Kauf dieses neuen Evolution Benzinmotors. Jeder dieser Motoren wurde sorgfältigst entwickelt und getestet um ihnen viele Jahre sorgenfreien Betrieb und Zuverlässigkeit zu bieten. In dieser Anleitung fi nden Sie alle notwendigen Informationen zum erfolgreichen Betrieb. Die Montage des 62GX ist einfach da er für die Abmessungen der gängigen 50- 60cc Giant Scale Klasse konstruiert wurde.
-
Page 22: Einbau Des Motors
Einbau des Motors Befestigen Sie den Motor an den Motorspannt mit M6 oder 1/4 - 20 Schrauben. Nutzen Sie Distanzhülsen um den richtigen Propellerabstand nach der Bauanleitung des Modells einzustellen. Die Montageabmessungen entnehmen Sie bitte der Seite 13. WARNUNG: Ziehen Sie vor jedem Flug alle Motorbefestigungsschrauben nach. Wenn Sie die Motorbefestigungsschrauben nicht nachziehen, können sie sich durch die Vibrationen lockern und der Motor kann sich vom Rumpfl... - Page 23 Montage des Schalldämpfers (EVOM6 Einbauschalldämpfer abgebildet, nicht im Lieferumfang enthalten) WICHTIG: Ziehen Sie die Schalldämpferschrauben nach den ersten Tankfüllungen nach, da diese sich durch Hitze und Vibration gelöst haben könnten. Nach dem dritten Festziehen sollten sich die Schrauben nicht mehr lösen. Im Lieferumfang des Schalldämpfers befi...
- Page 24 Einstellen der Gaskurve Das Schmetterlingsventil des Vergasers erzeugt 1. Stellen Sie bitte sicher dass Sie das eine nicht lineare Gaskurve bei dem Gaswechsel. Gasgestänge wie beschrieben montiert Dieses bedeutet einen höheren Leistungszuwachs haben. Es ist dabei sehr wichtig dass die zwischen Leerlauf und 50% Leistung.
- Page 25 Bohren der Propellerbefestigungslöcher Verwenden Sie zum Bohren der vier Löcher eine Bohrschablone. Die Schablone gewährleistet, dass die Bolzen korrekt zum Mitnehmer ausgerichtet sind und kein Seitenverzug entsteht. Wir empfehlen dringend diese Arbeiten mit einer Standbohrmaschine durch zu führen. 1. Sollte der Propeller bereits ein 10mm Loch 4.
- Page 26 Anschluss der elektronischen Zündung Die elektronische Zündung benötigt eine Die Baugruppe besteht aus: Eingangspannung von 6.0 - 8,4 VDC. Wir • Zündmodul mit Batterieanschluss, empfehlen einen 2S LiPo Akku (wie den Zündsensoranschluss, Spektrum LiPo Empfängerakkupack 2000mAh Drehzahlmesseranschluss und (SPMB2000LP)) Der maximale Stromverbrauch Zündkerzenstecker bei Vollgas beträgt 650mA , im Durschnitt •...
- Page 27 Kraftstoff Zum Betrieb und Einlaufen-lassen des Motors ist Wir haben unsere Tests mit Red Line 2 Takt Öl ein Gemisch von 1:32 Benzin zu Öl erforderlich. durchgeführt, andere qualitativ hochwertige Öle sind ebenfalls dazu geeignet. Um dieses Gemisch herzustellen mischen Sie auf einen Liter 87 bis 93 Oktan Benzin 32ml Ein fetteres Gemisch von bis zu 1:25 ist auch qualitativ hochwertiges 2 Takt Öl.
-
Page 28: Einlaufen Des Motors
Einlaufen des Motors Ihr neuer Motor wurde im Werk ausführlich getestet, ist aber noch nicht eingelaufen. Der Einlaufvorgang ist notwendig um die Langlebigkeit der Komponenten sicher zu stellen. So ist der Zylinder mit Kolbenringen ausgestattet die mit den wechselnden Temperaturen Hitze und Abkühlung ihre Passung fi... -
Page 29: Problemlösung
Leitungen für den Betrieb des oder Rillen sehen kontaktieren Sie bitte den Systems eine grundlegende Anforderung sind. technischen Service von Horizon Hobby • Überprüfen Sie ob die Einspritzung korrekt für weitere Informationen. Versuchen Sie montiert ist und alle Dichtungen zwischen der bitte nicht den Kolbenfresser mechanisch zu EFI Einheit und Motor intakt und unbeschädigt... -
Page 30: Optionale Teile
Spezifi kationen 88.00mm (3.46in) 38.50mm Zündkerzenstecker 75.00mm (1.52in) (2.95in) 78.00mm (3.07in) 44.50mm (1.75in) 147.90mm 66.00mm 157.50mm (5.82in) (2.60in) (6.20in) 126.4mm (4.98in) Montageabmessungen 46.65mm 88.50mm (1.84in) Ø30.00mm (Ø1.18in) (3.48in) 41.00mm Abmessungen Propellermaße (1.61in) 129.50mm (5.10in) Disp 62cc (3.8 cu in) Gewicht Bohrung 1.80 in (46.0mm) Motor 52.3 oz (1483 g) Hub 1.50 in (37.0mm) - Page 31 Evolution 62GX Propellerbolzenset EVOG620703 Evolution 62GX Propellermitnehmerbolzen EVOG620704 Evolution 62GX Propellermitnehmer mit Passung EVOG620705 Evolution 62GX Magnet Zündkontakt EVOG620706 Evolution 62GX Kurbelgehäuse vorne mit Lager EVOG620507 Evolution 62GX Kurbelwellenlager vorne EVOG620508 Evolution 62GX Kurbelwellenlager hinten EVOG620509 Evolution 62GX Passbuchsen Kurbelwellenlager (2) EVOG620510...
- Page 32 Explosionszeichnung 32, 33 32,33 21, 33 32,33 30 27 21, 33 8,10...
-
Page 33: Garantie Und Service Informationen
Garantie und Service Informationen Vertrag, der Garantie oder der Gewährleistung erhoben werden. Horizon wird darüber hinaus keine Ansprüche einem Garantiefall Garantiezeitraum - Exklusive Garantie Horizon akzeptieren, die über den individuellen Wert Hobby, LLC (Horizon) garantiert, dass das des Produktes hinaus gehen. Horizon hat keinen gekaufte Produkt frei... - Page 34 Hubschraubern und RC-Cars sind extrem Sollte sich ein Garantiefall bestätigen wird das aufwendig und müssen deshalb vom Käufer Produkt repariert oder ersetzt. Diese Entscheidung selbst vorgenommen werden. obliegt einzig Horizon Hobby. Kostenpfl ichtige Reparaturen Liegt eine kostenpfl ichtige Reparatur vor, erstellen wir...
- Page 35 REMARQUE La totalité des instructions, garanties et autres documents est sujette à modifi cation à la seule discrétion d’Horizon Hobby, LLC. Pour obtenir la documentation à jour, rendez-vous sur le site horizonhobby.com et cliquez sur l’onglet de support de ce produit.
- Page 36 • Toujours ré-affecter votre émetteur après des changement de paramètres ou avant le premier vol. • Toujours contrôler que le failsafe place bien la commande des gaz au ralenti. • Toujours effectuer un test de portée avant le vol. • Toujours utiliser la tringlerie des gaz pour couper l’arrivée d’air ou l’interrupteur coupe circuit pour éteindre le moteur.
-
Page 37: Eléments Inclus
Introduction Félicitations pour l’achat de l’un de nos tous nouveaux moteurs de la gamme de moteur à essence Evolution. Tous les moteurs à essence de la marque Evolution ont été minutieusement conçu et testé pour garantir une expérience inédite sans incidence sur les performances attendues ou la résistance. -
Page 38: Installation Du Moteur
Installation du moteur Fixez le moteur à la cloison pare-feu en utilisant des boulons M6. Utilisez des entretoises si nécessaire pour respecter la distance entre l’hélice et la cloison pare feu préconisée par le fabricant de votre avion. Se référer à la page 13 pour les points de fi xation. AVERTISSEMENT: Avant chaque vol, resserrer toutes les vis de fi... - Page 39 Installation du silencieux (EVOM6 Silencieux compact inversé en illustration (non-inclus)) 1. Placez une rondelle frein sur chaque vis de fi xation du silencieux. Glissez les vis au travers du silencieux. Le silencieux est livré avec 2 vis de fi xation, 2 rondelles frein, 2 joints et une clé...
- Page 40 Réglage de la courbe des gaz Le papillon carburateur du moteur ne délivre la linéarité. pas une accélération linéaire en réponse aux 1. Assurez-vous d’avoir correctement suivi les mouvements du manche des gaz (l’augmentation instructions relatives à l’installation de la de puissance est plus importante entre le ralenti tringlerie des gaz.
- Page 41 Perçage de l’hélice Utilisez un guide de perçage pour effectuer les 4 perçage dans l’hélice. Le guide assure que les 4 seront parfaitement alignés avec ceux du volant moteur. L’utilisation d’une perceuse à colonne est fortement recommandée. 1. Si votre hélice à un alésage centrale de 4.
- Page 42 Connexion de l’allumage électronique L’allumage électronique nécessite une tension • Capteur d’allumage (déjà connecté au en entrée de 6.0-8.4VDC. Nous recommandons moteur) une batterie Li-Po 2S (comme le récepteur • Aimant du capteur (déjà monté dans le moyeu Li-Po Spektrum 2000mA (SPMB2000LP)). La d’entraînement d’hélice de votre moteur) consommation de courant maximum manche des •...
-
Page 43: Circuit D'alimentation En Carburant
Carburant Ce moteur nécessite un mélange de carburant Nous avons testé l’huile RedLine 2 temps. avec 3,12% d’huile pour le rodage et une D’autres huile 2 temps de bonne qualité peuvent utilisation normale. également être utilisées. Pour obtenir le bon mélange de carburant, Des mélanges 4% sont acceptables. -
Page 44: Rodage Du Moteur
Rodage du moteur Votre moteur a été testé en usine mais pas réglé. Il doit être rôdé afi n d’assurer la longévité des pièces. Ce moteur possède un piston segmenté, qui nécessite une procédure de rodage particulière afi n d’assurer l’étanchéité entre le segment et le cylindre. Pour être accompli, ce processus nécessite d’alterner entre des cycles de chauffe et de refroidissement. -
Page 45: Guide De Dépannage
Si le piston est fortement marqué ou rayé, sont nécessaires au bon fonctionnement du veuillez contacter le service technique système. Horizon Hobby pour obtenir des informations complémentaires. Ne tentez pas de réparer • Vérifiez le fonctionnement mécanique correct un piston ou un cylindre endommagé. -
Page 46: Caractéristiques
Caractéristiques 88.00mm Capuchon de la (3.46in) 38.50mm bougie d'allumage 75.00mm (1.52in) (2.95in) 78.00mm (3.07in) 44.50mm (1.75in) 147.90mm Dimensions du 66.00mm 157.50mm (5.82in) support moteur (2.60in) (6.20in) 126.4mm (4.98in) 46.65mm 88.50mm (1.84in) Ø30.00mm (Ø1.18in) 41.00mm (3.48in) Dimension des vis d'hélice (1.61in) 129.50mm (5.10in) Cylindrée 62cc (3.8 cu in) - Page 47 Liste des pièces Description Pièce 62GX - Carburateur Walbro EVOG620843 62GX - Rondelle avant de fi xation d’hélice EVOG620701 62GX - Rondelle arrière de fi xation d’hélice EVOG620702 62GX - Set de vis de fi xation d’hélice M5x45 (4) EVOG620703 62GX - Vis de fi...
- Page 48 Vue éclatée 32, 33 32,33 21, 33 32,33 30 27 21, 33 8,10...
-
Page 49: Garantie Et Réparations
Garantie et réparations d’un cas de garantie lorsque ces recours dépassent la valeur unitaire du produit. Horizon n’exerce Durée de la garantie - Garantie exclusive - Horizon aucune infl uence sur le montage, l’utilisation ou Hobby, LLC (Horizon) garantit que le Produit la maintenance du produit ou sur d’éventuelles acheté... - Page 50 fi gurent le nom de l’acheteur ainsi que la date d’achat. Si le cas de garantie est confi rmé, le produit sera réparé. Cette décision relève uniquement de Horizon Hobby. Réparations payantes - En cas de réparation payante, nous établissons un devis que nous transmettons à...
- Page 51 Informations de conformité pour l’Union européenne Déclaration de conformité de l’union européenne: Horizon Hobby, LLC déclare par la présente que ce produit est en conformité avec les exigences essentielles et les autres dispositions de la RTTE Directive CEM, et Directive DBT.
-
Page 52: Avvertenze Per La Sicurezza
Non tentare di smontare, utilizzare componenti incompatibili o modifi care il prodotto in nessun caso senza previa approvazione di Horizon Hobby, LLC. Questo manuale contiene le istruzioni per la sicurezza, l’uso e la manutenzione del prodotto. È... - Page 53 che possa incendiarlo. • Quando il motore è in moto, l’aereo deve essere ben fi ssato a terra senza possibilità di muoversi. • Fare sempre il “rebind” fra trasmettitore e ricevitore dopo le impostazioni e prima del primo volo. • Accertarsi sempre che il fail-safe sia impostato sul trasmettitore per avere il motore al minimo.
- Page 54 Introduzione Complimenti per aver acquistato uno dei più entusiasmanti nuovi motori della serie Evolution® a benzina. Tutti i motori a benzina Evolution sono stati accuratamente progettati e provati per garantire un’uso pratico senza problemi, pur non perdendo nulla in termini di prestazioni o durata ed essendo supportati da una garanzia limitata di 2 anni.
-
Page 55: Installazione Del Motore
Installazione del motore Fissare il motore all’ordinata parafi amma con viti M6. Usare dei distanziali secondo necessità per regolare la giusta distanza tra elica e ordinata in base alle indicazioni del produttore dell’aereo. Per le dimensioni di montaggio si faccia riferimento alla pagina 13. AVVERTENZA: prima di ogni volo stringere le viti di fi... - Page 56 Installazione di un silenziatore (EVOM6 silenziatore invertito, avvolgente, illustrato (non incluso)). IMPORTANTE: Siccome si potrebbero allentare per il calore e le vibrazioni, stringere le viti del silenziatore dopo aver fatto girare il motore per alcuni serbatoi di carburante. Dopo averle strette per la terza volta non ci dovrebbe essere più...
- Page 57 Impostazione della curva motore La valvola a farfalla del carburatore fornisce una 1. Accertarsi di aver ben regolato il rinvio come risposta non lineare del motore alle variazioni descritto nella sezione dedicata. È molto dell’acceleratore (si ha un maggiore incremento importante che i fi...
- Page 58 Foratura dell’elica Per praticare i 4 fori nell’elica usare una guida che garantisca un corretto allineamento delle viti. Si consiglia vivamente di usare un trapano a colonna. 1. Se l’elica da usare ha un foro centrale da 4. Durante l’utilizzo di un metodo sicuro per 10mm, passare al punto 2.
- Page 59 Collegamento dell’accensione elettronica Questa accensione richiede una tensione • Sensore di accensione (già attaccato al di alimentazione tra 6,0 e 8,4VDC. Noi motore) consigliamo una batteria LiPo 2S (come la • Magnete per il sensore (già montato sulla batteria Spektrum per ricevente da 2000mAh rondella di trascinamento dell’elica) (SPMB2000LP)).
-
Page 60: Sistema Di Alimentazione
Carburante Questo motore richiede una miscela benzina/ benzina a 87-93 ottani. olio di 32:1 per il rodaggio e il funzionamento Prima di tutto l’abbiamo provato con l’olio per 2 normale. tempi Red Line, però anche un olio per 2 tempi Per miscelare correttamente il carburante mettere di alta qualità... - Page 61 Rodaggio del motore Questo motore è stato provato in fabbrica ma non è stata fatta la messa a punto. È necessario un rodaggio per garantire una lunga durata a tutti i suoi componenti. Questo motore ha il pistone con segmento che richiede una speciale procedura di rodaggio per garantire una buona tenuta tra il segmento e il cilindro.
-
Page 62: Guida Alla Risoluzione Dei Problemi
Avviamento e funzionamento del motore Affi darsi per il fi ltraggio del carburante 5. Ruotare l’elica fi no a portarla al punto di al solo fi ltro del pendolino incluso nel compressione. Lanciare l’elica con decisione serbatoio, potrebbe creare problemi al buon fi... -
Page 63: Parti Opzionali
Specifi che 88.00mm (3.46in) 38.50mm Cappuccio candela 75.00mm (1.52in) (2.95in) 78.00mm (3.07in) 44.50mm (1.75in) Dimensioni 147.90mm 66.00mm 157.50mm supporto motore (5.82in) (2.60in) (6.20in) 126.4mm (4.98in) 46.65mm 88.50mm (1.84in) Ø30.00mm (Ø1.18in) 41.00mm (3.48in) Dimensioni bulloni elica (1.61in) 129.50mm (5.10in) Cilindr 62cc (3.8 cu in) Peso Alesaggio 1.80 in (46.0mm) Solo motore 52.3 oz (1483 g) -
Page 64: Elenco Ricambi
Elenco ricambi Descrizione Codice Carburatore Walbro 62GX EVOG620843 Rondella anteriore elica 62GX EVOG620701 Rondella posteriore elica 62GX EVOG620702 Set bulloni elica (4) M5 x 45 62GX EVOG620703 Bullone fi ssaggio trascinatore elica 62GX EVOG620704 Trascinatore elica con chiavetta 62GX EVOG620705 Magnete accensione 62GX EVOG620706 Carter anteriore con cuscinetti 62GX... -
Page 65: Vista Esplosa
Vista esplosa 32, 33 32,33 21, 33 32,33 30 27 21, 33 8,10... -
Page 66: Garanzia
Periodo di garanzia - La garanzia esclusiva - di combinazioni di vari prodotti. Quindi Horizon Horizon Hobby, LLC (Horizon) garantisce che non accetta nessuna responsabilità per danni o i prodotti acquistati (il “Prodotto”) sono privi di lesioni derivanti da tali circostanze. - Page 67 Informazioni sulla conformità per l’Unione Europea Dichiarazione di Conformità EU: Horizon Hobby, LLC con la presente dichiara che il prodotto è conforme ai requisiti essenziali e ad altre disposizioni rilevanti del R&TTE, direttiva EMC, e LVD. Una copia della dichiarazione di conformità per l’Unione Europea è disponibile a: http://www.horizonhobby.com/content/support-render-compliance.
- Page 68 ©2015 Horizon Hobby, LLC. Evolution, the Evolution logo, DSMX and the Horizon Hobby logo are registered trademarks of Horizon Hobby, LLC. The Spektrum trademark is used with permission of Bachmann Industries, Inc. Nikasil is a registered trademark of MAHLE, Inc.
Need help?
Do you have a question about the EVOLUTION 62GX and is the answer not in the manual?
Questions and answers