
Related Manuals for DÖRR SNAPSHOT MINI BLACK 30MP 4K


Summary of Contents for DÖRR SNAPSHOT MINI BLACK 30MP 4K
- Page 1 SURVEILLANCE CAMERA INSTRUCTION MANUAL SNAPSHOT MINI BLACK 30MP 4K doerr-outdoor.de...
- Page 2 INDEX PAGE 01 | SAFETY HINTS 02 | SAFETY HINTS FOR BATTERIES 03 | PRIVACY POLICY 04 | NOMENCLATURE 05 | ILLUSTRATION OF PARTS 06 | FIRST COMMISSIONING 06.1 Inserting the batteries 06.2 Changing the batteries 06.3 Alternative power supplies 06.4 Inserting the SD/SDHC/SDXC Memory Card 07 | OPERATION...
-
Page 3: Safety Hints
01 | SAFETY HINTS Your camera is fitted with a weatherproof housing according to • THANK YOU very much for choosing a quality product by DÖRR. protection class IP66 (dust and jet waterproof) so that the camera can be used outdoors. Nevertheless, protect the camera from Please read the instruction manual and the safety hints carefully extreme weather conditions and direct sunlight. -
Page 4: Safety Hints For Batteries
02 | SAFETY HINTS FOR BATTERIES 04 | NOMENCLATURE Only use high-quality batteries of popular brands. When inserting Infrared LEDs the batteries, please respect the correct polarity (+/-). Do not in- LED indicator/light sensor sert batteries of different types and always replace all batteries at the Motion detector (PIR sensor) same time. -
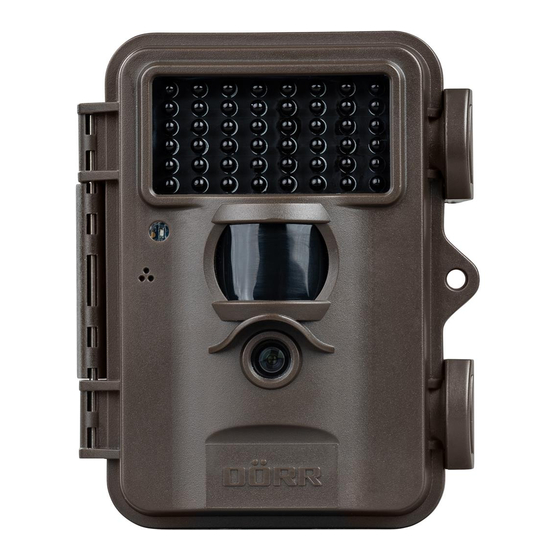
Page 5: Illustration Of Parts
05 | ILLUSTRATION OF PARTS doerr-outdoor.de... - Page 6 06 | COMMISSIONING Lead Battery 6V/4,5Ah www.doerr-outdoor.de/204350 CAUTION To avoid camera damages, make sure that camera is switched off DÖRR Battery Cable 2m with flat plug (slide control 09 = OFF) for the following steps! www.doerr-outdoor.de/204364 Both the solar panel and an external battery need to be plugged-in to the cameras DC 6V-12V port (14).
-
Page 7: Operation
07 | OPERATION 07.3 Main Menus To adjust the settings for your purposes, switch the slide control (09) 07.1 Overview home screen to the middle position SETUP and press the menu button (10) Switch the slide control (09) to the middle position SETUP . The 3 main menus appear in the top left of the LCD display (08). -
Page 8: Settings & Functions
08 | SETTINGS & FUNCTIONS 08.1 Main menu CAM Photo ✓ Camera Mode Photo . The camera takes pictures according to your further selection under Photo Selection Settings. Video Photo & Video → 5MP (3072x1728 pixels) Photo Size Select the desired image resolution. 8MP (3840x2160 pixels) 16MP (5376x3024 pixels) →... - Page 9 08.2 Main menu PIR PIR Trigger ✓ Trigger Mode The Passive Infrared Sensor (PIR) triggers upon motion and temperature changes re- cognised within the detection range. Time Lapse Both Select when camera triggers too often upon environment influences, e.g. falling branches or strong sunlight. →...
- Page 10 08.3 Hauptmenü SYS yyyy/mm/dd ✓ Set clock Set the date and time. Pre-set date format: Year/Month/Day (Example 2023/01/15) dd/mm/yyyy Further date formats: Day/Month/Year (Example 15/01/2023) mm/dd/yyyy Month/Day/Year (Example 01/15/2023) Time: 00 : 00 Time 24-Hours Format (Example 15:30) Deutsch ✓ Language Select the desired langua- Pre-set menu language:...
-
Page 11: Test Recordings
09 | TEST RECORDINGS 10.2 Turn on camera and start surveillance In order to get the camera ready to work, move the slide control (09) In SETUP mode (slide control 09 on position SETUP), a test photo or to the position ON and close the camera housing. After approx. 5 test video can be released and directly viewed. -
Page 12: Optional Accessories
11 | OPTIONAL ACCESSORIES 12 | PLAY & DELETE FILES 11.1 Optional mounting accessories 12.1 View photos Our optional accessories such as the patented DÖRR holding fixture Slide the Switch (09) to position SETUP. in combination with the DÖRR universal adapter are designed for fast and easy mounting of the camera at a tree, wall or other objects. -
Page 13: Technical Specifications
14 | TECHNICAL SPECIFICATIONS Use the navigation keys (11) to select either: Delete One in order to delete just the selected file, or Recording capability Photo / Video with audio / Photo + Video with audio Delete All if you want to delete all pictures and videos on your Combined picture and video SD card. -
Page 14: Scope Of Delivery
The WEEE logo (dustbin) shown DÖRR Surveillance Camera on the product and on the packaging indicates that the product SnapShot Mini Black 30MP 4K must not be disposed of in normal household waste. You are Item-No. 204500...
Need help?
Do you have a question about the SNAPSHOT MINI BLACK 30MP 4K and is the answer not in the manual?
Questions and answers