Table of Contents
Advertisement
Quick Links
Advertisement
Table of Contents

Related Manuals for Eletta S Series


Summary of Contents for Eletta S Series
- Page 1 Manual Eletta Flow Monitor S-series Modell S2 o05 2021-11-15 5041F2E22...
- Page 2 Eletta Flow AB, Sweden. Distributors Eletta has appointed a number of distributors all over the world. You will find more information about your closest distributor at our web site www.eletta.com, or by contacting our Customer Service Center.
-
Page 3: Table Of Contents
Contents General Information ................4 Description ................4 Specifications ................5 Installation ..................9 Unpacking ................. 9 Procedures before Installation ..........9 Installation of the Pipe Section ..........10 Separate mounting of the Pipe Section and Control Unit ..11 Installation and changing the Control Unit ...... -
Page 4: General Information
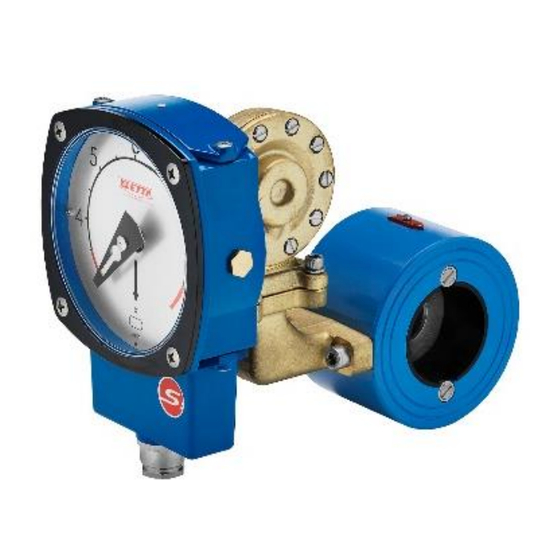
General Information 1.1 Description The Eletta Flow Monitor is used to control and measure flow of liquids and gases in pipes from size 15 mm to 500 mm (larger pipes as an option). They have been manufactured for over 70 years and are well known for its reliabili- ty. -
Page 5: Specifications
For example: If you have a flow of 110 l/min maximum and the normal Flow is at 90 l/min, chose the Eletta Flow Monitor S2 with a Flow Range of 60–120 l/min. This will give you the highest accuracy since your flow is in the middle of the Monitor Flow Range and give you a lower pressure loss. - Page 6 –20°C to 120°C (-4°F to 250°F), optional The lower temperature is not valid for Monitors equipped with FPM soft parts. FPM is limited to –5 °C (23 °F). Higher process temperature with remote installation of Control Unit (separate mounting, see section 2.4) These temperature limits are valid for models S2 and S25 (with micro switches) Temperature limit for S02 and S05 is –20°C to 120°C (–4°F to...
- Page 7 For intrinsically safe (IS) applications, we recommend ordering micro switches with gold plated contact surface, which are better suited for the voltage and current limitations in the Ex- regulations. As an option, hermetically sealed micro switches are available (1HM1) Protection Class: Control Unit: IP43 (NEMA 3R), standard IP65 (NEMA 4x), optional Degreased and powder coated aluminum alloy or brushed...
- Page 8 The Flow Monitor itself is not approved as a complete instru- ment according to EU Hazardous Area EX-regulations. approvals: The Eletta Flow Monitors conforms with the EU directive for low voltage no: 2014/35/EU. We refer to the certificates issued, which will be sent to you upon request. They are also available at www.eletta.com.
-
Page 9: Installation
Stainless Steel Pipe Sections (FSS/GSS) is not possible in the field without ordering a new Pipe Section and we kindly ask you to contact your local re- presentative or Eletta Flow AB, Sweden for help. Check that the pipe section has the right threads or the right flange standard to match your piping or counter flange. -
Page 10: Installation Of The Pipe Section
should not be used in temperatures over 90ºC (194 ºF). If your application temperature exceeds this temperature/pressure, we recommend using copper or stainless steel tubing, depending on the compatibility to the measured gas or liquid (see section 2.4) 2.3 Installation of the Pipe Section Note!!! Before starting to install the Pipe Section, please make sure that the piping is not under pressure from flow of liquid/gas! -
Page 11: Separate Mounting Of The Pipe Section And Control Unit
Control Unit Sometimes separate mounting of the Pipe Section and the Control Unit is re- quested due to vibrations, high temperature or lack of space. As the Eletta Flow Monitor is using the differential pressure caused by the orifice plate... - Page 12 ports up to the Control Unit, it is also possible to separate the Monitor (Fig. 2) from the Pipe Section -GL/FA into two parts. The pressure is then lead through either plastic hoses or metallic tubing depending on the liquid, pressure and temperature.
-
Page 13: Installation And Changing The Control Unit
2.5 Installation and changing of the Control Unit As all Eletta Flow Monitors are designed in sections to achieve a modular and versatile Flow Monitor, there is a possibility to upgrade/rebuild them and ad- ding other features to your already installed Monitor, by changing the Control Unit or Pipe Section. - Page 14 (diaphragm, o-rings and diaphragm lever) and you will get the Control Unit already tested and calibrated and ready to fit onto the Pipe Section, without any on-site adjustments or calibration. All Eletta DP Flow Monitors are working with the same differential pressure within their specific range (Pls.
-
Page 15: Pressure Drop
0.96 and 0.51 can be expected. Example: For the Eletta Flow Monitor S2-GL15 with a flow range of 10 - 20 l/min, the following example can be used for how to calculate the ... - Page 16 Furthermore, in order to use this −value in the above formula, we need to de- termine the . We can either use the ”Actual Pressure Drop Graph” (fig. (apd) 4) for an approximate value or for intermediate values we can use the formula below the graph (fig.
-
Page 17: Electrical Installation
2.7 Electrical Installation Note!!! An authorized professional person should make all electrical installations. This section is not valid for the models S02 and S05, S02SS and S05SS as these are Monitors without any micro switches installed and work without the need of electrical power. -
Page 18: Operation
This mechanism transforms the movement into a Flow rate value shown on the dial. All the Indicating units of Eletta Flow Monitors are tested and approved according to the European CE-mark regulations. (Pls. - Page 19 For threaded model -GL: Untighten the bolts that hold the Pipe Section between the flanges in the piping (do not remove the threaded parts from the piping). Remove only the number of bolts necessary to pull the Monitor from the piping, normally it takes only one bolt from the highest position, to get the Monitor out.
-
Page 20: Adjustment Of Switch Point, S2 And S25
3.3 Adjustment of switch point, S2 and S25 All the Eletta Flow Monitors are tested and calibrated according to the custo- mers’ orders before shipping. If the customer does not specify a desired switch point for the flow alarm, the S-series Monitor’s micro switches are preset to... - Page 21 Reinstall the cover at the top with the two screws and start up the process again. Figure 6, Adjustment of switch point Figure 7, Tool under the cover (Image shows aluminum cover, stainless steel cover looks a little bit different.) 3.4 Change of Flow Direction Empty the pipe system so that it is un-pressurized and has no flow! At the time of ordering, you must specify in which direction the Flow Monitor...
-
Page 22: Change Of Flow Direction
Figure 9 3.5 Change of Dial Orientation As the Eletta Flow Monitors are not limited to a certain mounting position in the piping system, the large visible dial can be mounted in several positions to suit the application. (please refer to fig. 9). If you need to change the orienta- tion in the field, please do as follows;... -
Page 23: Change Of Dial Orientation
Remove the front glass with the four screws that hold it in place. Push the pointer towards the dial and then upwards until the round hole in the pointer matches the spindle coming out from the mechanism and then remove the pointer. -
Page 24: Trouble Shooting
Trouble shooting 4.1 Verification of flow We would like to stress the fact that all indicating units of the Eletta Flow Monitors are calibrated and adjusted individually on water in a specially purpose built calibrated flow rig in our workshop. This means that we have... -
Page 25: Electrical Connections
5 if you apply a pressure of 5500 mmH2O (539 mbar). You can of course also verify the flow in the Eletta Flow Monitor versus an- other flow meter in the system or take the Monitor out and put in a flow test rig, if you have the possibility. -
Page 26: Spares
We refer to section 7 where you can find an exploded drawing showing all replaceable components included in the Flow Monitor. If you have installed the Eletta S-series Flow Monitor in a very critical appli- cation, we recommend you to have a complete identically precalibrated Control Unit on stock, as it will only take removal of four bolts to change this. -
Page 27: Tables
Tables 5.1 Measuring Ranges S2/S02, S2SS/S02SS S25/S05, S25SS/S05SS 5041 2E22... -
Page 28: Weight And Dimensions
5.2 Weight and Dimensions 5041 2E22... -
Page 29: Spare Parts
6.1 S-GL/FA Pos. Description Pos. Description Screw Spacer -GL Dial glass Threaded flange GL Pointer Screw Dial Connecting unit, FA Adjusting dial O-ring Lid assembly Pipe body, -FA Screw O-ring (orifice) Tool Orifice plate, -FA Casing Spacer, -FA 10 Lever Screw 11 Diaphragm housing Washer... - Page 30 5041 2E22...
-
Page 31: Exploded Drawing S-Gss/Fss
6.2 S-GSS/FSS Pos. Description Screw Dial glass Pointer Dial Adjusting dial Cover Screw Tool Casing Lever Diaphragm housing Diaphragm Diaphragm spring Diaphragm cover Screw and washer Ventilation Cable gland Connection box Terminal block Fitting O-ring Pointer mechanism Microswitch Spring bar Screw Orifice plate/Pipe FSS Flange gasket... - Page 32 5041 2E22...
-
Page 33: Exploded Drawing S-Ss-Gss/Fss
6.3 S-SS-GSS/FSS Pos. Description Screw Dial glass Pointer Dial Cover with tool Screw Tool Casing Lever Diaphragm housing Diaphragm Diaphragm spring Diaphragm cover Screw and washer Cable gland Cover without tool Screw O-ring Adjusting dial Terminal block Microswitch Orifice plate / pipe FSS Flange gasket Orifice plate / pipe GSS Flange, threaded... - Page 34 5041 2E22...
-
Page 35: Distributors
Distributors Eletta has appointed distributors around the world. You find more information about which distributor to contact on our website www.eletta.com Recycling Recycle your product and packaging at disposal These products and packaging should not be mixed with general household waste.
Need help?
Do you have a question about the S Series and is the answer not in the manual?
Questions and answers