Table of Contents
Advertisement
Quick Links
Advertisement
Table of Contents

Subscribe to Our Youtube Channel
Related Manuals for Rose electronics RS520


Summary of Contents for Rose electronics RS520
- Page 1 Beyond Audio, HiFi ROSE Complete HiFi Network Streamer RS250A - 1 - - 1 -...
- Page 2 Beyond Audio, HiFi ROSE - 2 - - 2 -...
- Page 3 - 3 - - 3 -...
- Page 4 - 4 -...
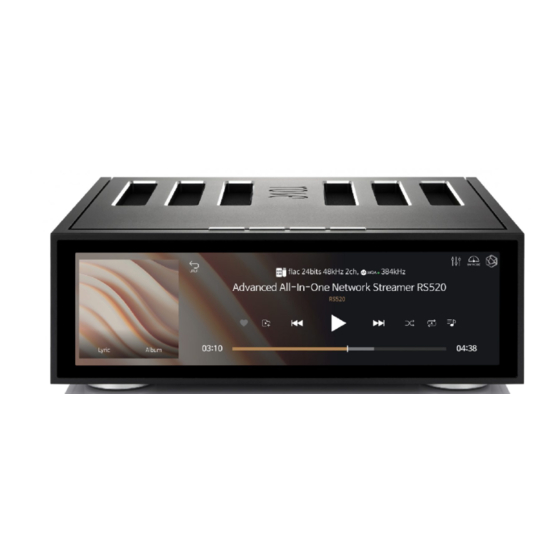
- Page 5 HiFi ROSE Products Advanced All-In-One Network Streamer RS520 ▪Reference Grade All-in-One Network Streamer ▪Network Streamer + DAC + Class AD Amplifi er with next generation GaN FET ▪High-Resolution Music Playback available(DSD512, PCM32bit/768kHz) ▪A Femto Clock provides Ultra Precision ▪The Special Linear Power Supply Confi guration minimizes electrical noise Speaker 2ch 250W(8Ω)
- Page 6 HiFi ROSE Products Complete HiFi Network Streamer RS250A ▪Reference Grade All-in-One Network Streamer ▪Network Streamer + DAC ▪High-Resolution Music Playback available(DSD512, PCM32bit/768kHz) ▪A Femto Clock provides Ultra Precision ▪The Special Linear Power Supply Confi guration minimizes electrical noise Native DSD 512 Headphone Out 3.5mm Hi-Res...
- Page 7 HiFi ROSE Products HiFi Network Streamer RS201 Series ▪Reference Grade All-in-One Network Streamer ▪Network Streamer + DAC + AMP ▪Built-in High-Performance Power Amplifi er(50W*2ch) ▪High-Resolution Music Playback available(DSD256, PCM32bit/384kHz) ▪A Femto Clock provides High Precision ▪Digital equipment, PreAmplifi er connection available ▪Awarded the world’s three major design awards(Reddot, GOOD DESIGN, PIN-UP) Native DSD 256 In/Out...
- Page 8 HiFi ROSE Products Premium Media Player RS350 ▪Casual All-in-One Speaker ▪Network Streamer + DAC + AMP + SPEAKER ▪3-Way full-range speaker confi guration ▪Playback of various fi le formats available(Music, Video, Image) ▪Powerful sound playback with dual passive woofer engine design(Patented technology) Connectivity WiFi, Bluetooth, DLNA, Airplay Rear Micro USB, USB A Type, Micro SD, Headphone Design 364*123*123 mm / 1.5 kg / 5”...
- Page 9 HiFi ROSE OS System Innovative ROSE OS System Spotify Connect Hi-Res Audio Spotify Connect allows you to play and HiFi ROSE devices are certifi ed with a wirelessly control Spotify music on your ROSE ‘High-Resolution Audio’ license OS over a network. With the Spotify Connect from the JAS (Japan Audio Society).
- Page 10 HiFi ROSE Remote App ROSE Connect Remote Application A dedicated Remote App is provided that allows users to conveniently control and smartly manage their ROSE device. The Remote App is supported on various platforms, including the iPhone, iPad, Android phone, and PCs. Control You can freely and conveniently control various HiFi ROSE functions wirelessly.
- Page 11 OWNER’S MANUAL RS250A Product User Manual - 11 -...
-
Page 12: Table Of Contents
Contents Safety Precautions 1. Warnings 2. Cautions List of Components Button and Connection Locations / Functions 1. Front of the Product 2. Rear of the Product 3. Remote Control Product Installation 1. Product Design Direction and Installation Location 2. How to connect the Power Cord 3. - Page 13 2-1-4. OPT IN 2-1-5. USB IN 2-2. OUTPUT 2-2-1. USB DAC 2-2-1-1. MQA Type 2-2-1-2. PCM Resampling Frequency 2-2-1-3. DSD Mode 2-2-1-4. SoftWare Volume Control 2-2-1-5. How to Calibrate the Lower 8 Bits of a 32-bit Sound Source 2-2-1-6. OUTPUT Gain 2-2-2.
-
Page 14: Safety Precautions
Safety Precautions 1. Warnings • Do not apply excessive force to the product, throw it, or impact it with a sharp object. • When used by children, a parent or guardian should tell them how to use the product correctly and make sure that they are using it correctly. •... -
Page 15: Cautions
2. Cautions • The contents of the owner’s manual are described based on the default settings of the product. • Some contents of this manual may be changed without prior notice to the user in order to improve product performance. •... -
Page 16: List Of Components
List of Components Main Device Bluetooth Remote Controller Power Cable MANUAL User Manual Mounting Screws AAA Batteries for Remote Controller - 16 -... -
Page 17: Button And Connection Locations / Functions
Button and Connection Locations / Functions 1. Front of the Product Volume Control Power Button Knob / Status LED IPS Touch Headphone Output Port Panel When you press the power button, the LED fl ashes, and when Power booting is complete, the LED turns off . Button( / Status LED ※... - Page 18 2. Rear of the Product Coaxial AC Power Ethernet USB 3.0 HDMI Audio Out In/Out Inlet FUSE Box Optical Analog Analog Audio In In/Out AC Power Connect the AC power cable. Inlet This port is for connecting an external device to the product. You can use this product as a USB DAC on your computer USB Audio after connecting this port to your computer using a USB B...
-
Page 19: Remote Control
3. Remote Control Function Note Power On/Off Sleep Mode On/Off Mute Play / Pause Current Song Play Previous Song Play Next song Go Back Go to the Home Screen Move Focus Up Move Focus Left 10 Move Focus Right 11 Move Focus Down Select Current Focus Works only when playing... -
Page 20: Product Installation
Product Installation 1. Product Design Direction and Installation Location • This product is designed for proper use on a table or shelf. • The product may malfunction due to high heat in the winter or summer. (Operating temperature : 0℃ ~ 40℃ / Storage temperature : -10℃ ~ 50℃) •... -
Page 21: How To Connect The Power Cord
2. How to connect the Power Cord • This product contains a removable power cord. Please connect the power cord after all other connections are completed. First, connect the power cord to the product’s AC inlet port, and then connect it to an outlet. RS250A Caution : When disconnecting the power cord, always disconnect the outlet first. -
Page 22: How To Properly Connect The Rear Port And The Cable
3. How to properly connect the Rear Port and the Cable 3-1. Connecting the Analog Output Port and the Power Amplifier or AV Receiver • You can connect the analog audio output of this product to the Analog input of a power amplifier or AV receiver as shown below. -
Page 23: Connecting The Analog Input Port And The Audio Device
3-2. Connecting the Analog Input Port and the Audio Device • As shown in the figure below, you can connect the analog output of an external device such as a CD player to the analog audio input of this product. •... -
Page 24: Connecting The Digital Input/Output Port And The Audio Device(Tv Or Digital Input/Output Support Device)
3-3. Connecting the Digital Input/Output Port and Audio Device(TV or Digital Input/Output Support Device) • As shown in the figure below, you can connect the Digital input/output of an external device to the Digital(Optical/Coaxial) input/output port of this product to use it. •... -
Page 25: Connecting The Usb Audio Output Port And The External Dac
Caution : Do not input signals other than linear PCM signals such as Dolby Digital, DTS, AAC, etc., into this device. Doing so may generate noise and damage the speaker. 3-4. Connecting the USB Audio Output Port and the External DAC •... -
Page 26: How To Connect The Usb Audio In
3-5. How to connect the USB Audio In • Connect the device as shown in the figure below. RS250A • 3-5-1. Download Rose_UsbAudio_[VERSION] from the ROSE website (www.hifirose.com). • 3-5-2. When you unzip the downloaded Rose_UsbAudio_[VERSION] file and run Rose_UsbAudio_[VERSION].exe, a screen will appears as shown in the image below. - Page 27 • 3-5-3. Reboot after installing the USB Audio Sound and Universal Serial Bus Controller. • 3-5-4. After driver installation is complete, when you switch the source to ‘USB In’ in the Input/Output Settings, the RS250-DAC will appear on your PC as shown below.
-
Page 28: How To Connect To Hdmi Output
3-6. How to Connect to HDMI Output • As shown in the fi gure below, you can connect a TV to the HDMI port of this product. • By connecting this product to a TV, video output (up to 3840x2160 / 60 ㎐) signals can be played back. -
Page 29: External Memory(Usb) And Sata Storage Devices
4. External Memory(USB) and SATA Storage • This product can connect to USB and SATA storage devices. • When connecting a storage device using the SATA method, it is recommended that you use an SSD. • USB storage devices are compatible up to 10TB and SATA storage devices up to 4TB. -
Page 30: How To Format After Installing The Ssd
7mm SSD 5-1-4. 5-1-4. 5-1-3. • 5-1-5. Assemble SSD cover with the SSD on the main body. • 5-1-6. Re-fi x the screws(2pcs) after pushing on the LOCK indicator. 5-1-6. 5-1-5. 5-2. How to format After Installing the SSD • You can format any SSD connected to this product from the SSD Format menu under System Settings. -
Page 31: How To Copy Files Over The Network
5-3. How to copy fi les over the Network • Set the SMB ID/PW in Storage Settings under System Settings. • After entering \\ROSE IP on your PC, enter the ID/PW that you set up for the SMB. Any storage connected with this product will appear and you will be able copy the fi les directly from your PC. -
Page 32: Network Connection
6. Network Connection • This product can be connected to a network via a wired or wireless connection. 6-1. Ethernet Connection(Wired) • After connecting a LAN to the rear Ethernet port, select ON from the Settings - Ethernet menu to connect to the network. •... -
Page 33: Wifi Connection(Wireless)
6-2. WiFi Connection(Wireless) • When WiFi is turned On in the Settings - WiFi menu, currently available SSIDs appears and the product connects to the network after one of the SSIDs is selected. ※ Y ou can remotely control this product by downloading and installing the ROSE Connect Premium App available through the Google Play Store and App Store on your smartphone. -
Page 34: How To Pair With The Bluetooth Remote Control
7. How to Pair with the Bluetooth Remote Control • 7-1. Press the Home ( )and Option ( )buttons on the remote control at the same time for about 5 seconds. • 7-2. When the white LED of the remote control turns on, activate the Bluetooth switch to ON in the Settings - Bluetooth menu on the main device and select Search Peripheral Devices ( )’. - Page 35 • Select this product from ‘Select Audio’ under Settings - Audio. • Once connecting with ROSE is completed, you can control and listen to the sound source by running the music in Roon. ※ To control this product from Roon, it must be connected to the same network. - 35 -...
-
Page 36: Initial Settings
Initial Settings 1. Power Button • 1-1. You can turn this product on and off by pressing the power button briefl y. 1-1-1. When the power button is pressed briefl y, the product enters standby mode when the power is on, or is turned on when the power is off . 1-1-2. -
Page 37: Input
2-1. INPUT • You can select an Input by selecting the icon from the INPUT Settings menu. When activated, the icon color changes to gold and a check mark appears. ※ Only one input can be selected at a time. 2-1-1. -
Page 38: Coax In
2-1-3. COAX IN • When using COAX In as a source, select the input source as ‘COAX In’ under Input/Output Settings. 2-1-4. OPT IN • When using OPT In as a source, select the input source as ‘OPT In’ under Input/ Output Settings. -
Page 39: Output
2-2. OUTPUT • You can enable/disable Output Settings by selecting the icon in the Output Settings menu. • When activated, the icon color changes to gold and a check mark appears. Only one of USB, HDMI, and Internal DAC can be selected. •... -
Page 40: Mqa Type
2-2-1-1. MQA Type • Set the MQA playback mode. You can select Authenticator or Decoder mode. • Only original sound or decoded audio data can be exported to Digital output; full-decoded audio data cannot be exported. 2-2-1-2. PCM Resampling Frequency •... -
Page 41: Software Volume Control
2-2-1-4. SoftWare Volume Control • You can adjust the playback volume of digital audio data using the ROSE Volume Control software. • Caution 1. This function is not available in Native DSD and DSD over PCM mode. It is applied after changing to DSD to PCM (up to DSD128) mode. •... -
Page 42: Hdmi
2-2-2. HDMI • You can set up HDMI. • When you select the setting icon for HDMI, the HDMI Settings screen appears as shown below. 2-2-2-1. PCM Resampling Frequency • This is the menu for Setting the Sampling Frequency. Select ‘Original Sampling Rate’... -
Page 43: Hdmi Passthrough
2-2-2-3. HDMI Passthrough • This bypasses HD Audio Formats such as Surround Sound Files to the Audio Receiver through HDMI without decoding. 2-2-2-4. SoftWare Volume Control • You can adjust the playback volume of digital audio data using the ROSE Volume Control software. -
Page 44: Output Gain
2-2-2-6. OUTPUT Gain • Adjust the Gain Value for Digital Output. If distortion occurs when connecting to an external receiver or DAC, adjust the Output Gain Value accordingly. 2-2-3. Digital • Here you can set COAX OUT and OPT OUT. •... -
Page 45: Pcm Resampling Frequency
2-2-3-2. PCM Resampling Frequency • This is the menu for setting the sampling frequency. Select ‘Original Sampling Rate’ if you want to output the original sound, or select the desired sampling rate(48kHz, 96kHz, 192kHz, etc.) to use the re-sampling function. 2-2-3-3. - Page 46 2-2-3-4. SoftWare Volume Control • You can adjust the playback volume of digital audio data using the ROSE Volume Control software. • Caution 1. This function is not available in Native DSD and DSD over PCM mode. It is applied after changing to DSD to PCM (up to DSD128) mode. •...
-
Page 47: Software Volume Control
2-2-4. Analog • You can set up the Analog Out. • If you select the Analog Setting icon, the Analog Output Settings screen appears as follows. 2-2-4-1. Pre-Out Level Settings • This fi xes the Pre-Output Level. This product can be used by fi xing the Output Level with inputs within the acceptable range of the AMP connected, without using volume control. -
Page 48: How To Calibrate The Lower 8 Bits Of A 32-Bit Sound Source
2-2-4-3. How to Calibrate the Lower 8 Bits of a 32-bit Sound Source • Some DACs may cause noise when playing 32-bit sound sources with high sampling rates. In this case, this feature can be used to reduce noise by correcting the lower 8 bits. 2-2-4-4. -
Page 49: Headphone Output Impedance
2-2-4-6. Headphone Output Impedance • This is the menu for setting the Output Impedance of your headphones. • You can enjoy better sound quality by selecting the Output(16Ω, 32Ω, 50Ω, or 100Ω) that matches your headphone specifi cations. 2-2-4-7. DSD Mode •... -
Page 50: Playback
Playback 1. Basic Operation • You can play music and video fi les by connecting a USB storage device to a USB port on the back of this product. • SATA HDD/SSD can be installed at the bottom of this product. ※... -
Page 51: After Completing The Media Scan
• When you select the ‘DB Scan’ button in the new storage pop-up, Media Scanning of the connected storage device begins. (Depending on storage capacity, the time to complete Media Scanning may vary.) • During DB scanning, the ‘Media Scanning’ loading image is displayed at the bottom left of the main screen of the product. -
Page 52: Supplementary Information
Supplementary Information 1. Firmware Update 1-1. OTA Update Progress • The system update pop-up appears when connected to the network if a new update is available. • If you select the ‘Yes’ button in the system update pop-up, the OTA update will begin. -
Page 53: Update Via The Settings Menu
1-2. Update via the Settings Menu • Whenever a newer version is available, the ‘Update’ button is displayed in the system version information in the Settings menu. • When you select the update button, the system update pop-up appears. • If you select the ‘Yes’ button in the system update pop-up, the OTA update will begin. -
Page 54: How To Install Xmos/Audio Mcu When An Update Pop-Up Appears
1-3. How to install XMOS/Audio MCU when an Update Pop-up Appears • If the XMOS/Audio MCU update is required after the system update, the update window is automatically displayed and you can proceed with the update. • Updates can occur in the following cases. 1-3-1. - Page 55 1-3-3. If the XMOS and Audio MCU update are required • After the XMOS update is complete, the Audio MCU update will automatically proceed and the system is automatically rebooted. Caution : Forcibly turning off the power during the update may cause problems. Do not remove power.
-
Page 56: Mqa (Master Quality Authenticated)
2. MQA (Master Quality Authenticated) · MQA is an award-winning British technology that delivers the sound of the original master recording. The master MQA fi le is fully authenticated and is small enough to stream or download. · RS250A includes MQA technology, which enables you to play back MQA audio fi les and streams, delivering the sound of the original master recording. -
Page 57: Product Specifications
Product Specifications 1. Specifications Specifications Part Customized Android 7.1 278(W) x 231(D) x 83(H)mm Size 3.2kg Design Weight 8.8” TFT LCD & Capacitive Touch Screen (MIPI-DSI) Display Dual-core Cortex-A72 up to 1.8GHz Hexa Core Quad-core Cortex-A53 up to 1.4GHz Mali-T864 GPU, OpenGL ES1.1/2.0/3.0/3.1, OpenVG1.1, OpenCL, DX11 LPDDR4 4GByte Memory... - Page 58 Input AC100-120, AC220-240V 50/60Hz Voltage Power Power Consumption T3.15AL / 250V Fuse SW update via internet, USB OTA, ROSE Store Update Remote Bluetooth Remote Controller Remote Controller Control ROSE Connect (Android, iOS) / Remote Feature Google PlayStore, App Store Power Cord x 1, Bluetooth Remote Controller x 1 Accessory (AAA Battery x 2), Manual x 1, SSD Screw x 4 2.
-
Page 59: Quality Guaranteed
Quality Guaranteed RS250A Model Name Date of Year Month Date Purchase Firm Name Place of Purchase Telephone Serial No. Telephone Term of 1 Year from the Date of Purchase Guarantee • Name of the company that received the Conformity Assessment : Citech Co., Ltd. •... -
Page 60: Faq
Q. The product does not turn on. - After disconnecting the power cord from the outlet, wait for about 10 seconds, then plug it back in and turn on the power. Q. Which one should I use, Ethernet or Wi-Fi? - In an environment where Ethernet connection is possible, using Ethernet will help you enjoy more stable music. - Page 61 Q. I played music, but there is no sound from the device. - Please check the volume. - Please check the cable you connected. - Make sure that the input and output you want to use are enabled in Input/Output Settings of the device.
- Page 62 Check Before Contacting the Service Center • If touch does not work while using the device, or the screen stops working, you must restart the device. Press and hold the power button for more than 5 seconds to force reboot. •...
- Page 63 Memo - 63 -...
- Page 64 Memo - 64 -...
Need help?
Do you have a question about the RS520 and is the answer not in the manual?
Questions and answers