Table of Contents
Advertisement
Quick Links
U.S.A.
: KUBOTA TRACTOR CORPORATION
1000 Kubota Drive, Grapevine, TX 76051
Telephone : 888-4KUBOTA
Canada
: KUBOTA CANADA LTD.
5900 14th Avenue, Markham, Ontario, L3S 4K4, Canada
Telephone : (905)294-7477
France
: KUBOTA EUROPE S.A.S
19-25, Rue Jules Vercruysse, Z.I. BP88, 95101 Arɡenteuil Cedex, France
Telephone : (33)1-3426-3434
Italy
: KUBOTA EUROPE S.A.S Italy Branch
Via Grandi, 29 20068 Peschiera Borrome (MI) Italy
Telephone : (39)02-51650377
Germany
: KUBOTA BAUMASCHINEN GmbH
Steinhauser str, 100, 66482 Zweibrucken Rheinlandpfalz Germany
Telephone : (49)6332-4870100
U.K.
: KUBOTA (U.K.) LTD.
Dormer Road, Thame, Oxfordshire, OX9 3UN, U.K.
Telephone : (44)1844-214500
Australia
: KUBOTA AUSTRALIA PTY LTD.
25-29 Permas Way, Truɡanina, VIC 3029, Australia
Telephone : (61)-3-9394-4400
Malaysia
: KUBOTA MALAYSIA SDN. BHD.
Lot 766, Jalan Subanɡ 4, off Persiaran Subanɡ Sunɡai Penaɡa Industrial Park,
47500 Subanɡ Jaya
Telephone : (60)-3-7890-3533
Philippines : KUBOTA PHILIPPINES, INC.
232 Quirino Hiɡhway, Baesa, Quezon City 1106, Philippines
Telephone : (63)2-422-3500
Taiwan
: SHIN TAIWAN AGRICULTURAL MACHINERY CO., LTD.
16, Fenɡpinɡ 2nd Rd, Taliao Shianɡ Kaohsiunɡ 83107, Taiwan R.O.C.
Telephone : (886)7-702-2333
Thailand
: SIAM KUBOTA CORPORATION CO., LTD.
101/19-24 Moo 20, Navanakorn Industrial Estate, Tambon Khlonɡnuenɡ, Amphur Khlonɡluanɡ,
Pathumthani 12120, THAILAND
Telephone : (66)2-909-0300
Japan
: KUBOTA Corporation
Farm & Industrial Machinery International Operations Headquarters
2-47, Shikitsuhiɡashi 1-chome, Naniwa-ku, Osaka, Japan 556-8601
PRINTED IN JAPAN
S
V
L
9
7
English (Canada)
2
Code No. V0643-5811-3
©
KUBOTA Corporation 2020
OPERATOR'S MANUAL
KUBOTA
CTL
MODEL
SVL97-2
READ AND SAVE THIS MANUAL
Compact
Track
Loader
1JKMD00001000
Advertisement
Table of Contents

Subscribe to Our Youtube Channel
Related Manuals for Kubota CTL SVL97-2


Summary of Contents for Kubota CTL SVL97-2
- Page 1 Malaysia : KUBOTA MALAYSIA SDN. BHD. Lot 766, Jalan Subanɡ 4, off Persiaran Subanɡ Sunɡai Penaɡa Industrial Park, 47500 Subanɡ Jaya Telephone : (60)-3-7890-3533 Philippines : KUBOTA PHILIPPINES, INC. 232 Quirino Hiɡhway, Baesa, Quezon City 1106, Philippines Telephone : (63)2-422-3500 Taiwan : SHIN TAIWAN AGRICULTURAL MACHINERY CO., LTD. 16, Fenɡpinɡ 2nd Rd, Taliao Shianɡ Kaohsiunɡ 83107, Taiwan R.O.C. Telephone : (886)7-702-2333 Thailand : SIAM KUBOTA CORPORATION CO., LTD. 101/19-24 Moo 20, Navanakorn Industrial Estate, Tambon Khlonɡnuenɡ, Amphur Khlonɡluanɡ, Pathumthani 12120, THAILAND Telephone : (66)2-909-0300 Japan : KUBOTA Corporation Farm & Industrial Machinery International Operations Headquarters 2-47, Shikitsuhiɡashi 1-chome, Naniwa-ku, Osaka, Japan 556-8601 1JKMD00001000 English (Canada) Code No. V0643-5811-3 READ AND SAVE THIS MANUAL © KUBOTA Corporation 2020 PRINTED IN JAPAN...
- Page 2 ABBREVIATION LIST Abbreviations Definitions Air Flow Sensor American Petroleum Institute ASTM American Society for Testing and Materials, USA Auxiliary Common Rail System Compact Track Loader Diesel Exhaust Fluid Deutsches Institut für Normung, GERMANY (German Institute for Standardization) Diesel Oxidation Catalyst Diesel Particulate Filter Exhaust Gas Re-circulation European Standard...
- Page 3 UNIVERSAL SYMBOLS As a guide to the operation of your machine, various universal symbols have been utilized on the instruments and controls. The symbols are shown below with an indication of their meaning. Caution Parking Brake Engine, Electrical Preheat Front Working Light Engine Lubricating Oil Pressure Rear Working Light Coolant Temperature...
- Page 4 FOREWORD Thank you for the purchase of a Kubota product. Before using this product, read this manual carefully and use the product correctly. After reading, keep the manual in a safe and easy-to-access place for future reference. Note that product specifications are subject to change without prior notice.
- Page 5 OTHERS ABOUT TRADEMARKS Trademark Owner AdBlue is a registered trademark of the VDA - Verband der Automobilindustrie AdBlue® e.V. (The German Association of the Automotive Industry). Company names, product names and service names described in this manual are the trademarks or registered trademarks of their respective owners.
-
Page 7: Table Of Contents
CONTENTS SAFE OPERATION........................7 SERVICE OF THE MACHINE....................23 DEALER SERVICE ............................. 23 1. Warranty policy ............................23 2. Procedure for scrapping the machine......................24 TECHNICAL DATA ........................25 SPECIFICATION TABLE............................. 25 MACHINE PARTS........................26 DESCRIPTION OF MACHINE PARTS ....................... 26 INSTRUMENT PANEL AND SWITCH ..................28 INSTRUMENT PANEL ............................ - Page 8 HOW TO USE AND CHECK THE FUNCTION OF THE ARMREST ..............42 HOW TO USE AND CHECK THE SEAT FUNCTION..................42 HOW TO CHECK THE REVERSE ALARM ......................42 HOW TO USE THE FORCED LIFT ARMS LOWERING DEVICE..............43 EXHAUST AFTERTREATMENT DEVICE .................44 CATALYST-CONTAINING DIESEL-PARTICULATE-FILTER (DPF) DEVICE .............
- Page 9 AUXILIARY HYDRAULIC ......................68 HOW TO USE THE AUXILIARY HYDRAULIC CONTROL................. 68 1. Operating the auxiliary hydraulic control ....................68 2. Auxiliary port operation [high-flow model only] ..................70 2.1 Selecting the action modes ........................ 70 2.2 Setting the maximum flow volume ..................... 71 2.2.1 AUX port MAX.
- Page 10 15. Checking the DPF (diesel-particulate-filter) muffler ................102 16. Checking the washer liquid [Closed cab model] ..................102 17. Checking the battery condition ......................102 18. Cleaning the fuel tank cap ........................104 EVERY 50 SERVICE HOURS .......................... 104 1. Draining the water from the fuel tank....................... 104 2.
- Page 11 2. Checking the exhaust manifold for cracks, gas, leakage, and mounting screw ........118 3. Checking the intake air line for air leaks ....................118 4. Checking the boost sensor and the AFS (air-flow-sensor) ..............118 5. Checking the condition of the diesel-particulate-filter (DPF) muffler............118 6.
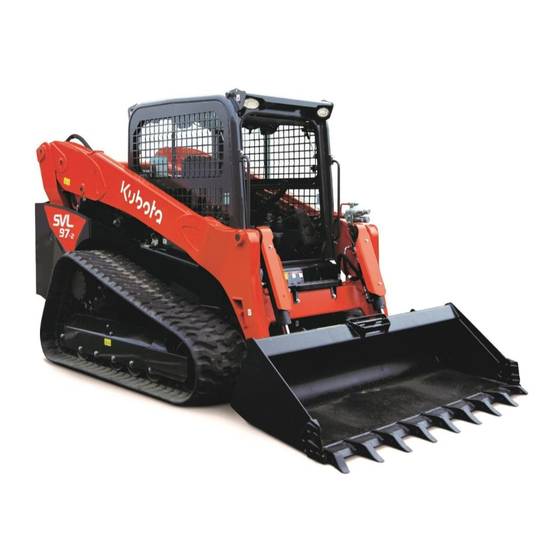
- Page 12 SVL97-2...
-
Page 13: Safe Operation
SAFE OPERATION SAFE OPERATION Careful operation is your best safeguard against an Electrocution can occur by coming into contact with accident. a machine that is near power lines. Read and understand the Safe operation section • Check for buried pipes and cables before digging. carefully, before operating the machine. - Page 14 ROPS and FOPS. • Before starting the engine, make sure that the • For your safety, KUBOTA installs a ROPS (roll- armrests are in the raised position, the control over-protective-structure) and a FOPS (falling-...
- Page 15 (such as polycarbonate • Avoid performing any work with the machine when door), depending upon application. KUBOTA it is on an incline, which could cause the machine to recommends the use of a polycarbonate door become unbalanced and rollover.
- Page 16 SAFE OPERATION • Always use caution when floating the lift arms. spaces through which the machine is to be moved – Always make sure that the bucket is lowered to in order to avoid accident or injury from hitting an the ground before floating the lift arms.
- Page 17 SAFE OPERATION machine to move and could cause a serious accident. PRECAUTIONS FOR MAINTENANCE 1. Preparing maintenance Before performing maintenance work on the machine, following the procedure. 1. Place the machine on a firm, flat, and level surface. 2. Lower the lift arms slowly to the ground. 3.
- Page 18 Leakages from pinholes can be totally invisible. Do necessary, contact your KUBOTA dealer where the not use hands for checking for leaks of hydraulic machine was purchased, or a competent service fluid.
- Page 19 SAFE OPERATION electrical parts and devices are covered. Any – Never work any kind under the machine or on water seepage into electrical wiring on the the machine while it is hoisted on jack-stands or machine cause short circuit other rigid support devices unless they are well malfunction of controls.
- Page 20 SAFE OPERATION – Keep control of the fuel-filler-nozzle while combustible materials from inside the pans of refueling. belly of the machine or lower unit structures as – Never overfill the tank with fuel. Leave room for well as from the area in proximity to the engine. thermal expansion.
- Page 21 SAFE OPERATION the pressure has been stabilized in the hydraulic system. – Gradually release internal pressure build-up by standing out of the line of any possible spray slowly removing plugs, screws, disconnect hoses. • Always use care whenever using grease that is pressurized.
- Page 22 SAFE OPERATION DEF (AdBlue) on clothes or shoes will leave a white If you spill DEF (AdBlue), immediately rinse with clean residue. water. If left untouched, DEF (AdBlue) may rust metal • DEF (AdBlue) itself is nonflammable. If it gets parts or corrode painted surfaces.
- Page 23 SAFE OPERATION SAFETY LABELS SVL97-2...
- Page 24 SAFE OPERATION SVL97-2...
- Page 25 SAFE OPERATION SVL97-2...
- Page 26 SAFE OPERATION SVL97-2...
- Page 27 SAFE OPERATION SVL97-2...
- Page 28 • Clean safety labels with soap and water, dry with a soft cloth. • Replace damaged or missing safety labels with new safety labels from your KUBOTA dealer. • If a component with safety label(s) affixed is replaced with new part, make sure that new safety label(s) is (are) attached in the same location(s) as the replaced component.
-
Page 29: Service Of The Machine
SERVICE OF THE MACHINE SERVICE OF THE MACHINE DEALER SERVICE Your KUBOTA dealer is always ready to help you with problems with your machine and make sure that you get the most value from it. After having carefully read these instructions, you will realize that you can perform much of the routine maintenance by yourself. -
Page 30: Procedure For Scrapping The Machine
Operator's Manual even it is within the warranty period. The product(s) described in this operator's manual are designed and manufactured only for the country in which they are initially wholesaled by KUBOTA or one of its affiliated companies. Neither KUBOTA... -
Page 31: Technical Data
SPECIFICATION TABLE TECHNICAL DATA TECHNICAL DATA SPECIFICATION TABLE KUBOTA CTL (Compact Track Loader) Model name SVL97-2 Type Open Cab Closed Cab 5125 kg 5250 kg Operating weight including operator's weight (11299 lbs.) (11574 lbs.) Water cooled 4 cycle diesel engine with 4 cylinder... -
Page 32: Machine Parts
MACHINE PARTS DESCRIPTION OF MACHINE PARTS MACHINE PARTS DESCRIPTION OF MACHINE PARTS (1) Bucket (4) Front working light (6) AUX supply port (9) DEF (AdBlue) tank cap (2) Tilt cylinder (5) Cab (open cab and closed (7) Drive motor [A] Open cab model (3) Armrest cab) (8) Rubber track... - Page 33 MACHINE PARTS (12) Rear idler (14) Front idler (16) Rear working light (18) Lift arm (13) Track roller (15) Lift arm cylinder (17) Hydraulic tank cap SVL97-2...
-
Page 34: Instrument Panel And Switch
INSTRUMENT PANEL AND SWITCH INSTRUMENT PANEL INSTRUMENT PANEL AND SWITCH INSTRUMENT PANEL (1) Speed indicator light (7) Glow plug indicator (14) Fuel gauge indicator and Low (18) Remaining DEF (AdBlue) (2) Parking brake warning light (8) Bucket-floating indicator fuel warning light warning lamp (3) Hydraulic lock indicator (9) DPF regeneration indicator... -
Page 35: Fuel Gauge Indicator
INSTRUMENT PANEL INSTRUMENT PANEL AND SWITCH 1. Fuel gauge indicator NOTE : • To open the fuel cap, keep the starter key With the starter key at the [RUN] position, the fuel- inserted. gauge-indicator indicates that the fuel remains in the fuel tank. -
Page 36: Checking The Coolant Temperature Gauge
INSTRUMENT PANEL AND SWITCH INSTRUMENT PANEL (1) Coolant temperature gauge (A) Hot (1) Glow plug indicator (B) Cool 5. Parking brake warning light IMPORTANT : • If the emission alarm “E:9114” “E:9115” When the parking-brake-switch is turned on, the displayed, the EGR valve will begin to close and parking-brake-warning-light on the instrument panel EGR system will not function. -
Page 37: Bucket-Floating Indicator
IMPORTANT : (1) Engine oil pressure indicator • If the master-warning-light lights up, consult your local KUBOTA dealer immediately. 9. Battery charge warning light The battery-charge-warning-light lights up if the charging system fails with the engine running. -
Page 38: Hydraulic Oil Temperature Indicator
INSTRUMENT PANEL AND SWITCH INSTRUMENT PANEL (1) Battery-charge-warning-light (1) Hour meter 10. Hydraulic oil temperature 12. Diesel-particulate-filter (DPF) indicator regeneration indicator The hydraulic-oil-temperature-indicator starts blinking As PM (particulate-matter) build up inside the DPF, the and the buzzer starts beeping if the hydraulic-oil- DPF regeneration cycle starts automatically to burn temperature has reached a specified level. -
Page 39: Air Cleaning Warning Indicator
INSTRUMENT PANEL INSTRUMENT PANEL AND SWITCH the engine performance is limited. In such case, stop the engine and consult your local KUBOTA dealer immediately. IMPORTANT : • Before and after the cold season, remove the CCV internal pressure switch cover and check the terminals, CCV internal pressure switch and others. -
Page 40: Switches
INSTRUMENT PANEL AND SWITCH SWITCHES SWITCHES (1) Horn switch (7) AUX port variable switch (12) Hydraulic quick-hitch switch (16) Hydraulic unlock switch (2) AUX electrical control switch (8) AUX hold switch (left) (hydraulic quick-hitch model (17) Parking brake switch (3) Travel speed switch (9) AUX hold switch (right) only) (18) Working light switch... -
Page 41: Starter Switch
SWITCHES INSTRUMENT PANEL AND SWITCH 1. Starter switch 2. When the switch is pressed onto the left side, the parking brake is released and the mark on the • [STOP] instrument panel lights off. You can insert the starter key at the [STOP] position. -
Page 42: Horn Switch
INSTRUMENT PANEL AND SWITCH SWITCHES (1) Hydraulic unlock switch 4. Horn switch When pressing the horn switch, the horn will beep. The horn switch is operative even when the starter key is in the [STOP] position. (1) Travel speed switch (2) Speed indicator light NOTE : •... -
Page 43: Seat Switch
SWITCHES INSTRUMENT PANEL AND SWITCH (1) Inhibit Switch (1) Working light switch Night operation 9. Float switch CAUTION WARNING To avoid personal injury: To avoid personal injury or death: • Visibility is reduced in darkness, therefore, in the event the working light alone does not •... -
Page 44: Aux Port Switch [Standard Flow Model]
INSTRUMENT PANEL AND SWITCH SWITCHES 10. AUX port switch [standard flow model] The AUX-port-switch is used to enable the AUX port. The AUX-port-switch can be used only when the AUX- port-variable-switch on the right-control-lever is in the neutral position. 1. When pressing the AUX-port-switch once, the AUX port is unlocked and the mark on the instrument panel lights up. -
Page 45: Aux Hold Switch
SWITCHES INSTRUMENT PANEL AND SWITCH 13. AUX hold switch 2. By pressing the AUX-electrical-mode-switch again, the AUX-electrical-mode-change-function will turn By pressing the right or left AUX-hold-switch, the flow off. rate of the hydraulic oil is maximized. The AUX-electrical-mode-change-indicator and the light on the AUX-electrical-mode-change-switch will go off. -
Page 46: Display Selector Switch
INSTRUMENT PANEL AND SWITCH SWITCHES (1) Hydraulic quick-hitch switch (A) Unlock position (2) Cover (B) Lock position 17. Display selector switch This display selector switch is used to select the display indication. Change the 2 or 3-mode display according to your jobs. (1) Hour meter [A] High-flow model and the (2) Tachometer... -
Page 47: Pedal And Levers
CONTROL PEDALS, LEVERS, AND ELECTRICAL OUTLET PEDAL AND LEVERS PEDAL AND LEVERS CONTROL PEDALS, LEVERS, AND ELECTRICAL OUTLET (1) Left control (traveling) lever (3) Armrest (6) Electrical outlet (2) Right control (front operating) (4) Seat (7) Accelerator pedal lever (5) Engine speed control dial SVL97-2... -
Page 48: Safety Features
SAFETY FEATURES HOW TO USE THE EMERGENCY EXIT SAFETY FEATURES HOW TO USE AND CHECK THE WARNING FUNCTION OF THE ARMREST To avoid personal injury or death: • Place the machine on a firm, flat and level 1. Sit in the operator's seat. surface 2. -
Page 49: How To Use The Forced Lift Arms Lowering Device
HOW TO USE THE FORCED LIFT ARMS LOWERING DEVICE SAFETY FEATURES 2. If clear, engage hydraulics and start to reverse. Alarms should sound. If not, check by your KUBOTA dealer. HOW TO USE THE FORCED LIFT ARMS LOWERING DEVICE 1. Start the engine. -
Page 50: Exhaust Aftertreatment Device
DPF, the engine may automatically stop. DIESEL-PARTICULATE-FILTER DPF regeneration system (DPF) DEVICE On the Kubota CTL, the ECU prompts the DPF- regeneration cycle. When starting the engine, auto- The catalyst-containing-DPF-device has the following regeneration-mode is set by default. When all the two functions. - Page 51 EXHAUST AFTERTREATMENT DEVICE • The DPF regeneration cycle only starts in the following conditions. If any of the conditions are not met, the DPF regeneration cycle may be interrupted. Coolant temperature above 65 ℃ DPF temperature above 250 ℃ Engine rpm above 1200 rpm •...
-
Page 52: Scr (Selective Catalytic Reduction) System
EXHAUST AFTERTREATMENT DEVICE SCR (SELECTIVE CATALYTIC REDUCTION) SYSTEM SCR (SELECTIVE CATALYTIC REDUCTION) SYSTEM WARNING To avoid personal injury or death: • Do not allow the fluid that comes out of the muffler to contact skin. Wash or flush immediately with large quantities of water after contact with fluid. -
Page 53: Def (Adblue)
• Use DEF (AdBlue) that conforms to ISO 22241. (AdBlue) tank. NOTE : • Purchasing DEF (AdBlue) from a KUBOTA Dealer • In North America, the high-grade NOx reducing is recommended. The product is also available at agent (aqueous urea solution) is sold under the gas stations, truck stops and specialty shops. -
Page 54: Warning Display When The Remaining Amount Of Def (Adblue) Is Low
EXHAUST AFTERTREATMENT DEVICE SCR (SELECTIVE CATALYTIC REDUCTION) SYSTEM the engine if the DEF (AdBlue) is contaminated with diesel fuel. Consult your KUBOTA Dealer immediately. • The warranty does not cover failures caused by adding or mixing anything other than DEF (AdBlue) into the DEF (AdBlue) tank. -
Page 55: Storing Purchased Def (Adblue)
30 minutes, consult your below -11 ℃ (12 ℉). The quality of DEF (AdBlue) local Kubota dealer. In order to avoid the will not be affected even if frozen. Thaw the DEF aforementioned error, it is recommended that you (AdBlue) before use. -
Page 56: Disposing Def (Adblue)
DEF (AdBlue). screen even after restarting the engine several • Be sure to turn the starter switch to [STOP] times, consult your local KUBOTA Dealer. position when replacing the DEF (AdBlue). • When draining and refilling the DEF (AdBlue) in 13. -
Page 57: Def (Adblue) Quality Warning Lamp
SCR (SELECTIVE CATALYTIC REDUCTION) SYSTEM EXHAUST AFTERTREATMENT DEVICE (1) SCR system warning lamp (1) Thawing DEF (AdBlue) lamp 15. DEF (AdBlue) quality warning lamp This lamp serves to indicate that the quality of DEF (AdBlue) is not as specified.If this lamp lights up, check the error code onscreen and follow the instructions given in LIST OF THE ERROR CODE NUMBERS on page 131. -
Page 58: Air Conditioner
AIR CONDITIONER ADJUSTING THE AIR FLOW OF THE AIR CONDITIONER AIR CONDITIONER ADJUSTING THE AIR FLOW OF Rear air outlet port (for cool air only) THE AIR CONDITIONER IMPORTANT : • Do not allow water to enter the fresh-air-inlet when washing the machine. NOTE : •... -
Page 59: Air Control Vent
AIR CONTROL VENT AIR CONDITIONER AIR CONTROL VENT Front air outlet port CAUTION To avoid personal injury: • Replace the hoses of the air-conditioner every two years. • Inspect the air control vent daily. Have the machine repaired immediately if any of the following flaws are discovered. -
Page 60: Operating The Control Panel
AIR CONDITIONER OPERATING THE CONTROL PANEL Air-conditioner switch and indicator light 2. Turn the blower switch on [1], [2], or [3]. 1. Push the air-conditioner-switch to activate the air- 3. Adjust the temperature-control-lever to the cool conditioner. (rightmost) or an intermediate position to achieve An indicator light will light up when the air- the desired temperature level. -
Page 61: Operation
CAB TYPE MACHINE OPERATION OPERATION CAB TYPE MACHINE Washer switch 1. Move the wiper/washer switch to the washer 1. Interior lamp position. The washer system sprays the cleaning fluid to the The interior-lamp-switch is operative even when the pane. starter key is in the [STOP] position. (1) Wiper/washer switch (A) Wiper (1) Interior lamp switch... - Page 62 OPERATION CAB TYPE MACHINE 2. Push the lock lever at the bottom of the cab door, and slowly lower the cab door half way. (1) Lock lever (bottom) Opening the cab door from outside (1) Lock lever (bottom) 1. Unlock the cab door and push the button. The cab door will open upward.
-
Page 63: Opening And Closing The Side Cab Window [Closed Cab Model]
CAB TYPE MACHINE OPERATION 3. Pull the cab door all the way to the lock at the back of cab. (1) Grip OPERATION OF THE ENGINE (1) Handle (2) Cab door 4. After opening the cab door, lock it in place by moving both lock pins to outside to prevent the cab WARNING door from inadvertently falling. -
Page 64: Starting The Engine
3. Make sure that the marks appear on the instrument panel. If not, the system is malfunctioned. Contact your local KUBOTA dealer. (1) Left control (traveling) lever (3) Armrest (2) Right (front operating) lever Start the engine in the following manner: 1. -
Page 65: Checking The Machine After Starting The Engine
SCR system stops. This is to prevent • If any preceding conditions occur, check the damage to the system device. machine and consult your local KUBOTA • Do not refill with DEF (AdBlue) before the dealer for service of the machine. -
Page 66: Starting The Engine With An Auxiliary Battery
OPERATION STOPPING THE ENGINE 1. Starting the engine with an auxiliary battery Follow the guidelines in this section when starting the engine with an auxiliary battery. WARNING To avoid personal injury or death: • Battery gases can explode. Do not smoke and keep sparks and flames away. -
Page 67: Start Of The Machine
OPERATION OF THE MACHINE OPERATION 2. Start of the machine Suspension seat WARNING To avoid personal injury or death: • Mount the machine and dismount the machine only at locations that have steps and/or handholds. Before you mount the machine, clean the steps and the handholds. -
Page 68: How To Use The Seat Belt
OPERATION OPERATION OF THE MACHINE Tilt adjustment 1. Pull the backrest-tilt-adjust-lever in the direction of unlock (D) and move the backrest to the desired angle. 2.2 How to use the seat belt WARNING To avoid personal injury or death: • Always use the seat belt with a ROPS and FOPS protection structure. -
Page 69: Turning The Machine
OPERATION OF THE MACHINE OPERATION (1) Left control lever (traveling (A) Pull lever) (B) Backward NOTE : • When the machine begins to travel backward, the reverse alarm starts sounding. IMPORTANT : • If the temperature of the hydraulic oil is too low, the reverse alarm may start sounding when switching from the backward to the forward travel. -
Page 70: How To Use Spin Turn
OPERATION OPERATION OF THE MACHINE (1) Left control lever (traveling (A) Tilt (1) Left control lever (traveling (A) Tilt lever) (B) Forward to the left lever) (B) Backward to the right To turn machine backward to the left 1. Tilt the left-control-lever (traveling lever) lever 4.2 How to use spin turn backward to the left. -
Page 71: Operating The Lift Arms
OPERATION OF THE MACHINE OPERATION 5. Operating the lift arms WARNING To avoid personal injury or death: • Do not exceed the rated operating capacity of the unit. If loads exceed the rated operating capacity, the unit can experience a hydraulic imbalance when half or medium "lift arms raise"... -
Page 72: Operating The Bucket
OPERATION OPERATION OF THE MACHINE (1) Lift arm stopper (2) Knob bolt (1) Lift arm stopper (A) Fit (2) Arm cylinder tube 5. Start the engine. (3) Knob bolt 6. Set parking-brake-switch parking 11. Start the engine. position. 12. Set the parking brake switch to the parking position. 7. - Page 73 OPERATION OF THE MACHINE OPERATION (1) Right control lever (front op- (A) Tilt erating lever) (B) Dump NOTE : • To stop the bucket operation, return the right- control-lever (front-operating-lever) neutral position. (1) Right control lever (front op- (A) Tilt erating lever) (B) Roll back To dump the bucket...
-
Page 74: Auxiliary Hydraulic
AUXILIARY HYDRAULIC HOW TO USE THE AUXILIARY HYDRAULIC CONTROL AUXILIARY HYDRAULIC HOW TO USE THE AUXILIARY IMPORTANT : • Use long enough hoses when connecting the HYDRAULIC CONTROL attachment. Otherwise the couplers could be damaged due to the frequent side load and impact to them during working. - Page 75 HOW TO USE THE AUXILIARY HYDRAULIC CONTROL AUXILIARY HYDRAULIC 3. Press the AUX port switch [High-Flow model only]. 6. If the tank must be drained, depending on an attachment in use, use the male-case-drain-port. (1) AUX port switch (High-Flow model only) (1) Male port (3) Male case drain port (2) Female port...
-
Page 76: Auxiliary Port Operation [High-Flow Model Only]
AUXILIARY HYDRAULIC HOW TO USE THE AUXILIARY HYDRAULIC CONTROL 2. Auxiliary port operation [high-flow model only] The AUX port switch is used to operate hydraulic attachment such as hammers. 2.1 Selecting the action modes The AUX port has been factory-set to three action modes. You can select one of them. Up to six action modes can be preset. -
Page 77: Setting The Maximum Flow Volume
HOW TO USE THE AUXILIARY HYDRAULIC CONTROL AUXILIARY HYDRAULIC 2.2 Setting the maximum flow volume The AUX port has been factory-set to three action modes 1, 2 and 3. The action modes 4 and 5 can also be preset. 1. With the starter key at the [RUN] position, press the user setting switch. -
Page 78: Aux Port Max. Flow Volume
AUXILIARY HYDRAULIC HOW TO USE THE AUXILIARY HYDRAULIC CONTROL 4. Press the display selector switch for a long time to go to the next port and make the settings for this port. (1) Value of left side port (A) Press display selector switch (2) Value of right side port for a long time. -
Page 79: Aux Port (Lh And Rh) Maximum Flow Volume Setting Flow Chart
HOW TO USE THE AUXILIARY HYDRAULIC CONTROL AUXILIARY HYDRAULIC 2.2.2 AUX port (LH and RH) maximum flow volume setting flow chart (1) AUX setting (A) Push and hold the display se- (C) Push the display selector (2) AUX port (LH and RH) maxi- lector switch. -
Page 80: Operating The Attachment Control Device (Option)
AUXILIARY HYDRAULIC HOW TO USE THE AUXILIARY HYDRAULIC CONTROL 3. Operating the attachment control device (option) You can use the attachment-control-device to feed electrical power for an attachment. For instance, to drive a valve. With the AUX port ready for use, you can supply power. Use K (+12 V) and B (GND) of the 14-pin coupler attached on the arm. -
Page 81: Quick-Hitch
HOW TO USE THE MECHANICAL QUICK-HITCH QUICK-HITCH QUICK-HITCH HOW TO USE THE MECHANICAL QUICK-HITCH This machine utilizes a quick-hitch for easy connection and disconnection of various attachments. By replacing the front attachments, you can use this machine in agriculture, raising stock, landscaping, gardening, and snow removal as well as general civil engineering and construction work. - Page 82 QUICK-HITCH (1) Quick-hitch lever (A) Lock (1) Lever (A) The lever contacts the ear (2) Ear plate plate at the points 7. Verify that both lock pins are completely engaged in (3) Lock pin (B) The pin protrudes through the base of the attachment. (4) Pin slot the slot 8.
-
Page 83: How To Use The Hydraulic Quick-Hitch
HOW TO USE THE HYDRAULIC QUICK-HITCH QUICK-HITCH 6. Lower the lift arms so that the quick-hitch mounting plate clears the saddle of the attachment. 7. Back the machine away from the attachment slowly. 8. If an attachment is not going to be attached to the quick-hitch immediately, push the lever of the quick- hitch to the locked position to prevent damage to the lever assembly. - Page 84 QUICK-HITCH the quick-hitch mounting plate, push and hold the hydraulic quick-hitch switch in the locked position until the quick-hitch levers are fully in locked position. (1) Lever (A) The lever contacts the ear (2) Ear plate plate at the points. (3) Lock pin (B) The pin protrudes through (4) Pin slot...
-
Page 85: Machine Precaution
IMPORTANT INFORMATION ON MACHINE OPERATION MACHINE PRECAUTION MACHINE PRECAUTION IMPORTANT INFORMATION ON 1. Caution while traveling MACHINE OPERATION • Running over large debris as rocks, stumps, blocks, and so on may cause such debris to fly up and • Do not operate the machine on loose rock or gravel damage the machine. -
Page 86: Precautions When Traveling On Inclines
109) • Never allow the main body of the machine to become submerged in water or sand. Contact your KUBOTA Dealer or Service Outlet if the main body of the machine is exposed to water. (A) With bucket full (B) With bucket empty 4. -
Page 87: Prohibited Actions For The Machine
IMPORTANT INFORMATION ON MACHINE OPERATION MACHINE PRECAUTION 2. Reduce the engine speed using the engine-speed- • Do not use near the oceanfront where salt water control-dial. can corrode the various parts of the machine. 3. Lower the bucket to the ground. •... -
Page 88: Lifting
LIFTING LIFTING THE MACHINE LIFTING LIFTING THE MACHINE verify proper engagement of hook or shackle in all instances. • Comply with all federal, state, and local DANGER regulations and safety standards before lifting the machine. To avoid personal injury or death: •... - Page 89 LIFTING Fig. 1 (Chain location at front of the machine) 2. Connect the hook. • At the front of the machine, use the following chain length. 8.84 m Chain length (348 in.) a. Pass the lifting chain and the hook between the front-track-roller and the front idler under machine.
- Page 90 LIFTING – Track frames – Rear lifting chains contact locations (frame and lift arm) Fig. 5 (Lifting chain with pads) Fig. 6 (Front lifting chain location) (1) Hoist hook (4) Pads (2) Front lifting chain (3) Rear lifting chain 8.84 m Front lifting chain (2) (348 in.) 3.58 m...
-
Page 91: Transporting
LOADING THE MACHINE ON A TRANSPORT VEHICLE TRANSPORTING TRANSPORTING DANGER To avoid personal injury or death: • Make sure that the load capacity of the ramps is greater than the machine and attachment weight. • Make sure that the ramps are clean, not damaged, and properly secured to the transport bed. -
Page 92: Towing An Operable Machine
TRANSPORTING TOWING AN OPERABLE MACHINE 10. Block the tracks and tie down the machine using your government transportation laws two tie-downs at the front and two tie-downs at the regulations. rear. (1) Chain or strap (A) Alternate front tie-down (A) Front tie-down locations 12. -
Page 93: Towing An Inoperable Machine
TOWING AN INOPERABLE MACHINE WARNING To avoid personal injury or death: • Towing an inoperable machine will damage the hydraulic drive or track system. Contact your local KUBOTA dealer for towing an inoperable machine. SVL97-2... -
Page 94: Maintenance
MAINTENANCE MAINTENANCE INTERVALS MAINTENANCE Whether the machine is properly lubricated and WARNING maintained directly determines the trouble frequency and service life of the machine. Periodically check and To avoid personal injury or death: maintain your machine, and you will find in the long run •... - Page 95 MAINTENANCE Hour meter indicator Ref. Check points Measures Interval page 1000 1500 2000 3000 check ○ ○ ○ ○ ○ ○ every 250 hrs Radiator hoses and clamps replace every 2 years check ○ ○ ○ ○ ○ ○ every 250 hrs Fuel line and intake air line replace every 2 years...
-
Page 96: Opening And Closing Of Components
Perform the job indicated by ◎ at the first operation. • The listed items (@ marked) are registered as emission related critical parts by KUBOTA in the U.S.EPA non-road emission regula- tion. As the engine owner, you are responsible for the performance of the required maintenance on the engine according to the preceding instruction. -
Page 97: Opening The Engine Hood
OPENING AND CLOSING OF COMPONENTS MAINTENANCE • When opening and closing the engine hood, be careful not to get your hands pinched or other parts of your body caught. 1. Hold up the engine hood and fix it with the stay rod. (1) Lever (A) Pull (1) Stay rod... -
Page 98: Where To Keep The Operator's Manual
MAINTENANCE OPENING AND CLOSING OF COMPONENTS 1. Remove the 3 bolts and detach the radiator and the oil-cooler-tilt-stopper. (1) Radiator hose (2) Stay 2. Place the radiator and the oil-cooler-tilt-stopper to prevent the tilted radiator and oil cooler from falling forward. -
Page 99: Tilting Up The Cab
OPENING AND CLOSING OF COMPONENTS MAINTENANCE [Closed cab] (1) Seat (2) Storage space 5. Tilting up the cab WARNING To avoid personal injury or death: • Raising or lowering the cab while the engine is running may cause the machine to move, and cause personal injury or death. - Page 100 MAINTENANCE OPENING AND CLOSING OF COMPONENTS Fig [A] (2) Latching mechanism 5. Insert the stopper pin into the locked position to fix the cab. (1) Lock bolt (A) Storage position (2) Stopper pin 77.5 N⋅m to 90.2 N⋅m Tightening torque (57.2 ft⋅lbf to 66.5 ft⋅lbf) (1) Stopper pin (A) Locked position...
-
Page 101: Discharging Mud From Operator Cab And Main Frame
DISCHARGING MUD FROM OPERATOR CAB AND MAIN FRAME MAINTENANCE DISCHARGING MUD FROM do not get under the plate and remove with much care. OPERATOR CAB AND MAIN FRAME 1. Tilt the cab. 2. Open the rear door and tilt the radiator. 1. -
Page 102: Checking The Coolant Level
MAINTENANCE DAILY CHECKS (See Care for safety labels on page 22) IMPORTANT : • According to the temperatures, use the proper diesel fuel as follows. 2. Checking the coolant level Temperatures Diesel fuel WARNING Over -5 ℃ (+23 ℉) No.2-D diesel fuel To avoid personal injury or death: Under -5 ℃... -
Page 103: Checking The Def (Adblue) Level And Adding The Fluid
(See Fuel gauge indicator on page 29) Purchasing DEF (AdBlue) from a KUBOTA Dealer is recommended. The product is also available at gas stations, truck stops and specialty shops. Be sure to... -
Page 104: Checking The Engine Oil Level
Consult your • After stopping the engine and remove the key, KUBOTA Dealer immediately. wait five minutes, then check the oil level. Park • The warranty does not cover failures caused the machine on level ground. -
Page 105: Checking The Hydraulic Oil Level
DAILY CHECKS MAINTENANCE 6. Checking the hydraulic oil level WARNING To avoid personal injury or death: • Stop the engine and remove the key before checking the oil level. IMPORTANT : • Before filling oil, wipe away all sand and dust from around the oil port. -
Page 106: Checking The Radiator And The Oil Cooler
MAINTENANCE DAILY CHECKS Lubrication points (1) Radiator and oil cooler (1) Lift arm linkage [A] Quick-hitch model IMPORTANT : (2) Link 1 (3) Bucket link pin – Keep the fins and ribs of the radiator and oil (4) Control link cooler clean in order not to overheat the (5) Lift arm cylinder boss engine and not to allow free flow of air... -
Page 107: Precautions For Washing Whole Machine
DAILY CHECKS MAINTENANCE • Stop the engine and remove the key before checking the V-belt. • Check the V-belt for cracks and proper tension. See the Adjusting the V-belt tension section. (See Checking and adjusting the V-belt tension on page 108) 11. -
Page 108: Checking The Pre-Cleaner
MAINTENANCE DAILY CHECKS 14. Checking the pre-cleaner 1. Check to see if the clamp is loose. If loose, retighten it up. 2. Check the appearance of the pre-cleaner for noticeable damage or cracks. In such a case, replace the pre-cleaner with new one. - Page 109 DAILY CHECKS MAINTENANCE deteriorate, which may shorten the service life How to read the indicator of the battery or cause an explosion. Check the Check the battery condition by reading the indicator. fluid level regularly and add distilled water as required so that the fluid level is between the State of indicator display [UPPER] and [LOWER] levels.
-
Page 110: Cleaning The Fuel Tank Cap
MAINTENANCE DAILY CHECKS • When exchanging an old battery for a new one, use a battery of equal specification. Battery Type Volts Capacity GP31 (105E41R) 12 V 85.3 A.H (at 5H.R) Normal Reserve ca- Cold crank- Battery Type charging pacity ing amps rate GP31 (105E41R) -
Page 111: Checking The Track Tension
EVERY 50 SERVICE HOURS MAINTENANCE 3. Drain the water from the fuel tank. (1) Jack stand 3. If necessary, adjust the track tension. (1) Cover (2) Drain plug The track tension is correct if the distance of clearance between the outer end of the track roller 2. -
Page 112: Cleaning The Air Cleaner Element
MAINTENANCE EVERY 50 SERVICE HOURS (See Replacing the air cleaner element on page IMPORTANT : 109.) • Clean the air cleaner element regularly or • Clean up the case inside with clean wet cloth. foreign materials will accumulate, which will After cleaning, wipe it dry with clean dry cloth. -
Page 113: Every 250 Service Hours
EVERY 250 SERVICE HOURS MAINTENANCE 3. From behind the dust-cover, remove foreign matter 3. If the radiator hoses become swollen, aged, or from the evacuator valve. cracked, replace the radiator hoses and re-tighten the hose clamps properly. (1) Evacuator valve (A) Clean from behind (2) Dust cover (1) Radiator hose... -
Page 114: Checking And Adjusting The V-Belt Tension
MAINTENANCE EVERY 250 SERVICE HOURS 2. If hoses and clamps are found worn or damaged, IMPORTANT : replace or repair them at once. • If the engine is run with a loose alternator belt, the belt could slip and cause insufficient battery charging. -
Page 115: Checking And Adjusting The Air-Conditioner Belt Tension [Closed Cab Model]
(3000 hours). • Use KUBOTA genuine inner and outer element. • Do not blow air to clean the case inside. It allows dust come into the inner element. • Clean up the case inside with clean wet cloth. -
Page 116: Cleaning The Inner Air Filter
MAINTENANCE EVERY 250 SERVICE HOURS 2. Blow air from the direction opposite to the normal air flow of the fresh-air-filter. Keep pressure of compressed air as follows. Under 205 kPa (2.1 kgf/cm Pressure of compressed air [30 psi] (A) Airflow of air conditioner IMPORTANT : •... -
Page 117: Every 500 Service Hours
EVERY 500 SERVICE HOURS MAINTENANCE the radiator or oil cooler. A hot radiator can cause severe burns and/or injury. 1. Check the air-conditioner condenser to be sure that it is clean from debris. (1) Drain plug (2) Under cover 3. Re-tighten the drain plug, and attach the under cover. -
Page 118: Replacing The Engine Oil Filter Cartridge
MAINTENANCE EVERY 500 SERVICE HOURS 2. Replacing the engine oil filter 3. Replacing the water separator cartridge filter element 1. Remove the under cover on the bottom of the frame 1. Set the shutoff-valve of the water separator to the to drain the spilled engine oil from the engine-oil- close position. -
Page 119: Replacing The Fuel Filter Cartridge
EVERY 500 SERVICE HOURS MAINTENANCE 4. Replacing the fuel filter cartridge 4. Fill the drive unit with the gear oil through the oil- filler-port. Fill the gear oil until it overflows out of the oil WARNING inspection port. To avoid personal injury or death: Use prescribed gear oil SAE 90. -
Page 120: Replacing The Hydraulic Oil Filter
(1) Hydraulic oil filter 9. Cleaning the front window roller [Closed cab model only] Consult your local KUBOTA dealer for cleaning the front window roller. (1) Drain plug (2) Cover 4. Loosen the bolt, and remove the tank cover. -
Page 121: Hydraulic Oil Check With The Hydraulic Hammers
100 Hrs. more every 200 Hrs. 3. Adjusting the engine valve clearance Consult your local KUBOTA dealer for adjusting the engine valve clearance. 4. Replacing the front window roller [Closed cab model only] (1) Plug 11. Let the engine run, and operate the lift arm and the Consult your local KUBOTA dealer for replacing the bucket. -
Page 122: Replacing The Oil Separator Element
The longer operating the DPF, the more ash (burnt residue) is collected in the DPF. Too much ash build-up Consult your local KUBOTA dealer for checking the adversely affects the DPF performance. PCV valve. Consult your local KUBOTA dealer to clean up the DPF. SVL97-2... -
Page 123: When The Def (Adblue) Tank Is Frozen
In such case, wait until the DEF (AdBlue) tank has (AdBlue) tank defrosted, and immediately carry on the manual (parking) regeneration. Consult your local KUBOTA Dealer for replacing the filter of DEF (AdBlue) tank. 4. Replacing the filter in DEF EVERY 3 SERVICE MONTHS (AdBlue) pump 1. -
Page 124: Annual Servicing
MAINTENANCE ANNUAL SERVICING 5. Checking the condition of the diesel-particulate-filter (DPF) muffler Consult your local KUBOTA dealer for checking the condition of the DPF muffler. 6. Checking the diesel-particulate- filter (DPF) differential pressure sensor and piping for gas leak Consult your local KUBOTA dealer for checking the DPF differential pressure sensor and the DPF piping for gas leak. -
Page 125: Checking The Relief Valve
(A) Fig [A] (1) Relief valve Fig [A] BIENNIAL SERVICING 1. Replacing the hydraulic hose Consult your local KUBOTA dealer for replacing the hydraulic hoses. 2. Changing the radiator coolant WARNING To avoid personal injury or death: • When using the antifreeze, use protective... -
Page 126: Replacing The Fuel Hose
MAINTENANCE BIENNIAL SERVICING 2. Open the drain plug on the bottom of the radiator Open cab 12.5 L (3.3 US gal.) and drain coolant completely. if a recovery tank is Radiator Cooling water Closed cab 13 L (3.4 US gal.) equipped, disconnect the line from the tank floor and then open the drain shutoff-valve. -
Page 127: Replacing The Intake Air Line
(earlier than 2 years). Consult your local KUBOTA dealer for replacing the pipes and hoses of the air-conditioner. 1. Replace the radiator hoses according to the following figure. -
Page 128: Replacing The Diesel-Particulate-Filter (Dpf) Differential Pressure Sensor Rubber Piping (Front And Back)
1. If the error code [E:9120] of the water separator appears on the meter panel, immediately drain the Consult your local KUBOTA dealer for the DPF- water separator according to the detailed procedure differential-pressure-sensor-rubber-piping (front in Draining the water separator on page 101. - Page 129 SERVICING AS REQUIRED MAINTENANCE • Cleaning the plastic parts with alkaline, acidic, or organic solvents such as alcohol or benzene can damage them. SVL97-2...
-
Page 130: Track
TRACK ADJUSTING THE TRACKS TRACK ADJUSTING THE TRACKS DANGER IMPORTANT : To avoid personal injury or death: • Make sure that no obstacles such as stones are • Do not work under the machine when caught in the track. Remove obstacles such as putting the machine on the jack stand. - Page 131 TRACK IMPORTANT : • If the tracks are too tight, wear is increased. • If the tracks are too loose, the track pads may collide with the sprocket and wear is increased. The track may dislocate or come off. • If the track tension is high due to sticking mud, remove mud from the track.
-
Page 132: Fuse
FUSE FUSES FUSE FUSES 2. Fuse capacities and circuits WARNING To avoid personal injury or death: • When changing fuse, stop the engine and turn the key in the [STOP] position. 1. Replacing the fuse 1. Detach the cover, and remove the cover of the fuse box. -
Page 133: Electrical Outlet
Protected circuit Capacity Max power is less than 120 W. If you need another auxiliary electric, contact your Blower motor 20 A KUBOTA dealer for details. Wiper 15 A Compressor clutch 10 A NOTE : • The fuses of No. 16 and No. 17 are not set at the factory. -
Page 134: Replacing The Bolted Slow Blow Fuse
FUSE FUSES Slow blow fuse 2 [Open cab model] Protected circuit Capacity Fuse type Main 60 A Bolted 40 A Plug-in CCV Heater 30 A Bolted [Closed cab model] Protected circuit Capacity Fuse type Main 60 A Bolted (1) Slow blow fuse case cap (4) Bolted slow blow fuse 40 A Plug-in... -
Page 135: Troubleshooting
TROUBLESHOOTING OF THE ENGINE AND OTHER SYSTEMS TROUBLESHOOTING TROUBLESHOOTING TROUBLESHOOTING OF THE ENGINE AND OTHER SYSTEMS If the machine does not perform as expected, or if trouble arises, see the following table and undertake appropriate measures. Trouble Cause Countermeasure • Check the fuel tank and the filter. - Page 136 TROUBLESHOOTING Trouble Cause Countermeasure Armrest is in the raised position. • Lower the armrests. Lift arms, bucket, or drive Operator is not in the operator's seat. • Sit in the operator's seat. Hydraulic System unit can not move. Hydraulic-unlock-switch is not press- •...
-
Page 137: List Of The Error Code Numbers
LIST OF THE ERROR CODE NUMBERS TROUBLESHOOTING LIST OF THE ERROR CODE NUMBERS ◎: Sure to happen ○: May happen Machine condition Error Engine performance Provisional measure and Code Problem or Failure Correction Machine performance Number Acceleration Engine out- Engine stop- limited put limited Immediately contact your lo-... - Page 138 TROUBLESHOOTING Machine condition Error Engine performance Provisional measure and Code Problem or Failure Correction Machine performance Number Acceleration Engine out- Engine stop- limited put limited The auxiliary-hydraulic-con- Auxiliary hydraulic control trol-system is not turned on. Immediately contact your lo- E:016 system (Control switch on The other functions of the cal dealer.
- Page 139 TROUBLESHOOTING Machine condition Error Engine performance Provisional measure and Code Problem or Failure Correction Machine performance Number Acceleration Engine out- Engine stop- limited put limited Move the machine to a safe place and release the inhibit DPF must be regenerated, switch to start the DPF regen- Requirement for the DPF but unable to start the DPF...
- Page 140 TROUBLESHOOTING Machine condition Error Engine performance Provisional measure and Code Problem or Failure Correction Machine performance Number Acceleration Engine out- Engine stop- limited put limited For correction, see Coolant temperature gauge on page Stop the engine and check the grill or oil cooler is clog- E:9114 Pre overheat ◎...
- Page 141 TROUBLESHOOTING Machine condition Error Engine performance Provisional measure and Code Problem or Failure Correction Machine performance Number Acceleration Engine out- Engine stop- limited put limited CCV system is frozen. If you continue running the engine Stop the engine and immedi- E:9127 CCV system freezing ◎...
- Page 142 TROUBLESHOOTING Machine condition Error Engine performance Provisional measure and Code Problem or Failure Correction Machine performance Number Acceleration Engine out- Engine stop- limited put limited Check to see if any air-intake hose is disconnected and if the air-cleaner-element is Engine air intake system clogged.
- Page 143 TROUBLESHOOTING Machine condition Error Engine performance Provisional measure and Code Problem or Failure Correction Machine performance Number Acceleration Engine out- Engine stop- limited put limited Add the DEF (AdBlue). And then if the error code DEF (AdBlue) Tank Level: E:9503 ◎...
- Page 144 TROUBLESHOOTING Machine condition Error Engine performance Provisional measure and Code Problem or Failure Correction Machine performance Number Acceleration Engine out- Engine stop- limited put limited Immediately contact your lo- E:9525 System Power (ACU) ◎ ◎ cal dealer. Immediately contact your lo- E:9526 ACU FLASH ROM ◎...
-
Page 145: Cold Weather
PREPARATION FOR OPERATION OF THE MACHINE IN COLD WEATHER COLD WEATHER COLD WEATHER STORING THE MACHINE AFTER Operation machine under cold weather conditions COMPLETION OF WORK IN COLD WEATHER PREPARATION FOR OPERATION OF THE MACHINE 1. Clean the machine thoroughly after work, and wipe IN COLD WEATHER dry. -
Page 146: Long Storage
If you have to keep the machine outdoors, follow intervals. For added safety, ask your KUBOTA dealer to the following procedure. replace the following important component parts. - Page 147 OPERATING THE MACHINE AFTER STORING FOR A LONG PERIOD OF TIME LONG STORAGE Inspection Interval Check points Oil leak at the fuel and hydraulic hose con- Daily Checks nections and points Oil leak at the fuel and hydraulic hose con- nections and points Every month Damages at the fuel and the hydraulic hose...
-
Page 148: Recommended Oils
Kubota Hydraulic Fluid 46HD Grease Shell Alvania EP2 Mobilux EP2 Fuel Diesel Fuel No.2-D S15 Fuel under -5 ℃ (23 ℉) Diesel Fuel No.1-D S15 KTC is an abbreviation for Kubota Tractor Corporation. Application Viscosity recommends Shell Esso Shell Spirax Gear oil... - Page 149 RECOMMENDED OILS Temperatures Below -20 ℃ (-4 ℉) Elevations Above 1500 m (5000 ft) – Diesel fuels that are specified to EN 590 or ASTM D975 are recommended. – No. 2-D is a distillate fuel of lower volatility for engines in industrial and heavy mobile service (SAE J313 JUN87).
-
Page 150: Biodiesel Fuel (Bdf)
(B6 - B20) which comply with American Society for conditions. Testing and Materials (ASTM) D7467 Standard, as 8. The Kubota Warranty, as specified in the Owner's revised, can be used without adversely affecting the Warranty Information Guide, only covers defects in performance and durability of the engine and fuel product materials and workmanship. - Page 151 Every 125 hrs Consult your local Fuel line Replace Every 1 year KUBOTA Dealer for this service. Long Term Storage: 1. BDF easily deteriorates due to oxygen, water, heat and foreign substances. Do not store B6 thru B20 longer than 1 month and B5 longer than 3 months.
-
Page 152: Appendices
APPENDICES MAIN DIMENSIONS OF THE MACHINE APPENDICES MAIN DIMENSIONS OF THE MACHINE SVL97-2... - Page 153 Turning radius from center-machine rear (63.4 in.) NOTE : • Dimensions are based on the machine with KUBOTA standard bucket. • Dimensions are based on the machine with KUBOTA standard rubber track. • Specifications are subject to change without notice. SVL97-2...
-
Page 154: Index
INDEX operating............... 54 boost sensor action modes checking.............. 118 selecting..............70 boost sensor pressure rubber piping AFS (air flow sensor) replacing..............122 checking.............. 118 breather filter air cleaner element replacing..............113 checking.............. 105 bucket................66 cleaning...............106 bucket-floating indicator..........31 replacing..............109 air cleaning warning indicator........33 air conditioner adjusting the air flow.......... - Page 155 draining..............48 drive unit oil handling............15,47 change..............113 quality..............47 driving................62 storing..............49 storing in the DEF (AdBlue) tank......49 DEF (AdBlue) hoses EGR cooler checking.............. 116 checking.............. 116 DEF (AdBlue) injector EGR cooler hose checking.............. 117 replacing..............122 DEF (AdBlue) injector tip EGR piping checking..............
- Page 156 fuel level interior lamp..............55 check..............96 fuel line checking.............. 107 levers................41 fuel system lift arm purging..............122 lowering..............43 fuel tank lift arm stopper............65 draining the water..........104 lift arms fuel tank cap..............104 operating............... 65 fuse................126 lifting the machine............82 replacing..............126 loading on a transport vehicle........
- Page 157 PCV (positive crankcase ventilation) valve SCR (selective catalytic reduction) system checking.............. 116 adding DEF (AdBlue)..........48 pivot turn..............63 DEF (AdBlue)............47 plastic parts DEF (AdBlue) level gauge........47 cleaning...............122 DEF (AdBlue) quality warning lamp...... 51 pre-cleaner disposing DEF (AdBlue)........50 checking.............. 102 draining DEF (AdBlue)..........
- Page 158 troubleshooting engine and other systems........129 turbocharger checking.............. 116 V-belt tension checking and adjusting tension......108 warranty policy............23 washer liquid [closed cab model] checking.............. 102 water separator drain..............101 draining in case warning against water of the fuel filter............... 122 water separator filter element replacing..............112 wiper/washer switch [closed cab model].....
Need help?
Do you have a question about the CTL SVL97-2 and is the answer not in the manual?
Questions and answers
where is hydraulic cannister filter on kubota 97-2
The hydraulic canister filter on the Kubota SVL97-2 is located under the cab. To access it, tilt up the cab and open the cap of the filter cover.
This answer is automatically generated