Advertisement
Advertisement
Table of Contents

Subscribe to Our Youtube Channel
Related Manuals for Redline SUSHI

Summary of Contents for Redline SUSHI
- Page 1 RedLine SUSHI USERS MANUAL 161218 g200kg...
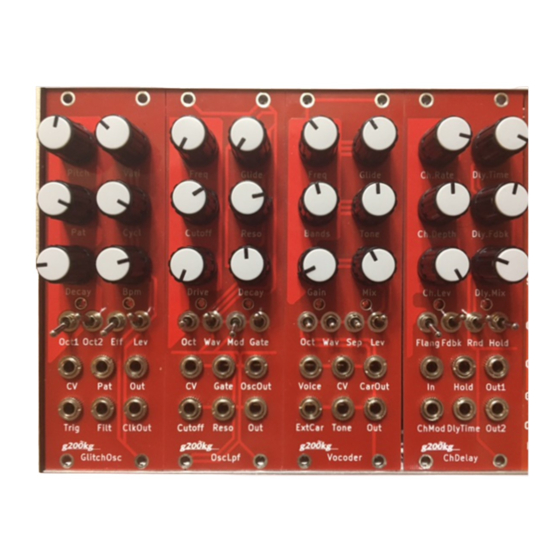
- Page 2 Firmware list FUTOMAKI OscLpf FUTOMAKI is Osc + Lpf module. Lpf can behaive as low pass gate with gate input. LABEL DESCRIPTION Freq Osc frequency Glide Portament control Freq Glide Cutoff Low pass filter cutoff frequency Reso Filter resonance Cutoff Reso Drive...
- Page 3 KOHADA GlitchOsc KOHADA is 2Osc+Lpf based random glitch oscillator. It genarate various tone syncing to Trig signal. LABEL DESCRIPTION Pitch Osc pitch Vari Pitch variation Random tone pattern Freq Glide Cycl Sequence cycle length Decay Decay rate Cutoff Reso Internal clock bpm.
- Page 4 ANAGO Vocoder ANAGO is a digital processed vocoder. frequency resolution can be controlled. Including internal carrier oscillator. LABEL DESCRIPTION Freq Internal carrier osc frequency Glide Internal carrier osc portamento Bands Frequency resolution Freq Glide Tone Tone control Gain Voice input gain control Vocoder / Original voice mix Bands Formant...
- Page 5 HOTATE ChDelay HOTATE is a Chorus/Flanger + Delay effect. LABEL DESCRIPTION Ch.Rate Chorus rate Dl.Time Delay time Ch.Depth Chorus depth Ch.Rate Dl.Time Dl.Fdbk Delay feedback Ch.Lev Chorus level Dl.Mix Delay dry/wet mix Ch.Depth Dl.Fdbk Chorus / Flanger mode Fdbk Chorus / flanger feedback Dl.Mix Ch.Lev...
- Page 6 Firmware Configuration SUSHI module firemware can be configure with ‘SushiConfig’ tool. that needs USB connection to WindowsPC or Mac. USB Micro(B) cable is required that is not included in the package. ‘SushiConfig’ needs Java environment. Installation of ‘SushiConfig’...
- Page 7 [Apple メニュー] - [システム環境設定] – [セキュリティとプライバシー] – [一般] 画面で左下のカギアイコンをクリックし、一時的にダウンロードしたアプリケーショ ンの実行許可を[すべてのアプリケーションを許可]に設定、あるいは SushiConfig を [このまま開く]というボタンが表示されている場合はそれを押せば起動できます。 2 回 目以降は警告は出なくなります。 2) SUSHI モジュール裏のジャンパーを[PROG]位置にセットします。 3) PC と SUSHI モジュールを MicroUSB ケーブルで接続します。 4) SUSHI モジュールの電源を入れます 5) SUSHI モジュールの裏面にある[RESET]ボタンを押します。 6) 展開したフォルダの SushiConfig.jar をダブルクリックして起動します 7) [Port] を設定します。 Mac : ‘/dev/cu/usbserial’ を選択します。...
- Page 8 9) [Write] ボタンを押すとファームウェアが書き込まれます。 終了後、 SUSHI モジュー ルのジャンパーを[NORM] 位置に戻し、電源を入れ直せば新しいファームウェアで立ち 上がります。 10) また、[Write]ボタンのかわりに[Boot] ボタンを押すとファームウェアは書き込ま れず、今回のみ選択したファームウェアで起動します。...
Need help?
Do you have a question about the SUSHI and is the answer not in the manual?
Questions and answers