
Related Manuals for Candy Idea FIDC N615/1


Summary of Contents for Candy Idea FIDC N615/1
- Page 1 User Instructions OVENS Instrukcje użytkownika PIEKARNIKI CANDY HOOVER GROUP Via Comolli 16 Brugherio – Italy...
-
Page 2: Table Of Contents
Summary Safety Indications General Instructions Product description Display description Cooking Modes General notes on cleaning Maintenance Troubleshooting Installation EN 2... -
Page 3: Safety Indications
Safety Indications • During cooking, moisture may condense inside the oven cavity or on the glass of the door. This is a normal condition. To reduce this effect, wait 10-15 minutes after turning on the power be- fore putting food inside the oven. ln any case, the condensation disappears when the oven reaches the cooking temperature. - Page 4 and cause the glass to shatter. • The oven must be switched off before removing the removable parts. After cleaning, reassemble them according the instruc- tions. • Only use the meat probe recommended for this oven. • Do not use a steam cleaner or high pressure spray for cleaning operations.
- Page 5 of incompatibility between the socket and the appliance plug, ask a qualified electrician to substitute the socket with another suitable type. The plug and the socket must be conformed to the current norms of the installation country. Connection to the power source can also be made by placing an omnipolar break- er, with contact separation compliant to the requirements for overvoltage category III, between the appliance and the pow-...
- Page 6 inserted completely into the cavity. • When inserting the grid tray pay attention that the anti-slide edge is positioned rearwards and upwards. • WARNING: Do not line the oven walls with aluminium foil or sin- gle-use protection available from stores. Aluminium foil or any other protection, in direct contact with the hot enamel, risk melting and deteriorating the enamel of the insides.
-
Page 7: General Instructions
General Instructions We thank you for choosing one of our products. For the best results with your oven, you should read this manual carefully and retain it for future reference. Before installing the oven, take note of the serial number so that you can give it to customer service staff if any repairs are required. Having removed the oven from its packaging, check that it has not been damaged during trans- portation. - Page 8 The grounding wire connected to the oven’s earth terminal must be connected to the earth ter- minal of the power supply. WARNING Before connecting the oven to the power supply, ask a qualified electrician to check the conti- nuity of the power supply’s earth terminal. The manufacturer accepts no responsibility for any accidents or other problems caused by failure to connect the oven to the earth terminal or by an earth connection that has defective continuity.
-
Page 9: Product Description
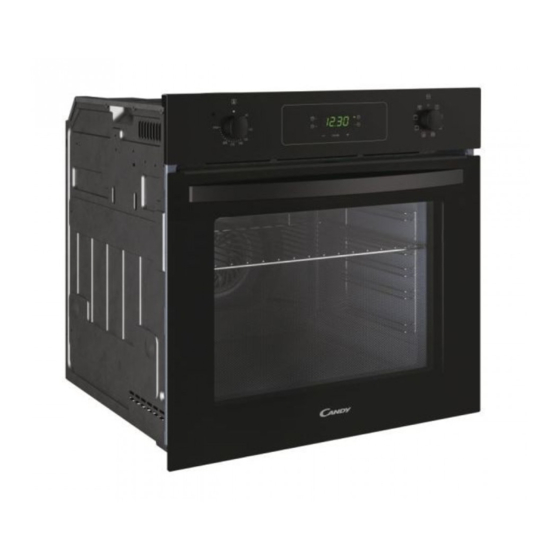
Product description 1. Control panel 2. Shelf positions (lateral wire grid if included) 3. Grids 4. Trays 5. Fan (if present) 6. Oven door 7. Lateral wire grids (if present: only for flat cavity) 8. Serial number ACCESSORIES Drip tray Metal grid Collects residues that drip when cooking food Holds baking trays and plates. -
Page 10: Display Description
Display description 1. Minute minder WARNING: the first operation to carry out 2. Clock setting after the oven has been installed or following 3. Cooking time the interruption of power supply (this is re- 4. Child Lock cognizable the display pulsating and showing 5. - Page 11 HOW TO FUNCTION HOW TO ACTIVATE WHAT IT DOES WHY IT IS NEEDED DEACTIVATE Child Lock function Child Lock function is activated by is deactivated by touching Set (+) touching touchpad for a minimum of 5 Set (+) again for a mi- seconds.
-
Page 12: Cooking Modes
Cooking Modes T °C T °C Symbol Function range fault LAMP: Turns on the oven light. DEFROST: When the dial is set to this position. The fan circulates air at room temperature around the frozen food so that it defrosts in a few min- utes without the protein content of the food being changed or altered. -
Page 13: General Notes On Cleaning
General notes on cleaning The lifecycle of the appliance can be extended damp sponge. through regular cleaning. Wait for the oven to cool before carrying out manual cleaning op- ACCESSORIES erations. Never use abrasive detergents, steel Clean accessories with a wet, soapy sponge wool or sharp objects for cleaning, so as to not before rinsing and drying them: avoid using irreparably damage the enamelled parts. - Page 14 Aquactiva Function The Aquactiva procedure uses steam to help remove remaining fat and food particles from the oven. 1. Pour 300 ml of water into the Aquactiva container at the bottom of the oven. 2. Set the oven function to Static ( )or Bottom ( )heater 3.
-
Page 15: Troubleshooting
Waste management and environmental protection This appliance is labelled in SAVING AND RESPECTING THE ENVIRON- accordance with European Di- MENT rective 2012/19/EU regarding Where possible, avoid pre-heating the oven electric and electronic appli- and always try to fill it. Open the oven door as ances (WEEE). - Page 16 Spis treści Instrukcje bezpieczeństwa Instrukcje ogólne Opis produktu Opis wyświetlacza Tryby pieczenia Czyszczenie i konserwacja piekarnika Konserwacja Rozwiązywanie problemów Installation PL 16...
- Page 17 Instrukcje bezpieczeństwa • Podczas gotowania wilgoć może skraplać się do komory pieka- rnika lub na szybkę drzwiczek. Jest to zjawisko normalne. Aby je ograniczyć, należy poczekać od 10 do 15 minut po włączeniu urządzenia, zanim żywność zostanie umieszczona w piekarniku. Skropliny znikną, gdy piekarnik osiągnie temperaturę...
- Page 18 dzieci bez nadzoru. • Do czyszczenia szybek drzwiczek piekarnika nie należy używać szorstkich lub ściernych materiałów ani ostrych metalowych skrobaków, ponieważ mogą one porysować powierzchnię i spowodować rozbicie szkła. • Piekarnik musi być wyłączony przed wyjęciem ruchomych częś- • Po wyczyszczeniu zmontować je zgodnie z instrukcjami. •...
- Page 19 tabliczce i musi posadać podłączony oraz działający styk uz- iemiający. Uziemienie oznaczone jest kolorem żółto-zielonym. Ta czynność musi być wykonana przez specjalistę z odpowiedni- mi kwalifikacjami. W razie niezgodności pomiędzy gniazdem i wtyczką urządzenia, należy poprosić wykwalifikowanego elek- tryka o zastąpienie gniazda innym odpowiednim typem. Wtycz- ka i gniazdo muszą...
- Page 20 em urządzenia. • Długa awaria zasilania podczas etapu gotowania może spow- odować usterkę monitora. W takiej sytuacji należy się skontak- tować z biurem obsługi klienta. • Aby uniknąć przegrzewania się, urządzenia tego nie należy in- stalować za panelem dekoracyjnym. • W razie umieszczania we wnętrzu półki należy się upewnić, że ogranicznik jest skierowany w górę...
- Page 21 Instrukcje ogólne Dziękujemy za wybór jednego z naszych produktów. Aby jak najlepiej wykorzystywać posiadany piekarnik, zachęcamy do uważnego przeczytania niniejszej instrukcji i starannego przechowy- wania jej, aby móc z niej skorzystać w razie potrzeby w przyszłości. Przed zainstalowaniem piekarnika należy zanotować jego numer seryjny, aby móc podać go personelowi biura obsługi klienta, gdyby wymagane były jakiekolwiek naprawy.
- Page 22 neutralnym. Przed podłączeniem piekarnika do sieci elektrycznej należy sprawdzić: - napięcie zasilania podane na mierniku; - ustawienia wyłącznika. Przewód uziemienia podłączony do zacisku uziemiającego piekarnika musi być podłączony do zacisku uziemiającego sieci elektrycznej. OSTRZEŻENIE Przed podłączeniem piekarnika do sieci elektrycznej ciągłość uziemienia sieci elektrycznej pow- inien sprawdzić...
- Page 23 Opis produktu 1. Panel sterowania 2. Pozycje półek (boczna siatka, jeśli jest dołączona) 3. Siatki 4. Tace 5. Wentylator (jeśli występuje) 6. Drzwiczki piekarnika 7. Boczne siatki (jeśli występują: tylko dla płas- kich komór) 8. Numer seryjny AKCESORIA Taca ociekowa Siatka metalowa Zbiera resztki, które ociekają...
- Page 24 Pierwsze Użycie Przed użyciem piekarnika po raz pierwszy należy: Wytrzeć powierzchnie zewnętrzne piekarnika miękką wilgotną szmatką. Umyć wszystkie elementy wyposażenia i wytrzeć wnętrze piekarnika używając roztwo- ru gorącej wody i płynu do zmywania naczyń. Ustawić pusty piekarnik na maksymalną temperaturę i pozo- stawić...
- Page 25 JAK Z FUNKCJA JAK WYŁĄCZYĆ JAK DZIAŁA DO CZEGO SŁUŻY NIEJ KORZYSTAĆ Funkcję blokady Funkcję blokady zabezpieczającej zabezpieczającej przed dziećmi uakt- przed dziećmi można ywnia się poprzez wyłączyć poprzez dotknięcie na ponowne dotknięcie minimum 5 sekund na minimum 5 przycisku Set sekund przycisku Set (+).
- Page 26 Tryby pieczenia Pokrętło T °C T °C Funkcja funkcji domyślnie zakres LAMPKA: Włącza oświetlenie piekarnika. ROZMRAŻANIE: Gdy pokrętło jest ustawione w tym położeniu. Wen- tylator wprawia w obieg powietrze o temperaturze pokojowej wokół zamrożonej żywności, dzięki czemu rozmraża się ona w ciągu kilku minut bez wpływu na zawarte w pożywieniu proteiny.
- Page 27 Czyszczenie i konserwacja piekarnika Żywotność urządzenia będzie dłuższa, jeś- rnika można ją wyczyścić delikatnie zwilżoną li będzie ono regularnie czyszczone. Należy gąbką. poczekać na ochłodzenie się piekarnika przed wykonaniem czyszczenia ręcznego. Nie używać AKCESORIA nigdy do czyszczenia ściernych detergentów, Akcesoria należy czyścić gąbką zwilżoną wodą i myjek drucianych lub ostrych przedmiotów, mydłem, przepłukać...
- Page 28 Funkcja Aquactiva W funkcji Aquactiva zostaje wykorzystana para wodna, która pomaga usunąć tłuszcz i resztki potraw z wnętrza piekarnika. 1. Wlać 300 ml wody do wgłębienia Aquactiva umieszczonego na dnie piekarnika. 2. Wybrać funkcję piekarnika Pieczenie Statyczne ( ) lub dolna ( ) grzałka 3.
- Page 29 Gospodarka odpadami i ochrona środowiska Urządzenie to jest oznaczone tronicznego, odbiera się go z domów. zgodnie z Dyrektywą Europe- • gdy kupuje się nowe urządzenie, zużyte moż- jską 2012/19 / UE w sprawie na zwrócić do sprzedawcy, który musi je przy- zużytego sprzętu elektry-...
- Page 30 Installation 600 mm 595 mm 20 mm 590 mm 595 mm 20 mm INSTALLATION 30...
- Page 31 EN If the furniture is coverage with a bottom at EN If the oven does not have a cooling fan, cre- the back part, provide an opening for the power ate an opening 460 mm x 15 mm supply cable. PL Jeśli mebel jest wyposażony w pokrywę...
- Page 32 70013818...
Need help?
Do you have a question about the Idea FIDC N615/1 and is the answer not in the manual?
Questions and answers