Advertisement
Quick Links
P/N 14-88360-29 Rev C 82006-21 / 07-09
MANUAL
Johnson Controls
STETIGE Stellantriebe
Typenbezeichnung/Spezifikationen/Technische Daten
M9304- GGA -1N
Stellantrieb AC/DC24V
Stellantriebe
M9304-GGA-1N
Drehmoment
Klappenfläche
Laufzeit
Betriebsspannung
Frequenz
Leistungsaufnahme:
- im Betrieb
- in Endstellungen
Dimensionierung
3.5VA/2.5A@2ms
Gewicht
DC 0...10 V/Ri > 100k Ω
Steuersignale
DC 0...10 V/R > 50k Ω
Stellungssignal
Drehwinkel:
- Arbeitsbereich
- Begrenzung
0°...30° und 90°...60°
Hilfsschalter
Schallpegel
Schutzklasse
Schutzart
Temperatur: Betrieb/Lager
–20°...+50°C/–30°...+60°C
Feuchte
Wartung
Normen
Gemäss CE Richtlinien
Technische Änderungen vorbehalten
Bitte diese Instruktion vor dem Anschliessen des
Gerätes sorgfältig durchlesen und aufbewahren.
Diese Instruktion dient zur Montage und Einstellung des Gerä-
tes. Weitere Informationen sind im Katalogblatt enthalten.
Sicherheitshinweis. Der elektrische Anschluss des Gerätes ist
!
nach den gesetzlichen Vorschriften auszuführen. Zur Vermei-
dung von Schäden an Personen und Geräten, muss vor dem
Öffnen des Gerätes immer die Betriebsspannung
abgeschaltet werden. Zum Abwenden von Gefahren für
Leben und Gesundheit oder Sachen ist das Gerät nur für den
bestimmungsgemässen Gebrauch zu verwenden.
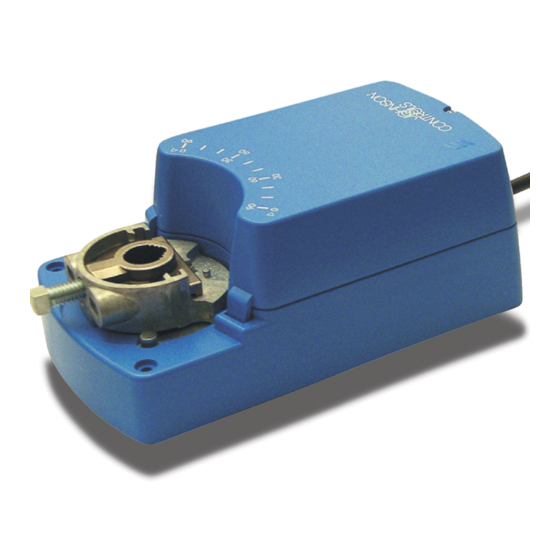
Anwendung. Der Stellantrieb dient zur Verstellung von Luft-
klappen in RLT-Anlagen. Mit dem Universal-Adapter wird er direkt
auf die Klappenachse montiert und über die mitgelieferte Verdreh-
sicherung fixiert.
W i r k u n g s w e i s e . Die Ansteuerung erfolgt mit einem
Steuersignal 0...10 VDC. Das Stellungssignal U ermöglicht die
Anzeige der Klappenstellung oder kann für die Folgesteuerung
von weiteren Antrieben benützt werden. Bei Erreichen des
Klappen- oder Antriebanschlages bleibt der Motor stehen. Zur
Handbetätigung der Klappen wird das Getriebe über die
selbstrückstellende Drucktaste (Fig. 1/e) ausgerastet.
W i c h t i g e r H i n w e i s . Bei der Bestimmung des Dreh-
momentbedarfs von Luftklappen müssen die Angaben der
Klappenhersteller beachtet werden.
Montage und Einstellung
• Montage: Antrieb mit Klemmbock auf der Klappenachse
befestigen und Verdrehsicherung mittels beiliegenden
Befestigungsschrauben anschrauben (Fig. 4).
• Drehwinkelbegrenzung (Fig. 1/g): Wenn ein Drehwinkel/Ar-
beitsbereich von weniger als 90° mechanisch begrenzt werden
soll, kann dieser durch Verstellen der Schrauben S1 und S2,
von beiden Endlagen aus um jeweils bis zu 30° verringert werden.
Drehrichtung einstellen
(Achtung Sicherheitshinweis beachten)
• Für die Drehrichtungsänderung Schraube (Fig. 1/d) lösen und
den Deckel abnehmen.
• Die Drehrichtung kann mit dem Microschalter (Fig. 1/c)
umgekehrt werden.
• Werkeinstellung: Im Uhrzeigersinn.
Elektrischer Anschluss über Sicherheits-Transformator
(Achtung Sicherheitshinweis beachten)
• Für den elektrischen Anschluss Schraube (Fig. 1/d) lösen und
den Deckel abnehmen.
• Stellantrieb
gemäss Klemmenplan (Fig. 2/i) anschliessen.
• Parallelbetrieb
gemäss Klemmenplan (Fig. 2/k) anschliessen.
• Hilfsschalter
keine.
• Stellungsgeber
gemäss Klemmenplan (Fig. 2/m) anschliessen.
• Zwangssteuerung gemäss Klemmenplan (Fig. 2/n) anschliessen.
• Anschluss nur durch eine Elektrofachkraft ausführen.
• Vor dem Einschalten der Betriebsspannung, Anschlüsse überprüfen.
• Falschanschluss kann zur Beschädigung des Gerätes führen.
• Bei der Installation sind die örtlichen Vorschriften zu beachten.
• Da sich der Motor im Betrieb etwas bewegt, sollte der An-
schluss mit flexibler Leitung erfolgen.
DEUTSCH
MANUAL
Johnson Controls
MODULATING actuators
Type/Designations/Technical data
M9304- GGA -1N
Actuators
4 Nm
Drive torque
0.8 m
2
Damper area
35 s
Running time
AC/DC24V
Power supply
50-60 Hz
Frequency
Power consumption:
2.5 W
- operating
0.75 W
- at end stops
For wire sizing
0.9 kg
Weight
Control signals
Position signal
Angle of rotation:
90° (93° mech.)
- working range
- limiting
keine
Auxiliary switch rating
40 dB (A)
Sound power level
II
Protection class
IP 42
Degree of protection
Temperatur: operating/store
5...95% r.F.
Humidity
Wartungsfrei
Maintenance
Standards
Subject to design modifications without notice
Please read these instructions carefully before instal-
ling the actuators and retain safety for reference. The
instructions refer to the installation and adjustment of the actua-
tors. Further information will be found in the Product Data Sheet.
Safety note. The electrical connections for the actuators must
!
be executed in accordance with the relevant legal requirements.
In order to avoid any danger to property, life and
limb, always isolate the power supply before com-
mencing any work on the electrical wiring. In order to
avoid danger to property, it is important for the equipment to be
used solely for which it is intended.
Application. The actuators are intended for the operation of air
dampers in HVAC systems. The universal adapter allows them to
be mounted directly on the damper spindle where they are
secured with the locking device supplied.
Mode of operation. The actuators are controlled a signal of
0...10 VDC. The position checkback signal U allows either the
position of the damper to be indicated or sequential control of
other actuators to be exercised. The motor stops running when the
damper end stop or actuator end stop is reached. For manual
operation of the damper the gearing is disengaged by means of
the selfresetting pushbutton (Fig. 1/e).
Important. When calculating the torque required to operate
dampers, it is essential to take info account all the data supplied
by the damper manufacturer.
Installation and adjustment
• Installation: Attach the actuator to the damper spindle witch the
adapter and secure the locking device with the screws
provided (Fig. 4).
• Angle of rotation limiting (Fig. 1/g): When an angle of rotation/
working range of less than 90° is to be limited mechanically,
move screw S1 and S2 away from the end positons by to 30° each.
Selecting the direction of rotation (Consult safety note)
• In order to reverse the direction of rotation, loosen screw (Fig.
1/d) and remove the cover.
• The direction of rotation can be reversed with the plug (Fig.1/c).
• Factory setting: Clockwise rotation.
Electrical connections via safety isolating transformer
(Consult safety note)
• In order to make the electrical connections, loosen screw (Fig.
1/d) and remove the cover.
• Actuator wiring diagram acc.terminal connection (Fig. 2/i).
• Parallel connection
• Auxiliary switches
• Transmitter
• Override control
• The electrical installation work should be carried
out by a qualified electrician.
• Check the connections before energizing the power supply.
• Since wrong connections can damage the equipment.
• Local accident prevention regulations should always be
adhered to when installing the actuators.
• The motor moves about slightly while it is working so it is
important to use flexible leads for the electrical connections.
ENGLISH
Actuator AC/DC24V
M9304-GGA-1N
4 Nm
0.8 m
2
35 s
AC/DC24V
50-60 Hz
2.5 W
0.75 W
3.5VA/2.5A@2ms
0.9 kg
DC 0...10 V/Ri > 100k Ω
DC 0...10 V/R > 50k Ω
90° (93° mech.)
0°...30° and 90°...60°
not possible
40 dB (A)
II
IP 42
–20°...+50°C/–30°...+60°C
5...95% r.F.
Maintenance-free
In accordance with CE Guidlines
acc.terminal connection (Fig. 2/k).
not possible.
acc.terminal connection (Fig. 2/m).
acc.terminal connection (Fig. 2/n).
MANUAL
Johnson Controls
Servomoteurs PROPORTIONELS
Type/Désignation/Spécifications techniques
M9304- GGA -1N
Servomoteur AC/DC24V
Servomoteurs
M9304-GGA-1N
Couple de rotation
Surface de volet
Temps de marche
Tension de service
Fréquence
Consommation:
- en marche
- en fin de course
Dimensionnement
3.5VA/2.5A@2ms
Poids
DC 0...10 V/Ri > 100k Ω
Signal de commande
DC 0...10 V/R > 50k Ω
Signal de positionnement
Angle de rotation:
- plage de travail
90° (93° mech.)
- limitation
0°...30° et 90°...60°
Contacts auxiliaires
Niveau sonore
Classe de protection
Degré de protection
Température: service/stock
–20°...+50°C/–30°...+60°C
Humidité
Entretien
Sans entretien
Normes
Conforme aux normes CE
Sous réserve de modifications techniques
Veuillez lire et conserver ces instructions attentive-
ment avant de raccorder l'appareil. Cette instruction
vous servira pour le montage et le réglage de l'appareil. Vous
trouverez d'autres informations techniques dans la feuille de
catalogue.
!
Consigne de sécurité. Le raccordement électrique de
l'appareil s'éffectue selon les lois en vigueurs. Afin de prévenir
tout accident auprés des personnes et des appareils, couper
toujours la tension d'alimentation avant d'ouvrir
l'appareil. Afin d'éviter tout danger l'appareil ne doit être utilisé
que pour l'usage préscris.
Utilisation. Le servomoteur sert à actionner le volet d'air dans
les installations de ventilation. Grâce à l'adaptateur universel, le
servomoteur est fixé directement sur l'axe du volet ou des
dispositifs de sécurité.
Principe de fonctionnement. La commande se fait par un
signal de 0...10 VDC. Le signal de positionnement U de 0...10
VDC permet d'indiquer la position du clapet ou de raccorder les
servomoteurs en parallel. Lorsqu'il atteint la butée du volet, le
servomoteur s'arrête. Pour actionner le volet manuellement, on
stoppe l'entrainement du moteur en appuyant sur le bouton de
débrayage (Fig. 1/e).
Indication importante. Pour déterminer le couple de rotation
nécessaire, on doit tenir compte des indications du constructeur
de clapet.
Montage et mise en service
• Montage: Positioner le servomoteur sur l'axe du clapet et serrer
les écrous de la bride de fixation à la main (Fig. 4).
• Limitation de l'angle de rotation (Fig. 1/g): Lorsqu'un angle de
rotation doit être inférieur à 90° et fixé mécaniquement, celui-ci
peut être ajusté par le simple déplacement des vis S1 et S2 de
max. 30° à partir des fin de courses.
Changement du sens de rotation (voir les consignes de
sécurité)
• Pour éffectuer un changement du sens de rotation, déserrer la
vis (Fig.1/d) et enlever le couvercle.
• Le sens de rotation peut être modifié avec la fiche (Fig. 1/c).
• Réglage d'usine: Le sens de rotation correspond au
sens horaire.
Raccordement électrique par transformateur de sécurité
(voir les consignes de sécurité)
• Pour éffectuer le raccordement électrique, déserrer la vis (Fig.
1/d) et enlever le couvercle.
• Servomoteur
à raccorder selon schema (Fig. 2/i).
• Commande en parallèle à raccorder selon schema (Fig. 2/k).
• Contacts auxiliaires
pas possible.
• Positionneur manuel
à raccorder selon schema (Fig. 2/m).
• Commande manuel
à raccorder selon schema (Fig. 2/n).
• Le raccordement doit être effectué que par une
personne spécialisée en électricité.
• Avant de remettre la tension, vérifier les raccordements.
• Un mauvais raccordement peut entraîner la déstruction de l'appareil.
• Lors de l'installation, tenir compte des préscriptions en vigueur
dans le pays.
• Vu que le moteur bouge légerement, le raccordement doit être
fait avec un câble flexible.
FRANÇAIS
4 Nm
0.8 m
2
35 s
AC/DC24V
50-60 Hz
2.5 W
0.75 W
0.9 kg
pas possible
40 dB (A)
II
IP 42
5...95% r.F.
!
Advertisement

Related Manuals for Johnson Controls M9304-GGA-1N


Summary of Contents for Johnson Controls M9304-GGA-1N
- Page 1 P/N 14-88360-29 Rev C 82006-21 / 07-09 MANUAL DEUTSCH MANUAL ENGLISH MANUAL FRANÇAIS Johnson Controls Johnson Controls Johnson Controls STETIGE Stellantriebe MODULATING actuators Servomoteurs PROPORTIONELS Typenbezeichnung/Spezifikationen/Technische Daten Type/Designations/Technical data Type/Désignation/Spécifications techniques M9304- GGA -1N Stellantrieb AC/DC24V M9304- GGA -1N Actuator AC/DC24V...
- Page 2 MANUAL DEUTSCH MANUAL ENGLISH MANUAL FRANÇAIS Johnson Controls Johnson Controls Johnson Controls M9304- GGA-1N M9304- GGA-1N M9304- GGA-1N STETIGE Stellantriebe MODULATING actuators Servomoteur PROPORTIONNELS Fig.1 Stellantrieb ohne Schutzdeckel Fig.1 Actuator open Fig.1 Servomoteur sans couvercle Drehrichtungseinstellung Change of direction of rotation Réglage du sens de rotation...
Need help?
Do you have a question about the M9304-GGA-1N and is the answer not in the manual?
Questions and answers