Table of Contents
Advertisement
The purpose of this Quick Guide is to help you
understand the operation of the TENS unit
much more quickly, and the contents of the
quick guide are not a substitute for the user
manual. Please read the user manual careful-
ly before use to understand the contraindica-
tions and warnings. Please consult your doctor
before use if you're not sure whether you can
use this device.
Note: Do not use it while charging.
1. Clear and dry the
application areas.
Quick Guide
Attention
OPERATION STEPS
2. Connect the lead
wire to a pair of
pads and the de-
vice(keep the unit
off).
Advertisement
Table of Contents

Related Manuals for Auvon AS8012


Summary of Contents for Auvon AS8012
- Page 1 Quick Guide Attention The purpose of this Quick Guide is to help you understand the operation of the TENS unit much more quickly, and the contents of the quick guide are not a substitute for the user manual. Please read the user manual careful- ly before use to understand the contraindica- tions and warnings.
- Page 2 3. Attach the pads to 4. Turn on the the skin firmly. device. 5. Choose the con- 6. Select a mode. nected channel.
- Page 3 7. Adjust intensity. 8. Set time. 9. Lock / Unlock the 10. Turn off the de- screen by holding vice after massage. for 3 seconds.
- Page 4 11. Remove the pads (do not pull the wire). Pad Placement Suggestion Notes: 1. Do not use the unit while bathing, sleeping, driv- ing, operating machinery, or during any electrical- ly-stimulated activity. 2. The electrode pads should not be overlapped nor placed on the artery, broken skin, or on the same side of the arm/leg.
- Page 5 USER MANUAL Dual Channel TENS Massager Please read the product introduction carefully before using the product Model AS8012 Device Name: TENS and Powered Muscle Stimulator...
-
Page 6: Table Of Contents
TABLE OF CONTENTS 1. Explanation of TENS ........7 2. Standard Package ..........7 3. Illustration of the Device ........8 4. Operating Instructions ........10 4.1 Note Before Use ........10 4.2 How to Use ..........10 4.3 After Use ..........15 4.4 Charge the Battery ......... -
Page 7: Explanation Of Tens
(arm), and lower extremities (leg) due to strain from exercise or normal household work activities. 2. Standard Package ● AUVON Dual Channel TENS Massager ® ● Pin Pads ● Pads Holder ●... -
Page 8: Illustration Of The Device
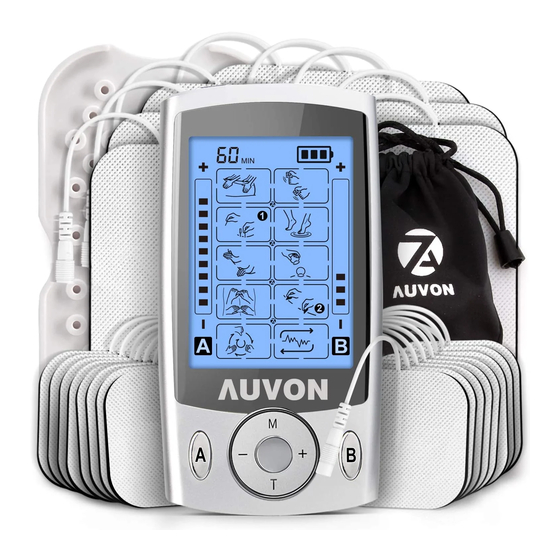
Email: support@iauvon.com 3. Illustration of the Device... - Page 9 Email: support@iauvon.com ① On / off switch ② USB port ③ Time indicator ④ Battery indicator ⑤ Adjustable Intensity (A Channel) ⑥ Adjustable Intensity (B Channel) ⑦ Intensity Decrease (-) ⑧ Channel A ⑨ Lock button ⑩ Mode Selection ⑪ Intensity Increase (+) ⑫...
-
Page 10: Operating Instructions
Email: support@iauvon.com 4. Operating Instructions 4.1 Note Before Use ● Do not use this device during charging. ● The backlight of the screen will automatically come off after 10 seconds of no operation; the machine will automatically shut down when the set time is over. ●... - Page 11 Email: support@iauvon.com 2. Take out the pads from the sealed packaging and keep the packaging for future storage. 3. Connect one pair of electrode pads to one lead wire and plug the other end of the wire into the A or B output of the device.
- Page 12 Email: support@iauvon.com 4. Grab the corner of the electrode pad and peel it off the protective film, and do not pull the wire directly. Attach one pair of electrode pads to the massage area and press the edge of the elec- trode pads firmly on your skin to make sure full contact.
- Page 13 Email: support@iauvon.com 6 . C h a n n e l O p t i o n : Choose the channel A/ B by pressing the A/B button, and the selected channel will flash. 7. Mode Option: Press the M button to choose main mode and press the center button choose submode under...
- Page 14 Email: support@iauvon.com 8. Intensity Option: To increase or decrease the intensity of the selected channel, please press the “+/-” button. Includes 20 Levels, each indicator bar represents 2 strength levels. For initial use, the intensity should be set between 1-3. If you feel the intensity is weak in 1-2 minutes, gradually increase it and select the...
-
Page 15: After Use
Email: support@iauvon.com 10. Press and hold the Center button for 3 seconds to lock the de- vice, then the intensity, mode, and time can’t be adjusted. Press the center button for 3 sec- onds again to unlock the screen. NOTE: Do not move the electrode pads or remove the lead wires during the use, or you... -
Page 16: Charge The Battery
Email: support@iauvon.com 4.4 Charge the Battery ● When the battery icon shows “ ” or the mas- sage strength decreases, it indicates that the battery needs to charge. Turn off the unit. ● Connect the device and the charger with a USB extension cord. - Page 17 Email: support@iauvon.com Main Mode Pulse Rate Pulse Mode Number (Hz) Width (μs) 11-98 10-55 11-98 11-98...
- Page 18 Email: support@iauvon.com Main Mode Pulse Rate Pulse Mode Number (Hz) Width (μs) 11-98 11-98 2.6-1.1...
-
Page 19: Pad Placement Suggestion
Email: support@iauvon.com 5.2 Pad Placement Suggestion Neck Pain Shoulder Pain Modes: 5, 7 Modes: 5, 6, 19, 20 Carpal Tunnel Syn- Tennis Elbow drome Modes: 3, 4, 5, 7 Modes: 9, 13, 15 Back Pain Sciatica Modes: 10, 11, 12, 14, Modes: 1, 2, 5, 6, 7, 8, 20 16, 17, 18, 20... - Page 20 Email: support@iauvon.com Hip/Thigh Pain Period Pain Modes: 3, 5, 7 Modes: 19, 20 Knee Pain Claf Pain Modes: 5, 7 Modes: 7, 8 Ankle Pain Plantar Fasciitis Modes: 3, 4 Modes: 5, 7...
-
Page 21: Tens Electrode Pads & Pads Holder
Email: support@iauvon.com 6. TENS Electrode Pads & Pads Holder 6.1 Features High-quality ABS material to make sure you use it safely. Widely compatible for pads in different sizes. The salient points are designed specially to lessen damage to the pads. -
Page 22: Instruction
Email: support@iauvon.com 6.2 Instruction Stick the electrode pads on the holder to Step 1 avoid getting dust. Wind the thread around the holder for Step 2 easy use as shown. -
Page 23: Electrode Pads Care And Storage
Email: support@iauvon.com Step 3: Store the electrodes in the storage Step 3 bag and reseal the bag tightly. 6.3 Electrode Pads Care and Storage ●Do not cover the sticky side of the electrode pads with subjects like dry paper or dust, if you do, please drop a few drops of water and clean with finger pulp to remove dirt. -
Page 24: Electrode Pads Precautions
Email: support@iauvon.com ●Please store the electrode pads in a cool (between 5°C-35°C/41°F-95°F) and dry place. Do not expose the electrode pads to sunlight or any extreme tem- peratures to prolong the lifespan of the electrode pads. ●When the electrode pad has the following condi- tions, please do not use it and promptly replace it: gel melting;... -
Page 25: Safety Precautions And Warnings
Email: support@iauvon.com ing, and the gel may be damaged when separating. The electrode pads should be at least one inch apart from each other. Changing the distance between the electrode pads or the orientation of the electrode pads can change the electrical sensation. *Ensure each connection port is well connected before use, or the current may be unstable. -
Page 26: Prohibited Individuals
Email: support@iauvon.com ●The lead wire connection port is broken. 7.2 Prohibited Individuals ● Pregnant women, infants and children. ● People who do not have the ability to express their thoughts or intentions. ● People who are incapable of operating the device by themselves. -
Page 27: Trouble Shooting
Email: support@iauvon.com ● Sleeping. ● Driving or operating machines. ● Exercising. ● Any activities that cannot be interfered with. 8. Trouble Shooting If your device is not operating properly, please check below for common problems and suggested solutions. If the recommended action does not solve the problem, please contact customer service: support@iauvon.com. - Page 28 Email: support@iauvon.com Possible Problem Solution Cause Different body Try to change the position areas react One pad of the electrode pads. differently. feels stronger Plug the wire into the than the Poor wire con- output port completely. If it other. nection.
- Page 29 Email: support@iauvon.com Possible Problem Solution Cause Excessive usage Reduce the application time time or the inten- or decrease the intensity. sity is too high. The skin turns red When the pad has the or the following conditions, please skin feels The electrode do not use and promptly irritated.
-
Page 30: Features
Email: support@iauvon.com 9. Features Mechanism Technical Description Symmetrical Bi-Phasic Square Wave Form Pulse Voltage 0-165V (Load: 500 ohm) Power source 180mA lithium battery 10.3cm(L)x5.5cm(W)x1.2cm(H) Size 76.4grams. Weight Atmosphere Pressure: Operating 700Hpa~1060Hpa. Condition There may be a +/-5% tolerance of all parameters and +/-20%toler- Remark ance of amplitude &... - Page 31 Email: support@iauvon.com Symbol Meaning BF Isolated Applied Part Class II equipment Disposal in accordance with Directive 2002/96/EC MANUFACTURER Date when the medical device was manufac- tured. AUTHORISED REPRESENTATIVE IN THE EUROPEAN COMMUNITY Pls read the user manual before use CE Mark, meets compliance of applicable directives and regulation in EU...
-
Page 32: Certification
15’’ on either side of the vertical. 11. Certification The device complies with following normative documents: ANSI/ES 60601-1, IEC60601-1-2, IEC60601-1-11, IEC 60601-2-10, ISO 10993-5, ISO 10993-10, FDA, MDD, CA65. 12. Customer Service 24-Month Limited Warranty Lifetime Technical Support +1(678)829-7256 support@iauvon.com AUVON-US-AS8012-sms-V3.6-220722...
Need help?
Do you have a question about the AS8012 and is the answer not in the manual?
Questions and answers
How will i know if charged
You can tell the Auvon AS8012 needs to be charged when the massage force decreases. Once charged, unplug the charger, as it is not included. Do not use the device while charging.
This answer is automatically generated
@Mr. Anderson how long do I wait for it to charge
Do I wait till fully charged
Yes, you should wait until the Auvon AS8012 is fully charged before using it, especially the first two times when the battery should be completely drained before charging. A full charge may take 2–3 hours.
This answer is automatically generated
What do the 1 and 2 in each mode represent?
The numbers 1 and 2 in each mode of the Auvon AS8012 represent the pulse rate (Hz) and pulse width (μs), respectively.
This answer is automatically generated
Which setting should you use when in labor?
The Auvon AS8012 should not be used during labor.
This answer is automatically generated
On the illustrious what do the different colored pads stand for
What do the pictures in the mode section mean? Very confusing