
Subscribe to Our Youtube Channel
Related Manuals for Auvon SM9126


Summary of Contents for Auvon SM9126
- Page 1 USER MANUAL AUVON TENS Massager ® Relaxation, Anywhere, Anytime Model SM9126 Device Name: TENS & PMS...
-
Page 2: Safety Precautions And Warnings
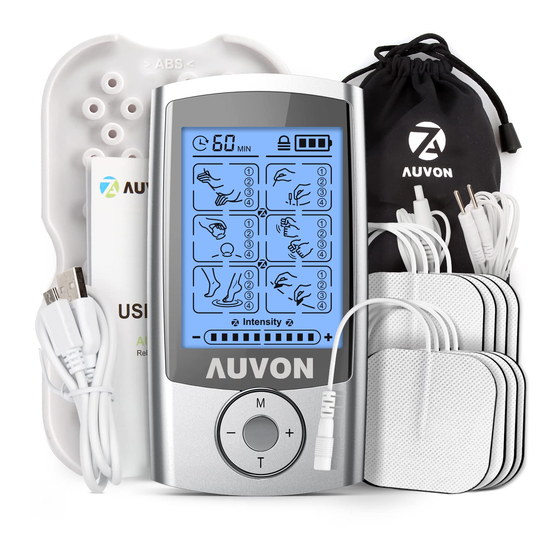
INCLUDED IN THIS STANDARD PACKAGE ● AUVON TENS Massager ® ● Set of Electrode Wires (1/2 Wire) ● USB Cable & USB Adapter ● User Manual ● Happy Card ● Electrode Pads FEATURES ● 2 output with 24 modes ● 20 level intensity ● 20 minutes default timer, can adjustable from 10-60 minutes ● Rechargeable lithium battery ● Battery indicator to know when need to recharge the battery ● AC adapter 110~240V, USB Charger 5V SAFETY PRECAUTIONS AND WARNINGS DO NOT USE THIS UNIT UNDER THESE CONDITIONS Consult with your physician before using this unit. - Page 3 Before using your unit, inspect these things. 1. Cord is not broken. 2. Pad gel is not damaged. 3. Electrode cord connection is not broken. 4. Unit is intact and working. 5. There is no battery leakage. DO NOT USE ON THESE INDIVIDUALS ● Pregnant women ● Do not use on children or infants because the device has not been evaluated for pediatric ● Keep out of the reach of young children because the electrode cord could cause strangulation ● Persons incapable of expressing their thoughts or intentions. ● Persons incapable of operating the unit by themslelves. ● Use with caution if you have a tendency to bleed internally, such as following an injury or fracture. ● If you have suspected or diagnosed heart disease, you should follow precautions recommended by your physician. ● If you have suspected or dignosed epilepsy, you should follow precautions recommended by your physician...
- Page 4 ● Use caution if stimulation is applied over the menstruating uterus. NEVER APPLY THE PADS TO THESE BODY AREAS: ● The head, the mouth, or any area of the face. ● The neck or any area of the throat because this could cause severe muscle spasms resulting in closure of the airway, difficulty in breathing, or adverse effects on heart rhythm or blood pressure. ● Do not use near the heart, or on genital area. ● Both sides of the thorax simultaneously (lateral or front and back), or across your chest because the introduction of electrical current may cause rhythm disturbances which could be lethal. ● On the calves of both legs at the same time because this may cause cardiac disturbance. ● On the bottom of both feet at the same time because this may cause cardiac disturbance. Open wounds or rashes or over swollen, red, infected or inflamed areas or skin eruptions (such as varicose veins, phlebitis, thrombophlebitis and thrombosis), or on top of or close to cancerous lesions, or over areas of skin that lack normal sensation.
- Page 5 DO NOT USE THIS UNIT DURING THESE ACTIVITIES ● When in bath or shower; ● While sleeping; ● While driving, operating machinery, or during any activity in which electrical stimulation can put you at risk of injury. PAIN MANAGEMENT WARNINGS ● If you have had medical or physical treatment for your pain, consult with your physician before using this unit. ● If your pain does not improve, becomes serious chronic or severe, or continues for more than five years, stop using the unit and consult with your physician. ● The mere existence of pain functions as a very important warning telling us that something is wrong. Therefore, if you suffer from any serious illness, consult your physician in order to confirm that it is advisable for you to use this Power Relief unit. PRECAUTIONS REGARDING THE PADS ● Do not move the pads to another location while the unit is on.
- Page 6 ● Make sure the components are connected well and the pads are fixed on the part of the body you wish to treat or the therapy may not be effective. ● Pad should not touch any metal object, such as belt buckle, necklace, or other metal worn under clothing. ● Do not overlap pads or put pads on top of each other. It may weaken or stop therapy, or the unit may stop working. Gel pads may also stick together and cause gel to be removed when separating. ● Do not share pads with another person. This may cause a skin irritation or infection. Pads are intended for use by one person. ● Do not leave pads attached to the skin after treatment. ● Do not bend or fold because the gel may get damaged and it won't stick or function properly. ● To avoid damage to the adhesive surface to the pads, put the pads only on the skin or on the plastic pad holder provided to avoid damage to the adhesive surface of the pads. ● Always place clean pads in accordance with illustrations provided. ● Do not apply ointment or any solvent to the pads or to your skin because it will disrupt...
-
Page 7: How Does It Work
the pads from functioning properly. The self- adhesive pads will adhere to your skin. HOW DOES IT WORK? Scientific theory suggests that electrical stimulation therapy may work in several ways: 1. The gentle electrical pulse moves through the skin to nearly nerves to block or shut out the pain message from the source of the pain to reaching the brain. 2. The gentle electrical pulse increases the production of the body's natural painkiller, such as endorphins. 3. Furthermore, it is thought that the electrical stimulation improves blood circulation as well. Muscles contract and relax with the flow of the electrical stimulation. With the replated contracting and relaxing, the blood flows in and out and the blood circulation improved. OPERATING INSTRUCTIONS 1. Connect the pads to the wire by snapping them on,then remove the protective film. Note: adding a few drops of water on the pads will increase their longevity. 2. Place pads where the massage sensations are desired. Plug into one of the ports on the... - Page 8 device. For additional relief use the second port and repeat procedure to put on another two pads. Make sure both pads on the skin and not overlapping. Make sure your skin is free from any dirt, oil or lotion. 3. Turn the device on by sliding the on/ off switch on the top of the unit.The unit will be now activated. 4. Press the mode button to try different modes. Then press the center button to choose the waves within that selection. Remember the strength will default to the lowest setting by each mode selection. Note: Center button can also be used as a lock key. Press and hold it for 3 seconds to lock the screen, 3 seconds again to unlock the screen. 5. Once you select a mode, gradually increase the intensity by pressing the + button; decrease it by pressing - button. 6. Recommended application is 10-60 minutes. Increase 10 minutes by each setting. The time remaining is automatically counted down. Then the unit will automatically turn off after time finish.
- Page 9 ILLUSTRATIONS OF THE DEVICE AND ACCESSORIES * The AUVON ® TENS Massager is with 6 Massage Modes, and totally 24 Sub-mode Choices.
- Page 10 ① Massage Time ② Knead Massage ③ Cupping Massage ④ Deep Tissue Massage ⑤ Mode Selection ⑥ Intensity Decrease (-) ⑦ Time Selection ⑧ Acupuncture Massage ⑨ Tapping Massage ⑩ Scrapeing Massage Adjustable Intensity / Strength (Include 20 Levels, ⑪ each indicator bar represents 2 strength levels) ⑫ Intensity Increase (+) Sub-mode Choices Selection under 6 Massage ⑬ Modes Mode Description: TENS: It is be used for temporary relief of pain associated with sore and aching muscles in the shoulder, waist, back, neck, upper extremities (arm), and lower extremities (leg) due to strain from exercise or normal household work activities. PMS: It is intended to be used to stimulate healthy muscles in order to improve and facilitate muscle performance.
- Page 11 Icon & Mode Name Description Lateral palm kneading (TENS) Simulating Flat palm Tuina is a kneading hands-on body (TENS) treatment which opens the flow Crosscut fist of Qi through kneading the meridians (TENS) Vertical fist kneading (TENS) Acupuncture (TENS) Simulating acupuncture provides the Moxibustion same sensation (TENS) without needles, Acupuncture by utilizing kneading-1 electronic (PMS) pulses to achieve the sensation of...
- Page 12 Icon & Mode Name Description Rubbing reduction (PMS) Stimulating Tapping cupping, (PMS) relatively constant Fibrillation stimulation massag-1 contracts (PMS) muscles. Fibrillation massage-2 (TENS) Lifting- Simulating pinching tapping is manipulation intended to (TENS) produce a hard thumping sensation that massage your muscles, which Vibrating can give you manipulation an invigorated (TENS) and revitalized feeling.
- Page 13 Icon & Mode Name Description Thai Simulating massage Shiatsu, it (PMS) is a type of alternative medicine consisting of finger and Shiatsu palm pressure, (TENS) stretches, and other massage techniques. Scrapeing (PMS) It is a similar feeling like scraping the skin with a Sensitive smooth edged parts instrument for massage relaxation. mode (TENS)
- Page 14 RECOMMEND MASSAGE POINTS LOWER BACK Modes 1,4,5,6,7,10,11,12,15,16 SCIATIC Modes 1,2,3,4,5,8 DELTOID Modes 2,3,,19,20,23,24 Attach one pad in front and one in back of the muscle. UPPER ARM &THIGH Modes 1,2,3,4,5,6,7,15,16 Attach both pads on either side of the area with pain WAIST/SHOULDER Modes 1,4,5,6,7,10,11,12,14,15,16...
- Page 15 KNEE Modes 1,2,3,4,5,6,7,10 Attach both pads above the knee or above and below oint with pain. CALF Modes 1,2,3,4,5,6,7,8,14,15 Attach both pads on the calf/ leg where you feel pain. (Do not place electrode pads simultaneously to the calves of both legs.) ANKLE/FOOT Modes 1,2,14,15 Attach pads per the illustration, on the left/ on the outside of your ankle/foot for pain. Attach the pads per illustration on the right/ on the other side of your ankle/foot. *The resistance of skin varies from different locations. If you use the two ports of AUVON TENS Massager at the same time while in two different locations, there will be inconsistencies in the strength. This is a normal phenomenon.
-
Page 16: Troubleshooting
TROUBLE SHOOTING If this Happens... Pad gel does not stick to skin. Possible causes... Try this solution... 1. Have you removed 1. Peel off film on the the transparent film from adhesive surface of pads. the pad? 2. Is the pad wet? or Is 2. Dry the pad. Or dry the your skin too wet? skin. 3. The pad gel may be 3. Repalce the pad. damaged. 4. Shave the immediate 4. Is there too much area for proper pad hair on your skin? adhesion. 5. Are you using pad 5. Dry the pad stuck area. during perspiring? 6. Have the pads been 6. Leave the pad in freezer washed too long and/or for overnight. - Page 17 If this Happens... The intensity is not felt or very weak intensity level. Possible causes... Try this solution... 1. Put the other pad on your 1. Are you using only skin. You must use both 1 pad? pads for therapy to work. 2. Have you removed 2. Peel off film on the the transparent film adhesive surface of pads. from the pad? 3. Are the pads 3. Check placement of pads. stacked together or do Refer to pad placement pads overlap? guide. 4. Connect cord plug 4. Is the cord properly correctly into the jack at connectd to the unit? bottom of this unit 5. Is the intensity 5. Press the “+” button.
- Page 18 2. Is the rapy time too 2. Use less than 25 long? minutes. 3. Are the two pads 3. Refer to the Pad attached properly to Placement Guide and the body? attach correctly. 4. Is the pad surface 4.Replace both pads at worn out? the same time. If this Happens... Only one side of the output can work properly. Possible causes... Try this solution... 1. One of the lead Contact AUVON wires defective Customer Servie to resolve the concern. 2. Defective TENS unit.
- Page 19 TENS Pads Holder features High quality ABS material to make sure your use safely. Wide compatibility for patches in different sizes. The shape of salient point designed specially to lessen damage to the patches.
-
Page 20: Maintenance And Care
Instruction Stick the electrode patches on Step 1 the holder to avoid getting dust. Wind the thread around the holder Step 2 for easy use as the picture shown. MAINTENANCE AND CARE l. When you are finished using the device, turn it off and take off the pads. Store the unit in a cool,dry place until next use. - Page 21 2. After usage, please cover the pads with the protective film and put them back in their zip lock bags. Applying a few drops water before and after usage will increase the longevity of the pads. Or stick the electrode patches on the holder and wind the thread around the holder. 3. Charge the unit at least every 3 month in event it is not used regularly.You can also use the unit with wall charger or directly from your computer using the USB cable. Warning: The stimulator has no any output when it is being charged. You must take off the electrode pads from your body before the stimulator charged. Operation environmental for adapter Normal working ambient 5~40℃ temperature Normal working ambient ≤80%RH; Atmosphere humidity and Atmosphere Pressure: 700 ~1060hPa pressure Store and transport -20~55℃ ambient temperature Store and transport ≤93%RH; Atmosphere ambient humidity and Pressure: 700 ~1060hPa Atmosphere pressure...
- Page 22 Input:100-240V 50/60Hz 0.18A Max Output: DC5V---250mA Class II ,not applied part, not suitable for use in the Charger presence of a flammable anaesthetic mixture with air or with oxygen or nitrous oxide, continuous operation The combination of stimulator and AC adaptor is considered as medical electrical system. The AC adaptor is not considered as part of ME equipment ME system Charging the Battery 1. Turn off the controller. 2. Connect the controller and the charger with USB extension cord. Plug charger into any power outlet. The charging process will last approximately 1-2 hours. Note: 1. Only charge the controller when battery is completely drained the first 2 times. 2. Unplug charger from power outlet when charging is complete. 3. When massage strength decreases, it indicates that the device needs charging. 4. Recharge it and then continue to use the device. Do not use the controller when charging.
-
Page 23: Customer Service
100-240V AC General - Input 50/60Hz 0.25A technological characteristics - Output DC5V---550mA Complied standards IEC60950 How it is connected to the device CUSTOMER SERVICE ● 24-Month Limited Warranty ● Lifetime Technical Support SM9126-sms-v1.0-210830-70×120mm...
Need help?
Do you have a question about the SM9126 and is the answer not in the manual?
Questions and answers