Table of Contents
Advertisement
Quick Links
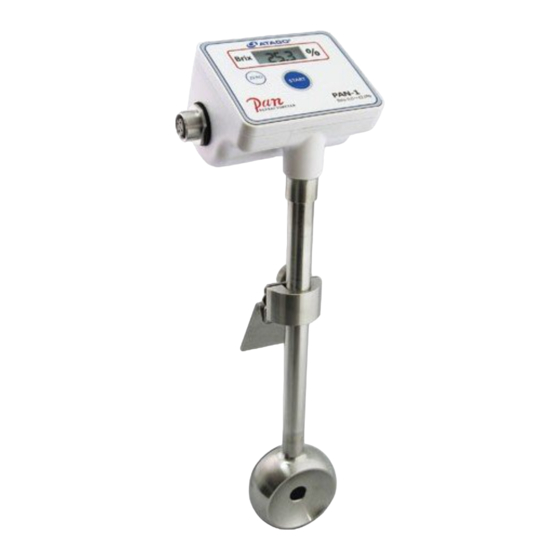
Digital Immersion Refractometer
PAN-1DC
Cat.No.3606
PAN-1DC(M)
Cat.No.3607
PAN-1DC(L)
Cat.No.3608
Introduction
Thank you for purchasing the Digital Immersion Refractometer, PAN-1DC. Before operating, read this
instruction manual carefully to understand its contents. Keep the manual with the instrument for future
reference.
Safety Precautions
To use the instrument safely, the precautions described in this instruction manual must be observed.
Failure to comply may result in injury and/or damage to property.
WARNING
Use caution as hot samples can cause severe burns. Do not dip the instrument directly into
a boiling pot to measure.
When measuring hazardous materials, use proper safety procedures, materials, and clothing to avoid personal injury.
Anyone handling hazardous materials should understand their properties and safety requirements.
If the instrument is dropped or subjected to a strong impact, contact your supplier for inspection.
Do not attempt to repair, modify, or disassemble the instrument.
CAUTION
Do not dip the instrument in any sample that is over 100 .
ATAGO is not liable for any loss and damage caused by the measurement and use of this instrument.
If this instrument is used to measure highly acidic samples, the prism and prism head may be damaged, resulting in
inaccurate measurements.
The prism is made of optical glass. Metal tools and/or implements can damage the prism surface. If the surface of the
prism is scratched or damaged, inaccurate measurements will occur.
Before use, carefully read the instruction manual and fully understand the function and operation of the instrument.
Supply the instrument with DC24V only (allowable fluctuation is
10 %).
Do not use power cables that are damaged or modified.
Do not insert or disconnect the power plug with wet hands.
Do not leave the instrument in a location exposed to direct sunlight or near a heat source for any extended period of
time.?
Do not change the ambient temperature of the instrument suddenly.
Do not place the instrument where it will be subject to strong vibrations.
Do not use the instrument where there is an excessive amount of dust.
Do not store the instrument in an extremely cool area.
Do not set or drop heavy objects on the instrument.
Note regarding water resistance
Only the prism head of the instrument should be submerged into water.
ELI Function
The instrument is equipped with the External Light Interference (ELI)
function to ensure accurate readings
If the instrument is subjected to intense light, such as direct sunlight or
artificial lighting, when measuring a sample or zero setting, the ELI
function will display the [nnnn] (Fig.A) warning message immediately after
the START or ZERO key is pressed. When this happens, shade the prism
head and press the START or ZERO key again. If the warning message
continues to be displayed, place the sample in a non-translucent cup to
measure.
1.Contents
The instrument comes with the following items:
Digital Immersion Refractometer PAN-1DC (with Clamp)
1
Instruction Manual (this book)
1
Power and RS-232C cable
1
2.Parts
Power and RS-232C terminal
Terminal to connect the
power and RS-232C cable.
ABS
ZERO Key
Press to perform zero-setting.
START Key
Press to begin measurement.
Clamp
Silicon
This grips the rim of a container.
(O-ring)
SUS316L
3. Power and RS-232C output
3606-E03
R
The power and RS-232C cable connects to the side
of the instrument, and it provides power (DC24V) to
Instruction Manual
the instrument and transmits Brix data via RS-232C.
One multipurpose socket: serves for both power and
Do not dip the instrument in any
RS-232C output (cable provided in standard
sample that is over 100 .
delivery).
The length of a cable is 2m.
The cable can be ordered to a custom length of up
to 15m.
2
1
4
(1)Power
When the DC24V power is supplied, the
instrument turns on.
The instrument has no power switch.
(2)RS-232C Output
Preparing a PC for Data Transmission
Download a terminal emulator for PC serial
communication.
Here, the open-source software "Tera Tarm "
is used as an example.
Download Tera Term from a website, such as
the one below:
http://ttssh2.sourceforge.jp/index.html.en/
Start Tera Term. (Fig.3-1)
Select "serial" on the New connection
dialogbox.
Fig.A
Select the port number.
Click OK.
Check the port number.
"Control Panel"
"System and Security"
"Device Manager"
"Port"
Click Setup, and then Serial port.
Enter the port number selected in step .
(Fig.3-2)
Baud rate : 2400bps
Data length : 8bit
Parity : none
Stop bits : 1bit
Click OK.
Click Setup, and then Terminal port.
Enter the settings as shown below and Click
Liquid Crystal Display (LCD)
OK. (Fig.3-3)
Displays the measured values.
Make sure that the "Local echo" is checked.
Battery compartment
PAN-1DC series is not battery
powered.
Do not force it to open.
(3)Transmit
Every time a measurement is taken, a new row
of data appears in the Tera Term window.
Immersed part
Transmitted data format.
This part is submerged into
Measurement successful
liquid.
"LLLL" error
Pr ism
"HHHH" error
External Light Interference (ELI) error
The sensor that detects
Zero-setting successful
concentrations (Brix %) is
Zero-setting failed
located.
Power and
RS-232C terminal
Z7001 (Clamp filter)
25
20
3
Z7114 (Cable)
Red & White
Signal name
Pin number
Cord color
Red
1
DC24V
1
Black & White
2
RS-232C GND
3
6
3
Black
DC24V GND
D-SUB 9-pin
4
Red & White
RS-232C
connector solderside
Example
Temperature Brix
Temperature LLLL
Temperature HHHH
Temperature NNNN
ZERO OK
ZERO NG
4. Zero Setting
Zero-set the unit twice a day.
Press the
START key
Black & White
Brix
5
9
Temperature
Brix
Zero-setting is complete if water
measures 0.0%.
If water does not measure 0.0%
*Caution
Press the
Press the ZERO
ZERO key
key to display the
temperature first
Fig.3-1
before zero-setting.
Temperature
Hold the ZERO key down 3 seconds
Blinks three times
Completion
6. Installation
Adjust the height of the display unit at the
clamp and fasten the mounting screw to
securely fix the shaft in position.
Fig.3-2
The clamp mount spins free when the
mounting screw is loosened, allowing for
shaft height adjustment at any desired
angle. Position the display unit upright after
the height adjustment is complete.
7.Error Messages
External Light Interference (ELI)
The following warning message will be displayed when intense light passes through the prism.
Shade the sample stage with your hand and press the START or ZERO key again.
"LLLL"
Measurement Error
There is an insufficient amount of sample on the prism surface
Fig.3-3
to perform measurements.
"HHHH"
Measurement Error
The measured value is out of the measurement range.
26.2,0.0
28.5,LLLL
Zero Setting Error
28.6,HHHH
There is no or insufficient amount of water on the prism surface
28.9,NNNN
to perform zero-setting.
ZERO OK
ZERO NG
5. Measurements
Press the
START key
Sample
Water
Blinks three times
Press the ZERO key
between
measurements to
Brix
display the
temperature.
*Once the
temperature is
Temperature
displayed, the
measurement is
paused. Press the
ZERO key to resume
Brix
measurement.
Automatically measures again in 35 seconds
Blinks three times
Brix
Temperature
Brix
R e p e a t
Brix
Press the START key to measure again
before 35 seconds elapse.
Height-adjusting shaft is fixed
with the mouting screw.
Mounting screw
Advertisement
Table of Contents

Subscribe to Our Youtube Channel
Related Manuals for ATAGO PAN-1DC


Summary of Contents for ATAGO PAN-1DC
- Page 1 ZERO key to resume Brix The instrument has no power switch. ATAGO is not liable for any loss and damage caused by the measurement and use of this instrument. measurement. Zero-setting is complete if water If this instrument is used to measure highly acidic samples, the prism and prism head may be damaged, resulting in measures 0.0%.
- Page 2 DC 24V (Allowable fluctuation is 10%) available when asking about repairs. Power consumption 0.6VA ATAGO's instruments are rigorously inspected to ensure International Protection class Immersed part IP67 each unit meets the highest standards of quality assurance. 80(W) 300(L) 72(H)mm 680g (Main unit only)
Need help?
Do you have a question about the PAN-1DC and is the answer not in the manual?
Questions and answers