
Related Manuals for Komatsu GD755-5R


Summary of Contents for Komatsu GD755-5R
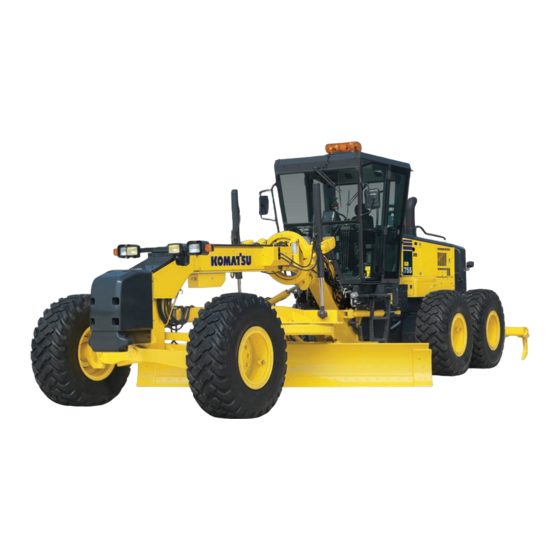
- Page 1 GEN00113-00 Field Assembly Instruction MOTOR GRADER GD755 SERIAL NUMBERS 10001 and up...
-
Page 2: Table Of Contents
CONTENTS 0000 Introduction (1/2) to (2/2) 0010 Preparation - Removal of parts on floor side (1/9) to (9/9) 0020 Preparation - Removal of exterior parts under floor (1/3) to (3/3) 0030 Preparation - Removal of floor mounting bolts 0040 Preparation - Removal of parts on cab side 0050 Installation of cab (1/5) to (5/5) 0060... -
Page 4: Introduction (1/2) To (2/2)
Assembly procedure NO.0000 Introduction (1/2) GD755-5R Installation procedure of operator's cab Introduction 1: Park the machine on a flat ground, lower the blade to the ground, and then start the work. 2: When selecting the parking place, consider the size and weight of the machine. - Page 5 Tightening 54 to 88 torque {5.5 to 9.0} If it is necessary to replace any nut or bolt, always use a Komatsu genuine part of the same size as the part that was replaced. Screw Nominal dia. a Target value Allowable range Nm {kgm} 3.9 {0.4}...
- Page 6 Assembly procedure NO.0010 Preparation - Removal of parts on floor side (1/9) 1. Preparation on floor side 1) The machine is delivered under the following condition 2) Removal of floor mat Precautions Tools to be used Facilities to be used Name Q'ty Name...
-
Page 7: Preparation - Removal Of Parts On Floor Side (1/9) To (9/9)
Assembly procedure NO.0010 Preparation - Removal of parts on floor side (2/9) 3) Removal of operator's seat (1) Remove the four bolts and remove the operator's seat and its base together. 01024-D1025 x4 Operator's seat Weight: 35 kg Precautions Tools to be used Facilities to be used Name Q'ty... - Page 8 Assembly procedure NO.0010 Preparation - Removal of parts on floor side (3/9) 4) Removal of accessory case 01225-70616 x4 23S-55-51970 x4 5) Removal of KOMTRAX (if equipped) (1) Remove the top cover of the KOMTRAX. 01024-81020 x4 Precautions Tools to be used Facilities to be used Name Q'ty...
- Page 9 Assembly procedure NO.0010 Preparation - Removal of parts on floor side (4/9) (2) Remove the left side cover. 01024-81020 x2 01024-D1025 x2 (3) Disconnect the KOMTRAX connector (under the additional heater) as shown below. 01024-81020 x2 Disconnect connector CN-KM1 Note) The engine does not start while this connector is disconnected.
- Page 10 Assembly procedure NO.0010 Preparation - Removal of parts on floor side (5/9) (4) Remove the three bracket bolts of the KOMTRAX base. 01024-D1225 x2 01024-D1020 x1 (5) Remove the additional heater vent and plate together as shown at right below, and then remove the KOMTRAX unit, bracket, and wiring harness together.
- Page 11 Assembly procedure NO.0010 Preparation - Removal of parts on floor side (6/9) 6) Removal of electrical parts bracket (1) Remove one bolt to set the electrical parts bracket free. 01024-81020 7) Move the heater unit inward Remove bracket mounting bolts 01024-81020 x3 Move additional heater and bracket together toward inside of machine.
- Page 12 Assembly procedure NO.0010 Preparation - Removal of parts on floor side (7/9) 8) Removal of lever link cover 01023-20812 x6 01023-20810 x7 01643-70823 x7 Removal of cab harness clip 01024-81020 04434-81020 45 deg. Precautions Tools to be used Facilities to be used Name Name Q'ty...
- Page 13 Assembly procedure NO.0010 Preparation - Removal of parts on floor side (8/9) 10) Move the work equipment lever link and bracket together. 01024-81025 x6 Move the work equipment lever link backward, keeping it assembled with the base bracket. Precautions Tools to be used Facilities to be used Name Q'ty...
- Page 14 Assembly procedure NO.0010 Preparation - Removal of parts on floor side (9/9) 11) Tilt the steering post. Tilt the post toward the rear of the machine. Tilt pedal 12) Remove the right console box cover and put the right air conditioner duct hose in the right console box.
-
Page 15: Preparation - Removal Of Exterior Parts Under Floor (1/3) To (3/3)
Preparation - Removal of exterior parts under floor Assembly procedure NO.0020 (1/3) 2. Removal of exterior parts under floor 1) Removal of right lower cover (washer fluid tank) (1) Disconnect the washer fluid tank harness and remove one harness clamp. (2) Remove one washer fluid hose clamp. - Page 16 Preparation - Removal of exterior parts under floor Assembly procedure NO.0020 (2/3) (3) Remove the six cover mounting bolts Cover outside bolt 01024-D1025 x4 There are two bolts inside the cover. Open Bolts inside the cover 01024-D1025 x2 23B-54-31990 x2 Loosen Precautions Tools to be used...
- Page 17 Preparation - Removal of exterior parts under floor Assembly procedure NO.0020 (3/3) (4) Remove the cover and washer fluid tank assembly together. Stop the water from flowing out of the hose by using tapes, etc. Appearance of removed assembly 2) Removal of left lower cover Remove four bolts to remove the cover 01024-D1030 x4 Precautions...
-
Page 18: Preparation - Removal Of Floor Mounting Bolts
Assembly procedure NO.0030 Preparation - Removal of floor mounting bolts 3. Removal of floor mounting bolts These nuts are not used after the cab is installed. Remove these bolts in advance 23B-957 7520 (16) 23B-957 23B-957 23B-957 01011 01643 5510 5570 5520 82730... -
Page 19: Preparation - Removal Of Parts On Cab Side
Assembly procedure NO.0040 Preparation - Removal of parts on cab side 4. Preparation on cab side 1) Removal of cover and duct at rear in cab (1) Remove the cover at the inside rear of the cab and the cushion material on the reverse. (2) Remove the fresh air intake duct of the air conditioner. -
Page 20: Installation Of Cab (1/5) To (5/5)
Assembly procedure NO.0050 Installation of cab (1/5) 5. Mounting cab 1) Slinging cab Remove four caps on the (1) Open the cab door and hitch it to the door open lock. ceiling and install M16 (2) Install the sling to the four seats of the cab ceiling. * If the revolving warning lamp may be eyebolts. - Page 21 Assembly procedure NO.0050 Installation of cab (2/5) 2) Move the cab to above the floor, and then lower it. <<Caution 1>>After lowing cab to height of right console (1) Take care that the door unlock lever on the right side of the cab does not interfere with the right console box.
- Page 22 Assembly procedure NO.0050 Installation of cab (3/5) [Precautions for removing cab according to this manual] (1) When lifting up the cab, take care that it does not interfere with the air conditioner duct at the rear right of the machine. Section of cab seen from right of machine <<Caution>>...
- Page 23 Assembly procedure NO.0050 Installation of cab (4/5) 3) Fixing cab (1) Place the cab on the floor and fix it by using the bolts shown in the figure. <<Caution>>When tightening bolt A, check that the mount rubber and the spacer are aligned with each other and the spacer is inserted to the cab floor surface.
- Page 24 Assembly procedure NO.0050 Installation of cab (5/5) Bolt B: M10, L30, 4 pcs Bolt C: M10, L45, 2 pcs SHIM Insert them from underside of Insert them from inside of cab machine Bolt D: M10, L40, 4 pcs Insert them from inside of cab Tighten floor and cab together with plate of t12 between them.
-
Page 25: Connections With Chassis (1/5) To (5/5)
Assembly procedure NO.0060 Connections with chassis (1/5) 6. Connections with chassis 1) Connection of windshield washer hoses on floor and hoses of cab side Connect Connect the three windshield washer hoses of the cab side to the windshield washer hoses at the rear left in the floor. Connect the hoses of the same marking color to each other. - Page 26 Assembly procedure NO.0060 Connections with chassis (2/5) 3) Installation of rear cover in cab Install the cab rear cover and cushion. 01024-D0816 x1 01024-D0612 x3 4) Connection of parts of electrical components Enlarged view of portion under additional heater at the left of floor Connect the harness between the chassis and cab.
- Page 27 Assembly procedure NO.0060 Connections with chassis (3/5) (Continued from connection of chassis and cab harness) Connect the cab air conditioner harness connector to the floor harness connector. (At the rear of floor: Two connectors) Connector: CN-AC4 Connector: CN-AC3 View from above Precautions Tools to be used Facilities to be used...
- Page 28 Assembly procedure NO.0060 Connections with chassis (4/5) 5) Connection of air conditioner duct hoses for cab (1) Connect the duct hose on the back of the cab. (2) Connect the air conditioner hose on the right side of the floor to the cab duct. (3) Install the hose to the air conditioner duct on the left side of the floor and connect it to the cab duct.
- Page 29 Assembly procedure NO.0060 Connections with chassis (5/5) 6) Connection of windshield washer hoses under floor Right side under the floor Connect the windshield washer hoes on the cab side and chassis side to the check valve at the circled part. Connect the hoses of the same marking color to each other.
-
Page 30: Restoration Of Parts Around Floor (1/3) To (3/3)
Assembly procedure NO.0070 Restoration of parts around floor (1/4) 7. Restoration of parts around floor 1) Restore the floor in the reverse order to step 1. * When restoring, see 2), 3), and 4). (Following pages) * See the precautions for restoration (page 29). 2) Restoration of work equipment lever link assembly Restore the work equipment lever link according to the following procedure. - Page 31 Assembly procedure NO.0070 Restoration of parts around floor (2/4) (2) Move all control levers and check that you can push and pull them smoothly and they always return to the N position when they are released slowly at the stroke end. If the levers do not return smoothly, loosen bolts 01024-81025, adjust the position of the link bracket assembly, and tighten the bolts...
- Page 32 Assembly procedure NO.0070 Restoration of parts around floor (3/4) <<Precautions for restoration work 1>> Check that the additional heater duct vent is aligned with the hole of the outside cover (KOMTRAX bracket) for the heater vent. If they are misaligned, the heater vent grille may interfere with the additional heater duct and may not open or close.
- Page 33 Assembly procedure NO.0070 Restoration of parts around floor (4/4) <<Precautions for restoration work 2>> (1) When installing the work equipment control lever cover at the front left, open the front lower window of the cab so that the windshield washer hoses are not caught. Front left of floor viewed from above diagonally After installation of cover...
-
Page 34: Check Of Each Operation (1/2) To (2/2)
Assembly procedure NO.0080 Check of each operation (1/2) 8. Check of each operation 1) Check that each operation is free from trouble. Cab ceiling room lamp Lamp switch positions are OFF, OFF, and ON (Center is OFF) Radio switch Upper right in Upper left in cab Beacon lamp switch Rear windshield wiper switch... - Page 35 Assembly procedure NO.0080 Check of each operation (2/2) (1) Starting switch (10) Hazard lamp switch (2) Starting aid switch (13) Creep mode switch (3) Head lamp switch (14) Differential lock switch (if equipped) (4) Front and rear working lamp switch (15) Machine monitor mode selector switch 2 (5) Blade accumulator (16) Machine monitor mode selector switch 1...
- Page 37 GD755-5R MOTOR GRADER Form No. GEN00113-00 ©2011 KOMATSU All Rights Reserved Printed In Japan 09-11...
Need help?
Do you have a question about the GD755-5R and is the answer not in the manual?
Questions and answers