
Related Manuals for VIVI MT26G


Summary of Contents for VIVI MT26G
- Page 1 American VIVI E-bike User’s Manual CAUTION: READ THIS MANUAL BEFORE USING YOUR EQUIPMENT MADE IN CHINA...
-
Page 2: Table Of Contents
CONTANTS Safety instruction------------------------------------------------------------------Page 1 Technical configuration parameters------------------------------------------------------Page 1 Meter operation-------------------------------------------------------------------Page 2 Battery:Further information and maintenance-----------------------------------Page 4 About Charging---------------------------------------------------------------------------Page 5 Installation Instruction----------------------------------------------------------Page5-10... -
Page 3: Safety Instruction
__________________ 1.Safety Instruction 1. Thank you for purchasing the VIVI E-BIKE. The E-BIKE features the most recent innovation in technology. 2. For Safety reasons, it is most important that you read this user’s manual before you operate the bike. Improper handling can reduce its riding performance and most importantly, cause danger to your safe and healthy. -
Page 4: Meter Operation
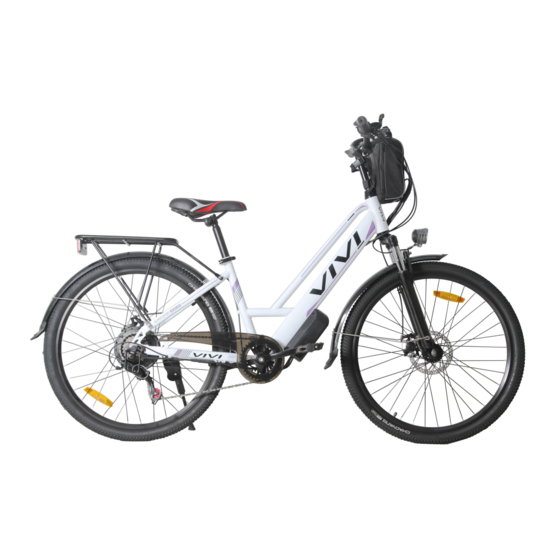
Front Front Controlle Saddle Meter derailleu Headlight Tire Pedal fork Bicycle Chain Engine Battery Transmission chain fender Brake rack cover 3. Meter operation 3.1 Meter instruction... - Page 5 3.2 Meter operation Operating instructions Hold the Press “+” Foot riding Press “+” to Press the "+" button again to move (without button for 2 crease into into pedal pedal 2s to switch seconds pedal assist assist level assistant on/off the during “High”.
-
Page 6: Battery:further Information And Maintenance
3.4 Operation Cautions Be careful of the safety use. Don’t attempt to release the connector when charging the battery. ● Avoid the risk of collision. ● Don’t modify system parameters to avoid parameters disorder. ● Make the display repaired when error code appears. 4. -
Page 7: Installation Instruction
5.Charging 1. For charging the E-bike, simply take the E-bike and bring near to the power supply that is available. Connect the charging plug to the charging base and then plug in the power plug of the charger to charger. 2.The battery can either be charged while on the bike or the battery can be removed and charged at a place of your convenience. - Page 8 3. Headlight installation 3.1 Loosen the headlight screw from the front fork; install the headlight and the front fender ears in the front fork screw hole, and tighten the screw with an Allen tool. 4.Front wheel installation: 4 .1 Cut the wrapping rope, remove the front wheel, remove the front fork protection lever and the front wheel protection cover.
- Page 9 5.1 First align the mounting holes of the rack with the mounting holes on the frame, and then use an M4 hexagon wrench to tighten the mounting screws of the rack respectively. 5.2Install the rear reflector in the small bag box on the lamp of the shelf. 6.Foot pedal installation: Check the two pedals.
- Page 10 8.Adjust the brakes, meters, and transmission system. tighten all of them with tools. 9. Battery installation. 9.1 Hang on the battery on the handlebar first. 9.2 Pull out the power cord connector from under the battery bag. 9.3 Locate the power cord connector on the frame and the battery power cord connector and insert them in place to complete the power supply installation.
- Page 11 11.Instructions for using Front derailleur 11.1 When you shift forward the right derailleur handle, the back derailleur will move inside, at the same time, move the chain from the small part of the rear flywheel to the large part. These steps will reduce the riding speed while riding, also will reduce the pedaling strength of riding.
- Page 12 More VIVI electric bike’s installation and repair instructions Any question about the item, please contact. Detail Packing List Description Quantity E-Bike Tools (13-15 spanner, 9-11 spanner, 8-10 spanner,14-17 spanner, eleven-shaped screwdriver, M6, M5, M4, M3 Allen wrench) Manual Charger rear reflector...
- Page 13 English VIVI E-bike User’s Manual CAUTION: READ THIS MANUAL BEFORE USING YOUR EQUIPMENT...
- Page 14 CONTANTS Safety instruction------------------------------------------------------------------Page 1 Technical configuration parameters------------------------------------------------------Page 1 Meter operation-------------------------------------------------------------------Page 2 Battery:Further information and maintenance-----------------------------------Page 4 About Charging---------------------------------------------------------------------------Page 5 Installation Instruction----------------------------------------------------------Page5-10...
-
Page 15: Safety Instruction
__________________ 1.Safety Instruction 1. Thank you for purchasing the VIVI E-BIKE. The E-BIKE features the most recent innovation in technology. 2. For Safety reasons, it is most important that you read this user’s manual before you operate the bike. Improper handling can reduce its riding performance and most importantly, cause danger to your safe and healthy. -
Page 16: Meter Operation
Front Front Controlle Saddle Meter derailleu Headlight Tire Pedal fork Bicycle Chain Engine Battery Transmission chain fender Brake rack cover 3. Meter operation 3.1 Meter instruction... - Page 17 3.2 Meter operation Operating instructions Hold the Press “+” Foot riding Press “+” to Press the "+" button again to move (without button for 2 crease into into pedal pedal 2s to switch seconds pedal assist assist level assistant on/off the during “High”.
-
Page 18: Battery:further Information And Maintenance
3.4 Operation Cautions Be careful of the safety use. Don’t attempt to release the connector when charging the battery. ● Avoid the risk of collision. ● Don’t modify system parameters to avoid parameters disorder. ● Make the display repaired when error code appears. 4. -
Page 19: Installation Instruction
5.Charging 1. For charging the E-bike, simply take the E-bike and bring near to the power supply that is available. Connect the charging plug to the charging base and then plug in the power plug of the charger to charger. 2.The battery can either be charged while on the bike or the battery can be removed and charged at a place of your convenience. - Page 20 3.Headlight installation 3.1 Loosen the headlight screw from the front fork; install the headlight and the fron t fender ears in the front fork screw hole, and tighten the screw with an Allen tool. 4. Front wheel installation 4.1 Cut the wrapping rope, remove the front wheel, remove the front fork protection lever and the front wheel protection cover.
- Page 21 5.Bicycle Rack installation: 5.1 First align the mounting holes of the rack with the mounting holes on the frame, and then use an M4 hexagon wrench to tighten the mounting screws of the rack respectively. 5.2Install the rear reflector in the small bag box on the lamp of the shelf. 6.Foot pedal installation: Check the two pedals.
- Page 22 8.Adjust the brakes, meters, and transmission system. tighten all of them with tools. 9. Battery installation. 9.1 Hang on the battery on the handlebar first. 9.2 Pull out the power cord connector from under the battery bag. 9.3 Locate the power cord connector on the frame and the battery power cord connector and insert them in place to complete the power supply installation.
- Page 23 10.4 First connect the power cord connector of the derailleur to the main connector, then move the derailleur to a suitable position, and lock it with an M3 hexagon wrench. 11.Tire inflation instruction 11.1 After the bicycle is assembled, please check whether the air pressure of the front and rear tires is within the normal value.
- Page 24 More VIVI electric bike’s installation and repair instructions Any question about the item, please contact. Detail Packing List Description Quantity E-Bike Tools (13-15 spanner, 9-11 spanner, 8-10 spanner,14-17 spanner, eleven-shaped screwdriver, M6, M5, M4, M3 Allen wrench) Manual Charger rear reflector...
- Page 25 German VIVI Die Bedienungsanleitung von Die Warnung: bitte lesen Sie das Handbuch sorgfältig durch, bevor Sie das Elektrofahrrad benutzen.
- Page 26 Das Verzeichnis Die Sicherheitanleitung----------------------------------------------------------Seite 1 Die technische Konfigurationsparameter-----------------------------------------Seite 1 Die Gerätebedienungsanleitung--------------------------------------------------Seite 2 Die Batterieinformationen und Wartung---------------------------------------Seite 4 Die Lademethode---------------------------------------------------------------Seite 5 Die Einbauanleitung---------------------------------------------------------Seite 5-10...
-
Page 27: Die Sicherheitanleitung
___________________ 1. Die Sicherheitanleitung Vielen Dank für Ihre Verwendung von VIVI Elektrofahrrad. Dieses Elektrofahrrad verwendet innovative Technologie in der Handwerkskunst. 2. Bitte lesen Sie aus Sicherheitsgründen die Bedienungsanleitung sorgfältig durch, bevor Sie das Elektrofahrrad benutzen. Die unsachgemäße Behandlung verringert die Fahrleistung und gefährdet vor allem Ihre Sicherheit und Gesundheit. -
Page 28: Die Gerätebedienungsanleitung
Geschwin Armature digkeitsre Scheinwe Vorderr Reife Steue Kissen Pedal nbrett gelunggri rfer adgabel rgerät Regal Griff Elektro e für Deckel Akkumul Schaltget Schutzb Zahnsch maschi Ware der Kette Brems ator riebe lech eibe 3. Die Gerätebedienungsanleitung 3.1 Die Instrumentenparameter... - Page 29 3.2 Die Gerätebedienungsanleitung Die Bedienungsanleitung 5.Drücken 1.1Um das 4.das Sie im Elektrofahrr Fahrmod Drücken Einschaltstat Drücken adsystem Sie weiter us: ohne us 2 Sie „+“, um ein- oder „+“, um die elektrisch Sekunden auszuschalt Geschwind lang die igkeit auf en, halten Geschwindi Unterstüt Taste „+“.
-
Page 30: Die Batterieinformationen Und Wartung
3.3 Das Methode von der Geschwindigkeitaufhebung Schalten Sie zuerst das Elektrofahrrad ein und stellen Sie den Gang auf die Hochgeschwindigkeitsgang ein. Drücken Sie gleichzeitig die Tasten „+“ „-“ und drücken Sie 3 bis 5 Sekunden lang. Dann wird das Tempolimit aufgehoben. 3. -
Page 31: Die Lademethode
4.2. Versuchen Sie bitte nicht, den Akkumulator zu öffnen. 4.3. Wenn der Akkumulator durch eine Kollision oder einen Fahrradunfall beschädigt wird, besteht die Gefahr eines Elektrolytlecks. Achten Sie auf chemische Verätzungen und verwenden Sie die beschädigte Batterie sofort nicht mehr. 4.4. - Page 32 3. Die Installation von der Scheinwerfer 3.1 Lösen Sie die Scheinwerferschraube von der Vordergabel; Das Frontlicht in das Loch der Vorderradgabelschraube einbauen und die Schraube mit einem Inbuswerkzeug festziehen. 4、Die Installation vom Vorderrad 4.1: Schneiden Sie das Wickelseil ab und bauen Sie das Vorderrad aus. Dann entfernen Sie den Vorderradgabelschutzhebel und die Vorderradschutzabdeckung.
- Page 33 Scheibenbremsrotor ohne offensichtliche Reibung dreht. 5. Die Installation vom Gegenhalterbock : 5.1 Richten Sie zuerst die Befestigungslöcher des Regals an den Befestigungslöchern am Rahmen aus und ziehen Sie dann die Befestigungsschrauben des Regals mit einem M4-Sechskantschlüssel fest. 5.2Entfernen Sie den hinteren Reflektor in der kleinen Tasche und installieren Sie den hinteren Reflektor auf der Leuchte des Regals 6.
- Page 34 7 Die Installation vom Kissen: 6.1. Öffnen Sie die Verpackung, nehmen Sie das Sitzkissen und die Sattelstütze heraus, dann installieren Sie den Rückstrahler an der Sattelstütze. 6.2 Setzen Sie die Sattelstütze in den Rahmen ein. 6.3 Stellen Sie die Sitzposition auf die Höhe ein, die Ihrer Fahrposition am besten entspricht, und ziehen Sie den Schnellspanngriff fest.
- Page 35 Nehmen Sie den Geschwindigkeitsregelungsgriff aus der kleinen Packungsschachtel. Setzen Sie zuerst den Geschwindigkeitsregelungsgriff von der rechten Seite des Fahrradlenkers ein, stecken Sie ihn danach in die Schutzhülle. Dann setzen Sie die kurze Lenkerhülle auf und klopfen Sie die Lenkerhülle mit einem Gummihammer fest.
- Page 36 11. Die Bedienungsanleitung des Geschwindigkeitsregelungsgriffs 11.1 Wenn der rechte Geschwindigkeitsregelungsgriff nach vorne geschaltet wird, bewegt sich das Heckgetriebe nach innen, und gleichzeitig bewegt sich die Kette von der kleinen Position des hinteren Schwungrads zur großen. Dies verringert die Fahrgeschwindigkeit während des Fahrens und verringert die Geschwindigkeit Tretkraft während der Fahrt;...
- Page 37 Für weitere Anweisungen zur Installation und Wartung von VIVI Elektrofahrrad oder bei eventuellen Fragen wenden Sie sich bitte an. Die Verpackungsdetails Beschreibung Zahl das Elektrofahrrad die Werkzeuge ( Nr. 13-15 Schraubenschlüssel, Nr 9-11, Nr. 8-10 Schraubenschlüssel,Nr 14-17 Schraubenschlüssel, Elf-Wort-Schraubendreher, M6-、 M5-、 M4-、...
- Page 38 French VIVI Manuel d’Utilisation du Vélo Electrique Avertissement: veuillez lire attentivement le manuel avant d'utiliser ce vélo électrique.
- Page 39 Table des Matières Consignes de Sécurité ---------------------------------------------------------------Page 1 Paramètres de Configuration Technique-----------------------------------------Page 1 Instructions d'Utilisation de l'Instrument ---------------------------------------Page 2 Informations Relatives à la Batterie et l’Entretien -----------------------------Page 4 Méthode de Charge -------------------------------------------------------------------Page 5 Notice d'Installation----------------------------------------------------------------Page 5-10...
- Page 40 __________________ 1.Consignes de Sécurité 1. Merci d'utiliser le vélo électrique VIVI. Les vélos électriques utilisent une technologie innovante dans l'artisanat. 2. Pour des raisons de sécurité, veuillez lire attentivement le manuel d'utilisation avant d'utiliser ce vélo électrique. Une mauvaise manipulation réduira ses performances de conduite, et plus important , mettra en danger...
- Page 41 Levier de Fourche Contrôleu Selle Compteur Phare Pneu Pédale Vitesses Avant Couvercl Poigné Boîte de Pare-bo Rayonnag Moteur Batterie e de Plateau e de Vitesse chaîne frein 3.Instructions d'Opération du Compteur 3.1Paramètres du Compteur...
- Page 42 3.2 Instructions d’Opération du Compteur Instructions d’Opération Pour Continuez à Mode Appuyez sur Appuyez sur le allumer/étein appuyer sur « conduite bouton « + » « + » pour + » pour dre le système sans pendant 2 augmenter la augmenter la du vélo assistance...
- Page 43 3.4Précautions d'Utilisation Faites attention à une utilisation sûre. N'essayez pas de desserrer le connecteur lors de la connexion à la batterie. ● Évitez les risques de collision. ● Ne modifiez pas les paramètres système pour éviter toute confusion ● Le code d'erreur du compteur doit être réparé à temps. 4.
- Page 44 d'abord la fiche de charge du chargeur à la base de charge de la batterie, puis branchez la fiche d'alimentation du chargeur pour charger. 2. La batterie peut être installée sur le vélo pour la charge, ou la batterie peut être retirée et placée dans un endroit pratique pour la charge.
- Page 45 3. Installation du Guidon: 3.1Desserrer les vis du phare de la fourche avant;Installer le feu avant et la Languette de levage de la plaque de boue avant sur le trou de vis de la fourche avant et serrer les vis à l'aide d'un outil à douilles hexagonales. 4.
- Page 46 5.2Retirer le réflecteur arrière de la petite boîte et l'installer sur le support. 6.Installation de la Pédale: Vérifiez les deux pédales, la pédale avec «L» imprimé à l'extrémité du mandrin doit être installée sur le côté gauche du véhicule (sans plateau), tournez dans le sens antihoraire, et la pédale "R"...
- Page 47 8.Ajustez les freins, le compteur et le système à vitesse variable puis serrez-les avec des outils. 9. Installation de la Batterie 9.1 Accrochez d'abord la batterie au guidon. 9.2 Retirez le connecteur du cordon d'alimentation du dessous du sac de batterie.
- Page 48 . Instructions de gonflage des pneus 11.1 Une fois le vélo assemblé, vérifiez si la pression d'air des pneus avant et arrière se situe dans la valeur normale; 11.2 Lors du remplissage des pneus, vous devez vous référer à la plage de référence de gonflage sur le côté...
- Page 49 Pour plus d'informations sur l'installation et la maintenance des vélos électriques VIVI, et si vous avez des questions sur ce produit, n'hésitez pas à nous contacter. Liste de Colisage Description Quantité Vélo Electrique Outils(Clé 13-15, 8-10,clé 9-11, 14-17, tournevis onze, clé Allen M6, M5, M4, M3) Manuel d’Utilisation...
- Page 50 Italian VIVI Manuale della bici elettrica ATTENZIONE:LEGGERE ATTENTAMENTE QUESTO MANUALE PRIMA DI UTILIZZARE L'ATTREZZATURA...
- Page 51 Contenuti Istruzioni di sicurezza------------------------------------------------------------------Page 1 Parametri di configurazioni tecnica------------------------------------------------------Page 1 Parametri di configurazioni tecnica--------------------------------------------------------Page 2 Batteria: Ulteriori informazioni e manutenzioni-----------------------------------Page 4 Ricarica---------------------------------------------------------------------------Page 5 Istruzioni per l'installazione----------------------------------------------------------Page5-10...
-
Page 52: Istruzioni Di Sicurezza
________________ 1.Istruzioni per sicurezza 1.Grazie per aver scelto e acquistato VIVI E-Bike. La bici elettrica presenta la più recente innovazione avanzata nella tecnologia. 2.Si prega di leggere attentamente le istruzioni prima di utilizzare la bici elettrica per motivi di sicurezza. Un funzionamento improprio ridurrà le sue prestazioni di guida e, cosa più... - Page 53 Forcella Leva del Pneumatic controllo Sella metro Faro anterio Pedale cambio Copertu Impugnatu Motor trasmissio parafan scaffali Dental Batteria ra a ra del merci disco catena freno 3.Funzionamento del misuratore 3.1 Istruzioni del misuratore...
- Page 54 3.2 Funzionamento dello strumento Istruzioni per l'uso Tenere Premere di Pedalata Premere "+" Premere il nuovo "+" per premuto il (senza pulsante "+" per passare passare al pulsante per 2 assistente di per 2 secondi al livello di livello di secondi per pedalata ed durante lo...
-
Page 55: Batteria: Ulteriori Informazioni E Manutenzioni
3.3 Istruzioni per la soluzione del misuratore: 1. Accendere prima la macchina e regolare la marcia sulla marcia ad alta velocità; 2. Premere contemporaneamente i pulsanti "+" "-". Premere a lungo per 3 secondi a 5 secondi, questo è il limite di velocità verrà sollevato; 3. -
Page 56: Ricarica
elettroliti. Attenzione alle ustioni chimiche! E smetti immediatamente di usare una batteria danneggiata. 4.4Non toccare la batteria senza un panno o guanti e assicurarsi che l'acido non tocchi gli occhi. 5.Ricarica 1.Per caricare la batteria con la bicicletta, è sufficiente posizionare la bicicletta alla portata dell'alimentatore e collegarla. - Page 57 3. Installazione del faro 3.1 Allentare la vite del faro dalla forcella anteriore; installare il faro e le orecchie del parafango anteriore nel foro della vite della forcella anteriore e serrare le viti con uno strumento esagonale interno 4. Installazione della ruota anteriore: 4.1: Tagliare la fune di avvolgimento, rimuovere la ruota anteriore, rimuovere la leva di protezione della forcella anteriore e il coperchio di protezione della ruota anteriore.
- Page 58 5.Installazione del portapacchi: 5.1 Allineare prima i fori di montaggio del rack con i fori di montaggio sul telaio. Poi utilizzare una chiave esagonale M4 per serrare rispettivamente le viti di montaggio del portapacchi. 5.2Togliere il riflettore posteriore nella piccola scatola e installarlo sulla lampada sullo scaffale.
- Page 59 8.Regolare i freni, i contatori e serrare il sistema di trasmissione con attrezzi. 9.Installazione della batteria 9.1Appendere prima la batteria al manubrio. 9.2 Estrarre il connettore del cavo di alimentazione da sotto la borsa della batteria. 9.3 Individuare il connettore del cavo di alimentazione sul telaio e il connettore del cavo di alimentazione della batteria.
- Page 60 manubrio. Mettere la manica, quindi mettere il coperchio della maniglia corta e battere la maniglia in posizione con un martello di gomma ; 10.3 Mettere il coperchio della maniglia lunga della manopola di controllo della velocità sul lato sinistro del manubrio e battere la maniglia in posizione con un martello di gomma;...
- Page 61 Si prega di contattare per altre istruzioni per l'installazione e la riparazione della bici elettrica VIVI o abbia qualsiasi domanda sull'articolo. Lista di imballaggio Descrizioni Quantita’...
- Page 62 Spanish VIVI Manual de bicicleta eléctrica ADVERTENCIA: LEA ESTE MANUAL DETENIDAMENTE ANTES DE UTILIZAR EL EQUIPO...
- Page 63 Contenido Las instrucciones de seguridad------------------------------------------------------------Page 1 Parámetros de configuración técnica------------------------------------------------------Page 1 instrucciones de contador-----------------------------------------------------Page 2 Batería: más información y mantenimiento---------------------------------------------Page 4 Recargar--------------------------------------------------------------------------Page 5 Instrucciones de instalación----------------------------------------------------------Page5-10...
- Page 64 __________________ 1.Instrucciones de seguridad 1.Gracias por elegir y comprar VIVI E-Bike. La bicicleta eléctrica cuenta con la última innovación avanzada en tecnología. 2.Lea atentamente las instrucciones antes de utilizar la bicicleta eléctrica por motivos de seguridad. El funcionamiento inadecuado reducirá su rendimiento de conducción y, lo que es más importante, provocará...
- Page 65 Palanca Tenedo Controlad Sillín metro faro Llantas Pedal cambio frontal Cubiert transmisió Disco Manillar Motor batería Estante a de Fender dental de freno cadena 3.Operación del medido 3.1 Instrucción del medidor...
- Page 66 3.2 Operación del medidor instrucciones de funcionamiento Mantenga Vuelva a Pedaleo (sin Pulse "+" Presione el presionado el pulsar "+" asistencia de botón "+" para cambiar para cambiar botón durante pedaleo durante 2 al nivel de al nivel de 2 segundos eléctrico)...
- Page 67 3.3 Instrucciones para la solución del medidor: 1.Primero encienda la máquina y cambie la marcha a alta velocidad; 2. Presione los botones "+" "-" simultáneamente. Mantenga pulsado durante 3 segundos a 5 segundos, este es el límite de velocidad se elevará; 3.
- Page 68 electrolito. ¡Cuidado con las quemaduras químicas! Y deje de usar una batería dañada inmediatamente. 4.4 No toque la batería sin un paño o guantes y asegúrese de que el ácido no toque sus ojos. 5.Recarga 1.Para cargar la batería con la bicicleta, simplemente coloque la bicicleta al alcance de la fuente de alimentación y conéctela.
- Page 69 3. Instalación de faros 3.1 Afloje el tornillo del faro de la horquilla delantera; Instale las orejas del faro y del guardabarros delantero en el orificio del tornillo de la horquilla delantera y apriete los tornillos con una herramienta hexagonal interna. 4.
- Page 70 5.Instalación del pedal: 5.1 Primero alinee los orificios de montaje del bastidor con los orificios de montaje del chasis. A continuación, utilice una llave hexagonal M4 para apretar los tornillos de montaje en bastidor respectivamente. 5.2Retire el reflector trasero de la Caja y colóquelo en el portalámparas del estante.
- Page 71 7.1 Abra el paquete y saque el cojín y la tija del asiento e instale el reflector trasero en la tija del asiento. 7.2 Inserte la tija del sillín en el marco. 7.3 Ajuste la posición del asiento a la altura que mejor se adapte a su posición de conducción y apriete el cierre rápido (asegúrese de que el cierre rápido esté...
- Page 72 10.1 Primero retire la cubierta del manillar preinstalada en el manillar, 10.2 Saque la perilla de control de velocidad del paquete pequeño, primero inserte la perilla de control de velocidad del lado derecho del manillar, luego coloque la funda, luego coloque la cubierta corta del mango y golpee el mango en su lugar con un martillo de goma;...
- Page 73 12.Instrucciones de uso de la palanca de cambios: 11.1 Cuando la palanca de cambios derecha se mueve hacia adelante, el desviador trasero se moverá hacia adentro y la cadena se moverá simultáneamente desde la posición del volante trasero pequeño a la grande. Esto reducirá...
- Page 74 Póngase en contacto para obtener más instrucciones de instalación y reparación de bicicletas eléctricas VIVI o si tiene alguna pregunta sobre el artículo. Lista de contenido Descripción Cantidad bicicletta elettrica Strumenti (chiave 13-15, chiave 9-11, 8-10,14-17, cacciavite a forma di undici,...
- Page 75 Informationen zum Hersteller Hersteller: Guangzhou Plenty Bicycle Co.,Ltd 105 No.11 Malingzhuang,Jingtang Adresse: Village,Huadong Town, Huadu District,Guangzhou,China. Informationen zum Produkt Modell Nr.: MT26G Marke: VIVI EC REP Informationen für EU-Vertretern Name: Pegasus Trading GmbH Contact: Jacky Chen Sperberweg 4G Neuss NRW 41468 Germany Adresse:...
Need help?
Do you have a question about the MT26G and is the answer not in the manual?
Questions and answers
What kind of display is on the model mt26gul
The VIVI MT26G model has an LCD display.
This answer is automatically generated