Table of Contents
Advertisement
Available languages
Available languages
FCC-B Radio Frequency Interference Statement
This equipment has been tested and found to comply with the limits for a class B digital device, pursuant to part 15 of
the FCC rules. These limits are designed to provide reasonable protection against harmful interference when the
equipment is operated in a commercial environment. This equipment generates, uses and can radiate radio frequency
energy and, if not installed and used in accordance with the instruction manual, may cause harmful interference to
radio communications. Operation of this equipment in a residential area is likely to cause harmful interference, in
which case the user will be required to correct the interference at his own expense.
Notice 1
The changes or modifications not expressly approved by the party responsible for compliance could void the user's
authority to operate the equipment.
Notice 2
Shielded interface cables and A.C. power cord, if any, must be used in order to comply with the emission limits.
VOIR LA NOTICE D'NSTALLATION AVANT DE RACCORDER AU RESEAU.
This device complies with Part 15 of the FCC Rules. Operation is subject to the following two conditions:
(1) this device may not cause harmful interference, and
(2) this device must accept any interference received, including interference that may cause undesired operation
Micro-Star International
MS-7032
G52-M7032X2
i
Advertisement
Table of Contents

Related Manuals for MSI K8M Neo-V


Summary of Contents for MSI K8M Neo-V
- Page 1 FCC-B Radio Frequency Interference Statement This equipment has been tested and found to comply with the limits for a class B digital device, pursuant to part 15 of the FCC rules. These limits are designed to provide reasonable protection against harmful interference when the equipment is operated in a commercial environment.
- Page 2 Copyright Notice The material in this document is the intellectual property of MICRO-STAR INTERNATIONAL. We take every care in the preparation of this document, but no guarantee is given as to the correctness of its contents. Our products are under continual improvement and we reserve the right to make changes without notice. Trademarks All trademarks are the properties of their respective owners.
- Page 3 Safety Instructions 1. Always read the safety instructions carefully. 2. Keep this User Manual for future reference. 3. Keep this equipment away from humidity. 4. Lay this equipment on a reliable flat surface before setting it up. 5. The openings on the enclosure are for air convection hence protects the equipment from overheating. Do not cover the openings.
- Page 4 Table of Content English ... 1 Deutsch ... 15 Français ... 31 日 本 語... 45 简体中文... 61 繁體中文... 75...
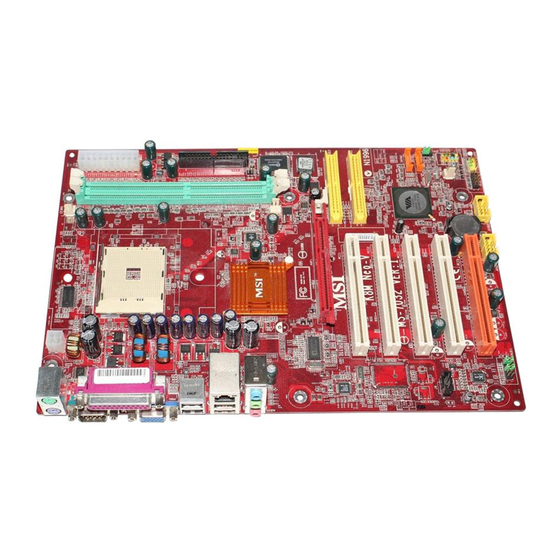
- Page 5 Introduction Thank you for choosing the MS-7032 (K8T Neo-V/K8M Neo-V) v1.X ATX mainboards. This K8T Neo-V/K8M Neo-V is based on VIA chipsets and provides eight USB 2.0 ports for high-speed data transmission, and RealTek ALC655 chip for 6-channel audio output. Designed to fit the advanced AMD Neo-V/K8M Neo-V mainboard delivers a high performance and professional desktop platform solution.
-
Page 6: Specifications
Specifications ® l Supports 64-bit AMD K8 Athlon64 processor (Socket 754) l Supports up to 2800+, 3000+, 3100+, 3200+, 3400+, 3700+, or higher CPU (Please refer to the latest online news at http://www.msi.com.tw/program/products/mainboard/ mbd/pro_mbd_cpu_support.php) Chipset ® l VIA K8T800 / K8M800 chipset... - Page 7 1 Audio port 1 D-Bracket2 pinheader 1 RJ-45 LAN Jack 8 USB Ports (Front x 4 / Rear x 4) 1 VGA Port (For K8M Neo-V only) Audio l 6 channels software audio codec RealTek ALC655. Compliance with AC97 v2.3 Spec.
-
Page 8: Hardware Setup
Mouse Keyboard COM A (For K8M Neo-V only) Hardware Setup This chapter tells you how to install the CPU, memory modules, and expansion cards, as well as how to setup the jumpers on the mainboard. It also provides the instructions on connecting the peripheral devices, such as the mouse, keyboard, etc. -
Page 9: Installing Amd Athlon64 Cpu Cooler Set
Fasten down the lever and then make sure the safety hook completely clasps the fixed bolt of the retention mechanism. Attach the CPU Fan cable to the CPU fan connector on the mainboard. MSI Reminds You... Overheating Overheating will seriously damage the CPU and system, always make sure the cooling fan can work... - Page 10 Double Single Double Double MSI Reminds You... The maximum memory speed decreases when both DIMM1 and DIMM2 slots are installed with double-sided memory module. Please refer to http://www.msi.com.tw/program/products/mainboard/mbd/pro_mbd_trp_list.php for compatible DDR modules. Total Memory 64MB~1GB 64MB~1GB 64MB~2GB Max Speed DDR 400...
-
Page 11: Connectors
Installing DDR Modules 1. The DDR DIMM has only one notch on the center of module. The module will only fit in the right orientation. 2. Insert the DIMM memory module vertically into the DIMM slot. Then push it in until the golden finger on the memory module is deeply inserted in the socket. -
Page 12: Sata1, Sata2
You must configure second hard drive to Slave mode by setting the jumper accordingly. IDE2 can also connect a Master and a Slave drive. MSI Reminds You... If you install two hard disks on cable, you must configure the second drive to Slave mode by setting its jumper. - Page 13 USB 1.1, and is ideal for connecting high-speed USB interface peripherals such as USB HDD, digital cameras, MP3 players, printers, modems and the like. MSI Reminds You... Note that the pins of VCC and GND must be connected correctly, or it may cause some damage.
-
Page 14: Clear Cmos Jumper: Jbat1
BIOS configuration. The orange PCI slot (PCI5) also works as a communication slot, which allows you to insert the communication card, such as the wireless LAN PCI cards of MSI. PCI Interrupt Request Routing The IRQ, acronym of interrupt request line and pronounced I-R-Q, are hardware lines over which devices can send interrupt signals to the microprocessor. -
Page 15: Bios Setup
BIOS Setup Power on the computer and the system will start POST (Power On Self Test) process. When the message below appears on the screen, press <DEL> key to enter Setup. DEL: Setup F11: Boot Menu F12: Network boot TAB: Logo If the message disappears before you respond and you still wish to enter Setup, restart the system by turning it OFF and On or pressing the RESET button. -
Page 16: Cell Menu
Cool’n’Quiet function, it is always recommended to have the memories plugged in DIMM1. Spread Spectrum When the motherboard clock generator pulses, the extreme values (spikes) of the pulses creates EMI (Electromagnetic Interference). The Spread Spectrum function reduces the EMI generated by modulating the pulses so that the spikes of the pulses are reduced to flatter curves. - Page 17 CoreCellTM Technology. It is designed to detect the load balance of CPU while running programs, and to adjust the best CPU frequency automatically. When the motherboard detects that the CPU is running programs, it will speed up CPU automatically to make the program run smoothly and faster.
- Page 18 Red: Not recommended setting and the system may be unstable. Changing CPU/DDR/AGP/North Bridge/South Bridge Voltage may result in system instability; therefore, it is NOT recommended to change the default settings for long-term usage. For complete BIOS setup information, please visit MSI website at http://www.msi.com.tw...
- Page 19 Einleitung Vielen Dank für die Wahl des MS-7032 (K8T Neo-V/K8M Neo-V) v1.X ATX Mainboards. Das K8T Neo-V/K8M Neo-V basiert auf dem VIA Chipsatz und ist mit USB 2.0 Anschlüssen Anschlüsse für schnellen Datentransfer ausgestattet und hat einen RealTek ALC655 Audio-Chip mit 6-Kanal-Ausgang. Entwickelt für AMD Prozessoren, bietet das K8T Neo-V/K8M Neo-V Mainboard hohe Performance und eine professionelle Desktop Platform Lösung.
-
Page 20: Spezifikationen
Spezifikationen ® l Unterstützt 64-bit AMD l Unterstützt bis zu 2800+, 3000+, 3100+, 3200+, 3400+, 3700+, oder schnellere CPU (Für die neuesten CPU-Kompatiblitäts-Informationen besuchen Sie bitte die folgende Webseite: http://www.msi.com.tw/program/products/Mainboard/mbd/pro_mbd_cpu_support.php Chipsatz ® l VIA K8T800 / K8M800 Chipsatz HyperTransport verbindung zu AMD Athlon64 Prozessor 8 oder 16 bit Control/Address/Data Transfer in beiden Richtungen 800/600/400/200 MHz “Double Data Rate”... - Page 21 1 Audio Anschluss 1 D-Bracket2 Anschluss 1 RJ-45 LAN Anschluss 8 USB Anschlüsse (Vorne x 4 / Rückseite x 4) 1 VGA Anschluss (Nur bei K8M Neo-V) Audio l 6 Kanal Software Audio Codec RealTek ALC655. Entspricht der AC97 v2.3 Spezifikation Entspricht den PC2001 Audio Performance Anforderungen ®...
- Page 22 Parallel Mouse Keyboard COM A (For K8M Neo-V only) Hardware Einrichtung Dieses Kapitel beschreibt Ihnen, wie CPU, Speichermodule und Erweiterungskarten eingesetzt werden, und wie Jumper auf dem Mainboard eingestellt werden. Es beinhaltet auch die Anleitung, wie Sie Peripheriegeräte wie Maus, Tastatur, usw. anschließen. Während der Installation behandeln Sie bitte die Komponenten vorsichtig und folgen Sie genau der Anleitung.
- Page 23 Installation der CPU im Sockel 754 Bitte schalten Sie den Computer aus und trennen ihn von der Netzspannung, bevor Sie die CPU einsetzen. Klappen Sie den seitlichen Hebel im 90° Winkel nach Oben. Die dreieckige Markierung auf dem Prozessor muss so ausgerichtet werden, dass sie wie ein Pfeil auf das Lager des Verriegelungshebel zeigt.
- Page 24 MSI erinnert Sie... Überhitzung… Überhitzung beschädigt Ihre CPU und ds gesamte System ernsthaft, stellen Sie daher sicher, dass die Lüfter immer funktionieren, um die CPU und das System vor Schäden zu bewahren. Die CPU tauschen… Wenn Sie die CPU tauschen, schalten Sie das System ab und ziehen den Netzstecker. Bevor Sie das Mainboard oder die CPU anfassen, erden Sie sich, in dem Sie kurz geerdeten Gegenstand (z.B.
- Page 25 MSI Reminds You... Die maximale Speicherzugriffsgeschwindigkeit sinkt, wenn auf DIMM1 und DIMM2 jeweils doppelseitige Speichermodule installiert werden. Um den letzten Stand bezű lich der unterstű zten Speichermodule zu erhalten, besuchen Sie bitte http://www.msi.com.tw/program/products/mainboard/mbd/pro_mbd_trp_list.php DDR Modules einsetzen 1. Das DDR DIMM Modul hat in der Mitte eine Nase, die verhindern soll, dass Sie das Modul in der falschen Richtung einsetzen.
- Page 26 Master und ein Slave Laufwerk angeschlossen werden. Die Einstellung für Master und Slave muss an dem Laufwerk mit einem Jumper festgelegt werden. MSI erinnert Sie... Wenn Sie zwei IDE-Laufwerke an einem IDE-Kabel anschließen, so müssen Sie das erste Laufwerk als Master und das zweite Laufwerk als Slave konfigurieren. Sie erfahren aus der Dokumentation der Laufwerke, wie diese Einstellung gemacht wird.
- Page 27 MSI Reminds You... § Bitte die Herstellerhinweise des Prozessorherstellers bezüglich passendem Kühler beachten. § CFAN1 unterstützt eine Drehzahlregelung des Lüfters. Mit dem Programm Core Center auf der beiliegenden CD wird die Lüfterdrehzahl anhand der CPU-Temperatur geregelt. CD-In Anschluss: J4 Hier können Sie das Audiokabel Ihres CD-Laufwerks anschließen.
- Page 28 Anschluss entspricht dem “Intel ® Front Panel I/O Connectivity Design Guide” MSI erinnert Sie... Wenn Sie diesen Audioanschluss nicht verwenden möchten, so müssen die Kontakte 5 & 6, 9 & 10 jeweils mit einem Jumper geschlossen sein, damit der hintere Audio-Ausgang des Mainboards funktioniert..
- Page 29 Hinweisen des Herstellers zum Einbau und möglichen Hardware- und Softwareeinstellungen. Der orangene PCI Steckplatz (PCI5) funktioniert auch als Kommunikations-Steckplatz, welcher den Einsatz spezieller W-LAN und Bluetooth PCI Karten von MSI ermöglicht. PCI Interrupt Verteilung Die IRQs, Abkürzung für Interrupt Request, sind Hardwaresignale, über welche Peripheriegeräte dem Prozessor Interrupt-Signale zusenden können, wenn sie Aufmerksamkeit des Prozessors brauchen.
- Page 30 BIOS Setup Wenn Sie den PC einschalten, startet er zuerst die POST-Systemdiagnose (Power On Self Test). Wenn die folgende Meldung angezeigt wird, dann drücken Sie die Taste <Entf> um in das BIOS-Setup zu gelangen. DEL: Setup F11: Boot Menu F12: Network boot TAB: Logo Wenn die Meldung verschwindet, bevor Sie die Taste gedrückt haben, wird es das installierte Betriebssystem starten.
- Page 31 In diesem Submenü können Sie den Status des Hardwaremonitorings ablesen. Cell Menu In diesem Menü können Sie Einstellungen an Frequenz und Spannung, sowie Üertaktungen der CPU und des AGP vornehmen. Load Fail-Safe Defaults Dies ist eine Voreinstellung für ein langsammes aber extrem stabiles und kompatibles System. Load Optimized Defaults Dies ist eine Voreinstellung für eine optimale Systemperformance bei hoher Stabilität und Kompatibilität.
- Page 32 Cell Menu Cool’n’Quiet Support Diese Einstellung schaltet die Cool’n’Quiet Funktion ein und aus. Cool’n’Quiet ist eine spezielle Funktion der AMD Athlon64 Prozessoren. Cool’n’Quiet sorgt dafür, dass wenn der Prozessor nicht ausgelastet ist, dass er heruntergetaktet wird. Durch das Heruntertakten braucht der Prozessor weniger Strom und bleibt kühler.
- Page 33 Dynamic Overclocking Dynamic Overclocking Technology (DOT) ist eine automatische Übertaktungsfunktion, welche in MSI CoreCell Technologie integriert ist. DOT beobachtet die Auslastung der CPU. Wenn DOT feststellt, dass die CPU durch Programme stark ausgelastet ist, erhöht es die Taktfrequenz noch ein wenig, um die Prozessorleistung weiter anzuheben, damit die Programme schneller ausgeführt werden.
- Page 34 Nicht empfohlen, System kann instabil sein. Das Ändern der CPU/DDR/AGP/North Bridge/South Bridge Spannungen kann die Systemstabiliät negativ beeinfluissen. Daher empfehlen wir, hier keine Änderungen durchzuführen, die über einen längeren Zeitraum wirksam sein sollen. Weitere Informationen zu BIOS-Einstellungen finden Sie auf der MSI-Webseite http://www.msi.com.tw...
-
Page 35: Schéma
Introduction Félicitation vous venez d’acheter la carte mère ATX MS-7032 (K8T Neo-V/K8M Neo-V) v1.X. La K8T Neo-V/K8M Neo-V est basée sur les chipsets VIA South Bridge et procure 8 ports USB 2.0 offrant des taux de transfert très rapide, et le chip RealTek ALC655 procure la fonction audio 6 canaux en sortie. - Page 36 Spécificités l Supporte les processeurs 64-bit AMD l Supporte les CPU jusqu’à 2800+, 3000+, 3100+, 3200+, 3400+, 3700+, ou supérieur (Veuillez visiter notre site pour connaître les dernières mises à jour http://www.msi.com.tw/program/products/mainboard/mbd/pro_mbd_cpu_support.php) Chipset ® l Chipset VIA K8T800 / K8M800 Connexion HyperTransport Transfert envoi/réception 8 ou 16 bit contrôle/adresse/données...
- Page 37 1 série de broches pour le D-Bracket2 1 RJ-45 LAN Jack 8 ports USB (Façade x 4 / Arrière x 4) 1 port VGA (pour K8M Neo-V uniquement) Audio l Codec RealTek ALC655 pour 6 canaux audio (logiciel) Compatible avec les spec. AC97 v2.3 Répond aux exigences audio PC2001...
-
Page 38: Installation Matériel
Mouse Keyboard COM A (For K8M Neo-V only) Installation Matériel Ce chapitre vous indique comment installer le CPU, la mémoire ainsi que les cartes d’extension ou encore le réglage des cavaliers présents sur la carte. Vous aurez aussi des instructions relatives à la connexion des périphériques tels que la souris, le clavier etc. -
Page 39: Cpu Installation Procedures For Socket 754
S’assurer que le ventilateur est bien fix é et qu’il ne risqué pas de bouger. Relier le câble d’alimentation au connecteur de la carte mère. MSI Vous Rappelle... Surchauffe La surchauffe endommagera le CPU ainsi que le système, c’est pourquoi il faut un ventilateur adéquat... - Page 40 Single Single Double Double Single Double Double MSI Reminds You... La vitesse maximale de la mémoire diminue lorsque les DIMM1 et DIMM2 sont pourvus de modules de mémoire de double densité. Total Mémoire 64MB~2GB Max Speed DDR 400 DDR 400...
- Page 41 Veuillez vous reporter : http://www.msi.com.tw/program/products/mainboard/mbd/pro_mbd_trp_list.php pour les modules DDR compatibles. Installer des Modules DDR 1. La barrette de DDR possède une seule encoche au centre. Vous ne pouvez ainsi réaliser de mauvais montage Insérer le module DIMM verticalement dans le slot mémoire. Puis appuyer jusqu’à ce que la marque dorée disparaisse dans le slot mémoire.
- Page 42 Esclave. Vous devez configurer le second disque en mode Esclave et ce à l’aide du cavalier situé à l’arrière. L’IDE2 peut aussi recevoir un matériel en Maître et en Esclave. MSI Vous Rappelle... Si vous voulez installer deux disques durs, vous devez configurer le second en Esclave en configurant le cavalier.
- Page 43 480Mbps, ce qui est 40 fois plus rapide que l’ USB 1.1. Idéal pour connecter des périphériques gourmand en bande passante (appareil photo numérique, caméra numérique etc). MSI Vous Rappelle... A noter que les broches VCC et GND doivent être connectées correctement pour ne pas causer de dégâts.
- Page 44 Le slot orange PCI (PCI5) also appelé slot de communication vous permet la connexion d’une carte réseau MSI par exemple. PCI Interrupt Request Routing IRQ est l’abréviation de “interrupt request line”. Les IRQ sont des signaux émis par des matériels. Les PCI IRQ sont connectés généralement au...
- Page 45 PCI bus INT A# ~ INT D# pins comme ceci: PCI Slot 1 PCI Slot 2 PCI Slot 3 PCI Slot 4 PCI Slot 5 BIOS Lorsque le PC démarre le processus de POST (Power On Self Test) se met en route. Quand le message ci-dessous apparaît, appuyer sur <DEL>...
- Page 46 Advanced Chipset Features Cette option vous permet de paramétrer les éléments relatifs au registre du chipset, permettant ainsi d’optimiser les performances de votre système. Power Management Features Utilisez ce menu pour appliquer vos choix en ce qui concerne le power management. PNP/PCI Configurations Apparaît si votre système supporte PNP/PCI.
- Page 47 Le DOT (Dynamic Overclocking Technology) est une fonction d’overclocking automatique inclus dans le nouveau CoreCell de MSI. Il est capable de déterminer automatiquement en fonction des besoins, la bonne fréquence du CPU. Habituellement le Dynamic Overclocking Technology se met en place lors de l’utilisation de jeux 3D notamment car le CPU est sollicité...
- Page 48 Ce paramètre est utilisé pour ajuster le Vcore (DRAM core voltage), rendant ainsi l’overclocking possible. MSI Vous Rappelle... Ce paramètre montre avec différentes couleurs le CPU Voltage, DDR Voltage, AGP Voltage, et North Bridge /South Bridge Voltage permettant ainsi de vérifier si les paramètres sont en phase avec votre système.
- Page 49 Introduction レイアウト この度は K8T Neo-V / K8M Neo-V (MS-7032 v1.X) ATX マザーボードをお買い上げ頂き、 誠にありがとうございます。本製品は VIA ットを搭載した AMD® Athlon64 プロセッサに対応したハイパフォーマンスマザーボードで す。高速通信が可能な USB2.0 ポートを8チャンネル装備している他、Realtek ALC655 に よる 6 チャンネルサウンド出力にも対応できます。(※搭載されている機能はモデルによ り異なります。) Top : mouse Bottom: keyboard Top : Parallel Port Bottom: COM A VGA Port (For K8M Neo-V only)
- Page 50 2800+, 3000+, 3100+, 3200+, 3400+, 3700+,あるいはそれ以上の CPU をサポート ( 最 新 の CPU 対 応 表 は 下 記 の ホ ー ム ペ ー ジ か ら ご 参 考 く だ さ い 。 http://www.msi.com.tw/program/products/mainboard/mbd/pro_mbd_cpu_support.php) チップセット ®...
- Page 51 - 1 オーディオポート - 1 D-Bracket2 ピンヘッダ - 1 RJ-45 LAN ジャック - 8 USB 1.1/2.0 ポート(バックパネルに 4 ポート、増設用ピンヘッダ 4 ポート) - 1 VGA ポート(K8M Neo-V のみ) オーディオ l Realtek ALC 655 ソフトウェアコーデック 6 チャンネルオーディオ - AC・7 v2.3 スペック準拠 - PC2001 オーディオ対応...
- Page 52 マウンティング l ATX 規格準拠 6 穴 バックパネル バックパネルには以下のコネクタが用意されています。 Parallel Mouse Keyboard COM A (For K8M Neo-V only) Hardware Setup この章ではハードウェアのインストール手順について説明します。インストール中は、 各種コンポーネントの取り扱いおよびインストール手順には最新の注意を払ってください。 いくつかのコンポーネントは誤った方向にインストールすると破損または不安定になる場 合があります。 コンピュータコンポーネントを扱う際は、必ず帯電防止バンドをつけてください。静電 気によってコンポーネントが破損する場合があります。 Central Processing Unit: CPU ® 本製品は AMD Athlon64 プロセッサで動作します。本製品は Socket 754 というソケット を使用しているため、CPU のインストールが大変簡単です。CPU の過剰な発熱を防ぐため...
- Page 53 メモリスピード/ CPU FSB サポート対応表 メモリ DDR 266 FSB200 Socket 754 CPU のインストール手順 1. CPU を装着する前に必ず電源スイッチをオフにし、電源コードを抜いてください。 2. レバーをソケットから横方向に引っ張ってください。 そのままレバーを持ち上げるよう にしてソケットとの角度が 90 度になるまで開きます。 3. ソケットのピン 1 と CPU の白い点か端が欠けている場所を確認してください。それら を合わせるようにして CPU をソケットに挿入してください。 4. CPU がしっかりと装着されているのなら、ピンが見えないようになります。CPU が正 しく装着されない場合、マザーボードに厳重なダメージを与えることになります。 5. CPU を奥まで押して、ソケットにしっかりと嵌めてから、レバーを閉じてください。 レバーが完全に閉じる前に、CPU を押した手を離さないでください。 AMD Athlon64 CPU クーラーセットのインストール手順...
- Page 54 安全フックを固定ボルトに引っかかるまで回します。 最後は安全フックがしっかりと固定されているかどうかを確認し、CPU ファンが固定 の装着作業が完了します。 MSI Reminds You... CPU の過熱 CPU が過剰な熱を持つと破損する場合があります。使用される冷却ファンが正常に動作す ることを必ず確認してから CPU の取り付けを行ってください。 CPU の交換 CPU を交換する間は必ず ATX 電源を切るか、ATX 電源用ケーブルを接地コンセントから 抜いて、まず CPU の安全を確保してください。 Memory 本製品には、184 ピン DDR SDRAM DIMM(Double In-Line Memory Module)モジュールを差 し込むソケットが 2 個あり、最大 2GB のメモリがサポートされます。DDR DIMM スロッ...
- Page 55 Single Single Single Single Double Double Single Double Double MSI Reminds You... 同時に DIMM1 と DIMM2 にてダブルサイドのメモリーモジュールをインストールします と、メモリーの最大速度が落ちます。 (最新の DDR モジュール対応表は下記のホームページからご参考ください。 http://www.msi.com.tw/program/products/mainboard/mbd/pro_mbd_trp_list.php ) DDR モジュールのインストール DDR DIMM スロットには絵に描いてあるような"VOLT"の切れ込みがあります。このため、 DIMM メモリは 1 方向にしか挿入できません。 1. DIMM メモリモジュールを DIMM スロットに垂直に差込み、押し込みます。 2. DIMM スロットの両側にあるプラスチッククリップが自動的に固定されます。...
- Page 56 1 台目の HDD は必ず IDE1(プライマリ)に接続します。IDE1 にはマスターとスレイブの 2 つ IDE/ATAPI のデバイスを接続することができますが、2 台目の HDD を追加する場合は HDD の設定をジャンパでスレイブに切り替える必要があります。IDE2 にもマスターとス レイブの 2 つ IDE/ATAPI のデバイスを接続することができます。 MSI Reminds You... ハードディスクを 2 台使用する場合は、ジャンパを使用して 2 台目のハードディスクを スレーブに設定する必要があります。ジャンパの設定手順等につきましてはハードディス ク製造業者から用意されましたマニュアルを参照ください。 Serial ATA/Serial ATA RAID Connectors controlled by VT8237/8237R: SATA1, SATA2 本製品に搭載しているサウスブリッジ...
- Page 57 スで、転送速度は 150MB/s となります。コネクタは Serial ATA 1.0 の規格に完全な互換性 を持っています。1 つのコネクタにつき、 1 つのハードディスクを接続することができます。 ファン電源コネクタ: CFAN1/SFAN1/PWFAN1 これらのコネクタは+12V の冷却ファンをサポートします。3 ピンコネクタをサポートしま す。接続するときに注意しなければならないのは、赤い線はプラスなので+12V に、黒い線 はアースなので GND に接続することです。 また、 本製品のシステムハードウェアモニタ機 能を使用する場合はファン回転数センサー機能がついたファンを使用する必要があります。 MSI からのご注意 ... § CPU クーラーの電源コネクタは、確実に接続してください。 § CFAN1 端子は、回転数制御に対応しています。コアセンターなどのアプリケーションを 利用する場合、CPU クーラーは CFAN1 端子に接続してください。 CD-In コネクタ: J4 このコネクタは CD-ROM オーディオコネクタと接続します。 ®...
- Page 58 フロント USB コネクタ: JUSB1 & JUSB2 本製品には 2 つの USB 2.0 ピンヘッダが搭載されています。USB 2.0 テクノ ロジーでは、 最大スループット 480Mbps までデータ伝送率を高速化するた め、USB 1.1 の 40 倍高速になります。USB ハードディスク、デジタル・ カメラ、MP3 プレーヤ、プリンタ、モデム、その他の高速 USB インター フェイス周辺機器へ接続することができます。 MSI からのご注意 ... VCC ピンと GND ピンは絶対ショートさせないでください。ケガや重大な故障につながる 恐れがあります。 Front Panel Audio コネクタ: JAUD1 JAUD1 フロント・パネル・オーディオ・コネクタを使用すると、フ ロント・パネル・オーディオを接続することができます。このコネ...
- Page 59 AGP (Accelerated Graphics Port) スロット AGP スロットは AGP グラフィックカード だけを挿すことができます。 AGP とは 3D グラ フィックの処理能力の需要のために開発されたインターフェイス規格です。グラフィック コントローラが 66MHz、 32 ビットチャンネルを利用してメインメモリに直接アクセスでき ます。本製品は 4x/ 8x AGP カードをサポートします。 PCI (Peripheral Component Interconnect) スロット スロットに拡張カードを挿入して、ユーザーのさま ざまな機能の拡張に応えることができます。拡張カ ードを挿入したり取り外したりするときは、必ず最初に電源プラグを抜いてください。拡 張カードについて記述されたマニュアルを読んで、ジャンパ、スイッチ、BIOS など必要な ハードウェア設定、ソフトウェア設定をすべて実行してください。 PCI 割り込み要求ルーティング IRQ(interrupt request line の省略形、I-R-Q と発音する)は、デバイスが割り込み信号をマイ クロプロセッサに送信するためのハードウェア回線です。...
- Page 60 BIOS Setup コンピュータを起動するとシステムは POST(Power On Self Test)過程に入ります。 下記のメッセージが画面に表示されている間に<DEL>キーを押すと設定画面に入ることが できます。 DEL: Setup F11: Boot Menu F12: Network boot TAB: Logo <DEL>を押す前にこのメッセージが消えてしまった場合、電源をいったん切ってからふた たび投入するか、 <RESET>を押すかして、 システムを再起動してください。 <Ctrl>、 <Alt>、 <Delete>を同時に押しても再起動できます。 メインメニュー Standard CMOS Features システムの基本的な設定をします。例えば、時間、日付など。 Advanced BIOS Features システムの特別機能の設定を行います。 Advanced Chipset Features チップセットに関する設定をしてシステムの性能を最適化します。 Power Management Features 電源管理に関する設定を行います。...
- Page 61 PC Health Status システムの温度、ファン回転速度などが表示されます。 Frequency/Voltage Control 周波数、電圧などの設定をします。 Load Optimal Defaults 安定したシステム性能を与える工場出荷デフォルト値を BIOS にロードします。 Load High Performance Defaults 最高のシステム性能をもたらす BIOS 値をロードします。ただし、システムの安定性が損 なわれることがあります。...
- Page 62 Cell Menu Cool’n’Quiet Support この項目では、Cool’n’Quiet 機能を使用するかどうかを設定できます。Cool’n’ Quiet 機能は AMD Athlon64 プロセッサに実装されている画期的な低消費電力・騒音低減シ ステムで、CPU 負荷に応じて動的に動作クロックを変化させることができます。 Cool’n’Quiet 機能動作中は、 システム負荷が低いと判断できる場合はさらにクロックダウン を行い、発熱と消費電力を削減することができます。またアイドルの際も、CPU はクロッ クダウンを行い、動作復帰と同時に CPU は徐々にクロックアップしていきます。 Spread Spectrum クロックジェネレータがパルスを発生すると、そのパルスの極値(スパイク) によって EMI(電磁妨害) が生成されます。Spread Spectrum 機能はパルスを変調することで生成さ れた EMI を軽減するので、パルスのスパイクは縮小し、フラッター曲線になります。EMI に問題がない場合は、 システムの安定性と性能を最適化するために Disabled に設定してお いてください。しかし、EMI に問題がある場合は、Enabled に設定して EMI を軽減してく ださい。オーバークロックを使用している場合は必ず...
- Page 63 できます。CPU 側の仕様で倍率変更を禁止している場合には、設定値を変更することはで きません。 Dynamic Over clocking D.O.T.は、MSI 独自のコアセル(Core Cell)技術を応用した、従来に無いオーバークロック 自動化技術です。D.O.T.は、CPU にどの程度負荷が掛かっているのかをリアルタイムで判 断し、動作が不安定にならないように各部を監視しながら、最適な CPU 周波数を BIOS レ ベルで設定します。ユーザーは、D.O.T.が動作していることを意識すること無く、スムー ズかつ高速な処理性能を享受できます。 万が一、CPU が異常加熱するなどのトラブルが発生してしまった場合でも、直ちに安全な 設定値に自動復帰することにより、通常と何ら変わらない信頼性を確保しています。大量 のデータを処理する必要があるビデオ編集や、 最新の PC を骨までしゃぶりつくす 3D ゲー ムなどを活用するユーザーにとって、D.O.T.は必需品になることでしょう。 Disabled(使用しない) (士長) Private Sergeant(曹長) Captain(1 尉) (1 佐) Colonel General(将官) Commander(幕僚長) MSI からのご注意 ...
- Page 64 DDR 300, DDR 333, DDR 400 に設定することができますが、 極端な設定値にした場合シス テムが動作しなくなります。 AGP Voltage (V) この項目ではオーバークロック実験などの際に、AGP スロットへの供給電圧を可変するこ とができます。よりハイパフォーマンスな設定が可能ですが、過度に電圧を上げた場合は システムの重大な損傷の原因になります。 DRAM Voltage (V) この項目では、DDR メモリのコア電圧を調整することができます。電圧を上げることによ りオーバークロック耐性が向上する場合がありますが、過度に電圧を上げた場合はシステ ムの重大な損傷の原因になります。 MSI からのご注意 ... DRAM Voltage(V)、AGP Voltage(V) の項目は設定値によって、表示する色が変わります。 表示する色の意味はそれぞれ 白: システムの安定性を影響しない設定です。 黄色: システムの性能を高めた設定です。 赤: システムのスペックより高い性能です。この設定値お勧めしません。 警告:過電圧動作は各部品の寿命を極端に縮めます。また、重大な損傷の原因になる場合 もあります。オーバークロックや過電圧実験は、短時間に留めて下さい。 BIOS についてのより詳細な説明は、WEB サイトをご覧下さい。 http://www.msi-computer.co.jp/...
- Page 65 简介 感谢您购买 MS-7032(K8T Neo-V/K8M Neo-V)v1.X ATX 主板。K8T Neo-V/K8M Neo-V 是基于 VIA K8T800/K8M800 北桥和 VT8237/8237R 南桥芯片组,并提供了 8 个 USB 2.0 端口,以实现高速数据传 输。RealTek ALC655 芯片实现了 6-声道音频数输出。K8T Neo-V/K8M Neo-V 主板是为 AMD Athlon64 的处理器量身定做的高性能主板,提供了高性能、专业化的桌面平台解决方案。 布局 Top : mouse Bottom: keyboard Top : Parallel Port...
- Page 66 规格 ® l 支持 64-bit AMD K8 Athlon64 处理器(Socket 754) l 支持到 2800+, 3000+, 3100+, 3200+, 3400+, 3700+, 或更高频率的 CPU (要了解最新的支持信息,请访问 http://www.msi.com.tw/program/products/mainboard/ mbd/pro_mbd_cpu_support.php) 芯片组 ® l VIA K8T800 / K8M800 芯片组 连接到 AMD Athlon64 处理器 HyperTransport 8 或 16 位控制/地址/数据传输双向传输...
- Page 67 1 个音频端口 1 个 D-Bracket2 针头 1 个 RJ-45 LAN 插孔 8 个 USB 端口(前置 x 4 / 后置 x 4) 1 个 VGA 端口(仅对于 K8M Neo-V) 音频 l 6 声道软件音频编解码 RealTek ALC655. 符合 AC97 v2.3 规格 满足 PC2001 音频性能要求...
-
Page 68: 中央处理器:Cpu
后置面板 后置面板提供了以下接口: Parallel Mouse Keyboard COM A (For K8M Neo-V only) 硬件安装 这一章主要告诉您如何安装 CPU、内存、扩展卡,也会告诉您怎样设置主板上的跳线,并提供连接外围 设备的指导,如鼠标,键盘等。安装时,请谨慎拿各零部件并且按照安装说明的步骤进行。 中央处理器:CPU ® 本主板支持 AMD Athlon64 处理器。主板使用的是 Socket-754 的 CPU 插槽,可使 CPU 安装过程简化。 当您在安装 CPU 时, 请务必确认您使用的 CPU 带有防过热的散热片和降温风扇。 如果您的 CPU 没有散 热片和降温风扇,请与销售商联系,购买或索取以上设备,并在开机之前妥善安装。 (要了解关于 CPU 的最新信息,请访问... - Page 69 更换 CPU 时,请先关闭 ATX 电源供应或拔掉电源插头以确保 CPU 的安全。 内存 主板提供了 2 条内存插槽,支持 184-pin 的 DDR SDRAM DIMM 模组,最大的容量为 2GB。您可以安装 PC3200/DDR400, PC2700/DDR333 或 PC2100/DDR266 无缓冲的 DIMM 模组在 DDR DIMM 插槽 (DDR 1~2)中。请把内存插入 DIMM1 插槽和 DIMM2 插槽中,使系统达到最佳性能。 微星提醒您... 当 2 条内存插槽都插上双面记忆卡模块时,最大内存速度下降至 DDR333 要了解内存模组的最新支持情况,请访问 http://www.msi.com.tw/program/products/mainboard/mbd/pro_mbd_trp_list.php 。...
- Page 70 Single Single Single Single Single Double Double Single Double Double 请访问 http://www.msi.com.tw/program/products/mainboard/mbd/pro_mbd_trp_list.php 以了解兼容的 DDR 模组。 安装 DDR 模组 1. DDR DIMM 内存条的中央仅有一个缺口。 2. 将 DDR 内存垂直插入 DDR 槽中,并确保缺口的正确位置。 3. DIMM 插槽两边的塑料卡口会自动闭合。 电源适配器 主板使用 ATX 结构的电源适配器给主板供电。在连接电源适配器之前, 请务必确认所有的组件都已正确安装,并且不会造成损坏。建议您 使用功率为 300W 或以上的电源。 ATX 20-Pin 电源接口:ATX 总内存...
- Page 71 此接口可连接 ATX 电源适配器。在与 ATX 电源适配器相连时,请务必确认,电源适配器的接头安装方向 正确,针脚对应顺序也准确无误。将电源接头插入,并使其与主板电源接口稳固连接。 ATX 12V 电源接口:JPW1 此 12V 电源接口用于为 CPU 供电。 软驱接口:FDD1 主板提供了一个标准的软盘驱动器接口 FDD,支持 360K, 720K, 1.2M, 1.44M 和 2.88M 的软盘驱动器。 IDE 接口:IDE1 & IDE2 主板有一个 32-bit 增强 PCI IDE 和 Ultra DMA 33/66/100/133 控制器 , 提供 IDE 接口设备工作于 PIO 模式 0-4 , Bus Master 和...
- Page 72 微星提醒您... § 请询问厂商以使用适当的 CPU 降温风扇。 § CFAN1 支持风扇控制。 您可以安装 Core Center 工具, 它可以根据 CPU 温度自动控制 CPU 风扇速度。 CD-In 接口:J4 此接口用于连接 CD-ROM 音频接口。 ® 2 接口:JLED1(选配) D-Bracket 主板提供了 JDB1 接头以连接到 D-Bracket 规格的一个 USB 档板,其上镶嵌了四个指示灯,它通过指示灯组合的 16 种信号,帮助 用户诊断系统问题。 机箱入侵侦测接口:JCASE1 此接头可与一个 2-pin 机箱开关相连。如果机箱被打开了,此接头会短接,系统会 记录此状态,并在屏幕上显示警告信息。要消除这一警告信息,您必须进入...
- Page 73 微星提醒您... 如果您不想使用前置音频,针脚 5 & 6, 9 & 10 必须用跳线帽短接,这样输出信号 才会转到后面的音频端口。否则后面的 Line-Out 音频接口将不起作用。 清除 CMOS 跳线:JBAT1 主板上建有一个 CMOS RAM,其中保存的系统配置数据需要通过一枚外置电池来维 持。CMOS RAM 是在每次启动计算机的时候引导操作系统的。如果您想清除保存 在 CMOS RAM 中的系统配置信息,可使用 JBAT1 (清除 CMOS 跳线) 清除数据。 请按照以下方法清除数据: 微星提醒您... 在系统关闭时,您可通过短接 2-3 针脚来清除 CMOS 数据。然后,返回到 1-2 针短接的状态。请避免在 系统开机时清除 CMOS,这样可能会对主板造成损害。 主板具有...
- Page 74 BIOS 设置 计算机加电后,系统将会开始 POST (加电自检)过程。当屏幕上出现以下信息时,按<DEL>键即可进 入设定程序。 DEL: Setup F11: Boot Menu F12: Network boot TAB: Logo 如果此信息在您做出反应前就消失了,而您仍需要进入 Setup,请关机后再开机或按机箱上的 Reset 键, 重启您的系统。您也可以同时按下<Ctrl> <Alt>和<Delete>键来重启系统。 主页面 Standard CMOS Features(标准 CMOS 特性设定) 使用此菜单可对基本的系统配置进行设定。如时间,日期等。 Advanced BIOS Features(高级 BIOS 特性设定) 使用此菜单可对系统的高级特性进行设定。 Advanced Chipset Features(高级芯片组特性设定) 使用此菜单可以修改芯片组寄存器的值,优化系统的性能表现。 Power Management Features(电源管理特性设定) 使用此菜单可以对系统电源管理进行特别的设定。...
- Page 75 Cell Menu(核心菜单) 使用此菜单可以进行频率和电压的特别设定。 Load Optimal Defaults(载入优化缺省值) 使用此菜单可以载入制造厂商设定的稳定系统性能的缺省值。 Load High Performance Defaults(载入高性能缺省值) 使用此菜单可以载入系统性能最佳化的缺省值,但值可能会影响系统的稳定性。...
- Page 76 核心菜单 Cool’n’Quiet Support(Cool’n’Quiet 支持) 此项可开启或关闭 Cool’n’Quiet 功能。Cool’n’Quiet 是专为 AMD Athlon64 处理器设计的。使用 Cool’n’Quiet,当系统放置一段时间不使用时,系统会自动调低 CPU 频率,当系统恢复工作时,再调回 原本的 CPU 频率。设定值有:[Enabled], [Disabled]。请注意,为了使 Cool’n’Quiet 运行稳定,建议您把 内存插入 DIMM1 插槽中。 Spread Spectrum(频展) 当主板上的时钟震荡发生器工作时,脉冲的极值(尖峰)会产生 EMI(电磁干扰) 。频率范围设定功能可 以降低脉冲发生器所产生的电磁干扰,所以脉冲波的尖峰会衰减为较为平滑的曲线。如果您没有遇到电 磁干扰问题,将此项设定为[Disabled] ,这样可以优化系统的性能表现和稳定性。但是如果您被电磁干 扰问题困扰,请将此项设定为[Enabled],这样可以减少电磁干扰。注意,如果您超频使用,必须将此项 禁用。因为即使是微小的峰值漂移(抖动)也会引入时钟速度的短暂突发,这样会导致您超频的处理器 锁死。 Stop Unused PCI Slot Clock(停止闲置的 PCI 插槽时钟) 此项可开启或关闭...
- Page 77 Dynamic Overclocking(动态超频) Dynamic Overclocking Technology (动态超频技术) 具有自动超频功能,包含在 MSI 技术中。是用来侦测 CPU 在处理应用程序时的负荷状态,以及自动调整 CPU 的最佳频率。当主板检测 到 CPU 正在运行程序,它会自动为 CPU 提速,可更流畅更快速的运行程序。在 CPU 暂时处于挂起或在 低负荷状态下,它就会恢复默认设置。通常,动态超频技术(Dynamic Overclocking Technology)只有 在用户的 PC 需要运行大数据量的程序,例如 3D 游戏或是视频处理时,才会发挥作用,此时 CPU 频率 的提高会增强整个系统的性能。 设定值有: 关闭动态超频 [Disabled] 第一级别的超频 [Private] 第二级别的超频 [Sergeant] 第三级别的超频,也是“Load High Performance Defaults”的缺省值...
- Page 78 AGP Voltage (V)(AGP 电压,V) 您可在此项中调整 AGP 电压,当 AGP 显卡超频时,会提升它的性能,但会影响系统稳定性。 DRAM Voltage (V)(DRAM 电压,V) 此项设置用于调整 DRAM 核心电压(Vcore ) ,使超频顺利进行。 微星提醒您... 在 AGP Voltage 和 DRAM Voltage 中各项设置的不同颜色,帮助您区分系统设置是否恰当。 白色:安全设置。 黄色:高性能设置。 红色:不推荐的设置,可能导致系统不稳定。 改变 CPU/DDR/AGP/North Bridge/South Bridge Voltage 的值会导致系统的不稳定,所以我们建议您不 要改变默认值作为长期使用。 要查看 BIOS 的简介和设置,请访问微星 MSI 网站 http://www.msi.com.tw...
- Page 79 簡介 感謝您購買 MS-7032 (K8T Neo-V/K8M Neo-V) v1.X 主機板 。 K8T Neo-V/K8M Neo-V 主機板係採用 VIA K8T800/K8M800 北橋 & VT8237/8237R 南橋晶片組,並支援八個 USB2.0 連接埠供高速資料傳輸,一 組 RealTek ALC655 晶片供六聲道音效輸出。本 K8T Neo-V/K8M Neo-V 主機板係針對新一代 AMD Athlon64 處理器設計,可提供您高效能及專業的桌上型電腦平台解決方案。 主機板配置圖 Top : mouse Bottom: keyboard Top : Parallel Port...
- Page 80 主機板規格 中央處理器 支援 64-bit AMD Athlon64 處理器 ® 支援 2800+、3000+、3200+、3400+、3700+或更快的處理器。 (有關更多的 CPU 訊息,請至微星科技網站:http://cweb.msi.com.tw ) 晶片組 K8T800/K8M8000 晶片組 ® - 支援 HyperTransportTM 連接至 AMD® Athlon64 處理器 - 支援 8 或 16 bit 雙向控制/位址/資料傳輸 - 支援 800/600/400/200 MHz 雙向 Double Data Rate 操作模式...
- Page 81 - 一個平行埠可支援 SPP/EPP/ECP 模式 - 一個音效連接埠 - 一個 D-Bracket2 接頭 - 一個 RJ-45 的區域網路接頭 - 八個 USB2.0/1.1 連接埠(背板*4/面板*4) - 一個 VGA 輸出埠(僅供 K8M Neo-V) 音效 l Realtek ALC655 六聲道音效 - 符合 AC97 v2.3 規格 - 符合 PC2001 音效需求區域網路 LAN 區域網路...
- Page 82 滑鼠 平行埠 鍵盤 序列埠 A 硬體安裝 本章將教您安裝中央處理器、記憶體模組、擴充卡及設定主機板上的跨接器。附帶並告訴您如何連接滑 鼠鍵盤等週邊裝置。進行安裝時請小心處理零組件並遵守安裝步驟。 中央處理器 本主機板使用 Socket-754 規格的 CPU 插槽,支援 AMD 確認附有散熱器與冷卻風扇以防止 CPU 過熱。如果沒找到散熱器與冷卻風扇,請洽詢經銷商購買並在啟 動電腦之前,將散熱器正確地安裝在您的主機板上。 (有關更多的 CPU 訊息,請至微星科技網站:http://cweb.msi.com.tw ) 記憶體速度/CPU FSB 支援對照表 Memory DDR 266 FSB200 顯示卡連接埠 USB 連接埠 (僅供 K8M NEO-V) ® DDR333 區域網路 音效輸入...
- Page 83 安裝中央處理器,可能會造成主機板永久毀損。 5. 壓下拉捍以完成安裝。當您壓下拉捍的時候,中央處理器還是有可能會移動,請緊緊地按住中央處理 器上方,確定您的中央處理器腳座的拉捍適當而且完全地進入腳座內。 安裝 AMD Athlon64 CPU 風扇 當您在安裝 CPU 時,請確認附有散熱器與冷卻風扇以防止 CPU 過熱。如果沒找到散熱器與冷卻風扇, 請洽詢經銷商購買並在啟動電腦之前,將散熱器正確地安裝在您的主機板上。 撕開底板上的保護貼紙。 將主機板翻過來,並將底板安裝至適當的位置。 將主機板翻轉至正面,並放置於平面上。在主機板上找出這兩個螺絲孔的位置。 將風扇底座對準主機板上的螺絲孔,並以螺絲固定。 將風扇放置在風扇底座上。先將扣具的一端扣上。再將扣具的另一端扣上,以使風扇底座緊密地固 定在主機板上。 確認固定桿、安全鉤及固定栓的位置。順時針轉動固定桿。 將固定桿壓下,直到安全鉤扣住固定栓。 確認安全鉤和風扇底座上的固定栓確實扣上。 MSI 提醒您… 溫度過高 溫度過高將會嚴重損壞您的 CPU 及系統,請確保您的散熱風扇可以正常運作,以保護 CPU,避免發生 過熱的情形。 更換 CPU 當您在更換 CPU 時,為了確保不會損壞 CPU,應該要先關掉 ATX 電源的開關,或將電源線拔掉。...
- Page 84 記憶體 本主機板提供兩條 184-pin DDR SDRAM DIMM 插槽(雙通道記憶體模組) , 支援高達 2GB 的記憶體容量。 您可以安裝 PC3200/DDR400, PC2700/DDR333, PC2100/DDR266 記憶體模組在 DDR DIMM 插槽上 (DDR1~2)。在 DIMM1 及 DIMM2 插入記憶體,可使系統效能達到最佳化。(有關更多的記憶體模組訊息, 請至微星科技網站:http://cweb.msi.com.tw ) DDR DIMM 模組組合 為確保系統正常運作,至少要安裝一組 DIMM 模組在主機板上。記憶體模組可以任何順序安裝在插槽 上。您可以根據您的需要插入單面或雙面的記憶體模組。 您可以依下列組合安裝記憶體模組: Slot Memory Module DIMM 1 Single/Double side...
- Page 85 硬碟連接器:IDE1 & IDE2 本主機板具有一個 32 位元增強型 PCI IDE 及 Ultra UMA 66/100/133 控制器,可提供 PIO 模式 0~4、主 控匯流排以及 Ultra DMA33/ 66/100/133 等功能。你可透 過 IDE 連接線連接四部硬碟、CD-ROM、120MB 軟式磁 碟及其他裝置。第一部硬碟必須連接到 IDE1。IDE1 可以連接一部主要裝置及一部隸屬裝置。您必須根 據跳線設定將第二部裝置設定為隸屬裝置。IDE2 也可連接一部主要裝置及一部隸屬裝置。 MSI 提醒您… 假如您在同一條連接器上安裝兩組硬碟,您必須設定硬碟的跨接器(Jumper),將第二組硬碟指定到隸屬 模式。關於硬碟的設定方式,請參考硬碟廠商所提供之說明。 Volt N ot ch PS_ON -12V...
- Page 86 率,每個 Serial ATA 介面可連接一組硬碟機且均完全相容於 Serial ATA 1.0 的規 範。 冷卻風扇連接器:CFAN1/SFAN1/PWFAN1 CFAN1(處理器冷卻風扇),此連接器以+12V 的電壓供應電力給系統的冷卻風扇。 它支援 3-pin 接頭的連接器。當您將電線連接到連接器時,請務必記得紅色線是 正極,一定要連接到+12V,而黑色線是接地線,必須要連接到 GND。假如主機板上內建有系統硬體監 控器晶片組,你必須使用具有速度感應器的特殊設計冷卻風扇才能夠使用 CPU 冷卻風扇控制功能。 MSI 提醒您... * 請詢問供應商選擇合適的 CPU 風扇。 * CPUFAN1 支援風扇控制器,您可安裝 Core Center 工具 程式,這個程式會根據 CPU 的實際溫度來控 制 CPU 冷卻風扇的速度去 CD 輸入連接器:J4 此連接器是供光碟機的音訊連接器使用。 D-Bracket 2 連接器:JLED1(選購) 您的主機板附有...
- Page 87 面板 USB 連接器:JUSB1/JUSB2 主機板提供一個面板 USB2.0 連接器 JUSB1、JUSB2,其規格都符合 Intel 面板輸入 /輸出設計指南。USB2.0 技術可大幅提昇資料傳輸速率,最高可達 480Mbps,為 USB1.1 的 40 倍,適用於高速 USB 介面的週邊裝置,例如:USB 硬碟、數位相機、 MP3 播放器、印表機、數據機及相關週邊裝置。 MSI 提醒您... 注意:VCC 和 GND 的腳位一定要正確連接,否則將會照成主機板的損壞。 面板音效連接器:JAUD1 JAUD1 面板音效連接器可讓您連接到面板音效,其規格符合 Intel 面板輸入 /輸出設計指南。 MSI 提醒您... 如果您不想連接到此面板音效連接器,則必須用跨接器將連接器上的第 5、6、9 及 10 腳短路,以將音訊輸出導引至背板音效埠。...
- Page 88 PCI 插槽 此插槽可以讓您安裝各類擴充卡,以滿足你的使用需求。當您 要安裝或是移除擴充卡時,請先確認電源已切斷。另外,請詳 讀擴充卡的使用說明,以確認在使用擴充卡時所需要變更的硬體或軟體設定,例如跨接器、開關或 BIOS 的組態與設定。 橘色的 PCI 插槽(PC15)是網路通訊插槽,可以讓您安裝無線網路通訊介面卡。 PCI 的中斷要求 IRQ 是中斷要求 (Interrupt request) 的英文縮寫,它是一個可讓裝置傳送中斷訊號至微處理器的硬體線 路。PCI 的 IRQ 腳位通常都連接到 PCI 匯流排的 INT A#~INT D#腳位,如下所示: PCI Slot 1 PCI Slot 2 PCI Slot 3 PCI Slot 4 PCI Slot 5 Order 1 Order 2 Order 3...
- Page 89 BIOS 設定 打開電腦的電源後,系統就會開始 POST (開機自我測試)程序。當下列訊息出現在螢幕上時,按下<DEL> 鍵進入設定程式。 DEL:Setup F11:Boot Menu F12:Network boot TAB:Logo 如果此訊息在您反應之前就已消失 ,而您還想要進入設定時 ,將系統關閉重新啟動或是按下 RESET 按鈕。 您也可以同時按下 <Ctrl>、<Alt>及<Delete>鍵重新啟動系統。 主選單 Standard CMOS Features(標準 CMOS 設定) 使用此選單設定基本的系統組態,例如時間、日期等。 Advanced BIOS Features(進階 BIOS 設定) 使用此選單設定 AMI 悖 S 殊的進階功能選項。 Advanced Chipset Features(進階晶片組功能) 使用此選單變更晶片組暫存器中的數值,並將系統效能最佳化。 Power Management Features(電源管理設定)...
- Page 90 Integrated Peripherals(整合型週邊) 使用此選單指定整合型週邊裝置的設定。 PC Health Status(PC 狀況) 此選單可顯示您電腦目前的狀態,例如:溫度、電壓和其他設定。 Frequency /Voltage Control(頻率/電壓控制) 使用此選單指定您的頻率/電壓控制設定。 Load Optimized Defaults(載入理想化預設值) 使用此功能清單載入 BIOS 的出廠預設值,以獲得最穩定的系統作業。 Load High Performance Defaults(載入高系統效能設定) 使用此選單載入 BIOS 的最佳預設值,以獲得最佳化的系統效能。但系統穩定度可能會被影響。 Cell Menu Cool’n’Quiet Support 此項可開啟或關閉 Cool’n’Quiet 功能。Cool’n’Quiet 是專為 AMD Athlon64 處理器設計的。使用 Cool’n’Quiet,當系統放置一段時間不使用時,系統會自動調低 CPU 頻率,當系統恢復工作時,再調回 原本的 CPU 頻率。設定值為:開啟(Enabled);關閉(Disabled)。請注意,為了使 Cool’n’Quiet 運行穩定, 建議您把記憶體插入...
- Page 91 第二層動態超頻。 Captain 第三層動態超頻,同時也是 "Load High Performance Defaults"的初始值。 Colonel 第四層動態超頻。 General 第五層動態超頻。 Commander 第六層動態超頻。 MSI 提醒您... 使用動態超頻技術比手動超頻更穩定,基本上還是避免長時間超頻。我們建議您先確定您的中央處 理器能超頻至多大的負載。當發現您的個人電腦有不穩定或一直重新啟動的情況,最好先停止動態 超頻或是降低超頻選項的層次。如果您需要手動超頻,請先關閉動態超頻選項。 同時,為了安全的理由,我們提供了兩個功能來保護 BIOS 以及保護使用者的系統以防止毀壞: - 在 BIOS 上有一個安全特殊鍵 "Ins" 。如果超頻或者是 MAT 無法執行,您可以在重新啟動時按 下”Ins”鍵以貯存 BIOS 預設初始值 。 - 如果重新開機連續四次,BIOS 的預設初始值也會設定為 (Normal)。 CPU FSB Clock(CPU FSB 時脈)...
- Page 92 如果 DRAM 時脈模組設定為開啟,則可配置已安裝 DRAM 的時脈頻率。設定值為:DDR 200, DDR 266, DDR 300, DDR 333, DDR 400 AGP Voltage (V) Adjust(調整 AGP 電壓) 此設定可讓您調整 AGP 電壓,讓您超頻時可以增加您的 AGP 卡的效率,但系統穩定性可能受影響。 DRAM Voltage (V)(DRAM 核心電壓) 此設定是用來調整 DRAM 的核心電壓。讓使用者可以將系統超頻。 MSI 提醒您... 使如果您要針對系統調整合適的 CPU 電壓(V)、DDR 電壓(V)、AGP 電壓(V)設定值,此選項將針對調整 後的效果,顯示出不同顏色。 白色:為安全設定值 黃色:為高效能設定值 紅色:不推薦此設定值,此設定值將會照成系統的不穩定。 若您需要更詳細的 BIOS 介紹與設定,請至微星科技網站 http://cweb.msi.com.tw...
Need help?
Do you have a question about the K8M Neo-V and is the answer not in the manual?
Questions and answers