Advertisement
- 1 OVERVIEW
- 2 LOCATION AND DESCRIPTION OF CONTROLS
- 3 POWER SUPPLY
- 4 TURNING ON/OFF THE UNIT
- 5 SELECTION FUNCTION
- 6 ADJUSTING VOLUME
- 7 SETTING THE TIME AND DATE
- 8 LISTENING TO DAB/DAB+ RADIO
- 9 LISTENING TO FM RADIO
- 10 LISTENING TO RADIO PRESETS
- 11 SETTING THE ALARM AND THE ALARM MODE
- 12 SLEEP FUNCTION
- 13 SETUP MENU
- 14 REVIEWING MORE INFORMATION
- 15 BLUETOOTH PAIRING & LINKING OPERATION
- 16 LISTENING TO THE USB
- 17 USING HEADPHONES / EARPHONES
- 18 CONNECTING AUXILIARY SOURCE
- 19 TECHNICAL SPECIFICATIONS
- 20 SAFETY INFORMATION
- 21 Documents / Resources
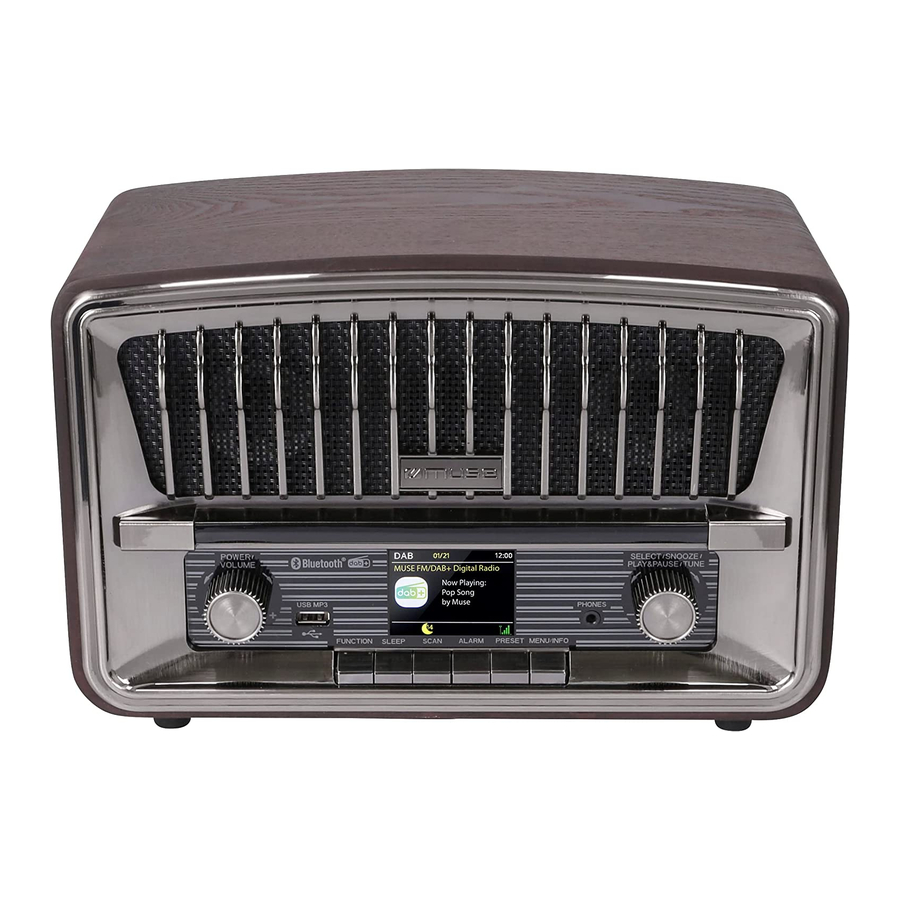
OVERVIEW

LOCATION AND DESCRIPTION OF CONTROLS
- POWER: To turn unit on/ off
VOLUME: To adjust the volume - USB port for MP3 playback
- FUNCTION: To select FM, Bluetooth, USB, AUX, or DAB mode
- SLEEP: To fall asleep with the radio/ music
- SCAN: Auto scan and storage
- ALARM: To set the alarm
- PRESET: Preset radio stations; Listen the preset stations
- MENU: To access the main menu
INFO: To review the setting information - Phones jack
- SELECT: Confirm the selection/ setting
SNOOZE: Interval alarm repetition
TUNE: Tuning; Setting up/ down; Skip to next/ previous track
PLAY&PAUSE: Play/ Pause - TFT display
- AUX IN jack
- DC IN jack
- Swivel telescopic antenna
POWER SUPPLY
AC ADAPTOR
The supplied AC adaptor is suitable for use on AC main supplies of AC 100-240V ![]() 50/60Hz and should only be connected to a mains supply within these parameters.
50/60Hz and should only be connected to a mains supply within these parameters.

- The AC adaptor included with this unit is for its use only. Do not use it with other equipment.
- Turn off the unit before unplugging the AC adaptor from the unit so as to avoid the unit being damaged.
- When the unit is not going to be used for long time, disconnect the AC adaptor from the AC outlet.
- Be sure to use it near the wall outlet and easily accessible. If a malfunction occurs, disconnect the plug from the wall outlet at once.
- AC adaptor is used as the disconnect device. It shall remain readily operable and should not be obstructed during intended use. To be completely disconnected the apparatus from supply mains, the AC adaptor of the apparatus shall be disconnected from the mains socket outlet completely.
- Never use an AC adaptor that is damaged, route power lead in a safe manner and make sure it is not subjected to trapping or pinching. If the power lead is damaged refer to a qualified service agent.
TURNING ON/OFF THE UNIT
In standby mode, press POWER button to turn on the unit. Press again to turn off the unit.
Note: Unit will automatically switch to standby mode after 15 minutes if no operation is done.
SELECTION FUNCTION
When the unit is on, repeatedly press FUNCTION button to select desired mode: FM, Bluetooth, USB, AUX, or DAB mode.
ADJUSTING VOLUME
To increase or decrease the sound level, rotate VOLUME knob clockwise or anticlockwise.
SETTING THE TIME AND DATE
The first time you listen to DAB/DAB+ radio, the time and date of your product will synchronized automatically to that broadcast by the DAB/DAB+ service in 24-hour mode, which is in line with daylight saving, so there is no need to set the time and date manually.
If you do wish to set the time and date manually, turn on the radio and follow the steps as below:
- Press and hold the MENU button.
- Rotate the TUNE knob to scroll to <Main menu>. Press SELECT button to enter this option.
- Press SELECT button to enter <Time setup>, then <Set time> is displayed, press SELECT again to enter this option.
- Date will flash. Use the TUNE knob and SELECT button to set the date, month and year.
- The hour digits will flash. Use the TUNE knob to set the hour, and press the SELECT button to confirm. Then the minute digits will flash. Use the TUNE knob to set the minute. Press the SELECT button to confirm.
When you confirm the time, the display will return to <Time setup>. You can now use TUNE knob and SELECT button to set followings:
- Clock format: 12/24 hour clock display.
- Auto update: Auto update the time from radio or no update.
Note: when do the setting in the menu, press the MENU button to return back to
LISTENING TO DAB/DAB+ RADIO
- Repeatedly press FUNCTION button to select DAB mode. The radio will start automatic scan for DAB/DAB+ stations if it's the first time to use the unit. The display will change to "Scanning....". A progress bar will show the progress of the scan and the number of stations found during the scan will also be displayed.
- When the scan is complete, the radio will select the first available station and begin to broadcast. Stations are listed in numerical and then alphabetical order by default.
Note: The DAB/DAB+ radio station list is stored in the memory and so the next time you switch your radio on, the station search does not take place. It is possible to scan manually for stations by pressing the SCAN button. - Rotate TUNE to select through the list of stations.
- When the desired station is displayed, press the SELECT button to confirm. There will be a short delay while your radio tunes to your selected station.
Note:
- If no broadcasts are found by DAB/DAB+ scan, "No station found" appears in the display.
- For a better reception, extend the telescopic antenna or do the full scan again in another place.
- During the search operation, the sound level is automatically muted.
LISTENING TO FM RADIO
In FM radio mode, rotate TUNE knob to tune manually. Press SCAN button once to search automatically.
Note: For a better reception, extend the telescopic antenna.
PRESET STATIONS
This unit can store 20 FM and 20 DAB/DAB+ stations.
Manual storage
- Repeatedly press FUNCTION button to select FM or DAB band.
- Select a radio station.
- Press and hold PRESET button to enter preset store mode.
- Use TUNE knob to select a channel.
Note: If you choose a station that hasn't been allocated, "Empty" will be displayed. If the station has been allocated before, the FM frequency or DAB station name will be showed. - Press SELECT button to save it.
- Repeat step 2-5 to store other stations.
Automatic storage
Press and hold SCAN button in FM mode, the unit will automatically locate and save the strong stations. When you store on a channel already been preset, the previous station will automatically be cleared and replaced by the new station.
LISTENING TO RADIO PRESETS
- Press FUNCTION button to select FM or DAB band.
- Press PRESET once. "Preset Recall" will be displayed, then rotate TUNE knob to select your desire station.
- Press SELECT to confirm your selection.
SETTING THE ALARM AND THE ALARM MODE
When the time has been set.
- Press ALARM button and enter <Alarm 1>.
- Press SELECT button to enter <Enable>, rotate TUNE knob to specify one of the following alarm frequency options: "Off", "Daily", "Once", "Weekdays" and "Weekends". Press SELECT button to confirm.
- Use TUNE knob and SELECT button to enter <Time>, rotate TUNE knob to set the time of wake up, press SELECT to confirm.
Noted: In 12 hour clock format, be sure to observe the AM/PM indicator to set correctly. - Use TUNE knob and SELECT button to enter <Mode>, rotate TUNE knob to select the source of wake up by buzzer, DAB or FM. Press SELECT button to confirm.
- Use TUNE knob and SELECT button to enter <Preset>, rotate TUNE knob to select the alarm station by last listened or other preset station. Press SELECT button to confirm.
Note: If you select the source of wake up by buzzer, it will not appear this selection. - Use TUNE knob and SELECT button to enter <Volume>, to set the alarm volume by TUNE knob. Press SELECT button to confirm.
- Use TUNE knob and SELECT button to select <Save> to save the alarm setting. Indicator will light up.
Notes:
- Same procedure applies for alarm 2.
- You can also set the alarm through MENU. Press and hold MENU button, and enter <Main menu> - <Alarms>, and same procedure as above.
- Preset the station before you select the wake up source by preset stations.
- If you wake up with last radio, select your desire station, then press button to turn off the radio before alarm time reaches. For the station selecting, please refer to "Listen to DAB/DAB+ radio" and "Listen to FM radio".
Stopping the alarm
- Alarm repetition
Press SNOOZE. The alarm stops and will sound again 5 minutes later. Indicator will blink.
Note: Repeatedly press SNOOZE button to select 5-10-15-30 minutes of alarm repetition time. - Alarm stop
Press POWER or ALARM button. The alarm 1 or alarm 2 will sound again the next day at the same time.
Notes:
- If you select the alarm frequency by "Once", the alarm will not sound again.
- If you select the alarm frequency by "Daily", the alarm will sound again.
- If you select the alarm frequency by "Weekend", the alarm will sound again at each weekend.
- If you select the alarm frequency by "Weekdays", the alarm will sound again except weekend.
- Alarm Cancellation
Press ALARM button and enter <Alarm 1> - <Enable>, then select "Off", press SELECT button to confirm. Rotate TUNE knob to select <Save>, press SELECT button to confirm to cancel the alarm 1 permanently. The indicator will turn off. Note: Same procedure applies for Alarm 2.
SLEEP FUNCTION
When the unit is on. To fall asleep with the radio/music, repeatedly press SLEEP button to select 15-30-45-60-90-120 minutes of listening, press SELECT button to confirm. Indicator lights up. The unit will automatically turn off after the specified time. To cancel the sleep function, repeatedly press SLEEP button until "Off" display, press SELECT button to confirm. The indicator will light off.
Note: You can also set the sleep time through MENU. Press and hold MENU button, and enter <Main menu> - <Sleep>, and same procedure as above.
SETUP MENU
Navigating the setup menu.
- In FM, DAB, AUX IN, USB and Bluetooth mode, press and hold MENU to enter into setup menu.
- Rotate TUNE knob to scroll to one of the available options.
FM mode: Audio setting/ Main menu
DAB mode: Station list/ Full scan/ Manual tune/ Station order/ DRC/ Prune station/ Main menu
AUX IN/ USB/ Bluetooth mode: Time setup/ Alarms/ Sleep/ EQ/ Backlight/
Languages/ Factory reset/ SW version - Press SELECT button to enter related setup. The "
![]() " will be displayed next to the current setting.
" will be displayed next to the current setting.
 " will be displayed next to the current setting.
FM Setting Menu
Audio setting
To select between "Stereo or mono" or " Mono only" for the FM radio.
Main menu
To select the system setting options: Time setup, Alarms, Sleep, EQ, Backlight, Languages, Factory reset, SW version.
Note: For the "Time setup", "Alarms" and "Sleep", please refer to the related setting operations as above.
- EQ
To set EQ (equalizers) mode as desired: Flat/ Rock/ Classic/ Jazz/ Pop/ Bass boost. - Backlight
- Select <Timeout> and press SELECT to enter to this option.
- Rotate TUNE knob to select your desire backlight timeout in seconds: Always on > 10 > 20 > 30 > 45 > 60 > 90 > 120 > 180. Then press SELECT to confirm your setting.
- Enter <Level> to select the background brightness by TNUE knob, press SELECT to confirm.
- Language
To select the desired language of the unit's menu: English, Français, Deutsch, and Nederlands. - Factory Reset
To restore to factory default settings. - SW version (software version)
To review the current software version.
DAB Setting Menu
Station list
You can review the station list after proceed full scan.
Full Scan
This function allows you to automatically scan and create a new list of receivable DAB broadcasts.
Manual Tune
This function can be used to assist the positioning of antenna or the unit, to enhance specific channel or frequency reception ability.
Station order
To list scan stations from MULTIPLEX, ALPHANUMERIC or ACTIVE.
- MULTIPLEX: Stations will be listed in random.
- ALPHANUMERIC: Stations will be listed in numerical and then alphabetical order. This is the default setting.
- ACTIVE: Stations will be listed by reception strong and weak.
DRC (Dynamic range compression)
DRC can make quieter sounds easier to hear when the unit is used in a noisy environment.
Rotate TUNE button to select your desire DRC level: off, low, high DRC off - no compression. This is the default setting.
DRC low - medium compression.
DRC high - maximum compression.
Note: DRC is effective only in dynamic range compression broadcast.
Prune station
Remove stations that are listed but unavailable. This function can remove all invalid stations indicated in the station list.
Main menu
Please refer to the <FM setting menu> - <Main menu>.
AUX IN/ USB/ Bluetooth Setting Menu
Please refer to the <FM setting menu> - <Main menu>.
REVIEWING MORE INFORMATION
Repeatedly press INFO button to review some unit settings (e.g. time, date) or available information (e.g. radio text, program type, strength) for the station you are listening.
BLUETOOTH PAIRING & LINKING OPERATION
The Bluetooth® word mark and logos are registered trademarks owned by Bluetooth SIG, Inc. and any use of such marks by New One S.A.S is under license. Other trademarks and trade names are those of their respective owners.
- Press the POWER button to turn on the unit.
- Press FUNCTION button repeatedly to enter Bluetooth mode.
- On the Bluetooth device, enable Bluetooth and select "M-135DBT" from the Device List. (Refer to the user manual of the device to be connected for detailed operations.) If the Bluetooth device prompts for a passcode, use "0000". Some Bluetooth devices will ask you to accept the connection. If the units are paired properly, you will hear the confirmation music.
Tip: If you want to connect your radio to another Bluetooth audio device, press and hold SELECT button to disconnect the device, and then follow the steps above to make a new connection.
Hereby, NEW ONE S.A.S, declares that this MUSE M-135 DBT is in compliance with the essential requirements and other relevant provisions of Directive 2014/53/EU. The declaration of conformity may be consulted at www.muse-europe.com
Play music from Bluetooth devices
Make sure the Bluetooth connection between the unit and the device is active.
- Press the PLAY & PAUSE button to start playback, press again to pause the playback.
- Rotate TUNE knob to skip to next/ previous track.
- Adjust the volume by using VOLUME knob.
LISTENING TO THE USB
- Connect a USB device containing MP3 files to the USB port.
- Press the FUNCTION button repeatedly to enter USB mode, music will play automatically.
- Press the PLAY & PAUSE button to start playback, press again to pause the playback.
- Rotate TUNE knob to skip to next/ previous track.
- Adjust the volume by using VOLUME knob.
- Press PRESET button repeatedly to select play mode: Normal/ Single repeat/ All repeat/ Shuffle.
Notes:
- There are many USB devices in the market. We cannot guarantee to support all different models. Please try another USB device if yours is not supported.
- The unit might not support all the multimedia files stored in USB because it includes some special playback procedure which might not be compatible with the procedure of this unit.
USING HEADPHONES / EARPHONES
(NOT INCLUDED)
Maximum output voltage ≤ 150 mV
HEADPHONE VOLUME WARNING

Connect earphones with the volume set low and increase it if required. Prolonged listening through some earphones at high volume settings can result in hearing damage. When headphones/earphones are connected, no sound will be emitted from the unit's speaker.
Avoid listening to sound at levels which may be harmful to your ears.
 To prevent possible hearing damage, do not listen at high volume levels for long periods.
CONNECTING AUXILIARY SOURCE
- Connect your auxiliary source (e.g. mp3 player) to the AUX IN jack on the unit (cable not included).
- Press FUNCTION button repeatedly to select AUX IN mode.
- Start playback from your auxiliary source.
- Adjust the volume to desired level.
- To stop playback, disconnect your auxiliary source from the AUX IN jack.
TECHNICAL SPECIFICATIONS
Power Supply: DC IN 6.0V  2.0A
2.0A
Radio Frequency: FM: 87.5-108 MHz
DAB/DAB+: 174.928-239.200 MHz
Bluetooth Version: V5.0
Bluetooth: 2.402-2.480GHz
RF Output Power: 4 dbm
Bluetooth working distance: Up to 10 meters measured in open space. (Wall and structures may affect range of device)
Design and specifications are subject to change without notice.
SAFETY INFORMATION

To reduce the risk of electric shock, do not open the device, there is no party inside for the user. Refer all servicing to qualified personnel.
 The lightning with the arrow symbol in the triangle is a warning sign alerting the user to "dangerous voltage" inside the unit.
 The exclamation point in the triangle is a warning sign alerting the user of important instructions accompanying the product.

- The Marking plate is located at the back of the device
- Make sure to have a minimum distance of 5 cm around the unit for sufficient ventilation.
- Ensure that the ventilation openings are not covered with items such as newspapers, tablecloths, curtains, etc.
- Do not place naked flame sources, such as lighted candles on the apparatus.
- Do not expose this appliance to dripping or splashing water.
- Do not place objects filled with liquids, such as glass, vase on the device.
- Use the apparatus only in moderate climates.
- AC adaptor is used as the disconnect device. It shall remain readily operable and should not be obstructed during intended use. To be completely disconnected the apparatus from supply mains, the AC adaptor of the apparatus shall be disconnected from the mains socket outlet completely.
- The normal function of the product may be disturbed by strong Electro-Magnetic Interference. If so, simply reset the product to resume normal operation by following the instruction manual. In case the function could not resume, please use the product in other location.
- Excessive sound pressure from earphones and headphones can cause hearing loss.

If in the future, you need to get rid of this product, please note that Waste electrical products should not be disposed of with household waste. Recycling facilities exist. Check with your municipality or ask your dealer for advice. (Directive for Waste Electrical and Electronic Equipment)
NEW ONE S.A.S
10, Rue de la Mission, 25480 Ecole Valentin, France


Documents / Resources
References
Download manual
Here you can download full pdf version of manual, it may contain additional safety instructions, warranty information, FCC rules, etc.
Download Muse M-135 DBT - Retro Digital Radio With Bluetooth Manual
Advertisement


Need help?
Do you have a question about the M-135 DBT and is the answer not in the manual?
Questions and answers