Advertisement
Quick Links
2
In just-a-minute
From 1 year to
years
1. It requires
only 1 minute!
Simply by answering questions, warranty period is extended from 1 year to 2 years.
2. ATAGO Logger NFC can also be downloaded at the same time.
(The registration page can be accessed from ATAGO website.)
5468-E01
Digital Hand-held "Pocket" IR Brix Meter
PAL- HIKARi 18
Instruction Manual
Cat.No.5468
Measurement
Place a fruit, then
Press against a fruit,
press the START button.
then press the side button.
or
Press the
START button
Beep
Touch the fruit and do not move.
The measurements are displayed.
Beep
18.3
Depending on the variety, there may be a difference between the refractometer
(sugar meter) and the measured value. Please confirm the difference from the value
measured with your refractometer (PAL - 0 of the set when purchasing IR Brix Meter
x Brix Meter) and use the offset function as necessary. (Refer to "Offset Function" )
Free Extended Warranty
⇒
Access now
Introduction
Thank you for purchasing the instrument.
Read and follow all safety instructions
before operating the instrument.
Fairure to comply with the following instruc-
tions may result in personal injury or property
damages.
This instrument measures amount of light
absorbed by shining the near infared light to
the fruit then converts to Brix (sugar level) to
display.
Brix (sugar level) can be measured with no
need to cut and squeeze the fruits.
Measurment variance may be seen depending
on the variety and harvest timing. This instru-
ment is equipped with offset function to match
the value in such cases.
Acclimate the fruit and this instrument
●
to ambient temperature.
The temperature difference between
the surface and the inside of the fruit,
Press the
and temperature difference between
Beep
side button
this instrument and the fruit may affect
the measurement values.
Especially when measuring refrigerated
fruits, be sure to let the fruits acclimate
to the ambient temperature.
Clean the surface of the fruits.
●
Do not measure the spoiled spots.
T h e i n s t r u m e n t m a y n o t m e a s u r e
correctly when there is water droplets,
dust or scar, and bruising soft spots.
● Place the sample stage to the fruit.
Be sure to avoid any spacing between
the fruit and the outer cushion to avoid
the external light interference. If the
<LCD Auto Shut-off>
cushion is deteriorated, please replace
The instrument will turn itself off
it with a brand new cushion. (Refer to
after 30 seconds of inactivity.
"How to change the cushion")
To manually turn it off, hold down
the START button for more than
Sugar level varies depending on
●
3 seconds.
the measured area.
Example for measurement value: Take
few measurements from the same fruit,
then compute and use the average.
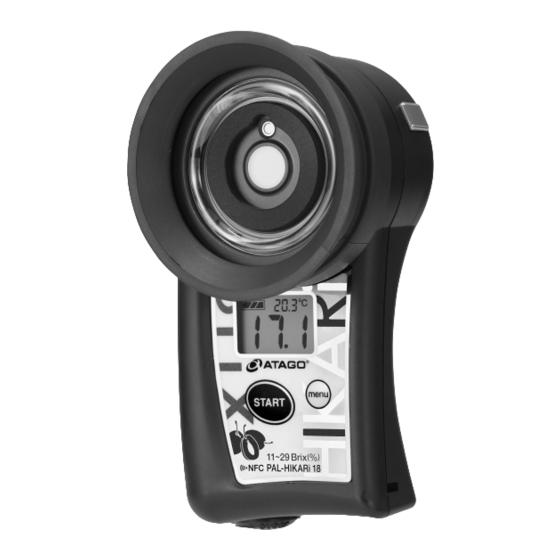
Parts
Silicon cushion R
Light emitting part
Radiation
temperature
sensor
Cushion RS
Receiver
START button
Battery compartment
Contents
・Main unit
・・・・・・・・・・・・・・・・・・・・・・・・・・・・・・・・・・・・・・・・・・・・
・Instruction Manual(this book)
・Inspection Report
・・・・・・・・・・・・・・・・・・・・・・・・・・・・・・・・・・
・Cushion RS (for replacement)
・AAA alkaline batteries
・・・・・・・・・・・・・・・・・・・・・・・・・・・・・
※AAA alkaline batteries are included.
Remove the tape from the battery compartment before
closing the battery compartment cover. (Refer
to "Replacing the Batteries")
Measurement tips and precautions
17.7
18.4
17.7+18.2+18.4
18.2
Replacing the Batteries
1. Insert a coin in the groove on the battery
Side button
compartment cover. Turn the coin
counterclockwise to remove the cover.
Sample stage
2. Insert two batteries
Observe the correct polarity.
Note
LCD
3. Align the cover and push it down.
Menu button
Lanyard hole
4. Close the battery compartment cover by
pushing the cover in with a coin in the groove
and turning it clockwise until it stops.
When the
cover is
1
open
1
・・・・・・・・・・・・・・・・・・・・・
1
3
・・・・・・・・・・・・・・・・・・・・
・ About battery indicator
2
When the battery icon indicates the low power
level , replace both batteries with a brand new
set of AAA alkaline batteries (1.5V).
* Check the expiration dates on batteries before
purchase.
Error Meassages
When there is an operation error or malfunction, the
below error message will show with alarm sound or alarm
vibration can for warning.
The battery is low.
Measurement was
taken for fruits with Brix
l o w e r t h a n t h e
measurement range.
Measurement was
taken for fruits with
Brix highter than the
measurement range.
Measurement was
taken while the sample
s t a g e w a s n o t i n
contact with fruit.
When correct measurements are
not achievable due to interference
from external light.
There is a temperature
difference between the
fruit and the main unit.
The instrument is
faulty.
Replace the batteries. Contact
ATAGO if this error persists.
= 18.1
When the history of measured data reaches
3
Full
100.
Turn OFF the NFC Function or Delete
Data History.
(Example)
Groove
When the
cover is
closed
When it is outside of temperature
compensation range.
Main unit' s temperature
※
error will preferentially
display when the main unit's
and fruits' temperatures are
both out of range.
Measurement
was taken when
the unit' s
temperature was
4˚C or lower.
Measured when
the main unit's
temperature is
exceeding 45℃.
Measurement was
taken when the
fruit' s temperature
was 4˚C or lower.
Measured when
t h e f r u i t ' s
temperature is
exceeding 45℃.
Advertisement

Related Manuals for ATAGO PAL- HIKARi 18


Summary of Contents for ATAGO PAL- HIKARi 18
- Page 1 1 minute! Simply by answering questions, warranty period is extended from 1 year to 2 years. Light emitting part counterclockwise to remove the cover. 2. ATAGO Logger NFC can also be downloaded at the same time. ⇒ Radiation Access now (The registration page can be accessed from ATAGO website.)
- Page 2 TEL: 81-3-3431-1943 overseas@atago.net http://www.atago.net/ Measurement accuracy Brix ±1.5% * Temperature ±1˚C instrument. ・ATAGO is not liable for any or all damages as a result of Brix scale Repeatability Brix ±1% use of the instrument for those other than its intended purposes Automatic temperature TEL: 1-425-637-2107 customerservice@atago-usa.com...
Need help?
Do you have a question about the PAL- HIKARi 18 and is the answer not in the manual?
Questions and answers