Table of Contents
Advertisement
Quick Links
Advertisement
Chapters
Table of Contents

Related Manuals for FAR TI60 INF 444


Summary of Contents for FAR TI60 INF 444
- Page 1 TI60 INF 444...
-
Page 3: Table Of Contents
MANUEL D’UTILISATION FAR TI60 INF 444 Nous vous remercions d’avoir choisi la qualité FAR. Ce produit a été créé par notre équipe de professionnels et selon la réglementation européenne. Pour une meilleure utilisation de votre nouvel appareil, nous vous recommandons de lire attentivement ce manuel d’instructions et de le conserver pour toute référence... -
Page 4: Instructions De Sécurité
FRANÇAIS INSTRUCTIONS DE SÉCURITÉ Lisez attentivement ce manuel d’utilisation avant d’installer et utiliser votre appareil et conservez le pour une éventuelle consultation ultérieure. • MISE EN GARDE: Cet appareil et ses parties accessibles deviennent chauds pendant leur utilisation. Il convient de veiller à ne pas toucher les éléments chauffants. - Page 5 FRANÇAIS fixe, raccorder les trois conducteurs du câble d’alimentation à un boîtier de raccordement en respectant les polarités ci-dessous : – Phase : Marron – Neutre : Bleu – Terre : Jaune / vert • En ce qui concerne les instructions d’installation de l’appareil, référez-vous au paragraphe ci-après de la notice.
- Page 6 FRANÇAIS – l’utilisation par les clients des hôtels, motels et autres environnements à caractère residentiel; – les environnements de type chambres d’hôtel. • Si le câble d’alimentation est endommagé, il doit être remplacé par le fabricant, son service après-vente ou des personnes de qualification similaire afin d’éviter un danger.
- Page 7 FRANÇAIS fonctionnement au moyen d’une minuterie extérieure ou par un système de commande à distance séparé. • Il est recommandé de ne pas déposer d’objets métalliques tels que couteaux, fourchettes, cuillères et couvercles sur le plan de cuisson, car ils peuvent devenir chauds. •...
-
Page 8: Description Du Produit
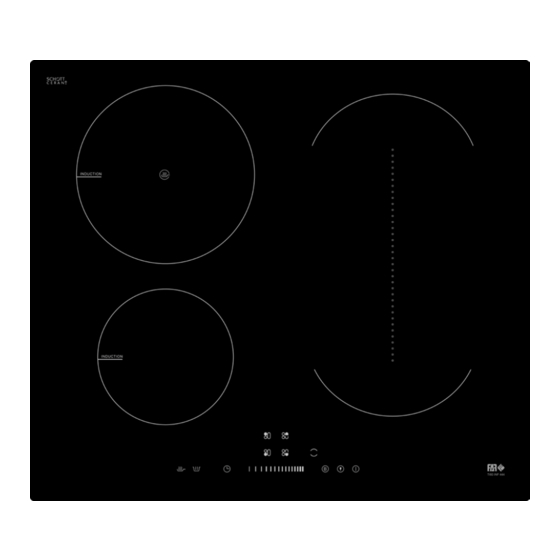
FRANÇAIS DESCRIPTION DU PRODUIT Vue supérieure 1. Foyer 1200/1500 W max. 2. Foyer 2300/2600 W max. 3. Foyer 1500/1800 W max. 4. Foyer 1500/1800 W max. 5. Foyer 3000/3600 W max. 6. Plaque en verre 7. Bandeau de commandes Bandeau de commandes 1. - Page 9 FRANÇAIS Principe de fonctionnement La cuisson à induction est une technologie de cuisson sûre, avancée, efficace et économique. Elle utilise des vibrations électromagnétiques générant de la chaleur directement dans l’ustensile de cuisson, plutôt qu’indirectement en chauffant la surface de verre. Le verre devient chaud uniquement parce que l’ustensile de cuisson finit par le chauffer.
- Page 10 FRANÇAIS Spécifications techniques Modèle FAR TI60 INF 444 Tension 220-240V ~ 50/60Hz Puissance 7100W Type de table de Électrique cuisson Nombre de foyers 2 foyers et 1 zone modulable Technologie de Foyers et zone de cuisson à chauffe induction Diamètre des...
-
Page 11: Utilisation Du Produit
FRANÇAIS UTILISATION DU PRODUIT Boutons tactiles • Les boutons de contrôle réagissent au toucher, il n’est donc pas nécessaire d’appuyer dessus. • Utilisez la pulpe du doigt et non le bout du doigt. • Vous entendez un bip à chaque fois que la pression sur un bouton est détectée par l’appareil. - Page 12 FRANÇAIS cuisson dont le fond convient pour la cuisson à induction. Cherchez le symbole induction sur l’emballage ou sur le fond de l’ustensile de cuisson. • Vérifiez que votre ustensile de cuisson convient en le testant avec un aimant. Rapprochez un aimant du fond de l’ustensile de cuisson.
- Page 13 FRANÇAIS Vérifiez que le fond de l’ustensile de cuisson est lisse, repose à plat contre le verre et qu’il a la même taille que le foyer. Utilisez des ustensiles de cuisson dont le diamètre est aussi large que le dessin du foyer sélectionné. Utiliser un ustensile de cuisson légèrement plus large permet de maximiser l’efficacité...
- Page 14 FRANÇAIS Mode d’utilisation Démarrer la cuisson Touchez le bouton marche/ arrêt pendant trois secondes. Une fois l’appareil allumé, il bipe une fois et tous ses afficheurs affichent « - » ou « -- », ce qui indique que la table de cuisson à induction est entrée dans le mode d’attente.
- Page 15 FRANÇAIS Réglez la puissance de chauffe en appuyant sur le curseur tactile. • Si vous ne réglez pas la puissance de chauffe dans la minute, la table de cuisson à induction s’éteint automatiquement. Vous devez alors recommencer depuis l’étape 1. •...
- Page 16 FRANÇAIS foyer. L’afficheur s’éteint automatiquement après 2 minutes si aucun ustensile de cuisson approprié n’est placé sur le foyer. Terminer la cuisson Touchez le bouton de sélection du foyer que vous voulez éteindre. Éteignez le foyer en touchant le curseur tactile sur « ».
- Page 17 FRANÇAIS Prenez garde aux surfaces brûlantes. « H » indique le(s) foyer(s) brûlant(s) au toucher. Il disparaît quand la surface a refroidi jusqu’à une température sûre. Il peut également servir de fonction d’économie d’énergie si vous voulez chauffer d’autres ustensiles de cuisson en utilisant la chaleur résiduelle des foyers.
- Page 18 FRANÇAIS Annuler la fonction Booster Touchez le bouton de sélection du foyer pour lequel vous voulez annuler la fonction Booster. Touchez le bouton Booster pour annuler la fonction Booster, ensuite le foyer retourne dans son réglage d’origine. • Cette fonction est disponible avec tous les foyers.
- Page 19 FRANÇAIS Zone modulable • Cette zone peut être utilisée comme zone unique ou zones doubles selon les besoins de cuisson. • Cette zone est constituée de deux inducteurs indépendants pouvant être contrôlés séparément. Comme une grande zone Pour utiliser la zone modulable comme une grande zone unique, touchez simplement le...
- Page 20 FRANÇAIS Nous recommandons de ne pas utiliser de configuration autre que les trois indiquées ci-dessus, car cela peut affecter la chauffe de l’appareil. Comme deux zones indépendantes Pour utiliser la zone modulable comme deux foyers différents, deux choix de chauffe sont possibles : a.
- Page 21 FRANÇAIS Remarque : N’utilisez pas d’ustensile de cuisson de plus de 12 cm. Fonction spéciale Il y a deux fonctions spéciales : La fonction Frire et la fonction Maintien au chaud. Fonction Frire Fonction Maintien au chaud a. Fonction Frire •...
- Page 22 FRANÇAIS Touchez le bouton de la fonction Frire. L’afficheur affiche « F » et le foyer démarre la fonction Frire. b. Fonction Maintien au chaud • Cette fonction vous permet de maintenir des aliments chauds. • Cette fonction est disponible avec tous les foyers.
- Page 23 FRANÇAIS accidentellement les foyers). • Quand le verrouillage est activé, tous les boutons de contrôle à l’exception du bouton marche/arrêt sont désactivés. Verrouiller les boutons de contrôle Touchez le bouton de L’afficheur du minuteur verrouillage affiche « Lo ». Déverrouiller les boutons de contrôle Touchez longuement le bouton de verrouillage .
- Page 24 FRANÇAIS A. Utiliser le minuteur comme alerte sonore Si vous ne sélectionnez aucun foyer Vérifiez que la table de cuisson est sous tension. Remarque : Vous pouvez utiliser l’alerte sonore même si vous ne sélectionnez aucun foyer. Touchez le bouton du minuteur, «...
- Page 25 FRANÇAIS Réglez la durée en touchant le curseur tactile (par exemple : 9), le minuteur est maintenant réglé sur 95 minutes. Une fois la durée réglée, elle commence immédiatement à être décomptée. L’afficheur affiche la durée restante. La sonnerie bipe pendant 30 secondes et l’afficheur du minuteur affiche «...
- Page 26 FRANÇAIS Réglez la durée en touchant le curseur tactile. (par exemple : 5) Touchez à nouveau le bouton du minuteur, le « 1 » clignote. Réglez la durée en touchant le curseur tactile (par exemple : 9), le minuteur est maintenant réglé sur 95 minutes.
- Page 27 FRANÇAIS Les autres foyers allumés restent allumés. Régler plusieurs foyers : La procédure de réglage de plusieurs foyers est identique à celle de réglage d’un foyer. Quand vous réglez la durée de plusieurs foyers simultanément, les points des foyers concernés sont affichés. L’afficheur du minuteur affiche la durée en minutes, le point du foyer correspondant clignote.
- Page 28 FRANÇAIS Touchez le bouton de sélection d’un foyer, la durée correspondante s’affiche dans l’afficheur du minuteur. C. Annuler le minuteur Touchez le bouton de sélection du foyer pour lequel vous voulez annuler le minuteur. Touchez le bouton du minuteur, l’afficheur clignote. Touchez le curseur tactile pour régler le minuteur sur «...
-
Page 29: Guide De Cuisson
FRANÇAIS Puissance 1 2 3 4 5 6 7 8 9 Durée de 8 8 8 4 4 4 2 2 2 fonctionnement par défaut (heure) Quand l’ustensile de cuisson est retiré, la table de cuisson à induction s’arrête immédiatement de chauffer et elle s’éteint automatiquement après 2 minutes. - Page 30 FRANÇAIS cuisson et économiser de l’énergie en retenant la chaleur. • Minimisez la quantité de liquide ou de graisse pour réduire la durée de cuisson. • Démarrez la cuisson avec une puissance élevée et réduisez-la quand la chaleur a pénétré les aliments.
- Page 31 FRANÇAIS Griller un steak Pour cuire un steak juteux et savoureux : 1. Placez la viande à température ambiante 20 minutes environ avant de la cuire. 2. Faites chauffer une poêle à fond épais. 3. Huilez au pinceau les deux côtés du steak avec de l’huile.
- Page 32 FRANÇAIS Cette méthode de cuisson doit être rapide. Pour cuire une grande quantité d’aliments, faites les cuire successivement en plusieurs petites quantités. 3. Préchauffez brièvement la poêle et ajoutez deux cuillères à soupe d’huile. 4. Faites d’abord cuire la viande, puis mettez-la de côté...
-
Page 33: Réglages De La Puissance De Chauffe
FRANÇAIS RÉGLAGES DE LA PUISSANCE DE CHAUFFE Les réglages ci-dessous ne sont fournis qu’à titre indicatif. Les réglages exacts dépendent de plusieurs facteurs, parmi lesquels votre ustensile de cuisson et la quantité d’ingrédients à cuire. Faites des tests avec la table de cuisson à... - Page 34 FRANÇAIS Réglage de la Approprié à puissance 7 - 8 • Sauté • Cuire des pâtes • Sauté asiatique • Griller • Porter une soupe à ébullition. • Bouillir de l’eau FR-32...
- Page 35 ENGLISH Problem Possible causes What to do The touch The controls are Unlock the controls. controls are locked. See section ‘Using your unresponsive. induction cooktop’ for instructions. The touch There may be Make sure the touch controls are a slight film of control area is dry and difficult to water over the...
- Page 36 FRANÇAIS Quoi ? Comment ? Important ! Débordements, Enlevez-les immédia- • Enlevez les taches substances tement avec une pelle laissées par des fondues et pro- à poisson, un couteau aliments fondus jections de subs- à palette ou un racloir ou sucrés ou des tances sucrées à...
-
Page 37: Trucs Et Astuces
FRANÇAIS Quoi ? Comment ? Important ! Débordements/ 1. Mettez la table de • La table de cuisson projections sur cuisson hors tension. peut biper et les boutons 2. Imprégnez les subs- s’éteindre, et les tactiles. tances avec de l’eau. boutons tactiles 3. - Page 38 FRANÇAIS Problème Causes possibles Solutions Les boutons Les boutons sont Déverrouillez-les. Consul- tactiles ne réa- verrouillés. tez les instructions du gissent pas. chapitre « Utilisation de votre table de cuisson à induction ». Les boutons tac- Il y a une fine Veillez à...
- Page 39 FRANÇAIS Problème Causes possibles Solutions La table de cuis- Cela est dû à la C’est normal, mais le son à induction technologie de bruit doit normalement produit un bour- cuisson à induc- s’atténuer ou disparaître donnement sourd tion. complètement quand vous quand elle est baissez la puissance.
- Page 40 FRANÇAIS Problème Causes possibles Solutions L’ustensile La table de cuis- Utilisez des ustensiles de de cuisson ne son à induction ne cuisson adaptés à la cuis- chauffe pas détecte pas l’us- son à induction. Voir le et s’affiche à tensile de cuisson, chapitre «...
-
Page 41: Codes D'erreur Et Inspection
FRANÇAIS CODES D’ERREUR ET INSPECTION La table de cuisson à induction intègre une fonction d’autodiagnostic. Elle permet aux techniciens de contrôler le fonctionnement de plusieurs composants sans démonter ou désinstaller la table de cuisson de la surface d’installation. Dépannage 1. Codes d’ e rreur s’affichant pendant l’utilisation par le consommateur et solutions correspondantes : Code d’erreur... - Page 42 FRANÇAIS Code d’erreur Problème Solution Température élevée de Attendre que la l’IGBT. (N° 1) température de l’IGBT redevienne normale. Température élevée de Appuyer sur le bouton l’IGBT. (N° 2) « marche/arrêt » pour redémarrer l’appareil. Vérifier que le ventilateur fonctionne normalement.
- Page 43 FRANÇAIS Code d’erreur Problème Solution F9/FA Panne du capteur Changer la carte de température de d’alimentation. l’IGBT. (court-circuit/ circuit ouvert N° 1) FC /FD Panne du capteur de température de l’IGBT. (court-circuit/ circuit ouvert N° 2) 2. Pannes et solutions spécifiques Panne Problème Solution A...
- Page 44 FRANÇAIS Panne Problème Solution A Solution B Certains La carte Changer la carte boutons d’affichage est d’affichage. ne fonc- endommagée. tionnent pas ou l’affichage LED n’est pas nor- mal. L’indica- La tempéra- La température teur du ture de la table ambiante est peut- mode de de cuisson est...
- Page 45 FRANÇAIS Panne Problème Solution A Solution B La chauffe Le type Utiliser un usten- Le circuit de s’arrête d’ustensile de sile de cuisson détection de soudai- cuisson est approprié (Consul- l’ustensile de nement inapproprié. ter la notice d’utili- cuisson est pendant sation).
- Page 46 FRANÇAIS Panne Problème Solution A Solution B Le moteur Le moteur du Changer le venti- du venti- ventilateur est lateur. lateur fait endommagé. un bruit anormal. Les indications fournies ci-dessus correspondent à l’évaluation et l’inspection des pannes communes. Ne démontez pas l’appareil vous-même pour éviter des dangers et la détérioration de la table de cuisson à...
-
Page 47: Installation
FRANÇAIS INSTALLATION Sélectionner l’emplacement d’installation Coupez le plan de travail conformément aux dimensions indiquées sur le schéma. Pour l’installation et l’utilisation, un espace minimal de 5 cm doit être laissé tout autour du trou. Vérifiez que le plan de travail a une épaisseur d’au moins 30 mm. - Page 48 FRANÇAIS L(mm) W(mm) H(mm) D(mm) A(mm) B(mm) X(mm) F(mm) 560+4 490+4 3 mini mini Dans tous les cas, veillez à ce que la table de cuisson à induction soit bien aérée et à ce que ses entrées et sorties d’air ne soient pas bouchées. Vérifiez que la table de cuisson à...
- Page 49 FRANÇAIS AVERTISSEMENT : Assurer une aération appropriée Veillez à ce que la table de cuisson à induction soit bien aérée et à ce que ses entrées et sorties d’air ne soient pas bouchées. Pour éviter le contact accidentel avec le dessous très chaud de la table de cuisson ou un choc électrique accidentel pendant l’utilisation, il faut placer un insert en bois, fixé...
- Page 50 FRANÇAIS panneau. • Le mur arrière et les surfaces adjacentes et environnantes doivent donc pouvoir résister à une température de 90°C. Avant d’installer la table de cuisson, procédez aux vérifications suivantes • Le plan de travail est horizontal et à angles droits, aucun support structurel n’interfère avec les espaces requis.
- Page 51 FRANÇAIS les conducteurs [phase] actifs si les règlements de câblage locaux autorisent cette variation des exigences). • Le sectionneur doit être facilement accessible par le consommateur quand la table de cuisson est installée. • Consultez les agences de la construction locales et leurs règlements en cas de doute concernant l’installation.
- Page 52 FRANÇAIS Avant de positionner les supports de fixation L’appareil doit être placé sur une surface lisse et stable (utilisez l’emballage). N’appuyez pas avec force sur les boutons de contrôle faisant saillie par rapport à la surface de la table de cuisson. Régler la position des supports Fixez la table de cuisson sur le plan de travail en vissant les 2 supports sous la table de cuisson...
- Page 53 FRANÇAIS En aucun cas, les supports ne doivent toucher les surfaces internes du plan de travail après l’installation (voir l’image). Mises en garde 1. La table de cuisson à induction doit être installée par un technicien ou un personnel qualifié. Nous avons des professionnels à votre service.
- Page 54 FRANÇAIS Brancher la table de cuisson au secteur Cette table de cuisson ne doit être branchée à l’alimentation secteur que par une personne ayant les qualifications requises. Avant de brancher la table de cuisson à l’alimentation secteur, procédez aux vérifications suivantes : 1.
- Page 55 FRANÇAIS modification. Toute modification doit impérativement être effectuée par un électricien qualifié. • Si le câble d’alimentation est endommagé ou doit être changé, cela ne doit être fait que par un agent du service après-vente avec des outils spécialisés pour éviter un accident. •...
- Page 56 FRANÇAIS régulièrement et remplacé exclusivement par des techniciens agréés. La surface inférieure et le cordon d’alimentation de la table de cuisson ne sont pas accessibles après l’installation. En application de la directive DEEE 2012/19/UE concernant l’environnement, il est interdit d’éliminer les appareils électriques ou électroniques usagés dans la nature ou dans une simple décharge publique.
-
Page 57: Enlèvement Des Appareils Ménagers Usagés
FRANÇAIS ENLÈVEMENT DES APPAREILS MÉNAGERS USAGÉS La directive européenne 2012/19/EU sur les Déchets des Equipements Electriques et Electroniques (DEEE), exige que les appareils ménagers usages ne soient pas jetés dans le flux normal des déchets municipaux. Les appareils usagés doivent être collectés séparément afin d’optimiser le taux de récupération et le recyclage des matériaux qui les composent, et réduire l’impact sur la santé... - Page 59 INSTRUCTION MANUAL FAR TI60 INF 444 Thank you to have chosen the FAR quality. This product has been created by our professional team and according to the European regulation. For a better use of your new device, we recommend you to read carefully this user manual and keep it for record.
-
Page 60: Safety Instructions
ENGLISH SAFETY INSTRUCTIONS Read this instruction manual carefully before installing and using your appliance. Keep safe for future reference. • WARNING: This appliance and its accessible parts become hot during use. You must not touch the heating elements. • Children younger than 8 years old should be kept away unless continuously supervised. - Page 61 ENGLISH – Neutral: Blue – Earth: Yellow/green • The installation instructions can be found in the following section. • For detailed information on how to clean surfaces in contact with food, please refer to the following paragraph of the manual. •...
- Page 62 ENGLISH unsupervised on a hob using fat or oil may be dangerous and cause a fire. • NEVER attempt to extinguish a fire with water. Instead, switch off the appliance and then cover the flames, for example, with a lid or a fire blanket.
-
Page 63: Product Induction
ENGLISH PRODUCT INDUCTION Top View 1. Max. 1200/1500 W zone 2. Max. 2300/2600 W zone 3. Max. 1500/1800 W zone 4. Max. 1500/1800 W zone 5. Max. 3000/3600 W zone 6. Glass plate 7. Control panel Control Panel 1. Heating zone selection controls 2. - Page 64 ENGLISH Working Theory Induction cooking is a safe, advanced, efficient, and economical cooking technology. It works by electromagnetic vibrations generating heat directly in the pan, rather than indirectly through heating the glass surface. The glass becomes hot only because the pan eventually warms it up.
- Page 65 ENGLISH Technical Specification Model FAR TI60 INF 444 Voltage 220-240V ~ 50/60Hz Power 7100W Type of hob Electric Number of 2 zones and 1 area cooking zones Heating Induction cooking zone and technology cooking area Diameter of Left front 16.0 cm cooking zone ø...
-
Page 66: Operation Of Product
ENGLISH OPERATION OF PRODUCT Touch Controls • The controls respond to touch, so you don’t need to apply any pressure. • Use the ball of your finger, not its tip. • You will hear a beep each time a touch is registered. - Page 67 ENGLISH • You can check whether your cookware is suitable by carrying out a magnet test. Move a magnet towards the base of the pan. If it is attracted, the pan is suitable for induction. • If you do not have a magnet: 1.
- Page 68 ENGLISH Always centre your pan on the cooking zone. Always lift pans off the Induction hob – do not slide, or they may scratch the glass. How to use Start cooking Touch the ON/OFF control for three seconds. After power on, the buzzer beeps once, all displays show “–”...
- Page 69 ENGLISH Place a suitable pan on the cooking zone that you wish to use. • Make sure the bottom of the pan and the surface of the cooking zone are clean and dry. Touching the heating zone selection control, and an indicator next to the key will flash Select a heat setting by...
- Page 70 ENGLISH This means that: • you have not placed a pan on the correct cooking zone or, • the pan you’re using is not suitable for induction cooking or, • the pan is too small or not properly centered on the cooking zone. No heating takes place unless there is a suitable pan on the cooking zone.
- Page 71 ENGLISH Beware of hot surfaces H will show which cooking zone is hot to touch. It will disappear when the surface has cooled down to a safe temperature. It can also be used as an energy saving function if you want to heat further pans, use the hotplate that is still hot.
- Page 72 ENGLISH Cancel the Boost function Touching the heating zone selection control that you wish to cancel the boost function. Touching the “Boost” control to cancel the Boost function, then the cooking zone will revert to its original setting. • The function can work in any cooking zone •...
- Page 73 ENGLISH Flexible Area • This area can be used as a single zone or as two different zones, accordingly to the cooking needs anytime. • Free area is made of two independent inductors that can be controlled separately. As big zone To activate the free area as a single big zone, simply press the...
- Page 74 ENGLISH We don’t recommend other operations except for above mentioned three operations because it might effect the heating of appliance As two independent zones To use the flexible area as two different zones, you can have two choices of heating: a.
- Page 75 ENGLISH Notice: Make sure the pan is bigger than 12cm. Special function The are two kinds of special functions: Fry function and Keep warm function. Fry Function Keep Warm Function a. Fry function • You can use the function to fry food. •...
- Page 76 ENGLISH b. Keep warm function • You can use the function to keep the food warm. • The function can work in any cooking zone. Touching the heating zone selection control that you wish to use the warm function Touching the «Warm function”...
- Page 77 ENGLISH When the hob is in the lock mode, all the controls are disable except the ON/OFF , you can always turn the induction hob off with the ON/OFF control in an emergency, but you shall unlock the hob first in the next operation.
- Page 78 ENGLISH A. Using the Timer as a Minute Minder If you are not selecting any cooking zone Make sure the cooktop is turned on. Note: you can use the minute minder even if you’re not selecting any cooking zone. Touch timer control, the “10”...
- Page 79 ENGLISH Set the time by touching the slider control (e.g.9), now the timer you set is 95 minutes. When the time is set, it will begin to count down immediately. The display will show the remaining time Buzzer will beep for 30 seconds and the timer indicator shows “- -”...
- Page 80 ENGLISH Set the time by touching the slider control. (e.g. 5) Touch timer control again, the “1” will flash. Set the time by touching the slider control (e.g.9), now the timer you set is 95 minutes. When the time is set, it will begin to count down immediately.
- Page 81 ENGLISH set more zones: The steps for setting more zones are similar to the steps of setting one zone; When you set the time for several cooking zones simultaneously, decimal dots of the relevant cooking zones are on. The minute display shows the min.
- Page 82 ENGLISH C. Cancel the timer Touching the heating zone selection control that you want to cancel the timer Touching the timer control, the indicator flash Touch the slider control to set the timer to ”00”, the timer is cancelled Default working times Auto shut down is a safety protection function for your induction hob.
-
Page 83: Cooking Guidelines
ENGLISH When the pot is removed, the induction hob can stop heating immediately and the hob automatically switch off after 2 minutes. People with a heart pace maker should consult with their doctor before using this unit. COOKING GUIDELINES Take care when frying as the oil and fat heat up very quickly, particularly if you’re using PowerBoost. - Page 84 ENGLISH around 85˚C, when bubbles are just rising occasionally to the surface of the cooking liquid. It is the key to delicious soups and tender stews because the flavours develop without overcooking the food. You should also cook egg-based and flour thickened sauces below boiling point.
- Page 85 ENGLISH want it. Times may vary from about 2 – 8 minutes per side. Press the steak to gauge how cooked it is – the firmer it feels the more ‘well done’ it will be. 5. Leave the steak to rest on a warm plate for a few minutes to allow it to relax and become tender before serving.
-
Page 86: Heat Settings
ENGLISH 7. Serve immediately. Detection of Small Articles When an unsuitable size or non-magnetic pan (e.g. aluminium), or some other small item (e.g. knife, fork, key) has been left on the hob, the hob automatically go on to standby in 1 minute. The fan will keep cooking down the induction hob for a further 1 minute. - Page 87 ENGLISH Heat setting Suitability 3 - 4 • reheating • rapid simmering • cooking rice 5 - 6 • pancakes 7 - 8 • sautéing • cooking pasta • stir-frying • searing • bringing soup to the boil • boiling water GB-29...
-
Page 88: Care And Cleaning
ENGLISH CARE AND CLEANING What? How? Important! Everyday soiling on 1. Switch the power • When the power glass (fingerprints, to the cooktop off. to the cooktop marks, stains left by 2. Apply a cooktop is switched off, food or non-sugary cleaner while the there will be spillovers on the... - Page 89 ENGLISH What? How? Important! Boilovers, melts, Remove these • Remove stains and hot sugary immediately with left by melts spills on a fish slice, palette and sugary food the glass knife or razor blade or spillovers scraper suitable as soon as for Induction possible.
-
Page 90: Hints And Tips
ENGLISH What? How? Important! Spillovers on the 1. Switch the power • The cooktop touch controls to the cooktop off. may beep and 2. Soak up the spill turn itself off, 3. Wipe the touch and the touch control area with a controls may clean damp sponge not function... - Page 91 ENGLISH Problem Possible causes What to do The touch The controls are Unlock the controls. controls are locked. See section ‘Using your unresponsive. induction cooktop’ for instructions. The touch There may be Make sure the touch controls are a slight film of control area is dry and difficult to water over the...
- Page 92 ENGLISH Problem Possible causes What to do The induction This is This is normal, but the hob makes a low caused by the noise should quieten down humming noise technology or disappear completely when used on a of induction when you decrease the high heat setting.
- Page 93 ENGLISH Problem Possible causes What to do Pans do not The induction Use cookware suitable for become hot and hob cannot induction cooking. See appears in the detect the pan section ‘Choosing the display. because it is right cookware’. not suitable Centre the pan and make for induction sure that its base matches...
-
Page 94: Failure Display And Inspection
ENGLISH FAILURE DISPLAY AND INSPECTION The induction hob is equipped with a self diagnostic function. With this test the technician is able to check the function of several components without disassembling or dismounting the hob from the working surface. Troubleshooting 1. - Page 95 ENGLISH Failure code Problem Solution High temperature of Touch “ON/OFF” IGBT (2#) button to restart unit. Check whether the fan runs smoothly; if not , replace the fan. No Auto-Recovery F3/F6 Ceramic plate Check the connection temperature sensor or replace the ceramic failure- -short circuit.
- Page 96 ENGLISH 2. Specific Failure & Solution Failure Problem Solution A Solution B The LED No power Check to does not supplied. see if plug is come on secured tightly when unit is in outlet and plugged in. that outlet is working.
- Page 97 ENGLISH Failure Problem Solution A Solution B The Cooking High Ambient Mode temperature temperature Indicator of the hob. may be too comes on, but high. Air heating does Intake or Air not start. Vent may be blocked. There is Check something whether the wrong with...
- Page 98 ENGLISH Failure Problem Solution A Solution B Heating zones The power Check the of the same board and the connection. side ( Such as display board the first and connected the second failure; zone ) would The display Replace the display “u”...
-
Page 99: Installation
ENGLISH INSTALLATION Selection of installation equipment Cut out the work surface according to the sizes shown in the drawing. For the purpose of installation and use, a minimum of 5 cm space shall be preserved around the hole. Be sure the thickness of the work surface is at least 30mm. - Page 100 ENGLISH L(mm) W(mm) H(mm) D(mm) A(mm) B(mm) X(mm) F(mm) 560+4 490+4 3 mini mini Under any circumstances, make sure the Induction cooker hob is well ventilated and the air inlet and outlet are not blocked. Ensure the induction cooker hob is in good work state. As shown below Note: The safety distance between the hotplate and the cupboard above the...
- Page 101 ENGLISH WARNING: Ensuring Adequate Ventilation Make sure the induction cooker hob is well ventilated and that air inlet and outlet are not blocked. In order to avoid accidental touch with the overheating bottom of the hob, or getting unexpectable electric shock during working, it is necessary to put a wooden insert, fixed by screws, at a minimum distance of 50mm from the bottom of the hob.
- Page 102 ENGLISH temperature of 90°C. Before installing the hob, make sure that • The work surface is square and level, and no structural members interfere with space requirements. • The work surface is made of a heat-resistant and insulated material. • If the hob is installed above an oven, the oven has a built-in cooling fan.
- Page 103 ENGLISH laws if in doubt regarding installation. • You use heat-resistant and easy-to-clean finishes (such as ceramic tiles) for the wall surfaces surrounding the hob. After installing the hob, make sure that • The power supply cable is not accessible through cupboard doors or drawers.
- Page 104 ENGLISH Under any circumstances, the brackets cannot touch with the inner surfaces of the worktop after installation (see picture). Cautions 1. The induction hotplate must be installed by qualified personnel or technicians. We have professionals at your service. Please never conduct the operation by yourself.
- Page 105 ENGLISH the hob electronics 3. The induction hotplate shall be installed such that better heat radiation can be ensured to enhance its reliability. 4. The wall and induced heating zone above the table surface shall withstand heat. 5. To avoid any damage, the sandwich layer and adhesive must be resistant to heat.
- Page 106 ENGLISH do not use adapters, reducers, or branching devices, as they can cause overheating and fire. The power supply cable must not touch any hot parts and must be positioned so that its temperature will not exceed 75°C at any point. Check with an electrician whether the domestic wiring system is suitable without alterations.
- Page 107 ENGLISH electrical connection has been made and that it is compliant with safety regulations. • The cable must not be bent or compressed. • The cable must be checked regularly and replaced by authorised technicians only. The bottom surface and the power cord of the hob are not accessible after installation.
-
Page 108: Disposal Of Old Electrical Appliances
ENGLISH DISPOSAL OF OLD ELECTRICAL APPLIANCES The European directive 2012/19/EU on Waste Electrical and Electronic Equipment (WEEE), requires that old household electrical appliances must not be disposed of in the normal unsorted municipal waste stream. Old appliances must be collected separately in order to optimize the recovery and recycling of the materials they contain, and reduce the impact on human health and the environment. - Page 110 CONFORAMA France SA 80 Boulevard du Mandinet Lognes 77432 Marne la Vallée Cedex 2 FRANCE...
Need help?
Do you have a question about the TI60 INF 444 and is the answer not in the manual?
Questions and answers