Table of Contents
Advertisement
Quick Links
Advertisement
Table of Contents

Subscribe to Our Youtube Channel
Related Manuals for FETtec Mini AIO 15A


Summary of Contents for FETtec Mini AIO 15A
- Page 1 FETtec Mini AIO 15A Manual Page 1...
-
Page 2: Table Of Contents
Introduction ..........................3 Features ............................3 Dimensions (in mm) ........................4 Safety warning ..........................4 Recommended steps for installation of the FETtec Mini AIO 15A ..........4 Connection Diagram ........................5 Connection Layout Top ......................5 Connection Layout Bottom ....................... 6 Firmware updates ........................ -
Page 3: Introduction
◦ Live data graphs (Voltage, motor rpm, current, motor temp, gyro values, link quality) ◦ KISS GPS support + live map ◦ Custom graphic pilot logo ◦ Stick overlay ◦ Custom layout The FETtec Mini AIO 15A works with KISS/FETtec FC firmware version 1.3RC45Y or later ! Page 3... -
Page 4: Dimensions (In Mm)
Do not file the mounting holes as this may cause damage Recommended steps for installation of the FETtec Mini AIO 15A • Connect to FETtec Configurator and update to the latest firmware (see firmware update and settings) • Install the AIO in your copter (see Connection diagrams for correct wiring and installation) •... -
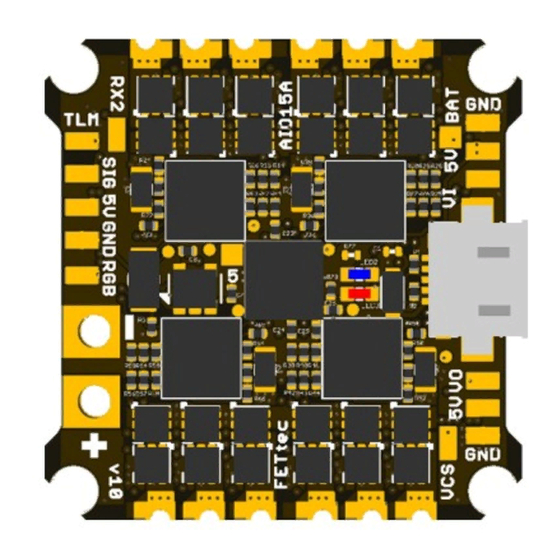
Page 5: Connection Diagram
Connection Diagram Connection Layout Top Page 5... -
Page 6: Connection Layout Bottom
Connection Layout Bottom The FETtec Mini AIO 15A has 3 UARTs in the following assignment UART 1: Onboard FETtec OSD or others in case you use the bridge (for DJI Unit e.g.) UART 2: RX UART 3: VTX control (smart audio) + ESC telemetry Note: A unit's transmit signal (TX) must match the corresponding receiver (RX) at the other end. -
Page 7: Firmware Updates
Firmware updates Please update the FETtec Mini AIO 15A before your first flight ! The FC, ESC and OSD of the FETtec Mini AIO 15V Board are flashable via the FETtec Configurator. The FETtec Configurator is available for download at https://github.com/FETtec or online https://gui.fettec.net/ESC/index.html. -
Page 8: Esc Firmware Update
ESC firmware update: Choose KISS FC Passthrough and press connect. all devices are shown now The Overview page allows to flash individual ESCs. The Setting page allows to adjust all available ESC parameter. - Reverse rotation direction - Slow start - 3D mode - PWM min &... -
Page 9: Osd Firmware Update
In the Telemetry page you can spin the motors, view and debug the motor telemetry. OSD firmware update: To update the OSD, connect to FETtec Configurator and flash the latest firmware via FC Passthrough. Page 9... -
Page 10: Osd Settings
OSD Settings All settings are to set directly in the OSD. To get in the menu move the sticks in the shown direction at the start: Throttle 50%, then move Yaw left, Pitch up Mode 1: Mode 2: In the menu: Page 10... -
Page 11: Issues In The Picture
OSD settings: Issues in the picture 1. OSD SYNC → AUTO SYNC 2. in case of blurry lines play with LEFT/WITH values try to avoid WITH values above 400 3. make a PAL/NTSC layout reset Move elements in the OSD menu Choose LAYOUT →...
Need help?
Do you have a question about the Mini AIO 15A and is the answer not in the manual?
Questions and answers