Table of Contents
Advertisement
Quick Links
The CE mark indicates that the product complies with the European medical device regulation
(EU) 2017/745.
Zumax Medical Co., Ltd.
5 Zhiying Street, Suzhou New District,
Suzhou, Jiangsu, China 215129
Phone:+86 512 66650502
Fax: +86 512 66909655
E-mail:Sales@zumaxmedical.com
Http://www.zumaxmedical.com
MedNet EC-REP GmbH
Borkstrasse 10, 48163 Münster, Germany
Surgical Microscope
OMS2360/OMS2365
User's Manual
Advertisement
Table of Contents

Subscribe to Our Youtube Channel
Related Manuals for Zumax Medical OMS2360


Summary of Contents for Zumax Medical OMS2360
- Page 1 OMS2360/OMS2365 User’s Manual The CE mark indicates that the product complies with the European medical device regulation (EU) 2017/745. Zumax Medical Co., Ltd. 5 Zhiying Street, Suzhou New District, Suzhou, Jiangsu, China 215129 Phone:+86 512 66650502 Fax: +86 512 66909655 E-mail:Sales@zumaxmedical.com...
- Page 2 Preface Thank you for purchasing our OMS2360/OMS2365 Surgical Microscope. To prevent damage to your product or injury to yourself or to others, read the following safety precautions in their entirety before using this equipment. Keep these safety instructions where all those who use the product will read them.
- Page 3 Ground Terminal Brightness adjustment Operating Warning Caution instructions <12 Kg Electrostatic discharge warning Weight limit Balance arm regulation Video plug Power plug...
-
Page 4: Table Of Contents
Contents _____________________________________________________________________________________________ 1. Purpose and Features ..........................1 1.1 Purpose ..............................1 1.2 main structure composition ......................1 1.3 Features ............................... 1 1.4 performance ............................1 1.5 contraindications ..........................1 2. Main components ............................ 2-7 3. Assembly ..............................8-10 3.1 Assembly of base ..........................9 3.2 Assembly of the first arm ........................ -
Page 5: Purpose And Features
A specially designed LED light source provides the maximum intensity of illumination needed to work confidently. OMS2360 for six times system, OMS2365 to five times.The eyepiece is wide Angle design, the optical system image is clear, the field is big, the field is long.The built-in zoom lens provides a larger range of work distance adjustment for doctors. -
Page 6: Main Components
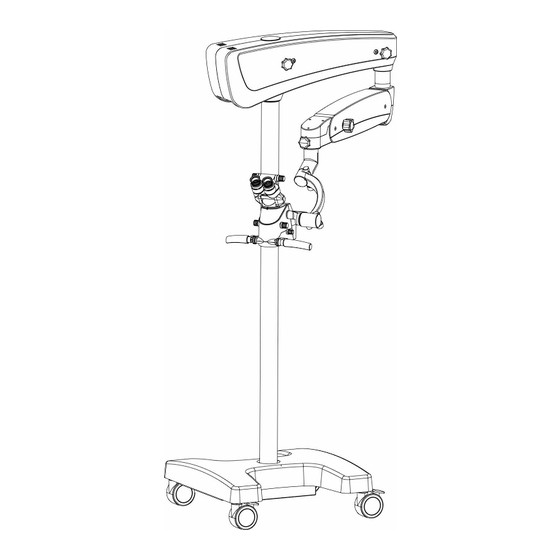
2. Main components Fig.1 general assembly view... - Page 7 Fig.2-1 A direction view Fig.2-2 base view Fig.3 Right back-side view...
- Page 8 Fig.4 Left back-side view Fig.5 Assembly the camera...
- Page 9 Fig.6 accessories parts...
- Page 10 [1] Star handler fixation screw. Lock/unlock the second arm. [2] Balance adjustment screw for second arm. Rotate the screw with 8mm special driver to adjust the balance of the second arm. [3] Star handler fixation screw. Use this screw to adjust the vertical moving balance on the second arm. [4] Star handler fixation screw.
- Page 11 ON. [24] magnification knob The OMS2365 can be switched between 5 mag ratios: 0.4x, 0.6x, 1x, 1.6x, 2.5x, OMS2360 can be switched between 6 mag ratios: 0.3x, 0.5x, 0.8x, 1.2 X, 2x, 3x.
-
Page 12: Assembly
3. Assembly The microscope is packed in one package. Please open the package and take out all parts and assemble them according to the following procedures. The second arm The first arm binocular connecting arm Support arm column Base Fig.7 Assembly drawing of microscope... -
Page 13: Assembly Of Base
3.1 Assembly of base (1) Please take out the base support from the package, lay it on the ground. (2)Take out the pole, place the pole on the base, and after fixing the cable then secure the 4 screws. (3) Place the plastic cover on the metal base Fig.8 Assembly of base 3.2 Assembly of the first arm Take out the first arm,please pay attention, the star handler fixation screw [3] must be... -
Page 14: Assembly Of Microscope Head
3.4 Assembly of microscope head Take out microscope head from the packing, tighten with M4 socket hexagon screw. Fig.8 Assembly of microscope head 3.5 Assembly of 190º inclinable binocular Take out the 190º inclinable binocular from the package, fix it to the microscope head , make sure the pin is in the right position, then tighten the screw [10]。... -
Page 15: Use Of The Microscope
4. Use of the microscope Warning: To avoid the risk of electric shock, this equipment must only be connected to a grounded power supply. Warning: To avoid the risk of mechanical hazards, this equipment must only be used in a controlled indoor environment. Warning: Exposure to eyes limit tmax =90 seconds. -
Page 16: Adjusting The Microscope
are almost equivalent. ● When adding or removing accessories, readjustment of the balance of the second arm is necessary. Caution:The second arm must be held firmly before unscrewing the star handle fixation screw [3]. 4.3.2 Adjusting the microscope ● Carry out this adjustment in your normal working position, switch to 0.3 x magnification, adjust the working distance and pupil distance of the microscope. -
Page 17: Using The Microscope
microscope has already been adjusted. Microscope: Adjusting the magnification: ●Magnifying knob is [24] working correctly. Eyepiece: ● The screw [10] to fix the eyepieces has been tightened. ● Operating microscope and eyepieces have been adjusted in a suitable position for the operation. -
Page 18: Movement And Storage After Use
4.6 Movement and Storage after use ● Put off all rubber caps and handles which can be sterilized in autoclaves. We ● Fold the microscope back near the column. Fasten every star knob firmly to fix the arm and the microscope. ●... -
Page 19: Maintenance
5. Maintenance 5.1 Replacing the consumable parts 5.1.1Replacing the LED Please contact the after-sales service department. 5.1.2 Replacing the fuse The fuse is integrated with main power input socket. Please replace the fuse according to the following steps: ● Turn off the main power switch. ●... -
Page 20: Sterilization
please use a special paper or absorbent cotton with a little bit of distilled water and wash off, the remaining stains can be cleaned off with a mixture of 50% ethanol and 50% ether. If there is dust on the lens, blow the dust off with a dust pen. Do not wipe the lens with any corrosive detergent, otherwise it may be damaged. -
Page 21: Microscope Occessories List
6. Microscope accessories list Order Code Description 800-0030 190 deg inclinable binocular 800-0031 Stereo observation tube 800-0033 190 deg inclinable binocular with PD adjustment device 800-0037 Dual iris diaphragm 800-0112 Beam Splitter (50%:50%) 800-0113 Beam Splitter (20%:80%) 800-0114 Extender and Beam Splitter (50%:50%) 800-0115 Extender and Beam Splitter (20%:80%) 800-0190... - Page 22 800-0201 Protective Lens Caps 800-0205 Laser Filter Module 800-0250 F450 Sony Nex Digital Camera Adapter 800-0251 F450 Canon Digital Camera Adapter 800-0252 F450 Sony Digital Camera Adapter 800-0253 F450 Nikon Digital Camera Adapter 800-0270 Rota360 F180 Canon Digital Camera Adapter 800-0271 Rota360 F180 Sony Digital Camera Adapter 800-0272...
-
Page 23: Trouble Shooting Guide
7. Trouble-shooting guide In case there is any trouble, please first refer to the trouble-shooting guide. If you can not solve the problem, please contact the authorized distributor or our after-sales service department. Trouble Possible reason Remedy Main power switch is not Turn on the main power switch or Equipment not turned on... -
Page 24: Technical Specifications
8. Technical specification Microscopes section (including binocular microscope, objective, eyepiece) OMS2365:0.3x, 0.5x, 0.8x, 1.2x, 2x, 3x Magnification factor OMS2360:0.3x,0.5x ,0.8x,1.2x,2x,3x Work distance 200mm~450mm Fine Focus by knob on objective 250mm Binocular F=170mm Adjustable range for pupil distance 55mm~75mm Eyepiece magnification 12.5X/17.7B, adjustable dioptor: ±7D... - Page 25 OMS2360 microscopes other Technical specification 190 ° inclinable binocular Straight/45 ° skimmer binocular Work distance mm Work distance mm Magnification basic parameter changer X Objective focus mm Objective focus mm Total magnification X 16.1 11.4 14.7 10.4 24.2 17.1 13.3 22.1...
- Page 26 OMS2365 microscopes other Technical specification 190 ° inclinable binocular Straight/45 ° skimmer binocular Work distance mm Work distance mm basic Magnification parameter changer X Objective focus mm Objective focus mm Total magnification X 12.8 11.7 20.1 14.2 11.0 18.3 13.0 10.1 0.010 0.007...
-
Page 27: Emc
9. EMC (electromagnetic compatibility) When using the device, the EMC precautions specified below must be observed. • Only use spare parts approved by zumax for this device. • Do not use any portable or mobile RF communication equipment in the vicinity of the device as this may impair the device's function. - Page 28 Electromagnetic immunity for ME equipment and ME systems Guidance and manufacturer’s declaration – electromagnetic immunity The microscope is intended for use in the electromagnetic environment specified below. The customer or the user of the microscope should assure that it is used in such an environment. Electromagnetic environment IMMUNITY IEC 60601...
- Page 29 Electromagnetic immunity for non-life-supporting ME equipment and ME systems Guidance and manufacturer’s declaration – electromagnetic immunity The microscope is intended for use in the electromagnetic environment specified below. The customer or the user of the microscope should assure that it is used in such an environment. Electromagnetic environment IMMUNITY IEC 60601...
Need help?
Do you have a question about the OMS2360 and is the answer not in the manual?
Questions and answers