Seen IRIS 860 Installation And Setup Manual
Hide thumbs
Also See for IRIS 860:
- Installation manual (26 pages) ,
- Quick install manual (2 pages) ,
- Installation manual (49 pages)
Table of Contents
Advertisement
Quick Links
Seen IRIS 860 installation and set-up guide
Important warning
Please read this guide in full before starting. Incorrect
installation may void the warranty. If you need help
with anything please call the Seen Safety office on
+64 4 381 4475
Seen IRIS 860 sensors can provide additional
information to the operator but are not intended to
provide active safety functions or control the machine.
Seen sensors do not replace the need for proper
operator training and best practice safe operating
procedure. The operator must always look to check
the way is clear before moving the vehicle. Detection
can never be guaranteed.
Seen sensors and cab boxes require a 12-24V DC
power supply. Voltages exceeding 24V may cause
damage and will not be covered by the warranty.
Caution Class I LASER PRODUCT. Disassembly or
modification of this device may result in hazardous
radiation exposure and will void the warranty.
This installation and set-up guide has been prepared
with all due care and attention, however, Seen Safety
Limited cannot be held responsible for any errors or
omissions in this guide or any consequences thereof.
Contact details
For technical support or questions please contact us.
Seen Safety Limited
Unit 4, 69 Kaiwharawhara Road
Wellington 6035, New Zealand
+64 4 381 4475
www.seensafety.com
info@seensafety.com
© Copyright 2020 Seen Safety Limited. All rights reserved. Patents and trademarks granted and pending. Version 1.71
Contents
2
2
3
3
4
5
6
7
8
10
12
12
12
13
14
1
Advertisement
Table of Contents

Related Manuals for Seen IRIS 860


Summary of Contents for Seen IRIS 860
-
Page 1: Table Of Contents
For technical support or questions please contact us. Seen Safety Limited Unit 4, 69 Kaiwharawhara Road Wellington 6035, New Zealand +64 4 381 4475 www.seensafety.com info@seensafety.com © Copyright 2020 Seen Safety Limited. All rights reserved. Patents and trademarks granted and pending. Version 1.71... -
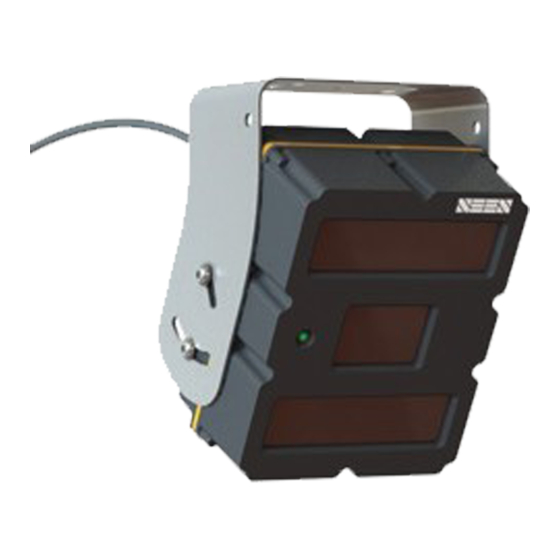
Page 2: Overview
THIS WAY UP Mounting bracket Correct mounting angle 27º B. Hung A. On top C. Vertical underneath © Copyright 2020 Seen Safety Limited. All rights reserved. Patents and trademarks granted and pending. Version 1.71... -
Page 3: Sensor Location
• Insert screw B, check the alignment and evenly tighten all screws. Note. It is not possible to attach a weather shield to a sensor mounted in the ‘hung underneath’ configuration. © Copyright 2020 Seen Safety Limited. All rights reserved. Patents and trademarks granted and pending. Version 1.71... -
Page 4: Sensor Electrical Connection
Sensor power cable BROWN BLUE Input power (ignition) Reverse (centre) Ground DC 12-24V 0.7A BLACK Reverse signal DC 12-100V Ground Ignition power Orientation slot © Copyright 2020 Seen Safety Limited. All rights reserved. Patents and trademarks granted and pending. Version 1.71... -
Page 5: Cab Box Electrical Connection
DC 12-24V 2.8A BLACK Reverse signal DC 12-100V Ground Ignition power Orientation slot Buzzer Cab box Sensor cable connectors Cab box power cable © Copyright 2020 Seen Safety Limited. All rights reserved. Patents and trademarks granted and pending. Version 1.71... -
Page 6: Trouble-Shooting The Reverse Signal Input Into An Iris 860 Sensor Or Cab Box
(Note the 1.2m minimum operating DC/DC converter circuit range when testing). © Copyright 2020 Seen Safety Limited. All rights reserved. Patents and trademarks granted and pending. Version 1.71... -
Page 7: Cab Box Sensor Cable
2. White 3. Blue Re-wireable connector 16mm Other wires Cable Grey wire (centre) Unscrew first 8mm 9mm Unscrew second Wire stripping guide Re-wireable connector © Copyright 2020 Seen Safety Limited. All rights reserved. Patents and trademarks granted and pending. Version 1.71... -
Page 8: Accessory Port And Cable
• A flywheel diode is required across the relay coil to protect the NPN transistor against the coil transient when the detection event ends and the coil is switched off • Maximum supply current 500mA. © Copyright 2020 Seen Safety Limited. All rights reserved. Patents and trademarks granted and pending. Version 1.71... - Page 9 (e.g. down to 5V or 3.3V) or use Detection 3V6 (black) for a 3.6V detection output. Also refer to section 15 for the Accessory Port PIN-out diagram for full electrical specifications. © Copyright 2020 Seen Safety Limited. All rights reserved. Patents and trademarks granted and pending. Version 1.71...
-
Page 10: Sensor Config Settings
Custom range setting panel* zone behind the machine wearing a reflective safety vest. Detection is indicated by an audible alarm and red LED. © Copyright 2020 Seen Safety Limited. All rights reserved. Patents and trademarks granted and pending. Version 1.71... - Page 11 The 3.5kHz alert tone is 94dB at 1 metre. Two sensors with mirrored custom shaped detection area © Copyright 2020 Seen Safety Limited. All rights reserved. Patents and trademarks granted and pending. Version 1.71...
-
Page 12: Self Checking Function
There are no user serviceable parts. Opening the sensor will void the warranty. © Copyright 2020 Seen Safety Limited. All rights reserved. Patents and trademarks granted and pending. Version 1.71... -
Page 13: Sensor Specifications
Operating temperature: -20 to +60 degrees C ambient Product specifications are subject to change without notice to improve reliability, function, design or otherwise. © Copyright 2020 Seen Safety Limited. All rights reserved. Patents and trademarks granted and pending. Version 1.71... -
Page 14: Connector Pin-Outs And Electrical Specs
100 uA max. Do not connect Detection High voltage logic Output 11v max. Supply detection output 9.3v min. voltage 12v, 2K Ohm load to ground © Copyright 2020 Seen Safety Limited. All rights reserved. Patents and trademarks granted and pending. Version 1.71...
Need help?
Do you have a question about the IRIS 860 and is the answer not in the manual?
Questions and answers