Table of Contents
Advertisement
Advertisement
Table of Contents

Subscribe to Our Youtube Channel
Related Manuals for Nextech QC8061


Summary of Contents for Nextech QC8061
- Page 1 QC8061 Outdoor Wildlife Trail Camera Instruction Manual...
- Page 2 Please study all notices carefully and diligently. Please study this information in detail observing, in particular, the safety instructions. Note: • Remove the protective foil from the camera lens by pulling the protruding tab. • Caution! Keep plastic foil and bags away from babies and small children, as otherwise danger of su ocation.
-
Page 3: Table Of Contents
Contents HAZARD, SAFETY AND WARNING NOTICES INTRODUCTION YOUR CAMERA Front view 4.1. Inside views 4.2. PREPARING THE CAMERA 5.1. Opening and closing the camera 5.2. Inserting the batteries 5.3. Inserting the memory card 5.4. External power supply 5.5. Assembly with strap USING THE CAMERA 6.1. -
Page 4: Faq
1. FAQ: Problem: The camera only record video at daylight, it doesn't work at night? Solution: 1. Please check whether your battery is dry and full of energy. If not, please use some new batteries for your camera. 2. Please check whether you have set the timer. For example, if you set the timer from 6:00 to 18:00, then it only works at daylight and doesn't record videos at night. -
Page 5: Hazard, Safety And Warning Notices
2. Hazard, safety and warning notices Incorrect use of the camera and accessories can be dangerous for you and others and can damage or destroy the camera. We therefore ask you to read and strictly observe the following Hazard, safety and warning notices. - Page 6 Injuries and material damage Only place the camera on sturdy surfaces. The camera could otherwise fall or topple over, causing damage or injury. Do not operate the camera whilst running or driving. You could fall or cause a tra c accident. Only use a mains adaptor (not supplied) for the camera, having the input voltage speci ed on the rating plate (6V).
-
Page 7: Introduction
3. Introduction The Wildlife Camera is a wildlife and surveillance camera with a PIR sensor. The sensor can detect sudden changes to the ambient temperature within an evaluation area. The signals of the highly sensitive infrared sensor (PIR, passive infrared sensor) switch on the camera, activating picture or video mode. Features of Wildlife Camera: •... -
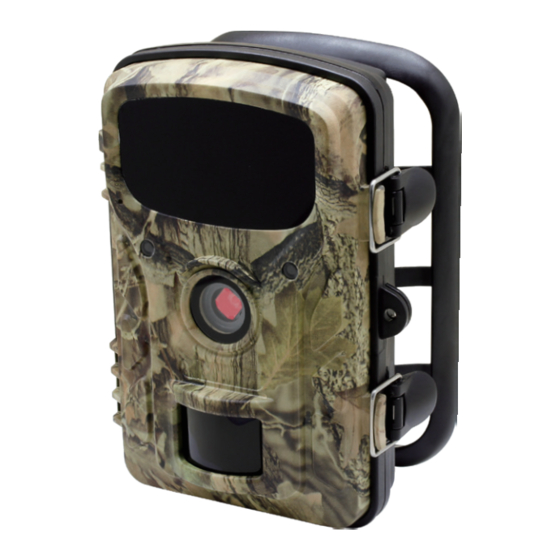
Page 8: Your Camera
4. Your camera 4.1. Front view LED infrared light Microphone Locking bracket Light sensor Motion indicator, red LED Locking hole Lens for lock Locking bracket PIR sensor... -
Page 9: Inside Views
4.2. Inside views Monitor Locking hole for lock Operating buttons Speaker Mode switch (OFF/ Memory card TEST/ON) compartment Mini USB connection The monitor is only switched on in the Test mode for changing menu settings or viewing existing photos and videos. Using the operating buttons, menu settings can be changed in the test mode or existing photos and videos can be played back. - Page 10 Battery compartment Locking bracket Locking hole for lock Locking bracket 6V DC connection Tripod thread Battery compartment : Insert 8 type LR6 (AA) batteries as shown. An external power supply can be provided via the DC connection (input 6 V, at least 1.5 A. Mains adaptor is not included.)
-
Page 11: Preparing The Camera
5. Preparing the camera 5.1. Opening and closing the camera Operating buttons, connections and batteries are located inside the Wildlife Camera. Fig. 1. Fig. 2. To open the camera undo the two lateral locking brackets as shown in Fig. 1. To lock the camera again, engage metal hoops of locking brackets into mount and press down plastic tab of bracket (Fig. -
Page 12: Inserting The Memory Card
Note: • Instead of type LR6 (AA) batteries, rechargeable batteries with the same speci cation (with 2000 mAh or higher) may be used. We recommend NiMh batteries with low self discharge (not supplied). • An alarm is sounded if battery charge is too low. 5.3. -
Page 13: External Power Supply
5.4. External power supply The camera can be operated using power from an external power supply. A 6 V power supply with at least 1.5 A is required containing a connector with a 3.5 mm external and 1.35 mm internal diameter (internal plus pole, external minus pole). -
Page 14: Using The Camera
6. Using the camera Prior to setting up the camera for surveillance, it must be set up for the respective purpose. For this purpose, there is a test mode available. In addition to changing settings, photos and videos can be taken and existing photos can be viewed in this mode. - Page 15 Functions of operating buttons in recording mode Below, the operating buttons are described in the recording mode with non activated menu. MENU: Open the Settings menu using the MENU button. REPLAY: Press this button to start the replay mode. : Change to the manual recording mode for video recordings. : Change to the manual recording mode for taking photos.
-
Page 16: Settings
: Move down one menu point or decrease value by 1. : Enlarge displayed photos in increments (up to 16x). : Decrease enlarged photos in increments. OK : Open selected options or accept selected settings. . If the change is not con rmed by pressing the OK Con rm each change to a setting by pressing button, the new settings are lost when leaving the menu. - Page 17 • Picture No.: 1 photo, 2 photo, 3 photo Select the number of photos to be taken in succession when the camera is triggered in the Photo mode. Please also observe the parameter Interval! Note: • 1M, 3M, 5M can choose 1 photo, 2 photos, 3 photos; 8M can choose 1photo, 2 photos, but 3 photos not available;...
- Page 18 Note: • If you forgot your password, please unlock the camera with password “OPEN”. • Serial no. Set: O /On (can only be used for photos not for videos) Select "On" to assign a serial number to the camera. As soon as "On" has been con rmed by pressing the OK button, the individual serial number can be inserted.
- Page 19 • Default set: No/Yes Press “Yes” to reset the camera settings to the default values and con rm the selection by pressing the OK button. • : 3min/ /10min/o Auto power o 5min With this function you can determine whether the camera should be automatically switched o when not used for some time in the Test mode.
-
Page 20: Night Recording
6.4. Night recording During night recording the infrared LEDs (IR LEDs) at the front of the Wildlife Camera provide the light required for taking photos. Wildlife Camera uses IR LEDs with a long wavelength, to keep red light to a minimum. -
Page 21: File Format
Red LED In this way you can determine the best position for aligning the camera. The LED only lights up in the Test mode as soon as one of the sensors has detected movement. The LEDs do not light up when in Live mode. In order to prevent incorrect signals and unnecessary photos, we recommend not using the camera at sunny points and check that no branches are in the active area of the sensor. -
Page 22: Connecting To Computer
7. Connecting to computer The Wildlife Camera can be connected to a computer using the supplied USB cable to view existing photo/videos. System requirements Windows® Macintosh Pentium® III or higher PowerPC G3/G4/G5 Windows® XP/Vista/7/8 OS 10.3.9 or newer system 512 MB RAM 512 MB RAM 1GB available hard disk space 1GB available hard disk space... -
Page 23: Technical Specification
8. Technical speci cation LCD: 2.4” Image Sensor: 1/4” CMOS Video Resolution: 1080p (1920 x 1080) 720p (1280 x 720) Image Resolution: 16MP (Interpolated) Frame Rate: 15fps (1080p), 30fps (720p) Lens Angle: 73° Recording Format: AVI Infrared: 28 x No-Glow IR LEDs Infrared Range: Up to 20m PIR Trigger Time: 0.5 Seconds PIR Sensor Angle: 60°... -
Page 24: System Information, Maintenance And Disposal
9. System information, Maintenance and Disposal Trademark information Microsoft® and Windows® are trademarks of Microsoft Corporation registered in the US. Pentium® is a registered trademark of Intel Corporation. Macintosh is a trademark of Apple Computer Inc. SD™ is a trademark. Other names and products can be trademarks or registered trademarks of the respective owners. - Page 25 Distributed by: Electus Distribution Pty Ltd 46 Eastern Creek Dr, Eastern Creek NSW 2766 Australia Ph 1300 738 555 Int’l +61 2 8832 3200 Fax 1300 738 500 www.electusdistribution.com.au...
Need help?
Do you have a question about the QC8061 and is the answer not in the manual?
Questions and answers
formatting SD card or how to test the SD card to see if it works.
To format an SD card for the Nextech QC8061:
1. Insert the SD card into the camera.
2. Press the OK button.
3. Confirm formatting by selecting "Yes".
4. Make sure to back up any important files before formatting.
To test if the SD card works:
1. Insert the formatted SD card into the camera.
2. Switch to TEST mode.
3. Take a photo or video.
4. Connect the camera to a computer using the supplied USB cable or insert the SD card into a card reader.
5. Check if the files (JPG or AVI) are saved in the folder "\DCIM\100MEDIA" and can be viewed on the computer.
This answer is automatically generated
formatting sd card
To format an SD card for the Nextech QC8061:
1. Press the OK button.
2. Confirm formatting by selecting "Yes."
3. Ensure all important files are backed up before formatting.
4. Formatting is recommended if the card is new or previously used in other devices.
This answer is automatically generated