Table of Contents
Advertisement
Advertisement
Table of Contents

Subscribe to Our Youtube Channel
Related Manuals for Nextech QC8067


Summary of Contents for Nextech QC8067
- Page 1 QC8067 4G Outdoor Trail Camera Instruction Manual...
-
Page 2: Table Of Contents
GENERAL INFORMATION & SAFETY INSTRUCTIONS General Information & Safety Instructions............2 Warnings & Safety Information ................3 Box Contents ........................3 Product Diagram ......................4 Quick Start Guide ......................6 Preparing the Camera ....................7 Using Your Camera ......................10 Connecting to a Computer ..................15 Specifications ........................16 Troubleshooting ...................... -
Page 3: Warnings & Safety Information
WARNINGS & SAFETY INFORMATION WARNING: The manufacturer is not responsible for any potential injury from misuse • Please ensure unit is completely sealed before deploying. • Please ensure you are aware of your surroundings when installing. • Please ensure you install in a safe and secure manner. •... -
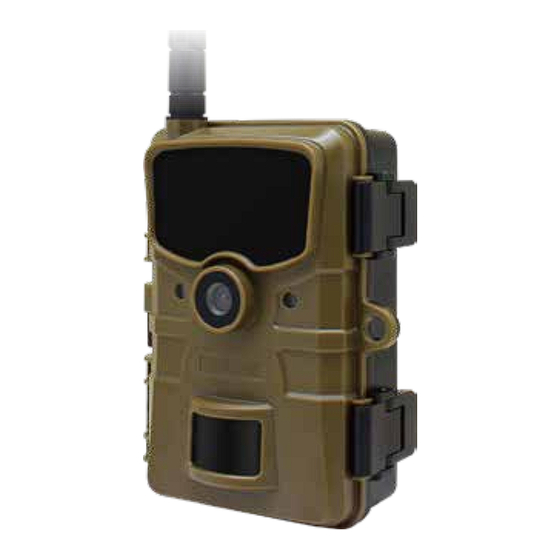
Page 4: Product Diagram
PRODUCT DIAGRAM... - Page 5 • The monitor is only switched on in the SETUP mode for changing menu settings or viewing existing photos. • A TF memory card must have been inserted into the memory card slot in order to save photos. • Using the mini USB connection (USB 2.0), the camera can be connected to a computer.
-
Page 6: Quick Start Guide
QUICK START GUIDE 1. Download the free trail camera APP on your smartphone from the APP Store or Google Play. 2. Open the APP, then sign in or create a new account. 3. Log in and click the Camera icon at the bottom of the screen, then click “+”... -
Page 7: Preparing The Camera
PREPARING THE CAMERA Inserting the batteries Open camera and lift out battery tray. With the tray removed, insert 8 new AA batteries, being careful to match orientation marked on try. After batteries are inserted, align metal contacts and reinsert battery try into camera. If you are using an external power source, ensure that it is 12V. - Page 8 Mobile apps The camera will work with a mobile APP that is compatible with IOS and android devices. SIMple download the free “Camera Trap Wireless” app from the APP store or Google Play. The app allows you full control of all camera settings as well as the ability to view pictures and video clips uploaded by your cameras.
- Page 9 App Function Upon opening the mobile app you will be at the Main Page. On the Main Page all the apps functions can be accessed. Use the guide below to learn how to navigate the Camera Trap Wireless app. There are several functions that can be performed to pictures and videos with your account.
-
Page 10: Using Your Camera
USING YOUR CAMERA CAMERA SETTING INFORMATION Mode: Selects the format your camera will record in. Photo: For photos only. Video: For videos only. Photo+Video: A photo followed by a video clip will be captured for each PIR trigger event. Interval: Defaulted 30seconds, optional from seconds to 60minutes Select the short setup period for the camera to wait before it reacts to the successive triggering of the main sensor after an animal has first been detected. - Page 11 Flash Light: Auto/ High/ Low Auto: Use this option on trails where game will be traveling fast for great shots, low glow infrared flash. High: This option has a flash range of 20meters and uses a low glow infrared flash. Low: This mode works well for short distance shots and in which game is within 10meters of the camera.
- Page 12 CELLULAR SETTING INFORMATION Cellular Modem: ON/ OFF This setting allows you to turn the cellular function of the camera on or off. Leave the setting in the “ON” setting to enable cellular communication. When in the “OFF”, no photos will be sent on your cellular data plan Connection Status: This menu displays the LET connection condition, IMEl and cellular signal strength.
- Page 13 camera name, then enter the new name using the arrow buttons and keyboard. Press the OK button to select a letter. Press MENU to save the name to memory. Time Stamp: On/ Off Select “ON” to print the data, time, temperature and battery percentage on each photo or video.
- Page 14 Mounting and positioning your camera After you’ve set up the camera’s parameters to your personal preferences, you’re ready to take it outside start capturing images. When setting up the camera for scouting game or other outdoor applications, you must be sure to mount it in place correctly and securely.
-
Page 15: Connecting To A Computer
Using an external power source (optional, user provided) Optionally, you can connect the Accessory Solar Panel to the “DC In” jack at the bottom of the camera (other external power supplies should not be used, as the camera and/or display may not function correctly). If the solar panel is connected and AA batteries are installed, the camera will be powered by the solar panel’s rechargeable Lithium-ion battery, as long as it provides adequate voltage (if not, the camera will switch to battery power). -
Page 16: Specifications
SPECIFICATIONS Lens f=4.3mm F/NO= 2.0; FOV=80°; 24M: 6528 × 3672; 16M: 5376 × 3024; Picture Size 8M: 3840 × 2160; 4M: 2688 × 1512; 2M: 1920 × 1080 1280x720; 640x360; 480x270 Picture Size (4G Upload) 1920x1080P 30fps, 1280x720P 30fps or 848x480p Video Size 30fps 848x480(30fps);... -
Page 17: Troubleshooting
TROUBLESHOOTING Camera takes continuous images of no subject A camera has what is known as a “false trigger” if the PIR sensor thinks that there is motion and heat in front of the camera lens when there is no subject in the im- age. - Page 18 • Make sure that you are using a good quality TF card in your camera. We recom- mend SanDisk TF Cards up to 32GB. If the TF card has its write protect switch in the lock position, the camera will not take images. •...
- Page 19 Short video clips—not recording to the length set. • Check to make sure that the TF card is not full. • Make sure that the camera has good batteries in it. Near the end of the battery life, the camera may choose to record shorter video clips to conserve power. Date/time stamp not appearing on images Make sure that the “TIME STAMP”...
-
Page 20: Faqs
FAQS Do i need to have my phone next to my camera while it syncs? No, you can sync your camera remotely from your phone. However, we recom- mend syncing in proximity of your phone to verify sync was successful. Why does my camera sometimes transmit an image later than when the image was captured? Due to network conditions, sometimes transmissions can be delayed.
Need help?
Do you have a question about the QC8067 and is the answer not in the manual?
Questions and answers