Advertisement
IMPORTANT SAFEGUARDS
Safe Operation & Use

When using electrical appliances, basic safety precautions should be followed, including the following:
- Read all instructions before using.
- Do not touch hot surfaces. Use handles and knobs when available.
- This appliance must be properly installed and located in accordance with these instructions before it is used.
- The use of accessory attachments not recommended by the appliance manufacturer may result in fire, electrical shock or injury to persons.
- Do not place on or near a hot gas or electric burner, or in a heated oven.
- Do not use outdoors.
- To protect against fire, electric shock and injury do not immerse cords, plugs, or the appliance in water or any other liquid.
- Do not overfill the Water Reservoir with water.
- Use only water in this appliance! Do not put any other liquids or foods in the Water Reservoir except as instructed in the Cleaning Instructions in this guide.
- Turn off and unplug the brewer before cleaning or maintenance. Allow to cool before putting on or taking off parts and before cleaning the appliance.
- For best operation, plug the appliance into its own electrical outlet on a dedicated circuit to prevent flickering of lights, blowing of fuses or tripping a circuit breaker.
- Do not operate any appliance with a damaged cord or plug or after the appliance malfunctions or is damaged in any manner. Contact Keurig Customer Service to report any malfunction of or damage to the brewer.
- Do not let the cord hang over the edge of the table or counter, or touch hot surfaces.
- To disconnect, press the Power Button on the brewer to "OFF" status and then remove the plug from the wall outlet.
- Close supervision is necessary when any appliance is used by or near children.
- Do not lift the brewer Handle while brewing is in progress.
- Always keep the Water Reservoir Lid on the Water Reservoir unless you are refilling it.
- This appliance is equipped with a power cord having a grounding wire with a grounding plug. The appliance must be grounded using a 3-hole properly grounded outlet. In the event of an electrical short circuit, grounding reduces the risk of electrical shock.
- If the outlet is a standard 2-prong wall outlet, it is your personal responsibility and obligation to have it replaced with a properly grounded 3-prong wall outlet.
- Do not, under any circumstances, cut or remove the third (ground) prong from the power cord or use an adapter.
- Consult a qualified electrician if the grounding instructions are not completely understood, or if doubt exists as to whether the appliance is properly grounded.
- Do not use the appliance for other than its intended use.
SAVE THESE INSTRUCTIONS.
WARNING TO USERS AND PARENTS
- DO NOT permit children to use brewer unless there is adult supervision. Brewer dispenses very hot water.
- SPECIAL NOTICE FOR HOT COCOA USERS: IMMEDIATELY AFTER USING A HOT COCOA K-CUP® PACK, RUN a Hot Water Brew Cycle without a K-Cup® pack to avoid the possibility of clogging the exit needle. DO NOT assume the next user will do this.

There are two sharp needles that puncture the K-Cup® pack, one above the K-Cup® Pack Holder and the other in the bottom of the K-Cup® Pack Holder. To avoid risk of injury, do not put your fingers in the K-Cup® Pack Assembly Housing.
There is extremely hot water in the K-Cup® Pack Holder during the brew process. To avoid risk of injury, do not lift the Handle or open the K-Cup® Pack Assembly Housing during the brewing process.
Do not fill above MAX FILL line. If you fill the Water Reservoir above this point, you may occasionally get a larger brew than you selected for your first brew of the day. If you prefer to have your reservoir filled to the top, we recommend you use a large mug for your first brew of the day to avoid any risk of overflow.
Please always keep the brewer in its upright position to avoid potential injury and/or damage to your brewer.
SHORT CORD INSTRUCTIONS: A short power supply cord is provided to reduce the risk of becoming entangled in or tripping over a longer cord.
If an extension cord is used,
- the marked electrical rating of the cord set or extension cord should be at least as great as the electrical rating of the appliance;
- the cord should be arranged so that it will not drape over the countertop or tabletop where it can be pulled on by children or tripped over unintentionally; and
- the extension cord must include a 3-prong grounding plug.
THIS PRODUCT IS FOR HOUSEHOLD USE ONLY.

THIS PRODUCT CONTAINS CHEMICALS, INCLUDING LEAD, WHICH IS KNOWN TO THE STATE OF CALIFORNIA TO CAUSE CANCER, BIRTH DEFECTS OR OTHER REPRODUCTIVE HARM.

TO REDUCE THE RISK OF FIRE OR ELECTRIC SHOCK, DO NOT REMOVE THE BOTTOM COVER. NO USER SERVICEABLE PARTS ARE INSIDE. REPAIR SHOULD BE DONE BY AUTHORIZED SERVICE PERSONNEL ONLY.
Set-Up
Helpful Hints
- Plug brewer into its own grounded outlet.
If the electric circuit is overloaded with other appliances, your brewer may not function properly. The brewer should be operated on its own circuit, separate from other appliances. - Keep your brewer turned "ON."
To brew a fresh cup of coffee, tea or hot cocoa anytime you want, keep your brewer turned "ON" all the time. However, you can set the brewer to automatically turn off two hours after your last brew. - For the best tasting gourmet coffee, tea or hot cocoa, Keurig recommends using bottled or filtered water.
Water quality varies from place to place. If you notice an undesirable taste in your cup of coffee, tea or hot cocoa (such as chlorine or other mineral tastes) we recommend you consider using bottled water or water from a filtration system. For best results, carefully follow manufacturer's instructions when using any water filtration system. - Customize the size, flavor & brew that's perfect for you.
With the choice of over 200 varieties of K-Cup® packs and 3 brew sizes (Small Cup-5.25 oz., Small Mug-7.25 oz. and Large Mug-9.25 oz.), your Keurig® brewer gives you endless options to customize the size, flavor and brew that's perfect for you. For a strong, intense cup, select an Extra Bold K-Cup® pack (with up to 30% more ground coffee than regular varieties) and brew size that's right for you. The smaller the brew size, the more intense flavor in your cup. The larger the brew size, the less intense flavor in your cup. - Remove K-Cup® pack after use.
- Brewing into a travel mug.
To brew into a travel mug, simply remove the Drip Tray Assembly and place the travel mug on the Drip Tray Base. - De-scale brewer regularly.
Unpacking Instructions
- Place brewer box on a large steady surface (such as a table or countertop) or on the floor. Open the box.
- Remove enclosed literature.
- Turn the box on its side with front of box face down.
- Reach into the box and grasp the plastic bag that contains the brewer.
- Carefully pull the plastic bag (and packaging materials) toward you and out of the box. The brewer will still be encased in the polyfoam and be on its side.
- Remove the top polyfoam packaging material.
- Carefully lift brewer off of the bottom polyfoam and place it upright on a flat, steady surface.
- Lift plastic bag off of brewer.
- Record the serial number for this brewer. The serial number can be found on the bottom of the brewer box or on the brewer behind the Drip Tray (when removed).
- Place the brewer upright on a flat, steady surface. Remove tape holding Water Reservoir in place.
We recommend you save all packing materials in case future shipping of the product is necessary.
Keep all plastic bags away from children.
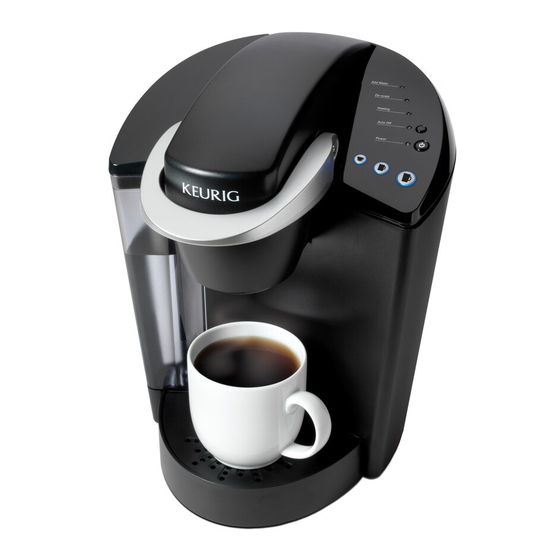
Features
K40/K45 Elite Brewer

K40/K45 Elite Brewer
- Water Reservoir Lid
- Water Reservoir
- MAX FILL
- Water Reservoir Lock Tab Slots
- Handle
- Funnel
- K-Cup® Pack Holder (E and F are the K-Cup® Pack Holder Assembly)
- Lid
- K-Cup® Pack Assembly Housing
- Housing
- Drip Tray Plate
- Drip Tray
- Drip Tray Base
- Vent
- Power Cord
Controls and Indicators
- Small Cup Button
- Small Mug Button
- Large Mug Button
- Power Button
- Power Light (Green)
- Auto Off Button
- Auto Off Light (Green)
- Heating Light (Red)
- Descale Light (Red)
- Add Water Light (Blue)
Set-Up & First Brew

You cannot use your Keurig® brewer until it has been set-up for its first use as set forth below.
NOTE: If brewer has been exposed to temperatures below freezing, allow brewer at least two hours to reach room temperature before brewing. A frozen or extremely cold brewer will not operate.
Setting up Your Brewer
- Unwrap cord and plug the brewer into a grounded outlet. Remove all pieces of packing tape.
- Place a large mug (10 oz. minimum) on the Drip Tray Plate.
- Remove the Water Reservoir from brewer by first removing Lid from Reservoir (fig. 1), then lifting Reservoir straight up and away from brewer (may be tight). Rinse with fresh water.

- Fill Water Reservoir with bottled or filtered water so that the water is to and not beyond the MAX FILL line.
- Place Water Reservoir base into the left side of the brewer and be sure the Water Reservoir Lock Tabs engage with the brewer (fig. 2). Replace Lid on Water Reservoir.

- Press Power Button found on upper right panel of the brewer. The green Power Light will illuminate.
NOTE: A K-Cup® pack should not be used for this sequence.
NOTE: If the Water Reservoir is empty or not in place on the brewer, the blue Add Water Light will illuminate. The Small Mug Button will not be activated until water is added to the Water Reservoir. - The brewer will automatically fill with water and then the water will be heated. This will take about 4 minutes. During the heating period, the red Heating Light will illuminate. Once the water is heated, the red Heating Light will turn off and the Small Cup, Small Mug and Large Mug Buttons will illuminate.
NOTE: Do not lift Handle during this heating period.
NOTE: You may see small amounts of water coming from the Vent and dripping into the Water Reservoir during this and subsequent heating – this is normal. - Lift and lower the Handle. Press the Small Mug Button to start a cleansing brew (fig. 3). Pour the hot water into the sink.

- The brewer may take 15 seconds to reheat water between brews during which time the red Heating Light may be illuminated. When the water has heated, the red Heating Light will turn off.
- The one-time set-up process is now complete and you are ready to brew!


Ready to Brew Your First Cup
- The green Power Light will illuminate to indicate the brewer is powered on.
- Place a cup or mug on the Drip Tray Plate.
- Lift the Handle and the K-Cup® Pack Holder will open toward you (fig. 4).

- Select a K-Cup® pack.
NOTE: Do not remove the foil lid or puncture the K-Cup® pack.
![]()
- Place a K-Cup® pack in the K-Cup® Pack Holder (fig. 5).

![]()
There are two sharp needles that puncture the K-Cup® pack, one above the K-Cup® Pack Holder and the other in the bottom of the K-Cup® Pack Holder. To avoid risk of injury, do not put your fingers in the K-Cup® Pack Holder. - Lower the Handle completely to close the Lid.
- Select your brew size: The Small Cup choice will yield a 5.25 oz. serving, the Small Mug will yield a 7.25 oz. serving and the Large Mug will yield a 9.25 oz. serving.

NOTE: If you do not push a Brew Button in 60 seconds, the Brew Buttons will be disabled to prevent accidental activation. Re-activate the Brew Buttons by lifting and lowering the Handle completely. - The blue Brew Button you choose will remain illuminated while brewing.
![]()
There is extremely hot water in the K-Cup® Pack Holder during the brew process. To avoid risk of injury, do not lift the Handle or open the K-Cup® Pack Assembly Housing during the brew process. - There may be a short pause before the brewing process begins. The entire brew process lasts for approximately 1 minute and ends with a burst of air to remove all liquid from the K-Cup® pack.
- Lift the Handle and dispose of the used K-Cup® pack.
![]()
K-Cup® pack will be hot. - Enjoy your first cup of Keurig Brewed® gourmet coffee, tea or hot cocoa!
- The red Heating Light may be illuminated as the water is heated for the next brew cycle. The brewer will be ready for use in approximately 15 seconds.
NOTE: During this period, your brewer will prepare for the next brew. The pump may make a vibrating sound. This is normal.


Stopping the Brew Process
If you need to stop the brewing after the process has started, press the Power Button to turn the brewer off. The flow of coffee, tea or hot cocoa will stop, the heating element will shut off and the green Power Light will turn off.
NOTE: You may get less coffee, tea or hot cocoa in your cup during your next brew. We recommend that you perform a cleansing brew after a terminated brew. Then your NEXT brew will be the proper volume.
Adding Water
The blue Add Water Light will illuminate when the water level in the Water Reservoir is low or if the Water Reservoir has been removed (fig. 6). The brewer will not allow you to brew when the blue Add Water Light is illuminated.

The Water Reservoir can be filled in two ways.
- Remove the Water Reservoir Lid and pour water directly into the Water Reservoir while it is still attached to the brewer. Fill with water to and not beyond the MAX FILL line. Replace the lid.
- Remove the Water Reservoir from brewer by first removing the Lid from the Water Reservoir, then lifting the Water Reservoir straight up and away from brewer. Fill with water to and not beyond the MAX FILL line. Place the Water Reservoir back on the brewer and replace the Lid.
![]()
Do not remove the Water Reservoir during the brewing process.
Brewing Iced Beverages
Your iced tea and iced coffee taste best when fresh-brewed hot over ice. Try it by placing a tall cup filled with ice on the Drip Tray Plate (the Drip Tray Assembly can be removed to accommodate taller cups), choose your favorite K-Cup® pack and press your preferred brew size. Also, look for the Brew Over Ice icon on K-Cup® packs that are specially crafted to brew over ice!
Do not brew into a cup made of glass. Doing so may cause the glass to crack or break.
Brewing hot Water
Your brewer is able to produce hot water for making hot cocoa in a packet, for use in cooking, for making soups, etc. Simply raise and lower the Handle on the brewer without adding a K-Cup® pack. The blue Brew Buttons will flash. Be sure to have a mug or cup on the Drip Tray Plate and then press a Brew Button.
NOTE: After brewing a hot cocoa K-Cup®pack, we recommend running a cleansing brew without a K-Cup® pack.
Purging the Brewer
If your brewer has not been used for more than one week, you should purge the water from the internal tank.
- If there is water in the Water Reservoir, remove the Lid, then lift Reservoir straight up and away from brewer. Discard water, rinse and refill with water. Place the Water Reservoir back on the brewer and replace the Lid. (If there is no water in Reservoir, simply refill.)
- Be sure the brewer is turned on. Lift and lower the Handle on the brewer without inserting a K-Cup® pack and wait until the red Heating Light turns off.
- The blue Brew Buttons will flash. Be sure to have a mug or cup on the Drip Tray Plate and then press a Brew Button.
- Repeat steps 2 and 3 two more times to completely purge water from internal tank.
If you are experiencing any problems with your brewer, please contact Customer Service at 1.866.901.BREW (2739).
Controls & Indicators (LED Control Center)
Programming auto off Timer Feature
Set the brewer to turn off two hours after the last brew.
- Press the Power Button to turn on the brewer.
- Press the black Auto Off Button to turn on the Auto Off Timer feature (fig. 7). The green Auto Off Light will illuminate.

When the Auto Off Timer is enabled, your brewer will automatically turn off two hours after your last brew. - To disable the Auto Off Timer, simply press the black Auto Off Button again and the green Auto Off Light will turn off.

Cleaning & Maintenance
Cleaning External Parts
Regular cleaning of the brewer's external components is recommended.
- Never immerse the brewer in water or other liquids. The Housing and other external components may be cleaned with a soapy, damp, non-abrasive cloth.
- The Drip Tray can accumulate up to 8 oz. of overflow. The Drip Tray and Drip Tray Plate should be periodically inspected and rinsed clean. To remove the Drip Tray Assembly, simply slide it toward you, keeping it level at all times to avoid spilling. The Drip Tray and Drip Tray Plate should not be placed in the dishwasher. They should be cleaned with a damp, soapy, non-abrasive cloth and rinsed thoroughly.
Cleaning the K-cup® Pack Holder Assembly
- Cleaning the Parts —The K-Cup® Pack Holder Assembly can be placed onto the top shelf of a dishwasher.
NOTE: Use low temperature cycles in the dishwasher.
To remove from the brewer, lift the Handle and grasp the top of the K-Cup® Pack Holder with one hand while pushing up on the bottom of the K-Cup® Pack Holder from underneath with the other until it releases (fig. 8). After cleaning, align the K-Cup® Pack Holder with the opening using the two front ribs as a guide and snap into place from the top.

- Cleaning the Funnel —The Funnel can be removed from the K-Cup® Pack Holder by pulling on it until it pops off (fig. 9). The Funnel is dishwasher safe. To replace it, just snap it back onto the K-Cup® Pack Holder Assembly.

- Cleaning the Exit Needle —The Exit Needle is located on the inside bottom of the K-Cup® Pack Holder Assembly. Should a clog arise due to coffee grinds, it can be cleaned using a paper clip or similar tool. Remove K-Cup® Pack Holder Assembly and detach Funnel. Insert the paper clip (fig. 9) into the Exit Needle to loosen the clog and push it out. The K-Cup® Pack Holder is dishwasher safe.
![]()
There are sharp needles that puncture the K-Cup® pack above the K-Cup® Pack Holder and in the bottom of the K-Cup® Pack Holder. To avoid risk of injury, do not put your fingers in the K-Cup® Pack Assembly Housing.


Cleaning The Water Reservoir & Water Reservoir Lid
The Water Reservoir Lid and Water Reservoir should be periodically inspected and cleaned.
The Water Reservoir Lid or Water Reservoir should not be put into the dishwasher. They should be cleaned with a damp, soapy, non-abrasive cloth and rinsed thoroughly. Do not dry the inside of the Water Reservoir with a cloth as lint may remain.
To clean the filter screen at the base of your Water Reservoir, empty the Water Reservoir and follow one or all of the following procedures.
NOTE: If you are using a water filter inside the Water Reservoir, remove it before cleaning.
- Rinse the filter screen with the strong force of water from your faucet.
- If you have a sprayer, aim the water spray at the filter screen.
- Fill the Water Reservoir with approximately two inches of clean water and agitate (shake) the Water Reservoir.
Empty the Water Reservoir then fill it with clean water and return it to the brewer. If needed, repeat above procedures.
Please rinse the Water Reservoir thoroughly after cleaning. This will ensure that no cleaners or cleaning solutions remain in this area as they may contaminate the water supply in the brewer.
De-Scaling Your Brewer
Mineral content in water varies from place to place. Depending on the mineral content of the water in your area, calcium deposits or scale may build up in your brewer. Scale is non-toxic, but left unattended, it can hinder brewer performance. De-scaling your brewer helps maintain the heating element, and other internal parts of the brewer that come in contact with water.
The brewer should be de-scaled every 3-6 months to ensure optimal performance. It is possible for calcium deposits to build up faster, making it necessary to de-scale more often.
You should promptly de-scale if the red Descale Light is illuminated (fig. 10). However, even if the red Descale Light is not illuminated you should continue to de-scale your brewer every 3-6 months.

De-Scaling Instructions
- PREPARE
Step 1: To begin, you will need the following:
At least 48 oz. of undiluted white vinegar
Access to an empty sink
A large ceramic mug (do not use a paper cup)
Step 2: Empty the water from the Water Reservoir.
NOTE: If you are using a water filter inside the Water Reservoir, remove it before proceeding.
Step 3: Disable Auto Off feature.
- FILL AND CLEAN
Step 1: Pour approximately 48 oz. of the vinegar into the Water Reservoir. Fill to and not beyond the MAX FILL line.
Step 2: Place a large mug on the Drip Tray Plate and run a cleansing brew. DO NOT USE A K-CUP® PACK, just press a Brew Button. Pour the contents of the large mug into the sink.
Step 3: Repeat the brew process without a K-Cup® pack until the blue Add Water Light illuminates.
Step 4: Now let the brewer stand for at least 4 hours while still on.
Step 5: Discard any residual vinegar and rinse the Water Reservoir thoroughly.
- RINSE
Step 1: Ensure the Water Reservoir is filled with fresh water. Fill to and not beyond the MAX FILL line.
Step 2: Place a large mug on the Drip Tray Plate and run a cleansing brew. Pour the contents of the large mug into the sink.
Step 3: Repeat brew process until the blue Add Water Light is illuminated.
Step 4: You may need to perform additional cleansing brews if you notice any residual taste.
NOTE: If the red Descale Light is still illuminated after completing the procedure, repeat the de-scaling procedure above.
Service
Beyond these recommended cleaning and maintenance procedures, this brewer is not user serviceable. For service, please refer to the Warranty section of this guide.
Storage
Empty the Water Reservoir before storing and take care to ensure that you store your brewer in a safe and frost free environment. Please be sure to store your brewer in its upright position to avoid water leakage from the inner tank. If you store the brewer in a cold environment, you run the risk of water freezing inside the brewer and causing damage. When you prepare to use it after storage, we recommend rinsing the Water Reservoir with fresh water and running three cleansing brews without a K-Cup® pack.
If you plan to move your brewer to a different location, turn the brewer off, unplug it and empty the Water Reservoir. If your brewer has been in an environment below freezing, please be sure to let it warm to room temperature for at least 2 hours before using.
Troubleshooting
| SITUATION | SOLUTION |
Brewer does not have power |
|
Brewer will not brew |
|
Blue Add Water Light, red Heating Light and Small Mug Button are all flashing simultaneously |
|
Brewing a partial cup |
|
Brewer shuts off automatically |
|
Water appears in the Brewer base with the Water Reservoir removed |
|
If any problems persist, contact Customer Service at 1.866.901.BREW (2739)
Warranty
Limited one Year Warranty
Keurig, Incorporated warrants that your brewer will be free of defects in materials or workmanship under normal home use for one year from the date of purchase. It is recommended that you fill out and return the warranty card enclosed with your brewer so that your purchase information will be stored in our system. Keurig will, at its option, repair or replace a defective brewer without charge upon its receipt of proof of the date of purchase. If a replacement brewer is necessary to service this warranty, the replacement brewer may be new or reconditioned. If a replacement brewer is sent, a new limited one year warranty will be applied to the replacement brewer.
This warranty only applies to brewers operated in the United States and Canada. This warranty gives you specific legal rights, and you may also have other rights that vary from state to state and, in the case of Canada, from province to province.
Only the use of Keurig Brewed® K-Cup® brand packs and accessories will guarantee the proper functioning and lifetime of your Keurig® brewer. Any damage to or malfunction of your brewer resulting from the use of non Keurig Brewed® K-Cup® brand packs and accessories may not be covered by this warranty or may result in a service fee if the damage or malfunction is determined to be caused by such use.
What is not covered by the Limited Warranty?
THIS WARRANTY DOES NOT COVER CONSEQUENTIAL OR INCIDENTAL DAMAGES SUCH AS PROPERTY DAMAGE AND DOES NOT COVER INCIDENTAL COSTS AND EXPENSES RESULTING FROM ANY BREACH OF THIS WARRANTY, EVEN IF FORESEEABLE. Some states or provinces do not allow the exclusion or limitations of incidental or consequential damages, so the above limitation or exclusion may not apply to you depending on the state or province of purchase.
Nor does this warranty cover damages caused by use of non Keurig Brewed® K-Cup® brand packs or accessories, services performed by anyone other than Keurig or its authorized service providers, use of parts other than genuine Keurig® parts, or external causes such as abuse, misuse, inappropriate power supply or acts of God.
Other Limitations
THIS WARRANTY IS EXCLUSIVE AND IS IN LIEU OF ANY OTHER EXPRESS WARRANTY, WHETHER WRITTEN OR ORAL. IN ADDITION, KEURIG HEREBY SPECIFICALLY DISCLAIMS ALL OTHER WARRANTIES WITH RESPECT TO YOUR K40/K45 ELITE BREWER, INCLUDING ANY IMPLIED WARRANTY OF MERCHANTABILITY OR FITNESS FOR ANY PARTICULAR PURPOSE. Some states or provinces do not allow disclaimers of such implied warranties or limitations on how long an implied warranty lasts, so the above limitation may not apply to you depending on the state or the province of purchase.
How do you obtain warranty service?
Keurig® brewers are high-quality appliances and, with proper care, are intended to provide years of satisfying performance. However, should the need arise for warranty servicing, simply call Keurig Customer Service at our toll free phone number 1.866.901.BREW (2739). Please do not return your brewer for servicing without first speaking to Keurig Customer Service to obtain an Authorization to Return number (ATR). Keurig® brewers returned without an ATR number will be returned to the sender without servicing.
Keurig, Incorporated
55 Walkers Brook Drive
Reading, MA 01867
1.866.901.BREW (2739)
Scan. Click. Call!
Learn more and reach us quickly without leaving home.

Scan here for videos about caring for your brewer!
Scan this QR code with your smartphone for step-by-step videos on cleaning, de-scaling and more. Or if you prefer, you can watch the videos on your computer at www.keurig.com/customer-service

Have questions? We're here to help!
Keurig is committed to your satisfaction. If you have questions, just give us a call to have them answered quickly without leaving the comfort of your home. 1.866.901.BREW (2739)
To learn more about Keurig, visit www.keurig.com or call 1.866.901.BREW (2739)
Keurig, Incorporated
55 Walkers Brook Drive
Reading, MA 01867
Keurig, Incorporated is a wholly-owned subsidiary of Green Mountain Coffee Roasters, Inc.

For Household Use Only
Pat. www.GMCR.com/patents
© 2013 Keurig, Incorporated
All rights reserved

VideosKeurig K40 Elite K-Cup Coffee Maker Unboxing Video
Documents / Resources
References
Download manual
Here you can download full pdf version of manual, it may contain additional safety instructions, warranty information, FCC rules, etc.
Advertisement


Need help?
Do you have a question about the K-Cup K40 Elite and is the answer not in the manual?
Questions and answers