Table of Contents
Advertisement
Quick Links
Advertisement
Table of Contents

Related Manuals for SYMA X800W


Summary of Contents for SYMA X800W
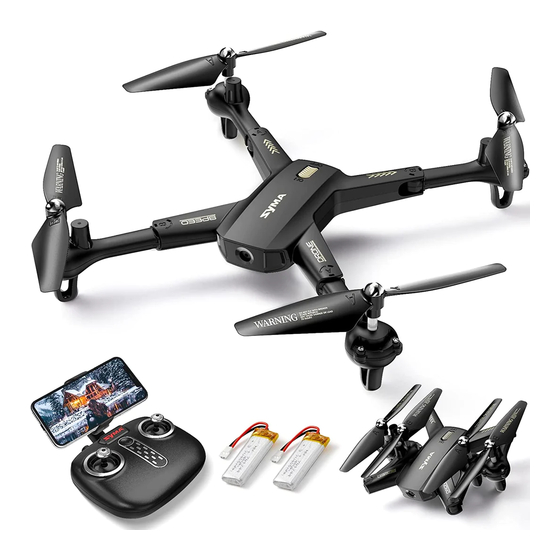
- Page 1 X800W FOLDING DRONE User manual...
- Page 3 Contents 1-22 ENGLISH INTRODUCE 23-46 DEUTSCH EINFÜHRUNG...
-
Page 4: Table Of Contents
Contents 1.0 Important safety information 2.0 About this product 2.1 Specifications 2.2 Install the SYMA FLY app 2.3 Drone components 2.4 Remote control components 3.0 Assembling the product 3.1 Installing the propeller protectors 3.2 Charging the drone battery 4.0 Flight guide 4.1 Flight preparation and turning the drone on/off... -
Page 5: Important Safety Information
1.0 Important safety information Thank you for purchasing this SYMA product. To ensure that you operate the aircraft correctly and conveniently, please read these instructions carefully before first use and store them in a safe place for future reference. Safety Guide 1.Adult or experienced RC pilot’s supervision is recommended for children. -
Page 6: About This Product
4 (A/B) Propeller protection frame User manual Phone holder 2.2 Install the SYMA Fly app Scan the QR code with your mobile device or download the app from your app store. Android Note: *For best results, use a device with iOS 8.0/Android 5.0 or later. -
Page 7: Drone Components
2.3 Drone components ① ⑧ ⑤ ② ③ ④ ⑥ ⑦ ① Propeller protection frame ⑤ Lens ② Motor ⑥ Battery cover ③ Power switch ⑦ Rear indicator ④ Propellers ⑧ Front indicator 2.4 Remote control ① Power switch ② Left joystick ③... -
Page 8: Assembling The Product
3.0 Assembling the product Folding the quadcopter 1. Unfold the arms in the direction of the arrow 2. Fold the arms in the direction of the arrow until the quadcopter is fully folded. Detaching the propellers Re-installing the propellers Remove the propeller covers and Insert the propellers onto the body of the screws in the direction of the arrow quadcopter in the direction of the arrow... -
Page 9: Charging The Drone Battery
Attaching the phone holder Insert the phone holder Press the spring to into the opening adjust the size of on the remote the phone holder. control. 3.2 Charging the drone battery Remove the battery Insert the battery Push the battery cover back, then flip it Insert the battery and close the battery up to remove the battery compartment cover. - Page 10 Note: *Do not short circuit or compress the battery, as this may cause an explosion. *Rechargeable batteries should be removed from the aircraft before charging *Failure to follow all the instructions may result in serious injury, irreparable damage to the battery and may cause a fire, smoke or explosion *Always check the batterys condition before charging or using it *Replace the battery if it has been dropped, or in case of an odor overheating, discolouration, deformation or leakage...
-
Page 11: Flight Guide
4.0 Flight guide 4.1 Flight preparation and turning the drone on/off Pairing the remote control with the drone Switch on the remote control Indicator flashes rapidly≥ slowly Remote control indicator flashes rapidly The indicator will stay constant when pairing is complete. Note: *After you switch on the remote control, the indicator will flash quickly to indicate that the remote control is waiting to be paired with the drone. -
Page 12: The Method Of Remote Control Flight Controlling
Turning the drone off Method one Method two Method three Push to the bottom for 2-3 seconds Pull the joysticks in a V shape Press the ascend/descend button 4.2 The method of Remote control flight controlling Ascend Descend Reverse Move forwards Rotate right Front Rotate left... -
Page 13: Stunt Functions
Front Tilt left Tilt right Rear 4.3 Stunt functions Press the spin button Rotate right Rotate left Press the spin button on the top-left of the remote control while holding the right joystick to the left or right. The drone will spin to the left or right accordingly. Ascend Press the spin button Rotate right... -
Page 14: Trimming
4.4 Trimming Trimming forwards and backwards If the aircraft drifts forwards or backwards when it is hovering, hold the left joystick down and push the right joystick down/up until the aircraft stops drifting. Trimming left and right If the aircraft drifts to the left or right when it is hovering, hold the left joystick down and push the right joystick right/left until the aircraft stops drifting. - Page 15 Level calibration Place the aircraft on a level surface and move the left and right joysticks to the lower right corner for approximately 3 seconds. The indicator will flash rapidly and then stay constant to indicate that the calibration process is complete. High/low speed mode Briefly press the right joystick to switch between high and low speed mode.
- Page 16 One - Key take-off/landing 1. When the aircraft is in standby, press the take-off button to make the aircraft take off automatically and hover at a height of1.5 m. 2. When the drone is in the air, press the one-touch take-off/landing button to make the aircraft land automatically.
- Page 17 1. Define the front When the aircraft is powered on for the first time, the direction of the aircraft nose is straight ahead. 2. Start headless function Headless mode After the linking is completed, press and hold the right joystick (about 2S), the remote controller will emit a "dididi,,,"...
-
Page 18: Real-Time Transmission Function
QR code shown. Note: * The QR code is printed on the packaging and on the back cover of the user manual. Visit the Syma website or your app store to download the latest version of the Syma Fly app. -
Page 19: Accessories (Available Separately)
7.0 Accessories (available separately) The following section contains a list of optional accessories that are available to purchase. Accessories can be purchased from your local retailer. Please indicate your preferred colour when making your purchase. Propeller protection Drone body frame Propeller blades Propeller decorations Motor A... -
Page 20: Contact Us
Rectification Procedures Problem Reason Solution 1. The drone has entered into low-voltage 1. Charge upo the drone. The drone does protection. 2. Change the batteries of not respond 2. When the power of the remote control the remote control. is weak, the power light indicator will blink. - Page 22 Transmitter power: 2445MHz-2475MHz Product name: DRONE Hereby, [GUANGDONG SYMA MODEL AIRCRAFT INDUSTRIAL CO., LTD], declares that this [drone ] is in compliance with Directive 2014/53/EU.The full test of the EU declaration of conformity is available at the following internet address: http://www.symatoys.com/down/-...
- Page 23 +1 718-312-0558 (US) +44(0)7723708421 (UK) +49 335-4551-9201(DE) usa@symatoys.com(US) eu@symatoys.com(EU) http://www.symatoys.com SYMA is a trademark of Guangdong Syma Model Aircraft Industrial Co., Ltd. registered in the United States and/or other countries. The company has the right of final interpretation of this user manual.
- Page 24 2 YEAR WARRANTY: LIMITED 2-YEAR WARRANTY AND FREE LIMITED REPLACEMENT PARTS FOR 2-YEARS Symatoys.com.cn warrants to the original buyer only that its products will be free from defects in material and workmanship for 2 years from the date upon which the product is shipped, either directly from symatoys.com.cn or from an Authorized Re-seller’s location, to the buyer.
- Page 25 LIMITED REMEDY: Symatoys.com.cn's sole liability, and buyer's sole remedy for any breach of the foregoing warranty shall be at Symatoys.com.cn's option to exchange the product with a new product or a refurbished product that is functionally equivalent to the original product, or issue a credit or refund to the purchase price the product.
Need help?
Do you have a question about the X800W and is the answer not in the manual?
Questions and answers