Advertisement
Available languages
Available languages
Quick Links
Language TOC.fm Page i Thursday, June 2, 2005 10:26 AM
English . . . . . . . . . . . . . . . . . . . . . . . . . . . . . . . . . . . . . . . . . . 1
. . . . . . . . . . . . . . . . . . . . . . . . . . . . . . . . . . . . . . . . . 9
. . . . . . . . . . . . . . . . . . . . . . . . . . . . . . . . . . . . . . . 17
. . . . . . . . . . . . . . . . . . . . . . . . . . . . . . . . . . . . . . 25
Türkçe . . . . . . . . . . . . . . . . . . . . . . . . . . . . . . . . . . . . . . . . 33
i
Advertisement

Related Manuals for Creative WebCam


Summary of Contents for Creative WebCam
- Page 1 Language TOC.fm Page i Thursday, June 2, 2005 10:26 AM English ......... . 1 .
- Page 2 Language TOC.fm Page ii Thursday, June 2, 2005 10:26 AM...
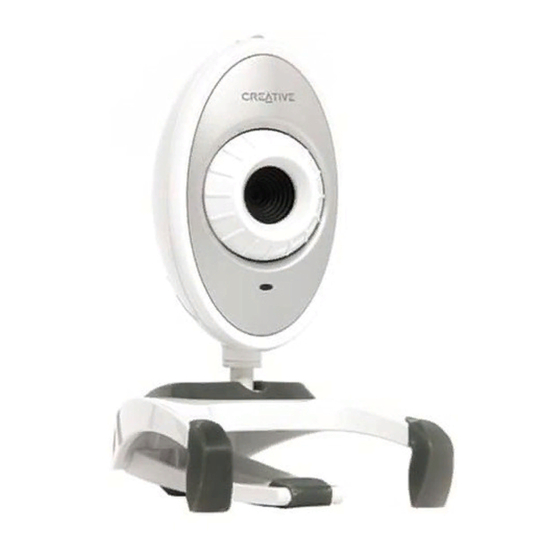
- Page 3 Side View Figure 1 Power LED Lights up when your Creative WebCam is connected to your computer's USB port. Adjusts the view focus. Point the lens toward your subject and then rotate this ring in Focus ring a clockwise or counterclockwise motion until the image is in focus.
-
Page 4: Getting Started
2.0 performance are installed on your computer, and alerts you if these components are missing. If you receive such a message, do either of the following to ensure that your Creative WebCam always performs to its fullest potential over a USB 2.0 connection: •... - Page 5 CLA Live! Effects QSB.fm Page 3 Thursday, June 2, 2005 10:46 AM Place your Creative WebCam on top of your computer monitor or other flat surface. For LCD flat panel monitors or notebook computers, use the integrated hinged lever to balance the Creative WebCam (see Figure 2).
-
Page 6: Verifying The Installation
CLA Live! Effects QSB.fm Page 4 Thursday, June 2, 2005 10:46 AM In Windows 2000 only: When a Digital Signature Not Found dialog box appears, telling you that Creative WebCam Live! Effects has been detected, click the Yes button. In Windows Me and Windows 98 SE only:... -
Page 7: Taking A Photo
CLA Live! Effects QSB.fm Page 5 Thursday, June 2, 2005 10:46 AM Using Your Creative WebCam Taking a Photo Click Start → Programs → Creative → Creative WebCam → Creative WebCam Center. In the Creative WebCam Center window, click the Capture tab. - Page 8 CLA Live! Effects QSB.fm Page 6 Thursday, June 2, 2005 10:46 AM Enabling Advanced Video FX Utility Advanced Video FX Utility enables you to add fun and interesting effects to your webcam video. You can launch the Advanced Video FX Utility in the following ways: •...
- Page 9 Utility in the following ways: • In WebCam Center, click Tools → Face Tracking Utility. • Right-click the Creative Cam Detector icon in the System Tray and click the Face Tracking Utility option. • Click Start → Programs or All Programs → Creative → Creative WebCam...
-
Page 10: Product Registration
<language> with the language that your document is in) Copyright © 2005 Creative Technology Ltd. All rights reserved. The Creative logo is a registered trademark of Creative Technology Ltd. in the United States and/or other countries. Microsoft and Windows are registered trademarks of Microsoft Corporation. - Page 11 WebCam について スナップショット ボタン フォーカス リング 電源 LED ランプ ヒンジ レバー ケーブル 正面 側面 図 1 電源 LED Creative WebCam がコンピューターの USB ポートに接続されている ランプ 場合に点灯します。 フォーカス フォーカスを調整するには、レンズを撮影対象に向けて画像の焦点が合う リング ように、このフォーカスリングを回します。 スナップ このボタンを押すと、WebCam Center 等のキャプチャソフトウェアを起動 ショットボタン して静止画をキャプチャします。 USB ケーブル コンピューターの USB ポートに接続します。 液晶モニター等を挟んだり引掛けて設置する際に、このヒンジレバーを開...
- Page 12 CLA Live! Effects QSB_JP.fm Page 10 Thursday, June 2, 2005 10:09 AM ご使用の準備 ソフトウェアのインストール 1. ソフトウェアをインストールする前に Creative WebCam をコンピューターに接 続しないで下さい。WebCam を接続してしまった場合は新しいハードウェアの 追加ウィザードダイアログボックスが表示されますのでキャンセル ボタンをクリックして、コンピューターから WebCam を取り外して下さい。 2. インストレーション CD をコンピューターの CD/DVD ドライブに挿入します。 インストールメニューが自動的に現れない場合は次の手順に従って下さい: i. スタートメニューやデスクトップのマイコンピュータを開きます。 ii. インストレーション CD を挿入した CD/DVD ドライブのアイコン選んで右クリックしま...
- Page 13 CLA Live! Effects QSB_JP.fm Page 11 Thursday, June 2, 2005 10:09 AM 5. 図 2 の様に液晶モニターに引掛けたり、ヒンジレバーを閉じた状態で平坦な 場所に置き、Creative WebCam を設置します。 図 2 6. Creative WebCam の接続を促す画面が表示されたら、図 3 の様に WebCam の USB ® ケーブルをコンピューターの USB ポートに接続します。Windows は自動的に WebCam を認識します。 図 3 Windows XP をお使いの場合:...
- Page 14 ディスクを挿入ダイアログボックスの OK ボタンをクリックし、画面の指示に従います。 7. ドライバーのインストール後、コンピューターを再起動するかを尋ねられる場合 があります。全てのインストールが完了するまで再起動は行わないで下さい。 8. 画面の指示に従いインストールを完了させ、コンピューターを再起動します。 インストールの確認 1. スタートメニューやデスクトップのマイコンピュータアイコンを選んで 右クリックします。 2. ポップアップメニューよりプロパティをクリックします。 Windows XP または Windows 2000 をお使いの場合: システムのプロパティダイアログボックスが現れますのでハードウェアタブをクリックし、 デバイスマネージャボタンをクリックします。 Windows Me または Windows 98 SE をお使いの場合: システムのプロパティダイアログボックスが現れますので、デバイスマネージャタブを クリックします。 3. イメージングデバイスツリーの + 記号をクリックします。Creative WebCam Live! Effects が見つけられない場合は、ソフトウェアのインストールを再度 行ってみて下さい。...
- Page 15 CLA Live! Effects QSB_JP.fm Page 13 Thursday, June 2, 2005 10:09 AM WebCam の使用 写真の撮影 1. スタート → すべてのプログラムまたはプログラム → Creative → Creative WebCam → Creative WebCam Center をクリックします。 2. Creative WebCam Center のウィンドウでスチル / ビデオキャプチャタブをク リックします。 3. 静止画の解像度リストより写真のサイズを選択します。 4. 静止画のキャプチャボタンをクリックします。...
- Page 16 エフェクトを付け加える選べるユニークなソフトウェアです。 アドバンスドビデオエフェクトユーティリティを起動するには: ・ WebCam Center のメニューよりツール → アドバンスドビデオエフェクトユー ティリティをクリックします。 ・ Windows タスクバーのシステムトレイの Creative Cam Detector アイコンを右ク リックして、ポップアップメニューよりアドバンスドビデオエフェクトユー ティリティをクリックします。 ・ スタート → すべてのプログラムまたはプログラム → Creative → Creative WebCam フィーチャー → アドバンスドビデオエフェクトユーティリティを クリックします。 ビデオエフェクトを適用するには: 1. アドバンスドビデオエフェクトユーティリティを起動します。 2. カテゴリリストが存在する場合は、使用したいエフェクトの種類を選択します。 3. エフェクトリストより、使用したいエフェクトを選択します。 4. Creative WebCam Center を起動します。...
- Page 17 CLA Live! Effects QSB_JP.fm Page 15 Thursday, June 2, 2005 10:09 AM フェイストラッキングの使用 フェイストラッキングは、WebCam の視野内の人の顔の動きを自動的に追尾して撮 影することの出来る機能です。この機能は WebCam Center や一般的なビデオメッ センジャーソフトウェア、ビデオキャプチャソフトウェアで使用することが出来 ます。 フェイストラッキングを有効にするには: ・ WebCam Center のメニューよりツール → フェイストラッキングユーティリティをク リックします。 ・ Windows タスクバーのシステムトレイの Creative Cam Detector アイコンを右ク リックして、ポップアップメニューよりフェイストラッキングユーティリティをク リックします。 ・ スタート → すべてのプログラムまたはプログラム → Creative → Creative WebCam フィーチャー → フェイストラッキングユーティリティをクリック します。...
- Page 18 ユーザーズガイドマニュアル d:\manual\<language>\manual.chm d: はインストール CD のドライブ名、<region> および <language> は製品をお求めになった国 / 地域(日本の場合は asia)と言語(日本語の場合は japanese)が当てはまります。 Copyright © 2005 Creative Technology Ltd. All rights reserved. Creative のロゴは Creative Technology Ltd. の米国および / またはその他の国における登録商標です。Microsoft および Windows は Microsoft Corporation の登録商標です。 その他の製品名や社名、 ロゴマークは該当する各社の登録商標または商標です。 本書の内容は予告なく変更されることがあります。また、製品の本体は本書に示す図とは多少異なる場合があ ります。...
- Page 19 快門按鈕 調焦光圈 電源 LED 兩用式活 USB 連接線 動支架 前部視圖 側視圖 圖 1 電源 LED 當 Creative WebCam 與電腦的 USB 連接埠相連時亮起。 調整焦距。將鏡頭對準要拍攝的物件,然後順時針或逆時針旋轉此光圈,直到 調焦光圈 圖像位於焦距中。 按下即可開啟 WebCam Center 與擷取圖像。 快門按鈕 USB 連接 將其連接至電腦的 USB 連接埠。 線 兩用式活動 用這個支架把 Creative WebCam 固定到 LCD 的顯示面板上。...
- Page 20 雙按我的電腦圖像。 ii. 右按 CD-ROM/DVD-ROM 光碟機圖像,然後單按自動播放。 3. 選擇您所在的地區並單按下一步按鈕。 4. 選擇語言,然後單按下一步按鈕。 5. 單按安裝驅動程式和應用程式的選擇,然後單按安裝按鈕。 僅針對具備 USB 2.0 功能的電腦使用者 : Creative 安裝程式將自動檢查發揮 USB 2.0 最佳效能所需的軟體元件是否已經 安裝在電腦上,如果元件遺失,會向您提醒。如果您收到類似的訊息,請採取下 列措施之一,以確保 Creative WebCam 總是透過 USB 2.0 連接發揮其最佳效 能: 安裝由經銷商提供的 USB 2.0 增強版主控制器驅動程式,或者 • ® 為您的 作業系統下載並安裝最新的 。...
- Page 21 CLA Live Effects QSB.fm Page 19 Tuesday, May 31, 2005 4:33 PM 6. 將 Creative WebCam 置於電腦顯示器的頂部或其他平坦的表面。如果要放置在 液晶顯示器或筆記型電腦上,請使用兩用式活動支架 ( 請參閱圖 2)。 圖 2 7. 在出現提示時,將 Creative WebCam 的 USB 連接線接至電腦的空閒 USB 連接 ® 埠 (見圖 3) 。Windows 會自動偵測到該裝置。 圖 3 僅在...
- Page 22 如果提示您放入 Windows 98 SE 或 Windows Me 光碟,請用相應的光碟取代安裝與應 用程式光碟。 ii. 在放入磁碟對話方塊中,單按確定按鈕。 8. 按照螢幕上的指示完成安裝。 9. 如果在全部應用程式安裝完畢之前提示您重新啟動電腦,就選擇否。 10. 在安裝了所有的應用程式之後,重新啟動電腦。 驗證安裝 1. 右按 Windows 桌面上或開始選單中的我的電腦圖像。 2. 在出現的選單上,單按內容。 僅針對於 Windows 2000 和 Windows XP: 在系統內容對話方塊中,單按硬體標籤。單按裝置管理員按鈕。 對於 Windows Me 和 Windows 98 SE: 在系統內容對話方塊中,單按裝置管理員標籤。 3. 單按圖像裝置圖像旁邊的加號 (+)標記。"Creative WebCam Live! Effects" 這 個項目會顯示出來。...
- Page 23 CLA Live Effects QSB.fm Page 21 Tuesday, May 31, 2005 4:33 PM 使用 Creative WebCam 拍攝照片 1. 單按開始 → 程式集 → Creative → Creative WebCam → Creative WebCam Center。 2. 在 Creative WebCam Center 視窗中,單按擷取標籤。 3. 單按照片解析度方塊,然後選擇所需的解析度。 4. 單按拍照按鈕擷取一幅圖像。圖像文件將儲存在預設媒體資料夾中。 要在圖像檢視器中檢視照片,請雙按縮圖 / 詳細資料窗格中的圖像檔案。...
- Page 24 幾種方法啟動進階影像 FX 公用程式: • 在 WebCam Center 中,單按工具 → 進階影像 FX 公用程式。 • 右按系統匣中的 Creative Cam Detector 圖像,然後單按進階影像 FX 公用程式 選項。 • 單按開始 → 程式集或所有程式 → Creative WebCam 特色工具 → Creative WebCam Center → 進階影像 FX 公用程式。 要套用一種影像效果,執行以下步驟: 1. 啟動進階影像 FX 公用程式。...
- Page 25 CLA Live Effects QSB.fm Page 23 Tuesday, May 31, 2005 4:33 PM 啟用臉部追蹤 在執行即時訊息程式及錄製影像時,您的攝影機可以自動縮放您的臉部。 您可以在臉部追蹤公用程式裡啟用臉部追蹤功能。按照以下幾種方法啟動臉部追蹤 公用程式: • 在 WebCam Center 中,單按工具 → 臉部追蹤公用程式。 • 右按系統匣中的 Creative Cam Detector 圖像,然後單按臉部追蹤公用程式選項。 • 單按開始→ 程式集或所有程式→ Creative → Creative WebCam 特色工具 → 臉 部追蹤公用程式。...
- Page 26 保固資訊 d:\warranty\<region>\<language>\warranty.chm 在保固期限內請務必保留一份購買憑證。 d:\manual\<language>\manual.chm 使用者指南 ( 將 d:\ 取代為表示 CD-ROM/DVD-ROM 光碟機的字母,將 <region> 取代為您所處 地區,將 <language> 取代為文件所用的語言 ) 版權 © 2005 Creative Technology Ltd. 版權所有。Creative 標誌是 Creative Technology Ltd. 在美國和 / 或其 他國家的註冊商標。Microsoft 和 Windows 是 Microsoft Corporation 的註冊商標。所有其他品牌和產品名稱都 是其各自擁有者的商標或註冊商標。所有規格如有變更,恕不另行通知。實物可能和圖示略有不同。...
- Page 27 关于 Creative WebCam 快门按钮 光圈 电源 LED 铰接式 USB 连接线 支架 前部视图 侧面视图 图 1 电源 LED 当 Creative WebCam 接至电脑的 USB 端口时,呈亮灯状态。 。 调整焦距。将镜头对准要拍摄的物体,顺时针或逆时针转动光圈直到图像位于 光圈 镜头中的合适位置。 按下即可打开 WebCam Center 并拍摄图片。 快门按钮 USB 连接线 将摄像头接至电脑的 USB 接口。 用于将 Creative WebCam 安装到液晶显示器上方。 铰接式支架...
- Page 28 CLA Live Effects QSB.fm Page 26 Tuesday, May 31, 2005 4:33 PM 使用入门 安装 Creative WebCam 1. 安装驱动程序前不要将 Creative WebCam 连接至您的电脑。如果您在安装驱动 程序前就连接了 Creative WebCam,并且添加硬件向导或找到新硬件向导对话 框出现,单击取消按钮。 2. 将安装和应用程序光盘放入 CD-ROM/DVD-ROM 光驱。 光盘应该自动运行。如果没有自动运行,请按以下步骤操作: i. 双击我的电脑图标。 ii. 右击 CD-ROM/DVD-ROM 驱动器图标,然后单击自动播放。 3. 选择您所在地区,然后单击下一步按钮。 4. 选择一种语言并单击下一步按钮。...
- Page 29 CLA Live Effects QSB.fm Page 27 Tuesday, May 31, 2005 4:33 PM 6. 将 Creative WebCam 放在电脑显示器的顶部或其它平坦的表面。 如果要放置在 液晶显示器或笔记本电脑上,请使用铰接式支架平衡 Creative WebCam( 参见 图 2)。 图 2 7. 出现提示时,将 Creative WebCam 的 USB 连接线接至电脑的空闲 USB 端口 ( 参见图 3)。 Windows ® 自动检测该设备。 图 3 仅在 Windows XP 下: i. 当找到新硬件向导对话框出现时,选择自动安装软件 (推荐)选项,然后单击下一步...
- Page 30 在插入磁盘对话框中,单击确定按钮。 8. 按照屏幕上的指示完成安装。 9. 如果还没有安装所有的应用程序,若出现要求您重新启动电脑的提示,选择否。 10. 所有应用程序安装完毕后重启电脑。 验证安装 1. 右击桌面上或开始菜单上的我的电脑图标。 2. 在出现的菜单上,单击属性。 仅在 Windows XP 和 Windows 2000 下: 在系统属性对话框中,单击硬件标记。单击设备管理器按钮。 在 Windows Me 和 Windows 98 SE 下: 在系统属性对话框中,单击设备管理器标记。 3. 单击图像设备图标旁边的加号 (+) 标志。 “Creative WebCam Live! Effects” 项 目出现。...
- Page 31 1. 单击开始 → 程序 → Creative WebCam → Creative WebCam Center。 2. 在 Creative WebCam Center 窗口中,单击捕捉标记。 3. 单击照片分辨率框,选择您需要的分辨率。 4. 单击拍摄照片按钮进行拍照。图像会作为文件保存于默认媒体文件夹中。 要在图像浏览器中查看图像,双击缩略图 / 详细内容区域的图像文件。 录制视频图像 1. 单击开始 → 程序 → Creative → Creative WebCam → Creative WebCam Center。 2. 在 Creative WebCam Center 窗口中,单击捕捉标记。 3. 单击视频分辨率框,选择您需要的分辨率。 4. 单击录像按钮启动或停止视频图像录制。停止录制时,视频会作为文件保存于默 认媒体文件夹中。...
- Page 32 法启动高级视频 FX 工具。 • 在 WebCam Center,单击工具 → 高级视频 FX 工具。 • 右击系统驻留程序中的 Creative Cam Detector 标记并单击高级视频 FX 工具选 项。 • 单击开始 → 程序或所有程序 → Creative → Creative WebCam 功能 → 高级视频 FX 工具。 如要应用一种视频效果,请按下列步骤操作: 1. 启动高级视频 FX 工具。 2. 单击选择类别框 (如果可用) ,然后选择您需要的效果类别。...
- Page 33 CLA Live Effects QSB.fm Page 31 Tuesday, May 31, 2005 4:33 PM 启用面部追踪 使用面部追踪,在进行即时通讯或录制视频时相机将自动放大人物的面部。 您可以在面部追踪工具中启动面部追踪。您可以通过以下方法启动面部追踪工具。 • 在 WebCam Center 中,单击工具 → 面部追踪工具。 • 右击系统驻留程序中的 Creative Cam Detector 标记并单击面部追踪工具选项。 • 单击开始 → 程序或所有程序 → Creative → Creative WebCam 功能 → 面部追踪 工具。...
- Page 34 客户支持服务 d:\support\<region>\<language>\support.chm 保修承诺 d:\warranty\<region>\<language>\warranty.chm 请在保修期内保留购买凭证。 用户指南 d:\manual\<language>\manual.chm ( 用 CD-ROM/DVD-ROM 光驱的盘符替代 d:\,用您所在的地区替代 <region>, 并用文件使用的语言替代 <language>) 版权 © 2005 Creative Technology Ltd. 版权所有。 Creative 标志是 Creative Technology Ltd. 在美国和 / 或其 它国家的注册商标。 Microsoft 和 Windows 是 Microsoft Corporation 的注册商标。本文中提及的所有其它产 品均为其各自所有者的商标或注册商标,在此予以认同。所有技术规格如有变动,恕不另行通知。实际内容可能 与图示略有不同。...
- Page 35 Menteşeli manivela kablosu Önden Görünüm Yandan Görünüm Şekil 1 Creative WebCam bilgisayarınızın USB bağlantı noktasına takılı olduğunda Güç LED'i yanar. Odak Odağı ayarlar. Lensi nesneye doğru tutun ve görüntü odağa yerleşinceye dek halkası halkayı saat yönünde veya saatin tersi yönde çevirin.
- Page 36 Creative Yükleme işlemi, USB 2.0 performansı için gerekli yazılım bileşenlerinin yüklü olup olmadığını otomatik olarak kontrol eder ve bu bileşenler eksikse sizi uyarır. Böyle bir uyarı mesajı alırsanız, Creative WebCam’in USB 2.0 bağlantı üzerinde her zaman iyi performans göstermesi için aşağıdakilerden birini yapın: •...
- Page 37 CLA Live! Effects QSB_turkish.fm Page 35 Thursday, June 2, 2005 11:01 AM 6. Creative WebCam’i bilgisayar monitörünüzün üzerine ya da düz bir zemine koyun. Düz panel monitörler veya dizüstü bilgisayarlarda, Creative WebCam’i dengelemek için menteşeli manivelayı kullanın (bkz. Şekil 2).
- Page 38 CLA Live! Effects QSB_turkish.fm Page 36 Thursday, June 2, 2005 11:01 AM Creative WebCam Live! Effects’in algılandığını bildiren Sayısal İmza Bulunamadı iletişim kutusu görüntülendiğinde, Evet düğmesini tıklatın. Windows Me ve Windows 98 SE sisteminde: Windows 98 SE veya Windows Me CD'sini takmanız istenirse, Kurulum ve Uygulamalar CD'sinin yerine uygun CD'yi yerleştirin.
- Page 39 CLA Live! Effects QSB_turkish.fm Page 37 Thursday, June 2, 2005 11:01 AM Creative WebCam’i Kullanma Fotoğraf Çekme 1. Başlat → Programlar → Creative → Creative WebCam → Creative WebCam Center ögelerini tiklatin. 2. Creative WebCam Center penceresinde, Capture (Yakala) sekmesini tıklatın.
- Page 40 • Yüklediğiniz video efektlerini Advanced Video FX Utility özelliğine eklemek için → → More Add video effects (Diğer Video efektleri ekle)öğelerini tıklatın. • Advanced Video FX Utility hakkında daha fazla bilgi için, Creative Webcam Özellikleri çevrimiçi Yardım’a başvurun.
- Page 41 Face Tracking özelliği ile, kameranız mesajlaşma oturumları veya video kaydı sırasında otomatik olarak yüzünüze odaklanır. Face Tracking özelliğini, Face Tracking Utility içinden etkinleştirebilirsiniz. • WebCam Centerfda, Tools → Face Tracking Utility oğesini tıklatın. • Sistem Tepsisi’nde Creative Cam Detector simgesini çift tıklatın ve Face Tracking Utility seçeneğini tıklatın.
-
Page 42: Diğer Bilgiler
(d:\ harfini CD-ROM/DVD-ROM sürücünüzün harfiyle, <region> seçeneğini bulunduğunuz bölgeyle ve <language> seçeneğini belgenizin diliyle değiştirin) Telif Hakkı © 2005 Creative Technology Ltd. Tüm hakları saklıdır. Creative logosu, Creative Technology Ltd.’in ABD ve/veya diğer ülkelerdeki kayıtlı ticari markasıdır. Microsoft ve Windows, Microsoft Corporation’un tescilli markalarıdır. - Page 43 Untitled2.fm Page 41 Thursday, June 2, 2005 10:37 AM Notes...
- Page 44 Untitled2.fm Page 42 Thursday, June 2, 2005 10:37 AM Notes...
Need help?
Do you have a question about the WebCam and is the answer not in the manual?
Questions and answers