Table of Contents
Advertisement
Available languages
Available languages
Quick Links
CLE_WCam Vista Plus QS.book Page i Monday, December 20, 2004 12:35 PM
English . . . . . . . . . . . . . . . . . . . . . . . . . . . . . . . . . . . . . . . . . . 1
Français . . . . . . . . . . . . . . . . . . . . . . . . . . . . . . . . . . . . . . . . . 7
Deutsch . . . . . . . . . . . . . . . . . . . . . . . . . . . . . . . . . . . . . . . 13
Italiano . . . . . . . . . . . . . . . . . . . . . . . . . . . . . . . . . . . . . . . . 19
Español . . . . . . . . . . . . . . . . . . . . . . . . . . . . . . . . . . . . . . . . 25
Nederlands . . . . . . . . . . . . . . . . . . . . . . . . . . . . . . . . . . . . . 31
Português . . . . . . . . . . . . . . . . . . . . . . . . . . . . . . . . . . . . . . 37
Svenska . . . . . . . . . . . . . . . . . . . . . . . . . . . . . . . . . . . . . . . . 43
Norsk . . . . . . . . . . . . . . . . . . . . . . . . . . . . . . . . . . . . . . . . . 49
Dansk . . . . . . . . . . . . . . . . . . . . . . . . . . . . . . . . . . . . . . . . . 55
Suomi . . . . . . . . . . . . . . . . . . . . . . . . . . . . . . . . . . . . . . . . . 61
. . . . . . . . . . . . . . . . . . . . . . . . . . . . . . . . . . . . . . . . . 67
Polski. . . . . . . . . . . . . . . . . . . . . . . . . . . . . . . . . . . . . . . . . . 73
. . . . . . . . . . . . . . . . . . . . . . . . . . . . . . . . . . . . . . . 79
i
Advertisement
Table of Contents

Related Manuals for Creative WebCam Vista Plus


Summary of Contents for Creative WebCam Vista Plus
-
Page 1: Table Of Contents
CLE_WCam Vista Plus QS.book Page i Monday, December 20, 2004 12:35 PM English ......... . 1 Français . - Page 2 CLE_WCam Vista Plus QS.book Page ii Monday, December 20, 2004 12:35 PM...
-
Page 3: English
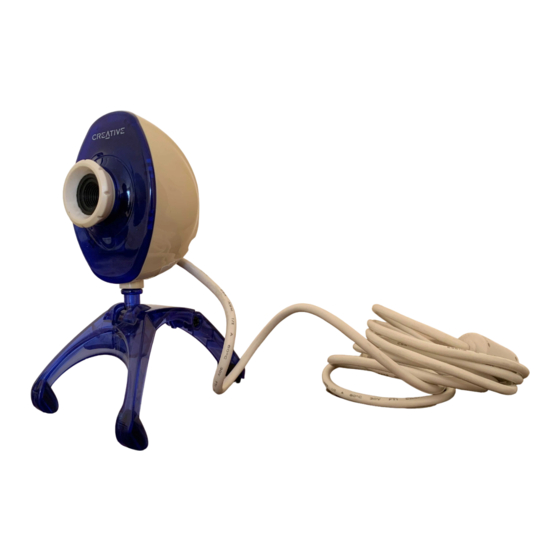
Side view Figure 1 Power LED Turns on when your Creative WebCam is connected to your computer. Adjusts the view focus. Point the lens toward your subject and then rotate this Focus ring ring in a clockwise or counterclockwise motion until the image is in focus. - Page 4 Getting Started Installing Your Creative WebCam Do not connect your Creative WebCam to your computer before installing the drivers. If you accidentally begin installation with your Creative WebCam connected and the Add New Hardware Wizard or Found New Hardware Wizard dialog box appears, click the Cancel button.
- Page 5 When a Hardware Installation dialog box appears, click the Continue Anyway button. In Windows 2000 only: When a Digital Signature Not Found dialog box appears, telling you that your Creative WebCam has been detected, click the Yes button. In Windows Me and Windows 98 SE only: If you are prompted to insert the Windows Me or Windows 98 SE CD, replace the Installation CD with the appropriate CD.
- Page 6 Manager button. In Windows Me and Windows 98 SE: In the System Properties dialog box, click the Device Manager tab. Click the plus (+) sign next to the Imaging Device icon. Your Creative WebCam’s name appears. Using Your Creative WebCam Taking a Photo Click Start →...
- Page 7 CLE_WCam Vista Plus QS.book Page 5 Monday, December 20, 2004 12:35 PM Recording a Video Click Start → Programs → Creative → Creative WebCam → Creative WebCam Center. In the Creative WebCam Center window, click the Capture tab. Click the Video Resolution box and select the resolution that you want.
- Page 8 Creative Technology Ltd. in the United States and/or other countries. NOMAD is a registered trademark of Aonix and is used by Creative Technology Ltd. and/or its affiliates under license. Microsoft, Windows and the Windows logo are registered trademarks of Microsoft Corporation. All other products are trademarks or registered trademarks of their respective owners and are hereby recognized as such.
-
Page 9: Français
Vue avant Vue latérale Figure 1 Ecran S'allume lorsque votre Creative WebCam est connectée à votre ordinateur. d'alimentation Permet de régler la mise au point. Dirigez l’objectif vers votre sujet puis faites Bague de mise tourner la bague vers la gauche ou vers la droite jusqu’à ce que l’image soit nette au point (mise au point). - Page 10 Cliquez sur les options pour installer les pilotes et les applications, puis cliquez sur le bouton Installer. Placez la Creative WebCam sur le haut de votre moniteur ou sur toute autre surface plane. Pour les moniteurs à écran plat LCD ou les ordinateurs portables, utilisez le levier à...
- Page 11 CLE_WCam Vista Plus QS.book Page 9 Monday, December 20, 2004 12:35 PM A l'invite, connectez le câble USB de votre Creative WebCam à un port USB disponible ® sur votre ordinateur (voir Figure 3). Microsoft™ Windows la détecte automatiquement. Port USB...
- Page 12 Le nom de votre Creative WebCam apparaît. Utilisation de votre Creative WebCam Prise d'une photo Cliquez sur Démarrer → Programmes → Creative → Creative WebCam → Creative WebCam Center. Dans la fenêtre Creative WebCam Center, cliquez sur l'onglet Capturer.
- Page 13 CLE_WCam Vista Plus QS.book Page 11 Monday, December 20, 2004 12:35 PM Enregistrement d'une vidéo Cliquez sur Démarrer → Programmes → Creative → Creative WebCam → Creative WebCam Center. Dans la fenêtre Creative WebCam Center, cliquez sur l'onglet Capturer. Cliquez sur la zone de résolution Vidéo et sélectionnez la résolution souhaitée.
- Page 14 <langue> par la langue de rédaction du document.) Copyright © 2005 Creative Technology Ltd. Tous droits réservés. Le logo Creative est une marque commerciale ou une marque déposée de Creative Technology Ltd. aux Etats-Unis et/ou dans d'autres pays. Microsoft, Windows et le logo Windows sont des marques déposées de Microsoft Corporation.
-
Page 15: Deutsch
Vorderansicht Seitenansicht Abbildung 1 Betriebs-LED Wird beim Anschließen der Creative WebCam an den Computer eingeschaltet. Passt die Fokussierung an. Richten Sie das Objektiv auf das gewünschte Motiv. Fokussierring Drehen Sie anschließend diesen Ring im bzw. entgegen dem Uhrzeigersinn, bis das Bild scharf eingestellt ist. - Page 16 Erste Schritte Installieren der Creative WebCam Schließen Sie die Creative WebCam erst an den Computer an, nachdem Sie die Treiber installiert haben. Wenn Sie versehentlich mit der Installation beginnen, während die Creative WebCam angeschlossen ist, und der Hardware-Assistent oder das Dialogfeld Neue Hardware gefunden angezeigt wird, klicken Sie auf die Schaltfläche Abbrechen.
- Page 17 Nur Windows 2000: Wenn Ihnen über das Dialogfeld Digitale Signatur nicht gefunden mitgeteilt wird, dass Ihre Creative WebCam gefunden wurde, ignorieren Sie diese Meldung, und klicken Sie auf Ja. Nur Windows Me und Windows 98 SE: Wenn Sie aufgefordert werden, die Windows 98 SE- oder Windows Me-CD einzulegen, nehmen Sie die Installations-CD aus dem Laufwerk und legen die entsprechende CD ein.
- Page 18 Name Ihrer Creative WebCam wird angezeigt. Verwenden Ihrer Creative WebCam Aufnehmen eines Fotos Klicken Sie auf Start → Programme → Creative → Creative WebCam → Creative WebCam Center. Klicken Sie im Fenster Creative WebCam Center auf die Registerkarte Erfassung. Klicken Sie auf das Feld Fotoauflösung, und wählen Sie die gewünschte Auflösung.
- Page 19 Wenn Sie die Fotos in einer Bildanzeige sehen möchten, doppelklicken Sie im Teilfenster Miniaturen/Details auf die Bilddateien. Aufnehmen eines Videos Klicken Sie auf Start → Programme → Creative → Creative WebCam → Creative WebCam Center. Klicken Sie im Fenster Creative WebCam Center auf die Registerkarte Erfassung.
- Page 20 Copyright © 2005 Creative Technology Ltd. Alle Rechte vorbehalten. Das Creative-Logo, MuVo und Creative MediaSource sind Marken oder eingetragene Marken von Creative Technology Ltd. in den USA und/oder anderen Ländern. NOMAD ist eine registrierte Marke von Aonix und wird von Creative Technology Ltd. und/oder Schwestergesellschaften unter Lizenz verwendet.
-
Page 21: Italiano
Regola la messa a fuoco. Puntare l'obiettivo sul soggetto, quindi ruotare la ghiera messa a fuoco in senso orario o antiorario fino a mettere a fuoco l'immagine. Pulsante Consente di avviare Creative WebCam Center o di catturare immagini. Istantanea Cavo USB Collegarlo alla porta USB del computer. - Page 22 CLE_WCam Vista Plus QS.book Page 20 Monday, December 20, 2004 12:35 PM Preparazione Installazione di Creative WebCam Non collegare Creative WebCam al computer prima di aver installato i driver. Se involontariamente si avvia l'installazione con Creative WebCam collegata e vengono visualizzate le finestre di dialogo Installazione guidata Nuovo hardware o Trovato nuovo hardware, fare clic sul pulsante Annulla.
- Page 23 CLE_WCam Vista Plus QS.book Page 21 Monday, December 20, 2004 12:35 PM Quando viene richiesto, collegare il cavo USB di Creative WebCam alla porta USB ® libera del computer (vedere la figura 3 ). Microsoft™ Windows rileva automaticamente la periferica.
- Page 24 Creative WebCam. Utilizzo di Creative WebCam Cattura di una foto Fare clic su Start → Programmi → Creative → Creative WebCam → Creative WebCam Center. Nella finestra Creative WebCam Center, fare clic sulla scheda Cattura. Fare clic sulla casella di selezione del tipo di risoluzione Foto e selezionare la risoluzione desiderata.
- Page 25 Per visualizzare le foto nel visualizzatore di immagini, fare doppio clic sui file delle immagini visualizzati nel riquadro Miniatura/Dettagli. Registrazione di un video Fare clic su Start → Programmi → Creative → Creative WebCam → Creative WebCam Center. Nella finestra Creative WebCam Center, fare clic sulla scheda Cattura.
- Page 26 Copyright © 2005 Creative Technology Ltd. Tutti i diritti riservati. Il logo Creative, MuVo e Creative MediaSource sono marchi o marchi registrati di Creative Technology Ltd. negli Stati Uniti e/o in altri paesi. NOMAD è un marchio registrato di Aonix e viene utilizzato da Creative Technology Ltd. e/o da suoi affiliati dietro apposita licenza. Microsoft, Windows e il logo Windows sono marchi registrati di Microsoft Corporation.
-
Page 27: Español
Vista frontal Vista lateral Figure 1 Indicador de Se enciende cuando Creative WebCam está conectada al ordenador. alimentación Ajusta el enfoque. Mire por la lente al sujeto que va a fotografiar y gire este aro Aro de enfoque hacia la derecha y hacia la izquierda hasta que la imagen esté enfocada. - Page 28 Instalación de Creative WebCam No conecte Creative WebCam al ordenador antes de instalar los controladores. En caso de que comience la instalación con Creative WebCam conectada al ordenador y se abra el cuadro de diálogo Asistente para agregar nuevo hardware o Asistente para hardware nuevo encontrado, haga clic en el botón Cancelar.
- Page 29 CLE_WCam Vista Plus QS.book Page 27 Monday, December 20, 2004 12:35 PM Cuando se le pida, conecte el cable USB de Creative WebCam a un puerto USB libre ® del ordenador (consulte la Figura 3). Microsoft™ Windows detectará el dispositivo de manera automática.
- Page 30 Aparece el modelo de Creative WebCam. Utilización de Creative WebCam Cómo hacer una fotografía Haga clic en Inicio → Programas → Creative → Creative WebCam → Creative WebCam Center. En la ventana Creative WebCam Center, haga clic en la ficha Capturar.
- Page 31 CLE_WCam Vista Plus QS.book Page 29 Monday, December 20, 2004 12:35 PM Cómo grabar un vídeo Haga clic en Inicio → Programas → Creative → Creative WebCam → Creative WebCam Center. En la ventana Creative WebCam Center, haga clic en la ficha Capturar.
- Page 32 Copyright © 2005 Creative Technology Ltd. Reservados todos los derechos. El logotipo de Creative es una marca comercial o marca comercial registrada de Creative Technology Ltd. en los EE. UU. y en otros países. Microsoft, Windows y el logotipo de Windows son marcas comerciales registradas de Microsoft Corporation. Todos los otros productos son marcas comerciales o marcas comerciales registradas de sus propietarios respectivos y se reconocen como tal.
-
Page 33: Nederlands
Zijaanzicht Afbeelding 1 Voedingslampje Gaat branden wanner uw Creative WebCam wordt aangesloten op uw computer. Hiermee stelt u het beeld scherp in. Richt de lens op het onderwerp en draai Scherpstelring deze ring vervolgens met de klok mee of tegen de klok in tot het beeld scherp is. - Page 34 Installatie van uw Creative WebCam Sluit uw Creative WebCam niet op de computer aan voordat u de stuurprogramma’s hebt geïnstalleerd. Als u per abuis toch met de installatie begint terwijl de Creative WebCam is aangesloten, en het dialoogvenster Wizard Hardware toevoegen of Wizard Nieuwe hardware gevonden verschijnt, klikt u op de knop Annuleren.
- Page 35 CLE_WCam Vista Plus QS.book Page 33 Monday, December 20, 2004 12:35 PM Wanneer u daartoe de instructie krijgt, sluit u de USB-kabel van uw Creative WebCam aan op de beschikbare USB-poort op uw computer (zie Afbeelding 3). Microsoft™ ® Windows detecteert het apparaat automatisch.
- Page 36 Creative WebCam wordt weergegeven. Gebruik van uw Creative WebCam Een foto maken Klik op Start → Programma’s → Creative → Creative WebCam → Creative WebCam Center. Klik in het dialoogvenster Creative WebCam Center op het tabblad Vastleggen. Klik op het vak voor de resolutie Foto en selecteer de gewenste resolutie.
- Page 37 CLE_WCam Vista Plus QS.book Page 35 Monday, December 20, 2004 12:35 PM Een video opnemen Klik op Start → Programma’s → Creative → Creative WebCam → Creative WebCam Center. Klik in het dialoogvenster Creative WebCam Center op het tabblad Vastleggen.
- Page 38 Creative Technology Ltd. in de Verenigde Staten en/of andere landen. NOMAD is een gedeponeerd handelsmerk van Aonix en wordt door Creative Technology Ltd. en/of partners onder licentie gebruikt. Microsoft, Windows en het Windows-logo zijn gedeponeerde handelsmerken van Microsoft Corporation.
-
Page 39: Português
Perspectiva frontal Figura 1 Indicador luminoso de Liga-se quando a WebCam da Creative é ligada ao computador. alimentação Ajusta o foco visual. Direccione a lente para o objecto e rode este anel no sentido Anel de focagem dos ponteiros do relógio ou no sentido contrário ao dos ponteiros do relógio até... - Page 40 Não ligue a WebCam da Creative ao computador antes de instalar os controladores. Se iniciar acidentalmente a instalação com a WebCam da Creative ligada e se aparecer a caixa de diálogo Assistente para adicionar novo hardware ou Assistente de novo hardware encontrado, clique no botão Cancelar.
- Page 41 CLE_WCam Vista Plus QS.book Page 39 Monday, December 20, 2004 12:35 PM Quando solicitado, ligue o cabo USB da WebCam da Creative a uma porta USB ® disponível no seu computador (consulte a Figura 3). O Microsoft™ Windows detecta automaticamente o dispositivo.
- Page 42 Aparece o nome da sua WebCam da Creative. Utilizar a sua WebCam da Creative Tirar uma fotografia Clique em Iniciar → Programas → Creative → Creative WebCam → Creative WebCam Center. Na janela CreativeWebCamCenter, clique no separador Capturar.
- Page 43 CLE_WCam Vista Plus QS.book Page 41 Monday, December 20, 2004 12:35 PM Gravar um vídeo Clique em Iniciar → Iniciar → Creative → Creative WebCam → Creative WebCam Center. Na janela CreativeWebCamCenter, clique no separador Capturar. Clique na caixa Resolução do vídeo e seleccione a resolução que pretende.
- Page 44 MediaSource são marcas comerciais ou marcas registadas da Creative Technology Ltd. nos Estados Unidos e/ou noutros países. NOMAD é uma marca registada da Aonix que é utilizada pela Creative Technology Ltd. e/ou suas filiais através de licenciamento. Microsoft, Windows e o logótipo Windows são marcas registadas da Microsoft Corporation. Todos os restantes produtos são marcas comerciais ou marcas registadas dos seus respectivos proprietários e são reconhecidos...
-
Page 45: Svenska
Framifrån Från sidan Bild 1 Strömindikator Tänds när Creative WebCam är ansluten till datorn. Justerar fokus. Rikta linsen mot motivet och vrid sedan ringen med- eller motsols Fokuseringsring tills motivet blir skarpt. Avtryckarknapp Startar Creative WebCam Center eller tar bilder. - Page 46 Komma igång Installera din Creative WebCam Anslut inte Creative WebCam till datorn innan du har installerat drivrutinerna. Om du av misstag påbörjat installationen med Creative WebCam ansluten och dialogrutan Lägg till ny maskinvara eller Ny maskinvara har hittats visas, klickar du på Avbryt.
- Page 47 Om det visas en dialogruta med texten Maskinvaruinstallation klickar du på Fortsätt ändå. Endast i Windows 2000: När dialogrutan Ingen digital signatur hittades visas, vilket betyder att Creative WebCam har identifierats, trycker du på Ja. Endast för Windows Me och Windows 98 SE: Om du ombeds mata in cd:n med Windows ME eller Windows 98 SE byter du ut installations-cd:n mot rätt cd.
- Page 48 Klicka på fliken Maskinvara i dialogrutan Systemegenskaper. Klicka på Enhetshanteraren. Endast för Windows Me och Windows 98 SE: Klicka på fliken Enhetshanteraren i dialogrutan Systemegenskaper. Klicka på plustecknet (+) bredvid ikonen Imaging-enhet. Namnet på din Creative WebCam visas. Så här använder du din Creative WebCam Ta foto Klicka på...
- Page 49 CLE_WCam Vista Plus QS.book Page 47 Monday, December 20, 2004 12:35 PM Spela in video Klicka på Start → Program → Creative Creative WebCam → Creative WebCam Center. I fönstret Creative WebCam Center, klickar du på fliken Capture. Klicka på rutan Video Resolution och välj den upplösning du vill ha.
- Page 50 Creative Technology Ltd. i Förenta staterna och/eller andra länder. NOMAD är ett registrerat varumärke som tillhör Aonix och används av Creative Technology Ltd. och/eller dess partners under licens. Microsoft, Windows och Windows-logotypen är registrerade varumärken som tillhör Microsoft Corporation.
-
Page 51: Norsk
Sett forfra Sett fra siden Figur 1 Strøm-LED Lyser når Creative WebCam kobles til datamaskinen. Stiller inn fokus for utsnittet. Rett linsen mot motivet og drei denne ringen med Fokuseringsring eller mot klokken til bildet kommer i fokus. Stillbildeknapp Starter Creative WebCam Center eller tar bilder. - Page 52 Komme i gang Installere Creative WebCam Ikke koble Creative WebCam til datamaskinen før du har installert driverne. Hvis du ved et uhell starter installeringen mens Creative WebCam er koblet til og dialogboksen Veiviser for ny maskinvare eller Ny maskinvare funnet vises, klikker du på Avbryt-knappen.
- Page 53 CLE_WCam Vista Plus QS.book Page 51 Monday, December 20, 2004 12:35 PM Når du blir bedt om det, kobler du Creative WebCams USB-kabel til en ledig USB-port ® på datamaskinen (se figur 3). Microsoft™ Windows vil oppdage enheten automatisk. USB-port...
- Page 54 Klikk på kategorien Maskinvare i dialogboksen Egenskaper for System. Klikk på knappen Enhetsbehandling. Windows Me og Windows 98 SE: Klikk på kategorien Enhetsbehandling i dialogboksen Egenskaper for System. Klikk på plusstegnet (+) ved siden av Bildeenhet-ikonet. Navnet på Creative WebCam vises. Bruke Creative WebCam Ta bilder Klikk på...
- Page 55 CLE_WCam Vista Plus QS.book Page 53 Monday, December 20, 2004 12:35 PM Gjøre videoopptak Klikk på Start → Programmer → Creative → Creative WebCam → Creative WebCam Center. Klikk på kategorien Capture i vinduet Creative WebCam Center. Klikk på Video Resolution og velg oppløsningen du vil bruke.
- Page 56 Copyright © 2005 Creative Technology Ltd. Med enerett. Creative-logoen, MuVo og Creative MediaSource er varemerker eller registrerte varemerker for Creative Technology Ltd. i USA og/eller andre land. NOMAD er et registrert varemerke for Aonix, som brukes på lisens av Creative Technology Ltd. og/eller affilierte selskaper. Microsoft, Windows og Windows-logoen er registrerte varemerker for Microsoft Corporation.
-
Page 57: Dansk
Set forfra Set fra siderne Figur 1 LED-indikator Lyser, når dit Creative WebCam er tilsluttet computeren. for strøm Justerer visningsfokus. Peg på emnet med linsen, og drej derefter denne ring med Fokusring eller mod uret, indtil billedet er i fokus. - Page 58 Introduktion Installation af dit Creative WebCam Slut ikke dit Creative WebCam til computeren, før du har installeret driverne. Hvis du ved et tilfælde begynder installationen med Creative WebCam tilsluttet, og dialogboksen Guiden Tilføj hardware eller Guiden Ny hardware fundet vises, skal du klikke på...
- Page 59 CLE_WCam Vista Plus QS.book Page 57 Monday, December 20, 2004 12:35 PM Når du bliver bedt om det, skal du tilslutte USB-kablet til din Creative WebCam til en ® ledig USB-port på computeren (se figur 3). Microsoft™ Windows registrerer automatisk enheden.
- Page 60 Enhedshåndtering. Windows Me og Windows 98 SE: Klik på fanen Enhedshåndtering i dialogboksen Egenskaber for system. Klik på plustegnet (+) ved siden af ikonet for Billedenhed. Navnet på dit Creative WebCam vises. Brug af dit Creative WebCam Sådan tager du et billede Klik på...
- Page 61 CLE_WCam Vista Plus QS.book Page 59 Monday, December 20, 2004 12:35 PM Sådan optager du en video Klik på Start → Programmer → Creative → Creative WebCam → Creative WebCam Center. Klik på fanen Capture i vinduet Creative WebCam Center.
- Page 62 Copyright © 2005 Creative Technology Ltd. Alle rettigheder forbeholdes. Creative-logoet, MuVo og Creative MediaSource er varemærker eller registrerede varemærker, som tilhører Creative Technology Ltd. i USA og/eller andre lande. NOMAD er et registreret varemærke tilhørende Aonix og anvendes af Creative Technology Ltd. og/eller firmaets associerede selskaber under licens.
-
Page 63: Suomi
USB-kaapeli jalusta Etuosa Sivunäkymä Kuva 1 Virran Syttyy, kun Creative WebCam -kamera liitetään tietokoneeseen. merkkivalo Säätää kuvan tarkennusta. Suuntaa linssi kuvauskohteeseen ja käännä sitten Tarkennussäädin rengasta myötä- tai vastapäivään, kunnes kuva on terävä. Laukaisin Käynnistää Creative WebCam Centerin tai tallentaa kuvia. - Page 64 Näin pääset alkuun Creative WebCam -kameran asentaminen Asenna ensin ohjaimet ja kytke vasta sitten Creative WebCam -kamera tietokoneeseen. Jos aloitat vahingossa asentamisen niin, että Creative WebCam -kamera on kytketty tietokoneeseen, näyttöön tulee Ohjattu uuden laitteen asentaminen- tai Ohjattu uuden laitteiston asennus -valintaikkuna. Valitse tällöin Peruuta.
- Page 65 Vain Windows 2000: Kun näyttöön tulee Digitaalista allekirjoitusta ei löytynyt -valintaikkuna, jossa on ilmoitus siitä, että järjestelmä on havainnut Creative WebCam -kameran, valitse Kyllä. Vain Windows Me ja Windows 98 SE: Jos näytössä kehotetaan asettamaan Windows Me- tai Windows 98 SE -levy CD-asemaan, vaihda pyydetty CD-levy asennuslevyn tilalle.
- Page 66 Napsauta Kuvankäsittelylaite-kuvakkeen vieressä olevaa plus (+) -merkkiä. Creative WebCam -kameran nimi tulee näkyviin. Creative WebCam -kameran käyttäminen Kuvan ottaminen Valitse Käynnistä → Ohjelmat → Creative → Creative WebCam → Creative WebCam Center. Napsauta Creative WebCam Center -ikkunassa Capture-välilehteä. Napsauta Photo Resolution -valintaruutua ja valitse haluamasi tarkkuus.
- Page 67 Jos haluat katsella valokuvia kuvankatseluohjelmassa, kaksoisnapsauta kuvatiedostoja Thumbnails/Details-kentässä. Videokuvan tallentaminen Valitse Käynnistä → Ohjelmat → Creative → Creative WebCam → Creative WebCam Center. Napsauta Creative WebCam Center -ikkunassa Capture-välilehteä. Napsauta Video Resolution -valintaruutua ja valitse haluamasi tarkkuus. Aloita ja lopeta kuvan tallentaminen napsauttamalla Record-painiketta. Videokuva tallennetaan tiedostoina oletuskansioon, kun lopetat tallennuksen.
- Page 68 (Käytä d:\-kirjaimen paikalla CD-/DVD-asemasi kirjainta, <alueen> paikalla omaa aluettasi ja <kielen> paikalla haluamaasi kieltä.) Copyright © 2005 Creative Technology Ltd. Kaikki oikeudet pidätetään. Creative-logo, MuVo ja Creative MediaSource ovat Creative Technology Ltd.:n tavaramerkkejä tai sen Yhdysvalloissa ja/tai muissa maissa rekisteröityjä tavaramerkkejä. NOMAD on Aonixin rekisteröity tavaramerkki ja Creative Technology Ltd.
- Page 69 Kabel USB Pohled zepředu Pohled z boku obr.1 Dioda LED Rozsvítí se po připojení kamery Creative WebCam k počítači. napájení Kroužek Zaostří obraz. Namiřte objektiv na požadovaný objekt a otočte tímto ostření kroužkem doprava či doleva až do plného zaostření.
- Page 70 4. Klepněte na možnosti instalace ovladačů a aplikací a poté na tlačítko Nainstalovat. 5. Umístěte kameru Creative WebCam na monitor počítače nebo na jiný rovný povrch. U displejů LCD nebo přenosných počítačů použijte k zajištění kamery Creative WebCam integrovaný úchyt (viz obrázek 2).
- Page 71 CLE_WCam Vista Plus QS.book Page 69 Monday, December 20, 2004 12:35 PM 6. Po vyzvání zapojte kabel USB kamery WebCam Creative do volného portu USB ® na počítači (viz obrázek 3). Systém Microsoft™ Windows zařízení automaticky rozpozná. Port USB obr.3 Pouze v systému Windows XP:...
- Page 72 3. Klepněte na znaménko plus (+) u ikony Zařízení pro digitalizaci obrazu. Objeví se název kamery Creative WebCam. Použití kamery Creative WebCam Pořízení snímku 1. Click Start → Programy → Creative → Creative WebCam → Creative WebCam Center. 2. V okně Creative WebCam Center klepněte na kartu Capture (Pořízení snímku).
- Page 73 Chcete-li si snímky prohlédnout, poklepejte na soubory snímků v okně Thumbnails/ Details (Miniatury a podrobnosti). Záznam videa 1. Click Start → Programy → Creative → Creative WebCam → Creative WebCam Center. 2. V okně Creative WebCam Center klepněte na kartu Capture (Pořízení...
- Page 74 (písmeno d:\ nahraďte písmenem označujícím jednotku CD-ROM/DVD-ROM, <oblast> oblastí, kde se nacházíte, a <jazyk> jazykem dokumentu) Copyright © 2005 Creative Technology Ltd. Všechna práva vyhrazena. Logo Creative, MuVo a Creative MediaSource jsou ochranné známky nebo registrované ochranné známky společnosti Creative Technology Ltd.
-
Page 75: Polski
Ruchoma podpórka Widok z przodu Widok z boku Rysunek 1 Dioda LED Zostaje włączona po podłączeniu internetowej kamery Creative WebCam zasilania do komputera. Pierścień Umożliwia ustawianie ostrości obrazu. Skieruj obiektyw w stronę ustawiania wybranego przedmiotu, a następnie obracaj pierścień w kierunku zgodnym ostrości... - Page 76 3. Wybrać język i kliknąć przycisk Dalej. 4. Kliknąć opcje instalowania sterowników i aplikacji, a następnie kliknąć przycisk Instaluj. 5. Umieścić kamerę Creative WebCam na monitorze komputera lub innej płaskiej powierzchni. W przypadku płaskich monitorów krystalicznych lub ekranów komputerów przenośnych, ustaw równo kamerę przy pomocy zintegrowanej ruchomej podpórki (Patrz: Rysunek 2).
- Page 77 CLE_WCam Vista Plus QS.book Page 75 Monday, December 20, 2004 12:35 PM 6. Po wyświetleniu monitu podłączyć kabel USB kamery Creative WebCam do dostępnego złącza USB komputera (Patrz: Rysunek 3). System Microsoft™ ® Windows automatycznie wykryje urządzenie. Port USB Rysunek 3 Tylko w systemie Windows XP: Kiedy zostanie wyświetlone okno dialogowe Kreator znajdowania nowego sprzętu,...
- Page 78 Używanie kamery WebCam firmy Creative Robienie zdjęć 1. Kliknij kolejno Start → Programy → Creative → Creative WebCam → Creative WebCam Center. 2. W oknie Creative WebCam Center kliknij zakładkę Capture (przechwyć). 3. Kliknij okienko Photo Resolution (Rozdzielczość obrazu) i wybierz żądaną...
- Page 79 CLE_WCam Vista Plus QS.book Page 77 Monday, December 20, 2004 12:35 PM Nagrywanie filmów wideo 1. Kliknij kolejno Start → Programy → Creative → Creative WebCam → Creative WebCam Center. 2. W oknie Creative WebCam Center kliknij zakładkę Capture (przechwyć).
- Page 80 Stanów Zjednoczonych i / lub innych krajach. NOMAD jest zastrzeżonym znakiem towarowym firmy Aonix i jest używany przez firmę Creative Technology Ltd. i / lub jej spółki na licencji. Microsoft, Windows i logo Windows są zastrzeżonymi znakami towarowymi firmy Microsoft Corporation. Wszystkie inne produkty są znakami towarowymi lub zastrzeżonymi znakami towarowymi ich odpowiednich właścicieli i za takie są...
- Page 81 Кабель USB рычажок Вид спереди Вид сбоку Рис. 1 Индикатор Включается при подключении камеры Creative WebCam к компьютеру. питания Регулировка фокусировки изображения. Направьте объектив на Кольцо предмет съемки, а затем вращайте это кольцо по часовой или против фокусировки часовой стрелки до получения максимальной резкости изображения.
- Page 82 3. Выберите соответствующий язык и нажмите Далее. 4. Выберите пункты установки драйверов и приложений и нажмите Установить. 5. Установите камеру Creative WebCam на монитор вашего компьютера или другую плоскую поверхность. При установке на плоскопанельный ЖК-монитор или переносной компьютер для крепления камеры Creative WebCam (см.
- Page 83 Только для Windows 2000: Когда появится диалоговое окно Цифровая подпись не найдена с сообщением, что обнаружена камера Creative WebCam, нажмите кнопку Да. Только для Windows Me и Windows 98 SE: При появлении запроса на установку компакт-диска Windows Me или Windows 98 SE замените...
- Page 84 изображений. Появится название камеры Creative WebCam. Работа с камерой Creative WebCam Фотосъемка 1. Выберите пункт меню Пуск → Программы → Creative → Creative WebCam → Creative WebCam Center. 2. В окне Creative WebCam Center перейдите на вкладку Capture (Захват изображения).
- Page 85 CLE_WCam Vista Plus QS.book Page 83 Monday, December 20, 2004 12:35 PM Запись видео 1. Выберите пункт меню Пуск → Программы → Creative → Creative WebCam → Creative WebCam Center. 2. В окне Creative WebCam Center перейдите на вкладку Capture (Захват...
- Page 86 Дополнительная информация Creative Knowledge Base Для самостоятельного решения технических вопросов и проблем можно обратиться в доступную круглосуточно Базу знаний Creative . Перейдите на узел http://www.creative.com и выберите свой регион. Зарегистрируйте свой продукт! Воспользуйтесь преимуществами, которые появятся у вас при регистрации...
- Page 87 бесплатно только в течение гарантийного периода в соответствии с гарантийными обязательствами. © Creative Technology Ltd., 2005. Все права защищены. Логотип Creative, MuVo и Creative MediaSource являются зарегистрированными товарными знаками Creative Technology Ltd. в США и/или других странах. NOMAD является зарегистрированным товарным знаком компании Aonix и используется компанией...
- Page 88 • Creative Product • Produit Creative • Creative Produkt • Prodotto Creative • Creative produkt • Creative-Produkt • Creative produkt • Výrobek firmy Creative • Producto Creative • Produto Creative • Creative Product • Creative Produkt • Creative продукт • Jälleenmyyjä leima •...
Need help?
Do you have a question about the WebCam Vista Plus and is the answer not in the manual?
Questions and answers