
Related Manuals for DuraVent DIRECT-TEMP Co-Linear Insert Kit


Summary of Contents for DuraVent DIRECT-TEMP Co-Linear Insert Kit
- Page 1 DIRECT-TEMP® Installation Instructions Venting System For Direct Vent Co-Linear Gas Inserts LISTED MH27778 ©2022 DIRECT-TEMP Form No. L950_820019494 Installation Instructions 11/08/2022 Printed in U.S.A.
- Page 2 CONTENTS CERTIFICATION LABEL ..........3 INFORMATION AND WARNINGS .
- Page 3 CERTIFICATION LABEL MH27778 Note: Diagrams & Illustrations Are Not to Scale.
- Page 4 ATTENTION: WARNING Always maintain required clearances (air Failure to follow the installation instructions spaces) to nearby combustibles to prevent a could cause FIRE, CARBON MONOXIDE fire hazards. Be sure to check the appliance POISONING, OR DEATH. If you are unsure manufacturer’s installation instructions for of installation requirements, call the Phone minimum clearance requirements between...
- Page 5 2 . S e l e c t t h e l e n g t h s n e c e s s a r y t o PLANNING YOUR INSTALLATION: accommodate the required distance The DIRECT-TEMP Co-Linear Insert Kit was determined above. Stretch the flexible liners designed to be installed in an existing mason-...
- Page 6 5. After carefully feeding the Flex Liner down Figure 2 the chimney to the bottom, form an angle to line up the Flex Liner with the vent opening on the appliance. Important: Do not let the Flex Liner sag below the level at which it will Flex Liner connect to the appliance or connector.
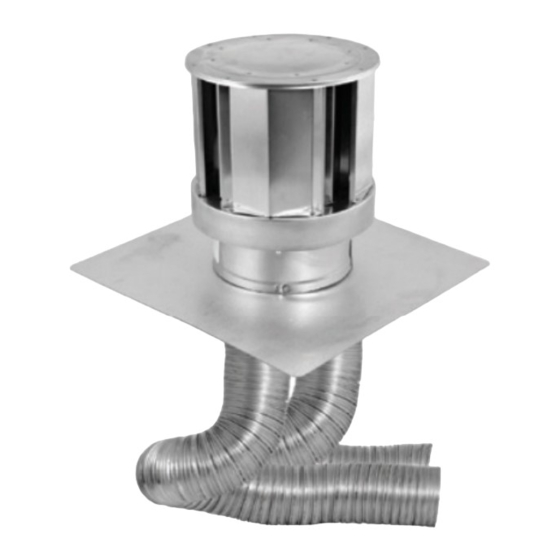
- Page 7 Co-Linear High Wind Figure 5 Flex Liners Baseplate Figure 7 10. Apply a bead of silicone sealant to the top of the masonry chimney prior to securing Existing the baseplate of the Co-Linear High Wind Masonry Cap to the masonry chimney. Secure Co- Chimney Linear High Wind Cap to masonry chimney with suitable fasteners (one at each corners)
- Page 8 GENERAL MAINTENANCE Conduct an inspection of the venting system twice a year. Recommended areas to inspect are as fol- lows: 1. Check areas of the Venting System which are exposed to the elements for corrosion. These will appear as rust spots or streaks, and in extreme cases, holes.
- Page 9 DIRECT-TEMP® Instructions d’installation Système d’évacuation pour les encastrables colinéaire à gaz d’évacuation directe HOMOLOGUÉ MH27778 ©2022 DIRECT-TEMP No. Formulaire L950_820019494 Instructions d’installation 11/08/2022 Imprimé aux É.U.
- Page 10 TABLE DES MATIÈRES ÉTIQUETTE DE CERTIFICATION ......... 3 INFORMATION ET AVERTISSEMENTS .
- Page 11 ÉTIQUETTE DE CERTIFICATION MH27778 Note: Les schémas et illustrations ne sont pas à l’échelle.
- Page 12 ATTENTION: AVERTISSEMENT Le non-respect des instructions d’installation Maintenir toujours le dégagement minimum requis pourrait provoquer UN INCENDIE, UN d’espace d’air aux combustibles pour empêcher EMPOISONNEMENT AU MONOXYDE DE un risque d’incendie. Consulter également le CARBONE, OU LA MORT. Si vous avez manuel d’installation du manufacturier de l’appar- quelques incertitudes concernant les exigences eil pour prendre connaissance des configurations...
- Page 13 En raison de possible accrochage, ce qui peut en- Schéma 1 traîner des dommages de surface, la prudence doit être observée lors de l’abaissement des longueurs dans la cheminée de maçonnerie. La partie supérieure de la cheminée de maçon- nerie doit être étanche pour empêcher l’humidité de rentrer dans la cheminée et de l’endommager.
- Page 14 5. Après avoir soigneusement descendu le Schéma 2 conduit dans la cheminée jusqu’en bas, former un angle pour aligner le conduit flexible avec l’ouverture de l’appareil. Important: Ne pas laisser le conduit fléchir au-dessous du niveau Conduit flexible auquel il se reliera à l’appareil ou au connecteur. Ceci pourrait permettre au gaz chaud d’être piégé...
- Page 15 Capuchon à grand vent Schéma 5 colinéaire Conduits flexible Plaque de base Schéma 7 10. Appliquez un ruban de scellant à la silicone sur le dessus de la cheminée de maçonnerie avant de sécuriser la plaque de base du capuchon à grand vent colinéaire à la cheminée.
- Page 16 ENTRETIEN GÉNÉRAL Effectuer une inspection de votre système deux fois par année. Les secteurs recommandé à inspecter sont comme suit: 1. Vérifier que les conduits externes du sys- tème d’évent ne comportent aucun signe de corrosion avancée. Ceux-ci apparaîtront com- me taches ou coulisses de rouille, et dans des cas extrêmes, trous.
Need help?
Do you have a question about the DIRECT-TEMP Co-Linear Insert Kit and is the answer not in the manual?
Questions and answers