
Related Manuals for LINET PURA


Summary of Contents for LINET PURA
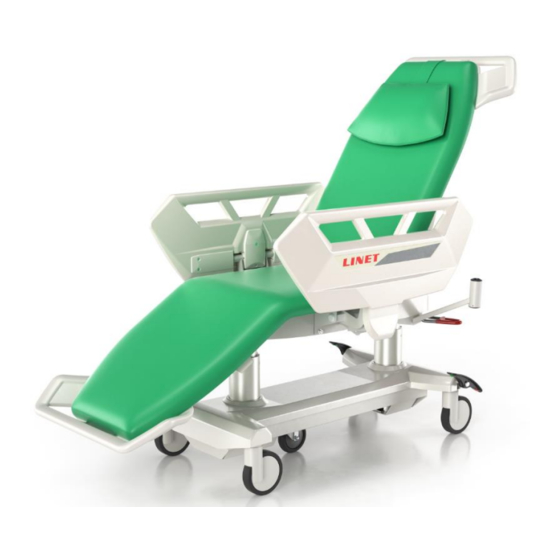
- Page 1 PURA Multifunctional chair D9U004ODA-0101 Version: 09 Publication Date: 2022-06...
- Page 2 Czech Republic Tel : +420 558 640 631 borcadmedical@borcadmedical.com www.borcadmedical.com PURA Multifunctional chair Author: BORCAD Medical a.s. Related links: http://www.linet.com/cs/borcad-medical All rights reserved. All trademarks and brands are the property of the appropriate owners. The manufacturer reserves the right to changes in the contents of this manual that relate to the product´s technical regulations. It is for this reason that the contents of this manual may indicate differences from the current manufacture of the product.
-
Page 3: Table Of Contents
Table of Contents 1 INTRODUCTION ...........................5 2 SAFETY AND DANGERS........................13 2.1 Safety instructions ........................13 3 UN-PACKING MANUAL ........................16 4 OVERVIEW OF BASIC PARTS ......................20 4.1 Overview of basic versions ......................20 4.2 Overview of colour verisons ......................20 4.3 Safety ............................ - Page 4 10.16 Front buffer ..........................49 10.17 Infusion stand .......................... 49 10.18 Eating table (version with barriers) ..................50 10.19 Eating table (for elbow-rest version) ..................51 10.20 Front central brake (a pair) ...................... 53 10.21 Fifth wheel ..........................54 10.22 Electric leg rest ........................55 10.23 USB cell-phone recharger .......................
-
Page 5: Introduction
Please always follow the instructions contained in this manual and use the chair only in accordance with these instructions. Please keep these instructions near the chair throughout its operation. Every person operating the chair PURA must read and understand the contents of these instructions. - Page 6 Pictogram Meaning Danger Danger: Hazardous voltage This symbol refers to all information that may help you to avoid operational complications Applied parts B Applied parts BF Production number Type number meaning Mark for intermittent functioning, this means that if the product is used without interruptions for an "x"...
- Page 7 Pictogram Meaning Maximum product weight, including accessories in maximum configuration Maximum chair weight with SWL load Producer Date of production Follow the instructions manual Equipotentiality Symbol of the packaging material: "Store in a dry place" Symbol of the packaging material: "Attention! Fragile"...
- Page 8 Pictogram Meaning Symbol according to the Directive 2002/96/EC (Directive on waste electrical and electronic equipment). Symbol for " Do not dispose of this product in the municipal collection points. Dispose of this product in the collection points for waste electrical and electronic equipment ".
- Page 9 Pictogram Meaning Cardiopulmonary resuscitation (CPR) MEDICAL DEVICE (compatible with Medical Device Regulation) UNIQUE DEVICE IDENTIFIER Warning: The power cable shall always be clamped on the selected place of the chair using a plastic hook as is recommended on picture! Follow the instructions manual! D9U004ODA-0101 9/81...
- Page 10 Placement of warning stickers - chair with armrests Placement of warning stickers - chair with side guards 10/81 D9U004ODA-0101...
- Page 11 Abbreviation Meaning Light emitting diodes Power intake unit Computer standard for computer imaging technology Universal serial bus Liquid crystal display Information technology Personal computer Sound intensity unit Pressure unit Frequency unit in the SI system Electromagnetic compatibility High frequency Medical equipment CISPR International Special Committee on Radio Interference Acoustic signalling...
- Page 12 Production label – explanation of symbols: Address of Manufacturer Type of product, serial number Manufacturing Date (Year-Month-Day) DI (Device Identifier)/ GTIN (Global Trade Item Number) PI (Product Identifier) 2D Bar Code (GS1 DataMatrix) DI+PI=UDI Electrical Specification 1D Bar code GS1-128 (Serial number) Symbols Please address any potential queries to the authorized representative or directly to the producer BORCAD Medical a.s.
-
Page 13: Safety And Dangers
2 Safety and Dangers 2.1 Safety instructions ❖ Follow the instructions carefully. ❖ Any non-observance of this manual may lead to injuries or material damage. ❖ Exclusively use the chair if it is in perfect working order. ❖ If necessary, check the chair functions daily or at each shift change. ❖... - Page 14 Ensure that the chair and its components are exclusively modified with the manufacturer´s approval. ❖ ❖ Ensure there is no risk of crushing or otherwise injuring the patient’s limbs (e.g. between siderails and mattress platform, between movable parts etc.) before positioning the chair or folding down the siderails. ❖...
- Page 15 Fire Extinguishing Information Warning: Note Danger of frostbite by contact of CO2 with human skin! Do not use halotron extinguisher in closed rooms without ventilation – danger to your health! The medical product is categorised as energised electric installation, hence, fire can be extinguished by the following types of extinguishers.
-
Page 16: Un-Packing Manual
3 Un-packing Manual Shipment inspection after delivery Do not unpack and/or accept the shipment if the package is clearly damaged! If that is the case, file a complaint. Personnel qualification Persons authorised to install the product and put it into operation, i.e. persons trained by BORCAD Medical a.s. Personnel required for unpacking and installation At least two persons. - Page 17 Remove the top of the packaging and the corner of the box. Cut off the corners of the outer reinforcement or crush them with your foot so that you can pull the chair out of the pallet easily. Carefully cut through the plastic packaging. Version with side rails: the side rails are in a down position.
- Page 18 Version with armrests: the armrests are placed horizontally, they do not touch the chair. Cut the strap to release them. Gradually pull all accessories out of the packaging and cut-outs, remove the empty packaging from the pallet and dispose of it. Cut off the tightening straps from the hand control and the power cable and remove the mirelon tubes at the bottom frame.
- Page 19 Cut off the tightening straps at the back part and remove the mirelon tube. Cut off the tightening straps holding the chair’s chassis together with the pallet and release the brake of the wheels. Then the chair can be carried by two persons from the pallet and placed on the ground. Křížovým šroubovákem odstraňte všechny 4 dřevěné...
-
Page 20: Overview Of Basic Parts
4 Overview of basic parts Back section with non removable uphostery Seat section / leg section with non removable upholstery Adjustable armrests Base of the chair with lifting column Lockable castors – 100 mm diameter Castors with central brake – 150 mm diameter Adjustable siderails Pilow (option) IV pole holder (option) -
Page 21: Safety
4.3 Safety Standards The product meets the requirements of valid standards EN 60601-1 ed. 2 and IEC 60601-1-2 ed. 3. According to the current text of the Directive on Medical Instrumentation 93/42/EEC, the chair is classified as class I medical device, non-sterile, without measuring function. -
Page 22: Function
5 Function Warning: Caution The essential functions are lying, sitting and supporting the patient during procedure. Additionally, it is the CPR position. The use of the chair is allowed only on the premises that comply with the conditions of the applicable regulations for electrical installations in premises for medical purposes. -
Page 23: Intended Use
6 Intended use The chair complies with the demands for chair before and after the day surgery operation (patient admission, transport, recovery after surgery) and for non-invasive procedures such as Colonoscopy/ Gastroscopy endoscopic examination, Operation of Hallux Valgus deformities, Surgical Treatment of small burns. The chair complies with the demands of treatment processes in terms of dialysis/oncology/blood donation. -
Page 24: Electrical Safety
7 Electrical safety Warning: Dangerous electric voltage The arm-chair mustn't be used in medical premises with potential danger of fire or explosion caused by air, environment with enriched oxygen, or with monoxide nitrogen in combination with anesthetic or cleaning agents. Since the unit is powered from the network, it may cause interference with sensitive equipment due to generation of electromagnetic field. - Page 25 Warning: Dangerous electric voltage Do not wrap the power cable around the chair and its parts – front part, barriers, armrests, transport handles and others! When lifting the chair or its back part, there is a risk of cable tear! Risk of electric shock or fire! In case of visible damage to the cabling, do not tamper with the chair or the cable! It is always necessary to call service technicians! The mains power cable must be always attached to a selected place on the chair with a plastic hook!
-
Page 26: Electromagnetic Compatibility
7.1 Electromagnetic compatibility Chair is intended for hospitals except for near active HF surgical equipment and the RF shielded room of a medical system for magnetic resonance imaging, where the intensity of EM disturbances is high. Chair has defined no essential performance. WARNING! It is recommended to avoid the use of this device next to or in block with other device, because it could lead to improper operation. - Page 27 Manufacturer instructions – electromagnetic susceptibility Immunity Tests Compliance level ± 8 kV for contact discharge Electrostatic discharge (ESD) ± 15 kV for contact discharge IEC 61000-4-2 Radiated RF 3 V/m 80 MHz – 2,7 GHz IEC 61000-4-3 80 % AM at 1 kHz Proximity fields from RF wireless communications equipment IEC 61000-4-3...
-
Page 28: Mechanical Safety
Before the patient seat section on the multifunctional char the char has to be positioned-locked safely! The multifunctional chair cannot be transported in the Trendelenburg position. The multifunctional chair PURA is equipped with 4 castors with brakes that must all be blocked so that the chair can stay steady on the floor To brake all castors in the version you use the central brake. -
Page 29: Transport, Braking
8.1 Transport, braking The chair also allows f o r t h e transport of a patient. This is, however, subject to the following conditions: Warning: Caution Transport the chair in its lowest position and make sure that it is not transported over areas with lateral inclination exceeding 6°. - Page 30 The chair is fitted with four castors (150mm version) and it may be moved in all directions. Castor functions are controlled by pedal brakes. Setting of the wheel pedal: Backward All castors locked Horizontally All castors free, spinning around their axle Left castor locked (patient on the chair view) in forward direction, other castors Forward free, spinning around their axle.
-
Page 31: Transportation Of The Chair From One Place To Another
8.2 Transportation of the chair from one place to another Follow the instruction below: Do not move the chair over cables. Power cable of the chair must always be fixed in the hook. Unlock the castors before travelling (see castor control and transportation). Do not move the chair on floors with unsuitable surfaces. -
Page 32: Operating The Chair
9 Operating the chair Warning: Caution The multifunctional chair is not intended for continuous use - motors can withstand the maximum loads values reported on the label, or 2 minutes of continuous use (e.g. continuous positioning of the chair) and then 18 minutes of rest. -
Page 33: Motor Setting
9.1 Motor setting The hand controller is very intuitive, ergonomic design and standard feature. It contains basic positions of chair sections (back section, foot section, and foot support), up/down and chair inclination. It also offers functions such as lock position, GO button, Trendelenburg, indication of the battery status, indication of connection to mains, STOP button and memory functions (horizontal and access position). - Page 34 GO button The GO button is used to turn on the time interval in which other functions on the control can be used. The GO interval ends 3 minutes after the control was used the last time. Next to the GO button, there is a LED indicator of the active GO periods (the time interval in which the control functions can be used).
- Page 35 Positioning of Positioning of Positioning the back part the leg rest of the and under- (accessories) under-leg leg part part simultaneous Height adjustment To reach the horizontal position, it is necessary to press and hold the button To reach the entry position, it is necessary to press the button and Positioning of...
-
Page 36: Armrests
9.2 Armrests 9.2.1 Basic armrest Warning: Caution The armrests are adapted for a maximum load – see Technical parameters In case of overload (such as when sitting on the armrests) this component may lose their functionality. We strongly recommend that you respect the maximum load of the armrest. -
Page 37: Improper Adjustment Of The Armrests
9.2.2 Improper adjustment of the armrests Warning: Caution Make sure that the armrests are adjusted correctly, including the height-adjustable armrests and the armrests with the elbow relief. Improper use of the armrests will damage the backrest upholstery and the back part upholstery. -
Page 38: Siderails
9.3 Siderails Warning: Caution Risk of injury due to patient falling out of chair! Ensure that folded-up siderails are securely anchored. Press against siderails from inside in order to check stability. Hospital personnel are responsible for ensuring siderails are folded-up when the chair is occupied. The split plastic siderails are components of the chair, the siderails cannot be removed. -
Page 39: Electric Setting Of Trendelenburg
9.4 Electric setting of Trendelenburg Warning: Caution The optional equipment of the arm-chair contains a backup battery, which serves to set the chair into the anti- shock position in case of a power outage. To set the Trendelenburg position press (and keep holding) the button on the remote control. In this way the anti- shock position can be set starting from any previous position of the chair. -
Page 40: Equipotential Bonding
9.5 Equipotential bonding The chair is fitted with a coupling for synchronizing the potential with other electrical medical equipment. The coupling is located behind the chair under the lying surface of the chair. The chair is interconnected to the other device by means of a cable (not supplied with the chair) that is connected easily by its end to the coupling. -
Page 41: Accessories
10 Accessories Warning: Caution Never put removable accessories onto the arm-chair, onto its loading area, onto the bottom cover or over a patient. Otherwise you can cause injury to persons or damage to the device! 10.1 Rotary holder of the infusion stand Warning: Caution The maximum loading is 8 kg! -
Page 42: Pillow (Flat)
10.3 Pillow (flat) A comfort height-adjustable head rest provides a support for a patient's head. A pillow with a leatherette band can be easily demounted. 10.4 Pillow (half-round) A comfort height-adjustable head rest provides a support for a patient's head. A pillow with a leatherette band can be easily demounted. -
Page 43: Pillow (Between The Back And Seat Parts)
10.6 Pillow (between the back and seat parts) The pillow increases patient's comfort in the area of his/her thighs, mainly in a horizontal position of the arm-chair. The pillow can be easily unfastened from the both sides of the arm-chair by unhooking from the pin. D9U004ODA-0101 43/81... -
Page 44: Big Plastic Box For Personal Things
10.7 Big plastic box for personal things Warning: Caution The big plastic box cannot be combined with the oxygen bottle holder! The maximum loading is 8 kg! It serves for putting patient's personal things into it. The vessel volume is 20 l. Dimensions (length: 42 cm, height: 23 cm, width: 30 cm). -
Page 45: Din Lath
10.9 DIN lath Warning: Caution While moving the arm-chair up and down, please make sure that ambient things are not in collision with or cannot be captured by this holder. The maximum loading is 50 kg at the maximum outreach of 200 mm! The holder is used for the placement of the certain accessories such as, for example, an additional rest, infusion stand and surgical trays. -
Page 46: Pvc Cloth Of Elbow-Rests (A Pair)
10.11 PVC cloth of elbow-rests (a pair) Place the protective cover on the armrest. (See photo) Then fasten the velcro straps on the bottom side as shown on the picture below. Fold the ends of the cover in the order of numbers and arrows. 10.12 PVC cloth of the leg rest Protective cover for foot section: Place the protective cover on the chair and fasten the ends of the cover (4) by the buttons that are located on... -
Page 47: Tablet Holder (L/R)
10.13 Tablet holder (L/R) Warning: Caution The maximum loading is 0,6 kg! While using a tablet in the holder, give a special attention to it. A tablet should be always safety laid in the holder to avoid its falling out and damaging. Parking position of the tablet holder is shown in the picture.. -
Page 48: Oxygen Bottle Holder
10.14 Oxygen bottle holder Warning: Caution The maximum loading is 15 kg! It is impossible to combine it with the big plastic box! Please be especially careful during manipulation with an oxygen bottle with the holder. It is always necessary to fix the oxygen bottle with the holder with the help of an attached strap to prevent from its falling out. -
Page 49: Front Buffer
10.16 Front buffer Warning: Caution The maximum loading is 45 kg! We recommend it in case of frequent transportation of the chair. Without these accessories, artificial leather can be damaged in case of a collision of the chair with an obstacle! It serves as a protection of the arm-chair during frequent transportation of the arm-chair with/without a patient. -
Page 50: Eating Table (Version With Barriers)
10.18 Eating table (version with barriers) Warning: Caution The maximum carrying capacity is 15 kg! During installation of the table or during its extraction, it is always necessary to pay attention on a patient who seats in the arm-chair. It is necessary to avoid a collision with his/her head, body, fingers! When the table is mounted, it is never allowed to tilt the barriers down. -
Page 51: Eating Table (For Elbow-Rest Version)
10.19 Eating table (for elbow-rest version) Warning: Caution The maximum load capacity is 10 kg! If a patient is sitting in the chair, take care of the patient while installing or removing the table. Be careful to prevent any collision with the patient! Never change the elbow-rest position with the table installed. - Page 52 Eating table movement (back and forward direction) 1. Press the table shift controller to shift the table back and forwards. 2. The maximum shift range is 180 mm Removal: To remove the table, please reverse the installation procedure. 1. Turn the table away from the patient, out of the chair. 2.
-
Page 53: Front Central Brake (A Pair)
10.20 Front central brake (a pair) The arm-chair is equipped with a front central brake only for the version with 150 mm wheels for an additional fee. The functions of the wheels are controlled by the brake pedals. Adjustment of the wheel pedal: STOP All wheels are blocked NEUTRAL... -
Page 54: Fifth Wheel
10.21 Fifth wheel The arm-chair can be equipped with a fifth wheel placed in the center of the support frame. The fifth wheel allows you to run and navigate the arm-chair in long corridors and small rooms. The version is only with 150 mm wheels. How to activate the fifth wheel: Disconnect the arm-chair from the main connection. -
Page 55: Electric Leg Rest
10.22 Electric leg rest Warning: Caution The leg rest doesn't protect the arm-chair against a stroke! The electric leg rest can't be combined with the front buffer! We don't recommend suspension of other accessories on the leg rest! It does not serve as an ascending step! The maximum capacity is 45 kg vertically and 100 kg when squeezed! Displacement is possible with the help of the manual controller by holding the push-buttons up and down. -
Page 56: Usb Cell-Phone Recharger
10.23 USB cell-phone recharger The USB charger is used for charging cell phones and tablets It is situated on the bottom side of the foot section (under the seat) on the right and left side of the chair. The USB connector has a plastic cover providing an IP protection for the USB connector. -
Page 57: Patient Fixation Band
10.24 Patient fixation band Warning: Caution While positioning the arm-chair, always unbind the patient for his/her safety and comfort. It is especially valid for the movement of the back part and the seat part. In the case of the use of the fixation band, it is recommended to place the arm-chair in the lowest position. To ensure higher patient's safety, patients can be fixed on the arm-chair with the leatherette strap in the field of their belly and breast. -
Page 58: Front / Rear Transport Handles
10.25 Front / rear transport handles Warning: Caution The maximum capacity is 45 kg vertically and 100 kg when squeezed! It serves mainly for easier transportation of the arm-chair with a patient in the horizontal position. Front transport handles: During transport, the handles should be tilted back from the tilted position to the vertical position. When tilting the handles, the handles must be lifted following the arrows to the 1st position, then tilted to the 2nd position. -
Page 59: Height-Adjustable Elbow-Rests
10.26 Height-adjustable elbow-rests Allows to set the height of the armrest at 2 positions, the default position is lower. To set a higher position, follow the picture. Lift the armrest (approx. by 10cm) Slide the armrest lock in When returning the armrest to the lower position, follow the picture below: Lift the armrest Slide the armrest lock out Explanation of the sticker on the adjustable... -
Page 60: Elbow-Rests With Cavities For Elbows
10.27 Elbow-rests with cavities for elbows 60/81 D9U004ODA-0101... -
Page 61: Controller Holder For Chair With Armrests
10.28 Controller holder for chair with armrests Controller holder installation Insert the controller holder into the hole in the armrest. When the lock engages, the holder is properly inserted Holder insertion hole Lock Removing the controller holder from the armrest Slide the holder out while pulling the lock in the direction (1) and sliding the controller in the direction (2) as shown in the picture D9U004ODA-0101... -
Page 62: Drink Holder For Chair With Armrests
10.29 Drink holder for chair with armrests Warning: Caution When using the drink holder, it is important to have the armrest correctly positioned so that the beverage does not tip over on the patient. It is recommended to have the armrest positioned so that the bottom of the beverage is always in a horizontal position. -
Page 63: Mechanic Cpr
10.30 Mechanic CPR Warning: Caution The CPR controller is marked by informative labels on the both sides under the rear section. The labels are marked by a CPR text. The CPR doesn't serve for individual settings of the back part to different positions, neither for saving time by personnel. -
Page 64: Patient Card Holder
10.31 Patient card holder The patient card holder should be placed on the siderails of the chair and loosely placed on the upper bar of the siderail. 10.32 Drinking vessel holder Warning: Caution The holder must always be placed on the upper bar of the siderail. (See photo) The holder is for cold drinks only, if the holder is improperly handled or hit hard, the holder may fall on the patient. -
Page 65: Comfort Mattress (130 Mm)
10.34 Comfort mattress (130 mm) Description of the cover The ODA-COM cover consists of two sections: 1. Removable top section of the mattress cover, fastened by a zip 2. Non-removable lower section of the mattress cover attached to the chair structure Technical parameters Support area 2123 ±... - Page 66 Recommended settings of the industrial washing machine Warning: Caution. The cover is not intended for washing in a continuous industrial washing machine Washing programme 9N^h Temperature [°C] 70 ± 3 Water level [mm] Washing Wash time [min] Cooling [-] Water level [mm] Rinsing 1 Rinse time [min] Water level [mm]...
- Page 67 Procedure for removing the mattress cover Step 1. Set the chair to the flat position. Feel for the zip — the zip slider is underneath the connecting part of the sitting section and the backrest. Step 2. Loosen the top of the sitting section cover by unzipping it.
- Page 68 Procedure for refitting the cover Step 1. Set the chair to the flat position. Spread out both the sitting section cover and the backrest cover onto the mattress core. Step 2. Fit the backrest section onto the mattress core Step 3. Lay the sitting section cover over the backrest Step 4.
- Page 69 Step 5. Insert the sitting section cover zip in the connecting part and lay the cover over the sitting section core. Step 6. Put the cover on and fasten along the entire length The removed cover should be washed according to the industrial laundry instructions.
- Page 70 Symbols on the mattress HAND WASH, HAND MAINTENANCE WASH IN AN INDUSTRIAL WASHING MACHINE DISINFECT WITH A SOLUTION CONTAINING <5000 PPM RINSE WITH WATER WIPE WITH A SOFT CLOTH AND A SOLUTION CONTAINING A GENERAL PURPOSE DETERGENT BATCH NUMBER RECYCLING SYMBOLS The upholstery conforms to BS 7177 fire resistance requirements in the medium hazard category.
-
Page 71: Backup Battery
10.35 Backup battery Warning: Caution Only service personnel is entitled to replace the battery! The battery replacement by insufficiently trained personnel is dangerous and can reduce functionality of the medical device! The battery is charged automatically from the control unit and requires no special maintenance. If there is a difference between the temperature of the chair and the ambient temperature (transportation/storage) in the place where you intend to install the chair, it is necessary to wait 24 hours until the chair temperature was stabilized to the room temperature. - Page 72 Battery Activation if ordered as option Warning: Dangerous voltage With regard to the possibility of unwanted switching on of PURA upon packaging, transport and unpacking, the battery is normally disconnected from the equipment. If isolating foil is damaged, contact the manufacturer’s service department immediately.
-
Page 73: Care
11 Care All BORCAD Medical a.s. products are designed for many years of service under the conditions of correct use. Please use your chair and its accessories carefully. Please follow these instructions and the herein descrichair operation procedures. Avoid negligent handling. Do not, in case of a function failure, undertake any repairs and never use force! 11.1 Cleaning and disinfection Warning:... -
Page 74: Recommended Disinfection (Disinfectants For Wiping)
11.1.2 Recommended disinfection (disinfectants for wiping) RTU- Ready-to-use non-diluted products – spray or foam Active substance How to use Example of disinfectant Amine, Alcohol up to 30% Spray and wipe Incidin foam Hydrogen Peroxide Spray and wipe Incidin OxyFoam S Alcohol till 30% Spray and wipe Bacillol 30 Foam... -
Page 75: List Of Error, Malfunction And Generated Messages
12.1 List of error, malfunction and generated messages Action to be taken by Actions to be taken by Problem desription Likely cause the operator to solve the the qualified service problem personnel Connect the power cable to Verify that the mains are Probably the chair is not The chair does not the mains and also to... -
Page 76: Technical Parameters
12.2 Technical parameters Rest area 2123 ± 3 mm Total rest area length 965 ± 2 mm Back section length 528 ± 2 mm Seat section length 630 ± 2 mm Foot section length 590 – 385 ± 10mm Back section width 590 ±... - Page 77 Castors Castor diameter / brake 150 mm / central, total Castor diameter / brake 100 mm / without central, total Adjustment angles: 0° ± 1° /+70° ± 2° Back section adjustment angle 0°±1° / -12° ±1° Seat section adjustment angle 0°...
-
Page 78: Electrical Parameters
12.3 Electrical parameters Batteries – back-up 24V/1,2 Ah Voltage – input 100 V AC, 315 VA Voltage – input 110 V AC, 350 VA Voltage – input 120 V AC, 380 VA Voltage – input 127 V AC, 400 VA Voltage –... -
Page 79: Storage Instruction And Transport
12.4 Storage instruction and transport During storage and transport, no heavy objects should be placed on the chair. Putting extra object on chair during storage is not allowed. Chair must not come into direct contact with flames or other flammable materials. Packed chair can be exposed for a period of 15 weeks to weather conditions with the following limit values Operation: 10°C –... -
Page 80: Applied Parts
12.6 Applied parts The applied parts of the product are of type B - providing a moderate degree of patient protection. • padding / mattress • armrests • siderails The applied parts of the product are of the BF type - providing a moderately high degree of patient protection. •... -
Page 81: Disposal
13 Disposal 13.1 Environmental Protection BORCAD MEDICAL a.s. is aware of the important role that the protection of our environment plays for future generations. The materials of this product are environmentally compatible. It does not contain hazardous substances on the basis of cadmium, mercury, asbestos, PCB or CFC.
Need help?
Do you have a question about the PURA and is the answer not in the manual?
Questions and answers