
Related Manuals for Futurepump SE1


Summary of Contents for Futurepump SE1
- Page 1 Futurepump SE1 Installation Manual Manuel d’installation Manual de instalación v. 1 01/20...
- Page 2 Contents: 1 x Futurepump SE1 pump 1 x 60 W panel, panel shoes and stand 1 x Suction hose (6m) - 1” (25mm) 1 x Box of spare parts and tools: • • 4 x flywheel belts 4 x flywheel belts •...
- Page 3 Enchufar el panel en el motor Switch on the pump!..................18 Mettre en marche la pompe! ¡Encienda la bomba! Make sure you have registered your 10 year warranty..20 Assurez-vous d’avoir rempli votre garantie de 10 ans Asegúrese de haber registrado su garantía de 10 años warranty.futurepump.com...
-
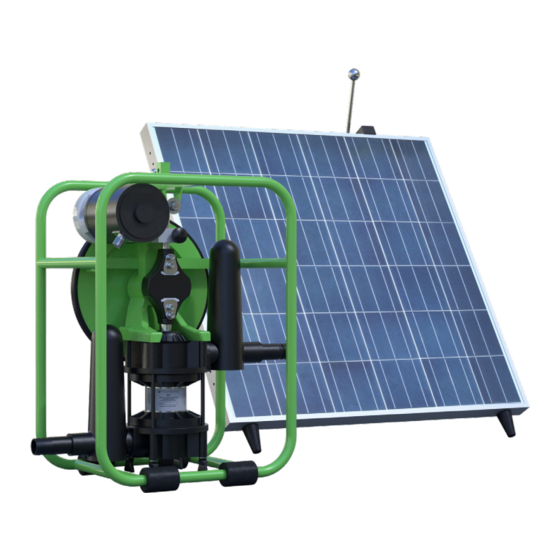
Page 5: Identifying The Parts
Identifying the parts Identifier les composants Identificar los componentes Solar panel / Panneau solaire / Panel solar Panel support / Support du panneau / Soporte del panel Piston rod & yoke / Tige du piston & bielle / Vástago de pistón y yugo Pump chamber / Corps de la pompe / Cámara de bombeo Inlet / Aspiration / Succión Outlet / Refoulement / Descarga... - Page 6 Identify installation location Identifier l’emplacement de l’installation Identificar lugar para la instalación Install near water source Installer à proximité d’une source d’eau Instalar cerca del suministro de agua Install panel in full sunlight Installer le panneau en plein soleil Colocar el panel orientado al sol Install as near as possible to irrigated plot Installer le plus proche possible de la parcelle à...
- Page 7 Calculate total head Calculer la hauteur monométrique totale Calcular altura total Discharge lift Hauteur de décharge Elevación de descarga Total head Hauteur manométrique Suction lift totale Hauteur d’aspiration Altura total Elevación de succión Max 15m (50ft) Max 7m (22ft) Calculate the total head that the pump see when it lifts the water.
- Page 8 Unpack Pump Déballez la pompe Desempaque la bomba Remove the black flywheel locks by unscrewing the bolts. Retirer les fixations noires du volant en dévissant les vis. Retirar las ataduras negras del volante destornillando los pernos. Lift the motor out of the securing clip and place it on the flywheel.
-
Page 9: Initial Checks
Initial checks Vérifications initiales Controles iniciales Rotate the flywheel clockwise by hand. Check that the pulley is touching the flywheel and is straight and that the wheel can move freely. Tournez le volant dans le sens des aiguilles d’une montre à la main. - Page 10 Stand up panel Installez le panneau Instalar el panel Panel Clamp included in box Take the panel out of the box. With the panel upside down, screw on the two shoes to the holes at each end of the panel and fasten using a nut. Insert the screw to the panel bracket and attach to the top of the panel, closest to the right-hand-side securing with a nut.
- Page 11 Stand up panel Continued... Installez le panneau Instalar el panel Retirez le panneau de l’emballage. Avec le panneau à l’envers, placez les deux pieds dans les trous situés de chaque côté du panneau et fixez-les à l’aide des écrous. Insérez la vis dans la bride du panneau et fixez-la au haut du panneau, le plus près de du côté...
-
Page 12: Connect Inlet Hose
Connect inlet hose Connectez le tuyau d’arrivée Conecte la manguera de succión Connect the inlet hose to the inlet side on the pump (the lower hose nipple). The recommended hose size for this pump is 1” (25mm) Connectez le tuyau d’aspiration à la prise d’entrée de la pompe (embout de tuyau inférieur). - Page 13 Using the tapered Note hose nipple Embout conique du tuyau Boquilla cónica de la manguera Attach the hose to the pump by pushing it into the air vessel and turning it one way until it is secure. To remove, twist the hose nipple in the opposite direction to insertion then pull.
-
Page 14: Prime Pump
Prime pump Amorcer la pompe Cebar la bomba Fill the pump chamber with water. Remplissez le corps de la pompe avec de l’eau. Llene la cámara de bombeo con agua. - Page 15 Connect outlet hose Connectez le tuyau refoulement Conecte la manguera de salida Connect the outlet hose to the tapered hose nipple. Then attach the hose to the outlet side of the pump (the upper hose nipple). The recommended hose size for this pump is 1” (25mm). Connectez le tuyau refoulement à...
-
Page 16: Plug In Panel
Plug in panel Branchez le panneau Enchufar el panel Plug the panel into the motor, ensuring plug grooves align. Brancher le panneau au moteur, en veillant à ce que les rainures des prises soient alignées. Conectar el panel al motor, asegurándose de que las ranuras de los enchufes estén alineadas. -
Page 17: Start The Pump
Poner en marcha la bomba Flip the switch on the solar panel to the “ON” position. Congratulations, you now have a fully operational SE1 pump! Placer l’interrupteur du panneau solaire sur la position “ON”. Félicitations, maintenant vous avez une pompe SE1 totalement opérationnelle! - Page 18 Optimum hose sizes Note Diamètres optimaux des tuyaux Diámetros óptimos de manguera Total head (m) Hauteur totale (m) 0 - 5 5 - 15 Elevación total (m) Maximum output (l/hr) 1600 - 1100 1100 - 700 Debit maximale (l/hr) Salida máxima (l/hr) Pipe size/ Total head Diamètre du tuyau/...
- Page 19 Enregistrement de votre garantie Registro de su garantía To register your warranty is easy: 1. Log on to warranty.futurepump.com 2. Enter your pump serial number and your details 3. Click register You will now receive 10 years warranty on all spare parts and labour.
- Page 20 2. Equipos de Futurepump que han sido modificados sin aprobación previa; 3. Reparaciones realizadas por personal no autorizado por Futurepump. 4. Daños causados por el uso de equipos que no se proveen por Futurepump; 5. Casos de fuerza mayor; 6. Daños incidentales o consecuentes, como romper el panel solar o la bomba a través del...
-
Page 21: Preventative Maintenance
How to keep your pump working efficiently Avoid extreme backpressure on the pump: optimal hose size is 1-inch or greater, avoid kinks in the pipe, if using sprinklers connect 2 or 3. Do not leave the pump outside in the elements - when not in use store it inside or cover it. -
Page 22: Entretien Préventif
Comment faire fonctionner votre pompe efficacement Évitez une perde de charge extrême sur la pompe : la taille optimale du tuyau est de 2,5 cm ou plus, évitez de plier le tuyau, si vous utilisez des arroseurs, branchez-en 2 ou 3. Ne laissez pas la pompe aux intempéries - si vous ne l’utilisez pas, stockez-la à... -
Page 23: Mantenimiento Preventivo
Cómo hacer que su bomba funcione eficientemente Evite la contrapresión extrema en la bomba: el tamaño óptimo de la manguera es mayor a 1 pulgada, evite torceduras de la manguera, si usa aspersadores, conecte 2 o 3. No deje la bomba a la intemperie; cuando no esté en uso, guárdela dentro o cúbrala. - Page 24 Have you registered your warranty? Visit warranty.futurepump.com to register for your 10 year warranty Problem with your pump? Please reach out to the shop where you purchased your pump or visit support.futurepump.com Avez-vous rempli votre garantie ? Visitez warranty.futurepump.com pour vous inscrire à...
- Page 25 TEST CERTIFICATE ‘SE1’ SOLAR IRRIGATION PUMP Product: VER.: Futurepump (India) Private Limited. Manufactured Sr.No.: Sur.No.1408, Lodhika Road, Chibhda, India. Customer Care - email: india@futurepump.com PV Module: Make: RG Enterprise. Utter Pradesh. Sr.No.: India DC Motor: Make: Adroit Systems, Pune - Sr.No.:...
Need help?
Do you have a question about the SE1 and is the answer not in the manual?
Questions and answers